The printer is not recognized. The PC does not recognize the printer: possible causes and solutions
Today, printing devices are in every company and in almost every home. This technique allows you to solve the issue of printing and scanning various documents (when it comes to multifunctional devices). All of them have long been considered reliable and sufficiently productive, but printers are not immune from breakdowns and malfunctions. Given the complexity of their technical execution, these may be malfunctions. different types from when toner is consumed in a cartridge to when the computer does not see the printer.
What if the computer refuses to recognize the device?
We must say right away that there can be many reasons for such a situation. We will focus only on the most common cases.
Check the integrity of the wires and contacts
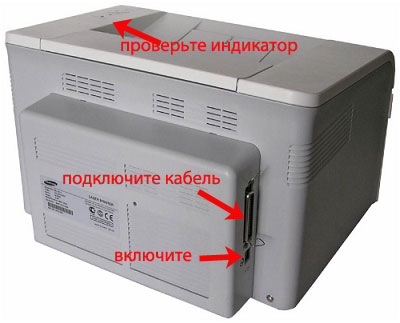
If the computer does not see the printer, then the first thing to do is to check the serviceability of all types of connection and the integrity of the wires. The most common cause of this problem is simply bad contacts in the cable. That is why it needs to be pulled out, cleaned and put back in several times. Moreover, this must be done, both in the printer and in the computer itself.
Make sure the USB connector is working
Also, you need to check the functionality of the USB connector. Typically, a 2.0 interface is needed, although if you connect it to 3.0 it certainly won't be worse. For a better check, you can plug the cable one by one into several connectors - one of them will definitely work.
Is the printer on ?!
Oddly enough, another elementary reason that the computer does not see the printer, is a switched off device. For example, due to the fact that the user simply forgot to click on the start button of the device !. You definitely need to check this moment. If everything is in order, then the solution to the problem should be looked for elsewhere.
Software diagnostics and driver reinstallation
For example, the driver could have simply been uninstalled or the user forgot to install it. The fact is that without special software, the device simply will not be recognized correctly. As a rule, it is supplied on a special disc that comes with each printer. If suddenly there is no such disk, then you can simply search for software on the Internet on the manufacturer's website. Here it is important to choose the correct device model, and so that the driver matches the bitness of the operating system installed on the user's computer.
After installation, you need to restart the computer, reconnect the device, after which it can be used.
Now let's consider the option when the software simply does not work correctly or "crashed". In both cases, you will need to reinstall it. To implement it, you need to perform the following sequence of actions:
Step 1. First go to the "Control Panel" tab, then "Programs and Features", where we find the MFP driver and remove it, then restart the PC;
Step 2... Go to the "Start" menu, find the "Printer and Faxes" tab, then open the "File" and "Drivers" menus or enter the "Device Manager";
Step 3. Select the required printer model and delete it;
Step 4... We are installing the driver.
PC setup
Another common reason why the computer does not see the printer, it can be a common mistake for a PC to define another MFP as the "default device". In order to fix this problem, it is enough to install the necessary equipment - click on its icon right click mouse and check the box "Use as default".
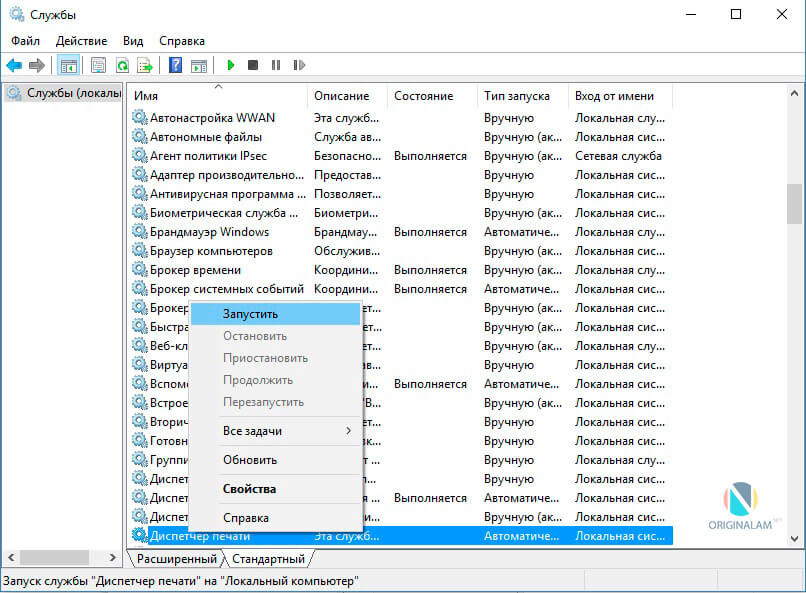
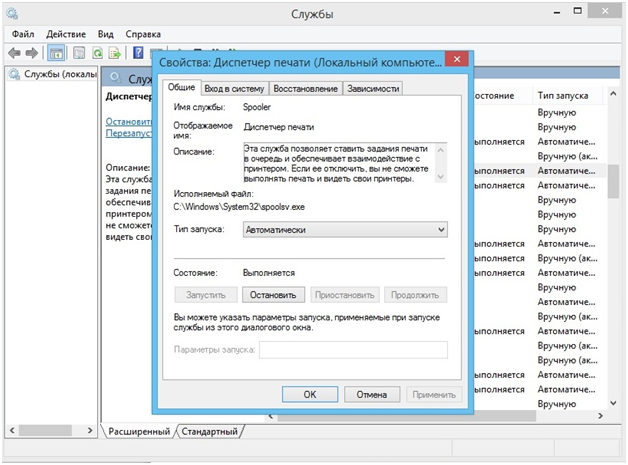
An equally common reason for such a situation is the disabled option "Automatic Printing Service". It can be found in the "Start" menu in the "Administration" tab, where you will need to find the item "Print Spooler". Inside it there is an inscription "Startup type", which must be switched to the "Auto" mode.
The last reason may be a malfunction of the operating system itself on the PC. It is very easy to check its availability - you just need to connect the MFP to another computer. If it works fine there, then the matter is in the user's computer.
If all the above recommendations did not help you, then you need to contact the specialists , where experienced craftsmen can find out the cause of the problem and fix it as soon as possible!
After connecting the printer, you always need to do correct installation devices. Sometimes the instructions are not followed correctly and the computer is oblivious to the connection.
Why can't the computer see the printer? How to fix it? Let's figure it out.
First of all, you need to understand the reason, and then look for an approach to this problem.
The user needs to test the connection
Quite often, this is the main source of the problem.
First, the user needs to unplug the USB cable from the computer and printer and plug it back in. Make sure the wire is securely connected to both devices.
Check if the selected connector is working. Most often this should be USB 2.0. For best quality check, disconnect other devices from the computer (mouse, keyboard, etc.).
Check all suitable connectors one at a time and wait for a response on the monitor (a beep is possible).
Also, the problem may be trivial, they forgot to press the power button on the printer. The computer does not see the usb printer when it is turned off. The button is located on the side or back of the case.
If all of the above is in order, then move on to the next possible reason.
Driver problem (not installed)
And in this case, it is possible that the user forgot to install it altogether. We will now consider this case.

For the computer to find and recognize the printer as a connected device, you need to install a special program.
This program is included on the CD that came with your printer. It is usually located in the instruction file.
After starting this disc, you just need to follow the instructions. After downloading the program, you will not need a disk to operate the printer.
If there is no disc in the kit, then perhaps there is a link to required driver or its name. Otherwise, you will have to look for the driver yourself on the Internet.
For a convenient search, drive in the printer model completely and the installer itself should be in the very first links. Download it very carefully, additional malware may be installed due to connection problems.
It is best to choose the official website of the manufacturer. Before installation, check if the PC version and the model of the connected device are suitable for the driver. If the driver is not the right one, nothing will work and there will be no connection either.
During installation, the driver will ask for the data from the PC, and after downloading, you must restart the computer.
To check if the program is running, after restarting, find "Printers and Faxes"... Further installation may be required following the instructions.
At this time, it is important to connect to wifi networks since all operations go through an internet connection.
Driver problem (crashed / buggy)
If all required programs installed, but the computer still does not see the printer, rather the problem is in the installer settings.
In this case, the device may be reflected in the connected, but there is no correct operation.
Troubleshooting instructions:
1 Go to the section "Installation and removal of programms"... Find your connected device in this section and delete it.
2 Through "Properties and Servers" or "Device Manager"(depending on the system) we find the "Drivers".
3 Delete already installed driver... Delete everything if necessary.
4 Now the user needs to reinstall the program back to the PC.
After a complete reboot of the program, it should start working correctly. The cause could be connection problems or site glitches.
If the problem persists after repeated reinstallation, the driver may not be the cause.
Default printers
Some PCs have connected printers before. And if another printing device is already installed by default, then this is easy to fix.
The user needs to right-click on the printer icon and select it as the "default device". You can also select the connection you want each time you print.
Disable automatic printing
V "Administration" find "Print Spooler"... In the "Startup type" tab, set the auto-mode. The problem has been fixed.

OS crash
In some cases, the operating system is out of date or has some kind of glitch. You can check this in one way. Connect the printer to another computer, laptop.
Almost everyone faced a problem when the computer stopped seeing the printer, or did not see it initially. Even if both devices are fully functional, the computer may not recognize the printer, even though the connection is correct. This problem is the most common, but at the same time, the easiest to solve.
Possible causes of malfunctions
- Incorrect connection.
Often the reason for the invisibility of the printer is the lack of contact when connecting - a consequence of clogged ports, a faulty cord, or simply not tight enough at the joint.

- Incorrect operation of drivers.
Drivers for printers, like any other software may fail, causing the printer to malfunction. If there is no disk included with the purchase of the printer, the user can download drivers that are incompatible or unsuitable for a specific OS.
![]()
- A different default printing device is set.
This problem can occur if other printing devices are connected to the computer, or they were previously connected but not removed properly. This means that the operating system will recognize another printer, which is automatically selected.

- The print service has been disabled.
In search of an answer to the question of why the computer does not see the printer, users often forget about the settings of the operating system itself. For trouble-free printing, the service must be always on.
Ways to solve these problems
To test the connection, just make sure you are using the working ports and cable. If you find debris or dust in the ports, you need to clean them to ensure contact between the elements. To check, you can free all the connectors, and if the computer does not see usb, check each of them sequentially. Sometimes the solution to the problem can be made by a trivial check whether the printer itself is turned on, since many often forget to turn on the device again after disconnecting from the network.
Driver problems can come from both their wrong work, and from their complete absence. It is important to use the native disk supplied with the printer to install the drivers. If there is no such disk, the drivers are downloaded from the Internet at the official website of the device manufacturer. When downloading the driver, it is important to select the package that fully matches the printer model and your operating system... If the drivers are not working correctly, you can reinstall them by first removing the non-working version.
To install a valid printer as a default device, you need to right-click on the device icon and check the box next to the "Use as default" option, or simply select this option.
To enable the print service, you need to go to the Control Panel, the “Administrative Tools” tab, then “Services” or “Print Spooler”. After that, you need to enable the service by selecting "Startup type" or the "Start" command, and putting a checkmark in front of the "Automatic" parameter.
Thus, if the computer does not see the printer connected, then you can solve this problem yourself in most cases. The evidence that the problem has been resolved is correct work device and display it on the computer. In other cases, you need to contact the specialists, since the lack of results for all the indicated methods of fixing the problem may indicate the presence of more serious malfunctions.
According to the experience of our service center, users encounter with a problem where the computer cannot see the printer, or stopped seeing him... Even if both devices are fully functional and correctly connected, the computer may still not recognize the printer. Let's consider methods for solving these problems.
Method 1: check if the connection is OK
Most often it is because of faulty connection the computer does not respond to the printer. Therefore, you need to remove the cable from both sides. printer and computer, insert it again. Check reliability connections. Most printers require a connection to USB 2.0. In the computer, insert the wire into the desired USB connector and so that it is working. You can turn off the mouse and keyboard for the duration of the test. Connect the cable one at a time to each connector. On some printers, the power button is located on the back or side of the case, it must be pressed. The light on the printer should light up.
Method 2: checking the driver
Drivers may not work properly or they are simply not installed. To install drivers you need to use the disc that came with printer. If there is no such disk, it is better to download the drivers on the official website of the manufacturer printer query in a search engine« PRINTER MODEL download driver »... It is important to select a driver package that matches your printer model and your operating system. If the drivers are not working correctly, you need to reinstall them, first removing the broken ones.
To install the printer driver, you need to do the following:
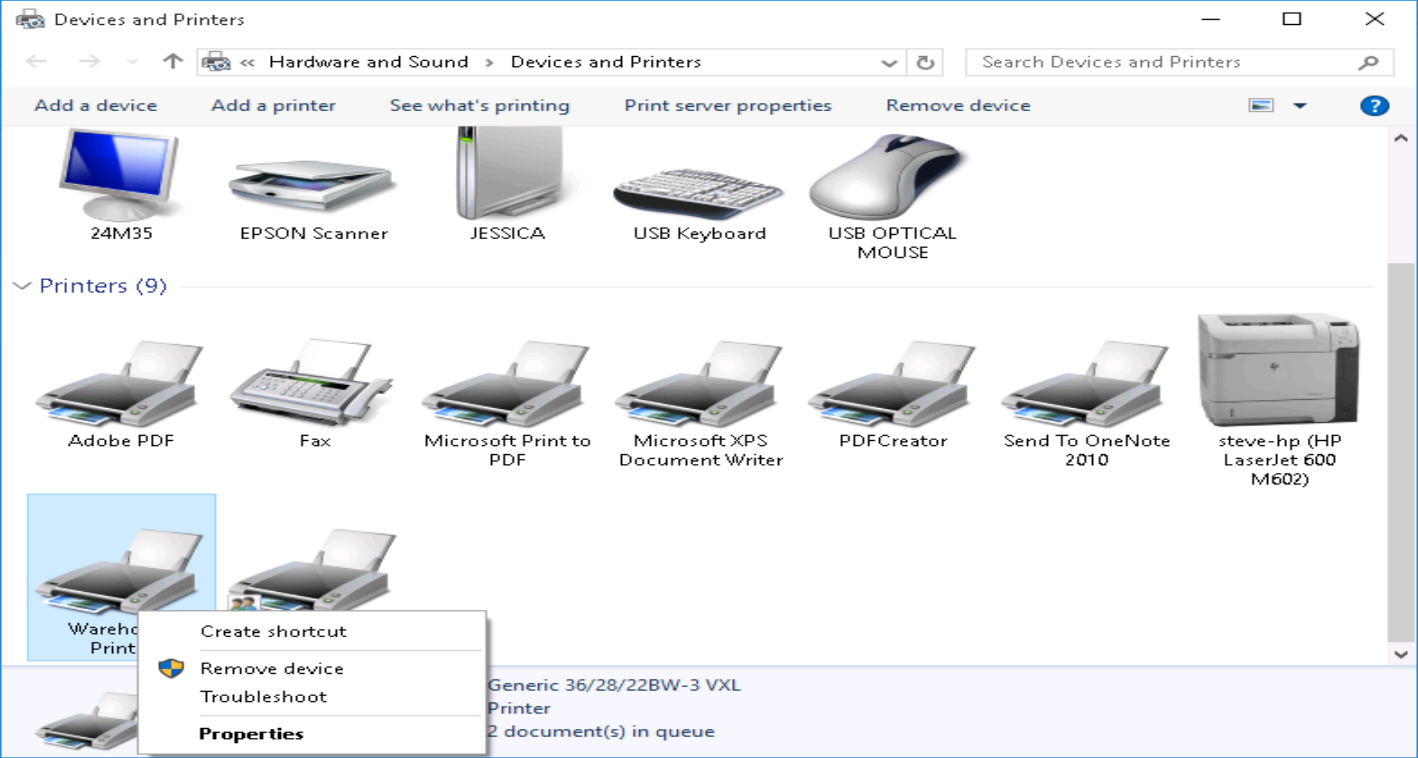
1) Click the "Start" button and select "Devices and Printers".
2) Right-click the printer whose driver you want to update and select "Printer Properties".
3) Click on the "Advanced" tab.
4) Click Change and follow the directions in the Additional Printer Driver Wizard.
Method 3: Checking whether the printer is installed by the device by default
1) You need to open "Start", select "Devices and Printers".
2) Right-click the desired printer and, if necessary, check the box next to the parameter"" Use as default"".
Method 4: check the automatic printing service
1) Open "Start" - "Control Panel" - "System and Security" - "Administrative Tools".
2) Then double click with the left mouse button open the shortcut "Services" in the list we find "Print Manager" and right-click in the drop-down menu, click "Properties". The startup type should be "Automatic" and the state should be "Running".
Method 5: The operating system is faulty
Connect the printer to another computer. If it works with that computer, then the problem is in the operating system.
Method 6. Repair at a service center.
work experience of masters;
guarantee for the work performed;
If you want to save time and not put your device at risk, printer repair in Odessa is carried out in service center IT service outsourcing.
The reasons can be many, starting with an unconnected cable and ending with a failure in the operating system. Let's consider common problems and their solutions - from simple to complex.
Faulty connection
Sometimes a computer or laptop cannot see the printer via USB due to a faulty cable or port, or a bad connection.
- Unplug the device cable at both ends and then plug it back in.
- Check if the USB connector is working properly. Try connecting another device through it, such as a keyboard or mouse.
- Try connecting the printer to a different USB port.
- If possible, replace the cable.
Also make sure the printer is turned on. Some devices have the power button on the back or side, and users simply forget to press it. Sometimes the computer does not see the printer via USB because of such a trifle, and it takes literally one minute to resolve the issue.
Settings Failure
Check which hardware is the default for printing. To do this, go to the control panel, then to "Hardware and Sound" - "View devices and printers". Right click on the printer icon and select the "Set as default" option. In some cases, this is enough for the device to work correctly.
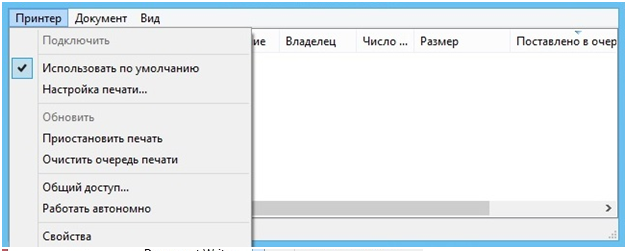
If the problem persists, double-click on the equipment icon, in the window that opens, select the "Printer" tab and uncheck the "Pause printing" and "Work offline" items. Also click on "Clear Print Queue".
If that doesn't work, go to the Control Panel, select "Small Icons" from the "View" menu, go to the "Administrative Tools" tab and open "Services". In the window that appears, you need to find the "Print Manager" service and install automatic type launch.
If the service is stopped, also click the Start button and then print a test page.
Lack of driver
It happens that the computer does not see the printer via USB due to the lack of a driver or due to incorrectly installed or outdated software.
Go to the manufacturer's official website, download the driver for your device from there and install it. Then restart your computer and try to print a test page.
If you accidentally installed an unsuitable driver, go to the "Device Manager" through the control panel, find the necessary hardware there, go to its properties, then to the "Driver" tab and click on the "Uninstall" button. After that, install the new software downloaded from the manufacturer's official website.
Device malfunction
If the printer does not connect to your computer via USB and all of the above methods did not resolve the issue, the problem may be in the hardware itself. Try connecting your device to another computer or laptop. If the problem persists, the best option is to take the printer to a service center for a technician to test and repair it.
 Bugs in Singularity?
 Just Cause 2 crashes
 Terraria won't start, what should I do?