Split the volume into two disks. How to partition a disk with Windows installed without losing data
The hard disk of a computer is a means of storing data for the system and the user in particular. Sometimes, it is necessary to divide information into some large sections to avoid confusion. It is recommended to install the system on one partition, and user files, programs, etc. save to others. When buying a new PC, most often, the hard disk is not divided into local disks (partitions), so you need to carry out this operation yourself. Consider how to properly break HDD into sections. For example, we will use Windows 7, which is the most stable among the current versions (Windows 8, 10).
Before starting the partitioning process, we recommend that you read the following tips:
- Allocate at least 50-60 GB of free space for the OS, otherwise you will not see normal system operation. Of course, if you already have a 100-200 GB hard drive, then that much space is too troublesome to allocate, but for systems starting with the "seven", you need enough memory.
- It is also better to take care of the path for saving files for the browser and torrent client, it is better to set the file upload paths for them not on the system disk (by default), but on another more capacious partition. You should also understand that desktop content takes up space on the system drive.
- If you have a hard drive up to 1 TB - divide into 3 partitions, if from 1 TB to 2 TB - divide into 4 partitions, more than 4 TB - into 5 partitions. This is explained by the fact that by downloading large files to the hard disk, optimal partitioning will allow it to be written correctly.
- Do not use up all the available hard disk space. It is necessary to leave some "reserve" space to restore damaged clusters.
If you follow these tips, you can set up the split once. hard disk and don't worry about it anymore until you decide to expand the memory on your computer.
How to partition hard drive in Windows 7?
To partition the hard disk, we will use the standard Windows operating system tool. It is called "Disk Management". To open this utility, you need to do the following:
Now let's move on to how to partition a hard drive in Windows 7. The instruction is as follows:
How to Partition a Hard Drive Windows 8, 10
Using Windows 7 as an example, we looked at the partitioning process. There will be nothing fundamentally new in the "eight" and "ten", so you can use this procedure for this system as well. The only exception, we will slightly tweak the tips to get the job done correctly:
- Leave (add) at least 70-80 GB of information for the system disk. Starting with the "seven", the system writes information about the current state to the local disk so that you can use the system restore if necessary. In addition, after many updates (including up to 8.1, 10), large files are generated that are protected by the system;
- Divide the disk into several partitions, do not leave 2 partitions. So it will be more convenient for you to handle files that are written to the hard disk, logically structuring them into sections.
How to partition hard drive in Windows 7, 8, 10 using third-party programs
What if you don't trust the standard local disk tool? We suggest using third party application Partition Wizard... This application is free, does not require a lot of space and is stable. Of course, its functionality is far from Acronis Disk Director, but it will be just right for partitioning a hard disk.
So, first download it, and then install it in a convenient place on your computer. When the program is installed, run it and wait while it loads the necessary information about your system and hard drive.
The unallocated section will be labeled "Unallocated". Click on it right click mouse and click "Create".
When you run this command, you will need to provide the following information in the next window:
- Section title;
- Partition type (for example, logical);
- Drive letter;
- File system type;
- Volume.
Please note that in the case of the program that is built into the system - "Disk Management", these operations are performed in different windows, but here, for convenience, everything happens in one window. For example, we created new section"Test" with 400 GB on board. After creation, the file system looks like this:
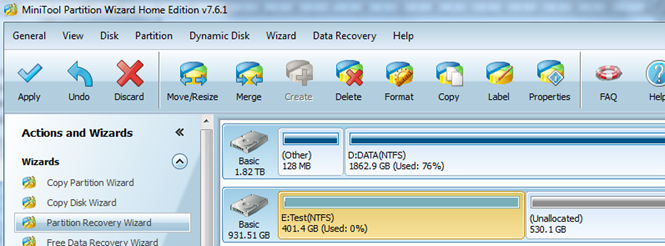
This process can be repeated as many times as you like until you run out of free, unallocated space. Please note that it is very important to leave very little free space so as not to harm the hard drive. To create another new section, just repeat the instructions. Don't forget to save your progress with the Apply button.
We are accustomed to using on our computer the conditional division of the hard disk into two partitions, respectively, C and D. On the first, the system is installed, on the second, user data is stored. This is done so that the next time we install Windows, we can perform a clean installation and format the partition without losing user data. The article will consider the question - how to break Windows disk 10 and all the nuances associated with it.
Very often there is a need not only to divide a physical disk into logical ones, but to change the size of existing parts, this will also be discussed below. It should be noted that a positive result can be achieved by the forces of the system itself, however, this will not be as easy to do as, for example, when using a third-party software... For the sake of completeness, we'll describe both methods.
The first option, which we will talk about today, is an already working system, in which it became necessary to partition the disk into 2 partitions. You can complete the task without using third-party software. Let's get started.
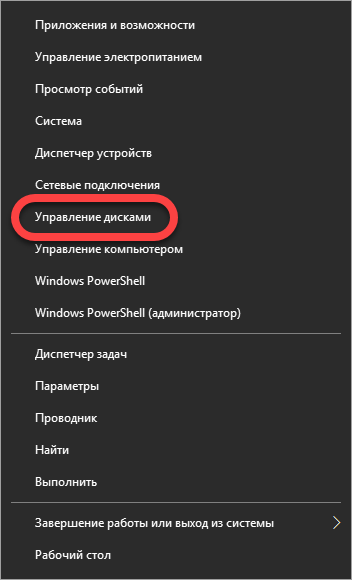
- Right-click on the "Start" button and select "Disk Management".
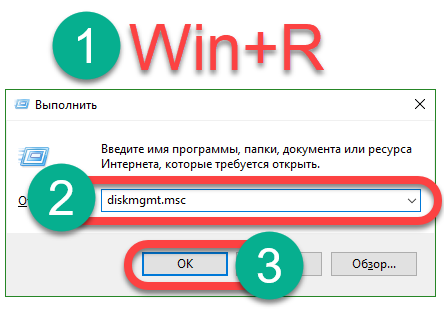
You can run the same tool in another way, simultaneously press two keys Win + R and enter the command diskmgmt.msc in the window that opens, then click the "OK" button.
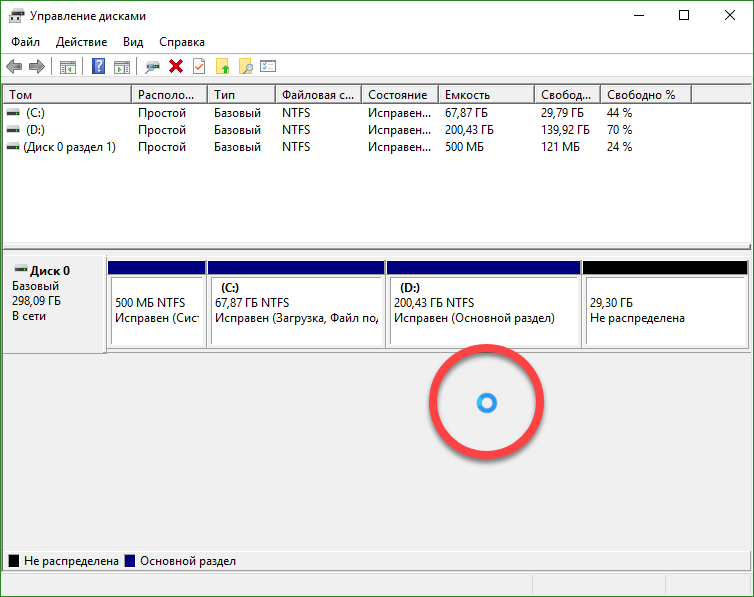
The top part of the window displays a list of all disks installed in the PC or laptop and their partitions. Here you can see the file system type, size and state. In this case, physical disks are designated by numbers, and logical ones by our usual letters.
The partition map is displayed at the bottom of the disk management utility. Thanks to the rectangles, we can roughly estimate the ratio of the sizes of the sections and, when editing by dragging and dropping, reduce or enlarge them. In our case, you can see a 500 MB system partition, a C drive of about 68 GB, and a user D partition taking up the rest of the space.

You cannot make any changes to drives that do not have letters. Most often these are system-reserved areas that contain system or boot files... If you edit such a section, the system can be damaged up to permanent failure.
- We continue our instructions. In order to partition a disk, you initially need to free free place... To do this, we shrink the disk that needs to be divided. In our case, this is the user section D. Click on it right key mouse and select the item "Compress".

- A small window will open in which we need to indicate how much to compress the partition. The space here is measured in megabytes, we write 10,000 MB, which corresponds to 10 GB, and click "Compress".

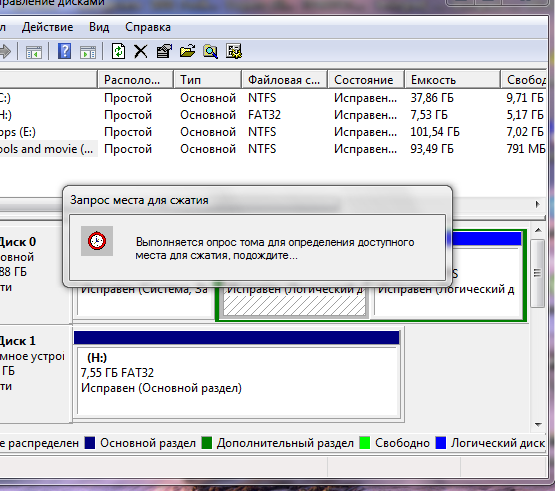
- The volume is being compressed. There is no progress bar here, we do not see how much is left until the completion of the operation, the fact that the process is underway is evidenced only by a circle of expectation. On our computer, the compression took about 3 minutes.
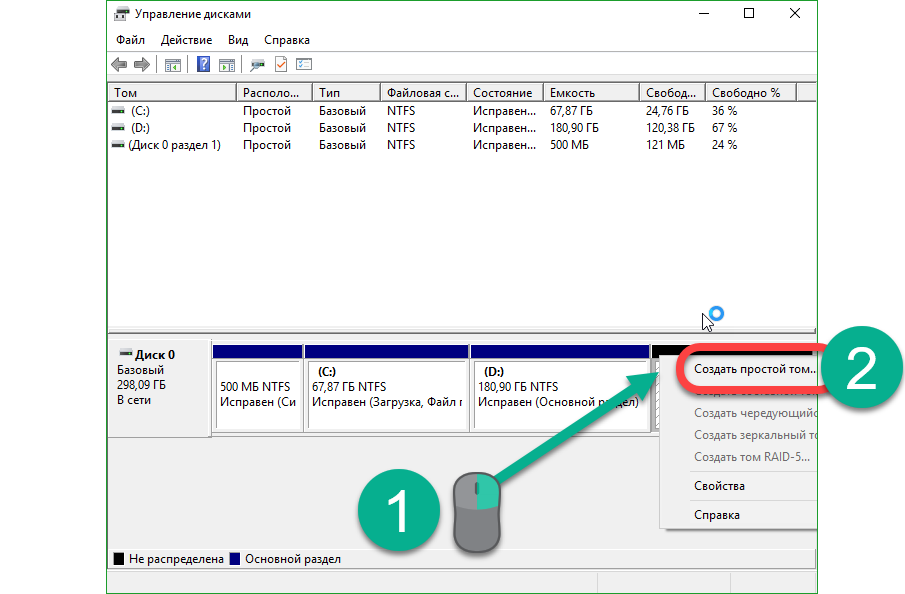
- Now you can create a new section. Share Windows 10 system drive regular means is not allowed, so we will create an additional section. How to increase the system volume will be discussed below. So, right-click on the unallocated space and select "Create Simple Volume".
- In the appeared volume creation wizard, click "Next".

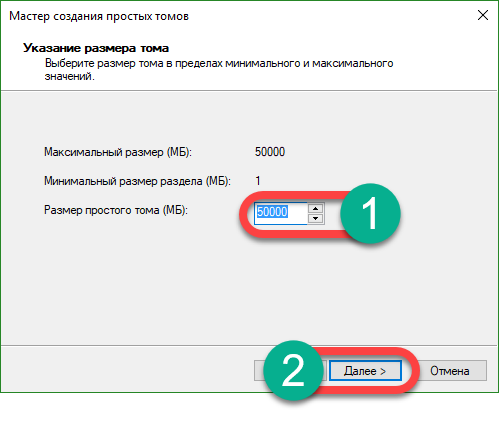
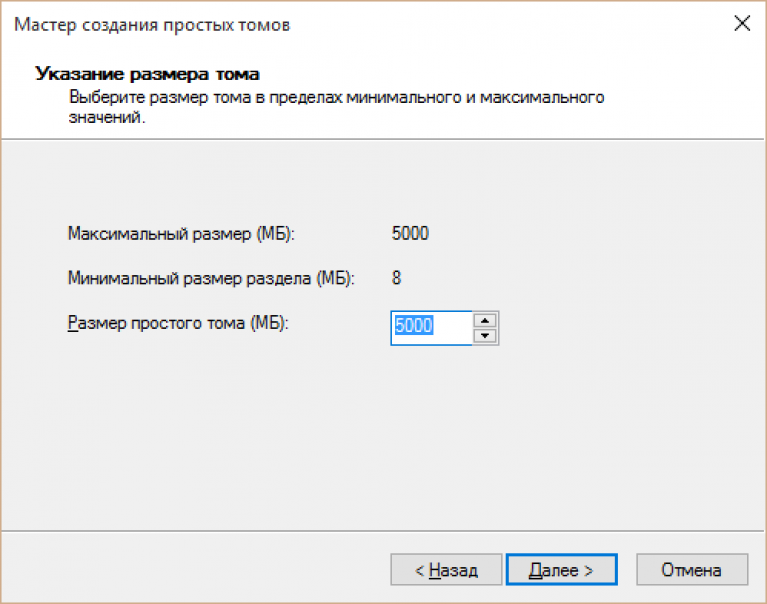
- We indicate the size that the new section will receive and click "Next". We will use the entire space.
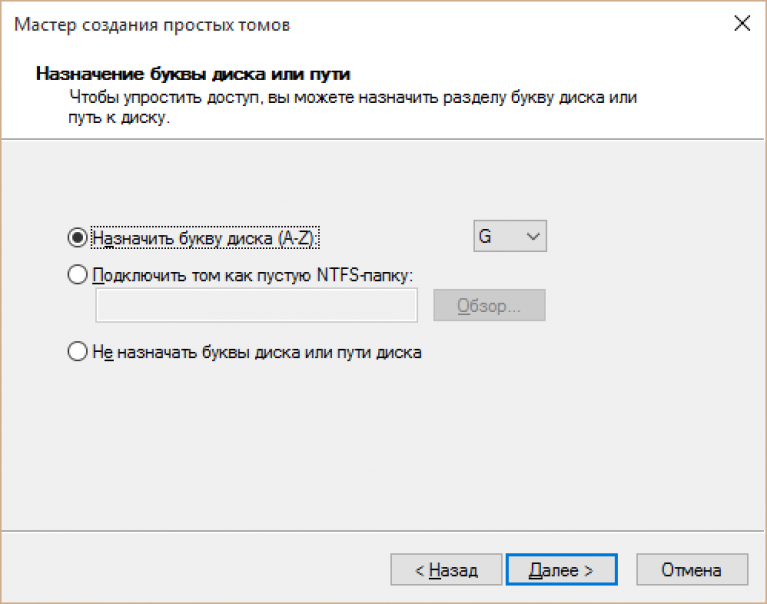
- The system will offer us a letter for the future volume, we agree and click "Next".
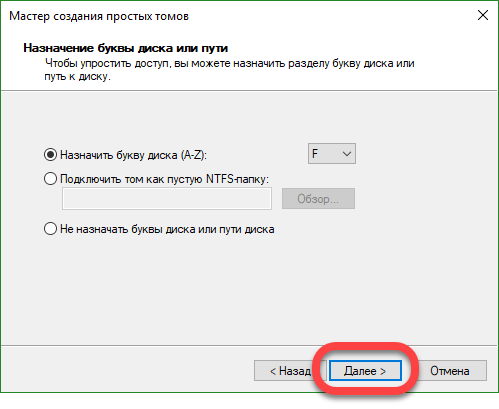
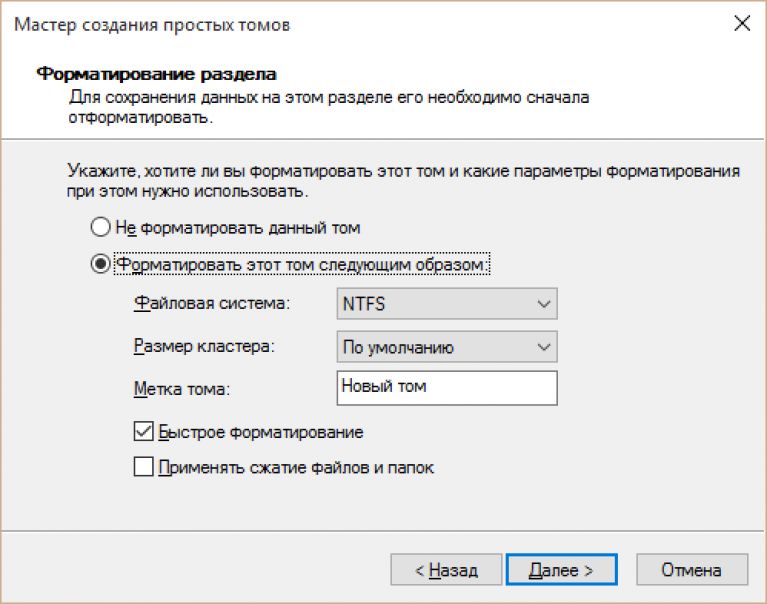
- In the next step, you need to select the file system of the partition (we will use NTFS) and specify the volume name (it will be displayed in the explorer). When the necessary settings are made, click on "Next".

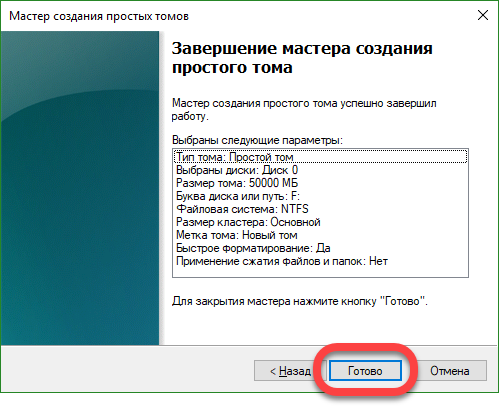
This completes the volume setup. We just have to press the button with the inscription: "Finish."


You don't need to shrink the shrink disk to the limit. If you do not leave space on it, the section will not be able to fully function. You will not be able to do defragmentation, and the speed of the volume will drop critically, which will affect the performance of the entire system.
How to partition a disk during Windows 10 setup
You can partition a physical disk into partitions using clean installation Windows 10. But here you have to lose all the data, this option is suitable for those who bought new computer or a laptop and wants to install an OS on it, or those who have safely saved their files elsewhere. One way or another, let's proceed to the instructions for partitioning disks when installing the system.
- The process itself Windows installations 10 is discussed in detail on our website. We are specifically interested in the moment of working with disks. Once the installation reaches the desired stage, you will see the following window.
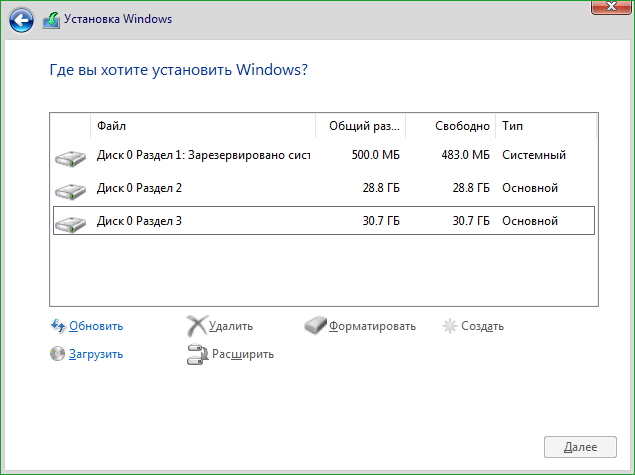
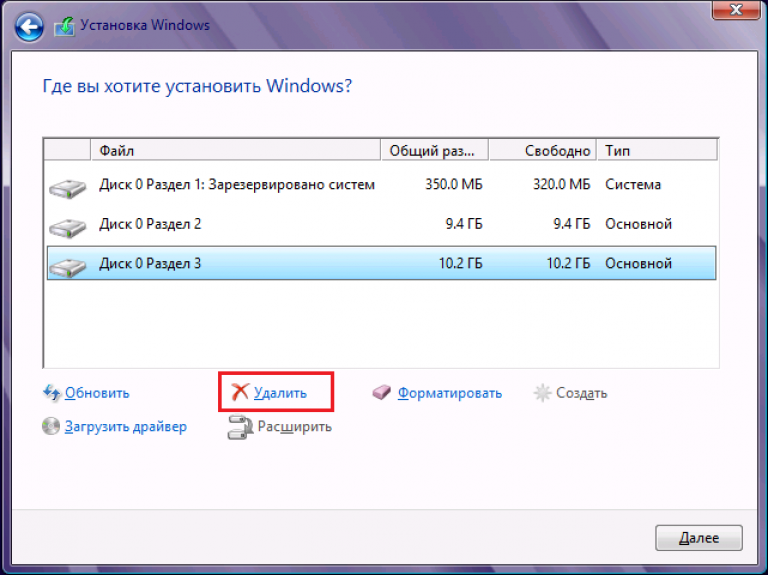
- Let's say we need to increase the size of the first partition and shrink the second. Our discs are called "2" and "3", you may have other names. All of them are located on physical device "0". Let's start partitioning the disk. Initially, you need to delete both sections. To do this, select each of them in turn and click on "Delete".

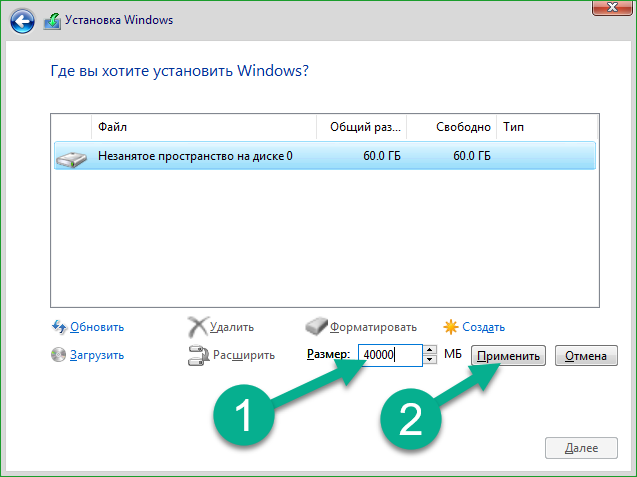
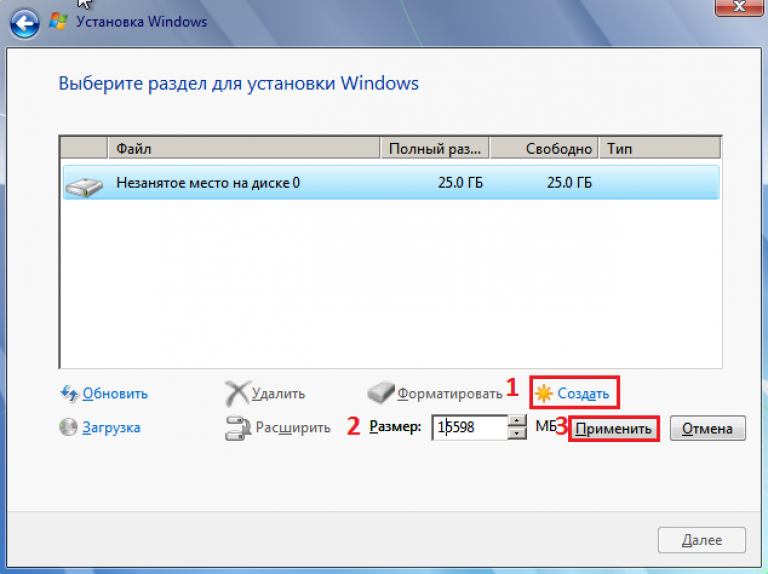
- As a result, we should have unallocated space. Select it and click on the "Create" button.

- We indicate the size of the new logical drive and click "Apply". We installed 40,000 MB, which equals 40 GB. You have the right to choose the volume you need, the figure given is only an example. For normal Windows work 10 needs to be allocated from 80 GB and above.
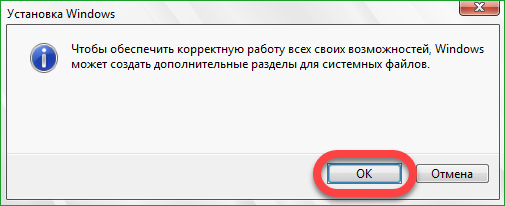
- The system will warn us that for correct work you need to create an additional section. It will store drivers and other important Windows components. We agree and click "OK".
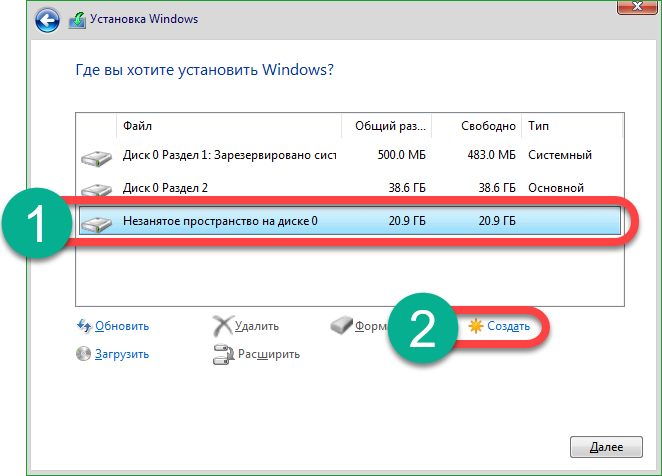
- As a result, we got one system partition with a size of 500 MB, a disk for the system with the size that we indicated (we have 40 GB) and unallocated space. This is what we will use to create a section for user data. Select free space and click on the "Create" item.
- We press the "Apply" button thereby taking away all the remaining space for disk D.
![]()
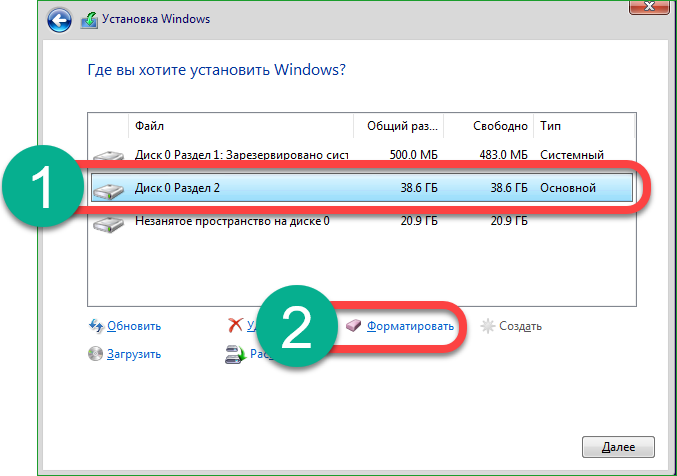
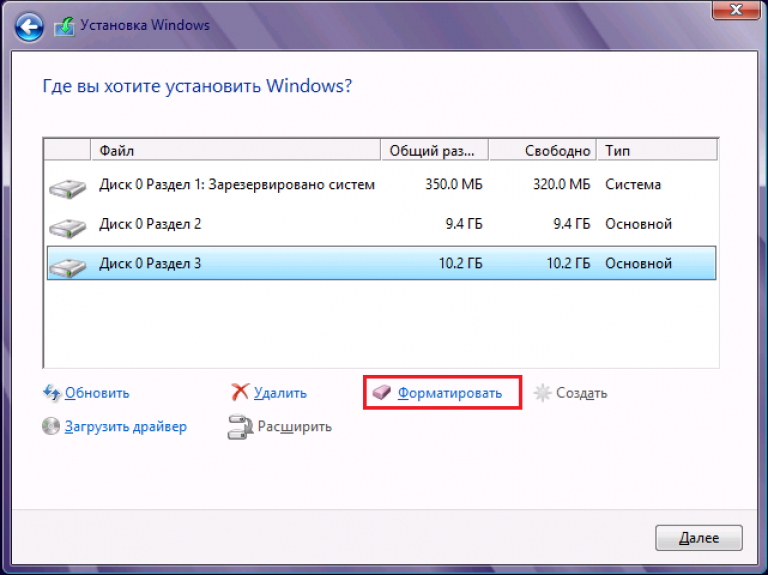
- All that remains is to format the disks. We'll show you how to do this using the first section as an example, and you will do the same with the rest. Select the volume and click on the "Format" item.
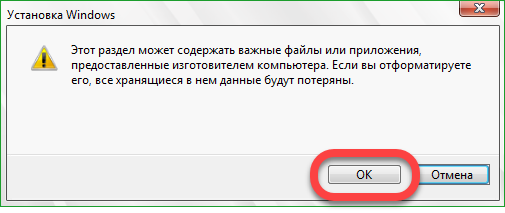
- Windows will warn us that all data from the partition will be permanently deleted, click "OK" to start the formatting process.
After a few seconds, the process will be completed and the disks are formatted. Now you can proceed to installing the system. To do this, simply select the system drive (on which you planned to install the OS) and click the "Next" button.

How to partition Windows 10 disk using third-party software
In addition to the standard system tools, there are many third-party utilities for partitioning the disk that differ in the best functionality and ease of use. We have selected 3 leading programs and will describe in detail the sequence of actions with each of them.
Minitool Partition Wizard Free
This is a handy application for working with sections of hard disk. All standard operations are also supported here: expansion, division, creation and deletion. There is a step-by-step wizard that will not let beginners get confused in the process.
You can download the utility after the file has been downloaded, we come to the instructions for its use.
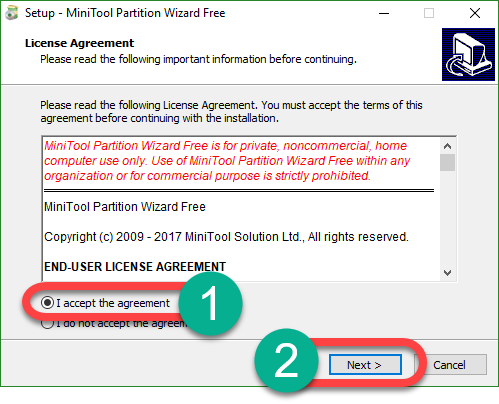
- Installing the utility is pretty simple, you first need to accept the license.
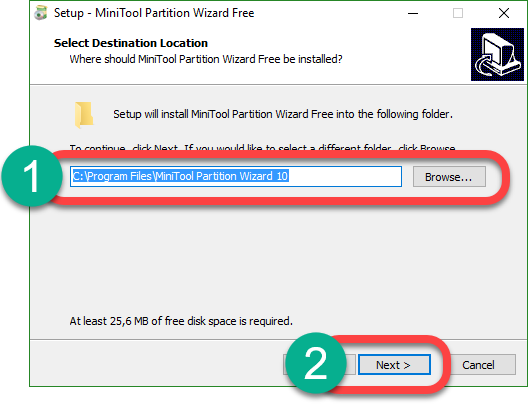
- Select the directory where our application will be installed and click "Next".
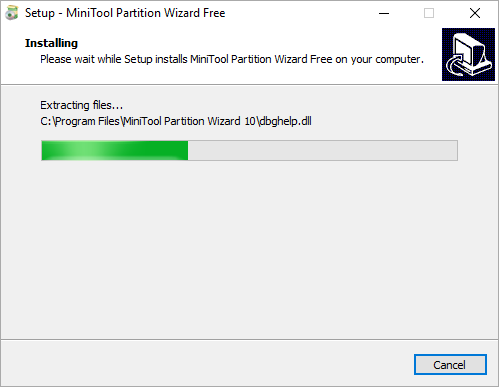
- The installation of the program is in progress, when it is completed, we will only have to click the "Finish" button.
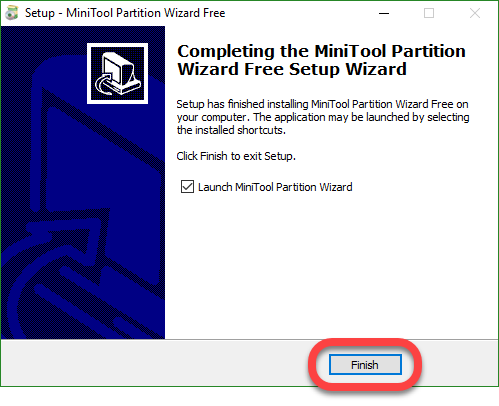
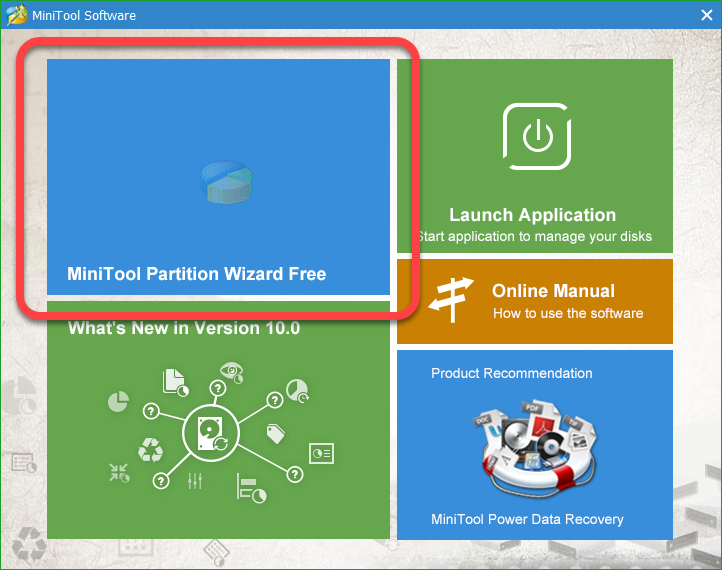
After the utility is installed, you can proceed to using it. We launch the program and follow the instructions.
- In the window that opens, click on the rectangle, which we circled with a red frame.
- Click on the desired disk with the right mouse button and select the item that we marked in the screenshot with the number "2".

- Using the slider, change the size of the disk to the value by which it will be reduced. The rest will be cut from the disk and will serve as a place to create the second partition.

- Click on the resulting free space right-click on our manipulator and select the "Create" item.

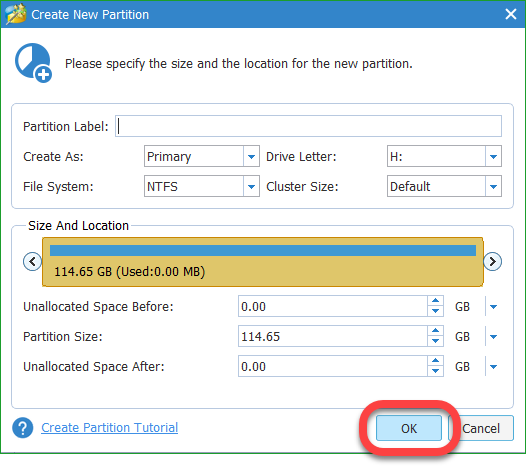
- Since we are going to create new volume the size of all the free space, do not change anything in the next window and just click "OK".
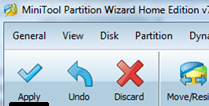
- Apply the changes with the button indicated in the screenshot.
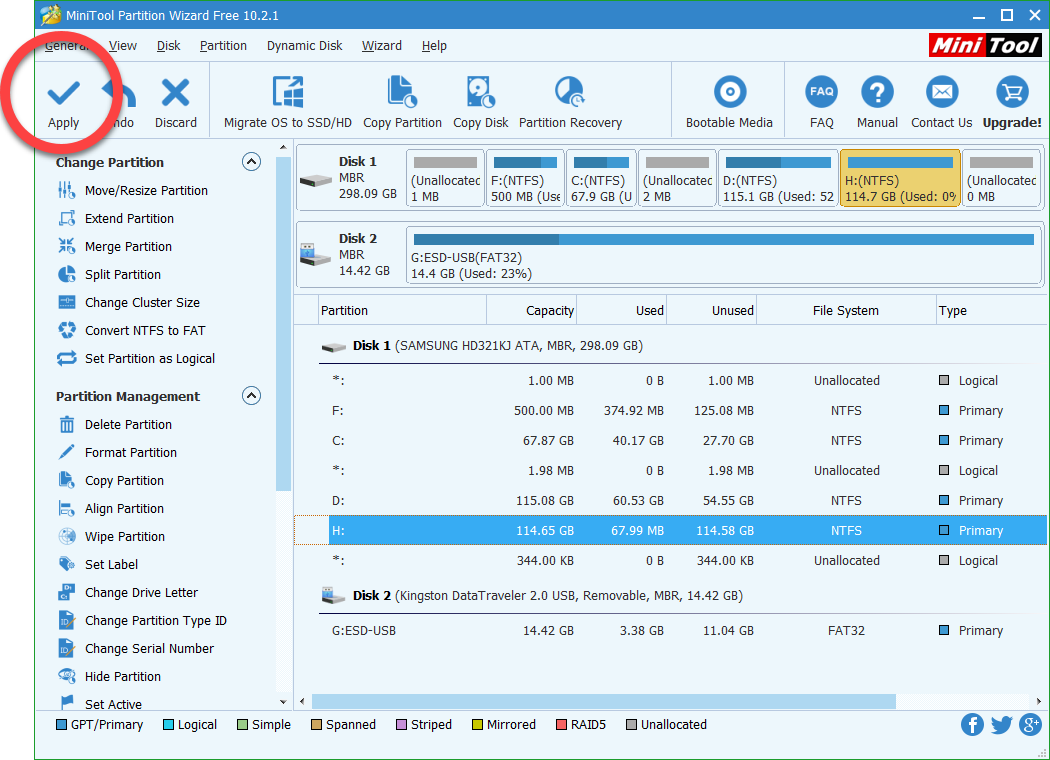
- Since we are working with drive D, there is no need to reboot. If actions were carried out on the system partition, Windows would reboot.

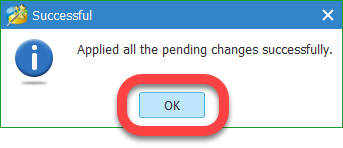
As a result, the changes were applied and our disk was split into pieces of the size that we specified during the setup process. Likewise, you can merge discs.
Acronic Disk Director
This is a professional tool that can be downloaded from the official website of the program. The application is paid, but there is also a demo version. Consider the process of working with Acronic Disk Director:
- Let's install the program first. There is nothing difficult here. When the file is downloaded, run it. Click on the entry indicated in the screenshot.

- We accept the license agreement by checking the box in the desired position, and click "Next".

- We select the directory in which the installation will be carried out.
- And we are waiting for all the files to be copied.
- After the application starts, click on the name desired disk right-click and select "Divide Volume".

- Using the slider, we change the size of the two new sections, when finished, click "OK".

- Now we need to apply the changes, for this we press the button, which we have highlighted in the picture with a red frame.
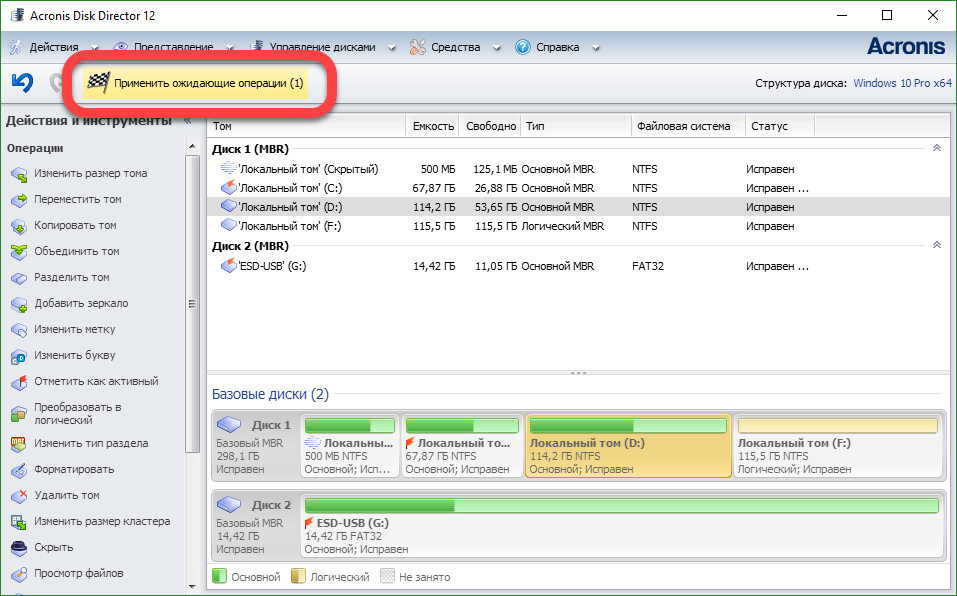
As a result, our changes will be applied and the section will be cut into two parts, in accordance with the parameters we specified. If the work is carried out with the system volume, a reboot is required.
Aomei Partition Assistant
A simple program for working with hard disk partitions. A number of functions are supported, such as: deleting disks, formatting them, shrinking and enlarging, moving, hiding and creating. This is not a complete list of the application's features.
Aomei Partition Assistant is very easy to use, all the procedures that you will carry out with it are of the type step by step wizard, in addition, we will describe in detail the process using the example of partitioning a disk in Windows 10. You can download the program from the official website.
Instructions for working with Aomei Partition Assistant:
- After the installation distribution has been downloaded (the program is free) launch it and first of all select the language in which the interface will be displayed. Russian is present and this greatly facilitates the work with the application.
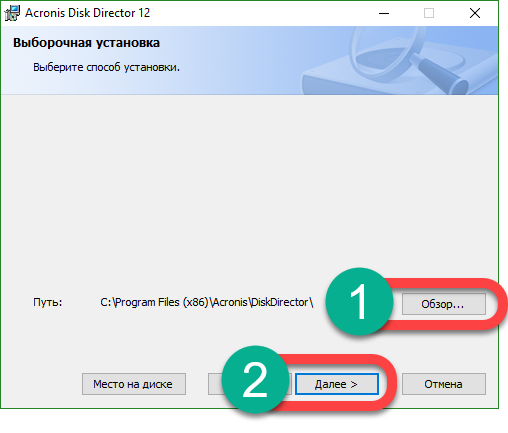
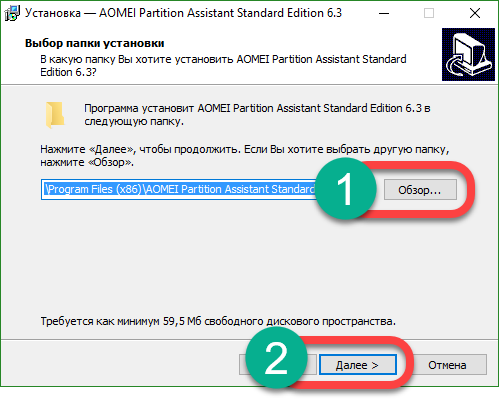
- Choose the path for the installation (the "Browse" button) and press the button marked in the screenshot with the number "2".
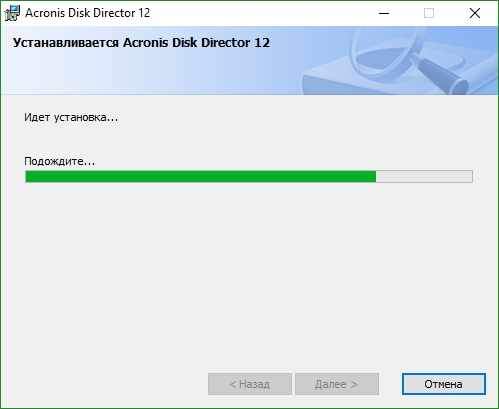
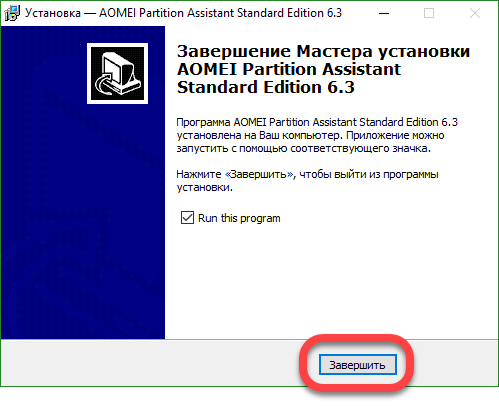
- We are waiting for the completion of the installation of the program. It took us about 1 minute.

- Now you can proceed to use, press the button marked in the picture.
- In the program window, select the disk you want to partition, right-click on it, and then "Resize Partition".

- Using the slider or entering a value, set a new size, then click on "OK".

- Right-click on the unallocated space that appears and select in context menu section "Create a section".

- We confirm the size, the letter of the future disk and its file system. When finished, click "OK".

- In order for the changes to take effect, click the "Apply" button.

The operation will go in the so-called PreOS mode, in other words, at the moment when Windows 10 has not yet fully loaded, our program will begin its work on partitioning the disk.
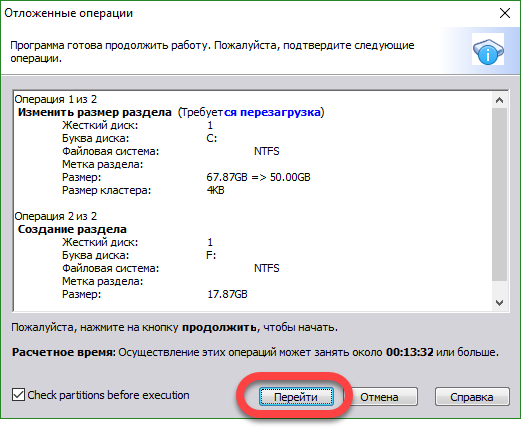
It remains only to confirm the procedure, click "Yes".

After the computer has restarted, we see in the disk editor a new partition with the size that we specified. The system drive C has shrunk. The procedure completed correctly.

Instead of an afterword
In the article, we considered the question - how to partition a Windows 10 disk into partitions, we did this in several ways, using the tools of the operating system itself and third-party utilities. If after reading the material you still have questions, read them, or ask them in the comments, and we, in turn, will try to give an intelligible answer as soon as possible.
Partitioning a hard drive is a way to organize storage of information, much like putting things on the shelves in a closet.
In this article, you will learn how to partition your hard drive and why.
Most users prefer to divide their disks into 2-3 partitions for the following reasons:
- so as not to mix operating system and personal files in case of reinstallation of the OS;
- for convenience manual search information;
- to install more than one operating system on a computer;
- so that each user, if there are several of them, has his own "corner" for personal files;
- to hide some information from other PC users (along with the section).
Note! When installing operating systems, service partitions are created - boot, recovery, for the paging file, etc., which are not visible in Explorer. These areas are hidden because changing or deleting their content breaks the operating system.
Some people think that it is imperative to partition the hard drive: so, they say, personal files will not be damaged in the event of a system failure, they will be less fragmented, which means that they will open faster.
In fact, the files will not disappear anywhere, even if the OS completely crashes. And this will not affect performance, especially since modern systems defragment themselves without user intervention.
On the contrary, the system partition tends to fill up quickly, and if there is little space on it, the computer will first slow down and then stop loading altogether due to the fact that the system has nowhere to expand.
Do you think you still need an additional section? Then read how to create it.
Two ways to divide a disk into partitions in Windows 7, 8, 10
Features of the installed system
Starting with Windows 7, you can partition disk space using the OS itself, both during installation and after.
There is only one condition: when dividing an existing partition, it is important that the part to be divided has no less free space than the one that will be partitioned.
Let's take a look at how to partition a hard drive in a running Windows 10.
- Go to the context menu of the Start button and start Disk Management.
- Open the context menu of the section to be split. Click Shrink Volume.
- The window that opens after that shows the total size of the area to compress and the space available for compression. From the latter, select the part that will be the new section.
As you remember, it should not exceed half of the value specified here. Then click the "Compress" button.

- In the wizard window, specify the size of the new volume. If you leave the default (equal to the entire area of unallocated space), the entire area you subdivided becomes a new partition.
If you specify a lower value, one part becomes a volume, and the other remains unallocated. Click Next.
- Assign a letter to the new volume if you want it to appear in Explorer, or connect it as a folder. If you decide to do this later, select "Do not assign drive letter or paths."
- Next, the wizard will offer to format the volume and assign a label to it. A label is a short name for a section that explains what is there. Leave this line blank if desired.
After formatting, the unallocated space becomes a full-fledged partition.
Volume creation during Windows installation
Creating new partitions during the installation of Windows differs from the method that we discussed above, in that the shared disk will have to be removed first, that is, completely cleaned of information.
And then build a new partition structure from the unallocated space.
The breakdown is performed at the stage when the program asks to indicate the location of the OS installation. What to do next:
- In the "Where do you want to install Windows?" click the "Disk Setup" button.
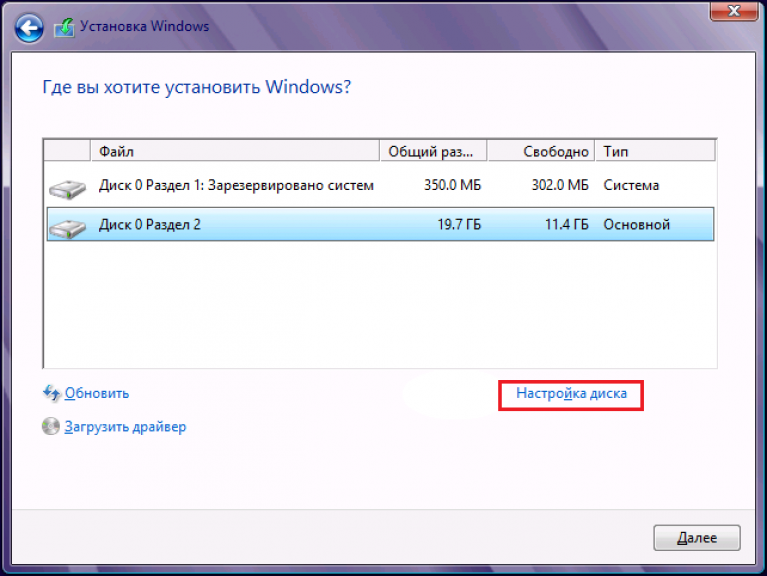
- Check the section you are going to split and delete it. An unallocated space will appear instead.
- Click the "Create" button (meaning, create a section), specify the desired size and click "Apply". If the partition being created does not take up all of the unallocated space, repeat the operation until there is no unallocated space on the disk.
- After that, format the new partitions and proceed with the installation.
We have shown the process of creating logical volumes. On Windows 8 and 10, this is done in the same way.
During the installation of Windows, it is not necessary to mark up the entire disk space; it is enough to select the area where the system will stand. You can mark the rest of the free space later, whenever you want.
These are not the only ones, but only the most available ways partitioning disks into sections.
Own functions for working with disk space, which are in all Windows versions starting with the "seven", it is enough in almost all situations, so the need to use third party programs, such as Acronis Disk Director or Paragon Partition Manager, have already disappeared.
Now we will analyze the solution to one of the most frequent tasks of the user after buying a new laptop: there is only one hard disk in the system, on which is installed operating system and the user needs to create another partition without any data loss. This article describes how to split a partition Windows tools, i.e. how to partition a disk without using additional special software.
How to partition a disk in Windows 7 / 8.1 / 10
Disabling system protection
Start explorer:
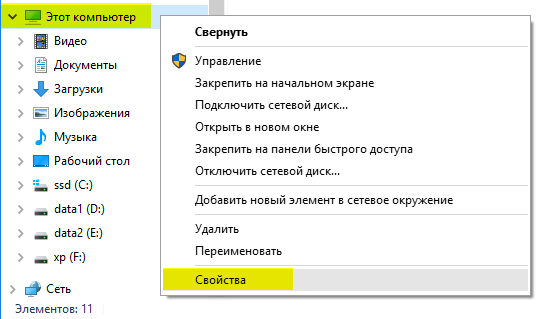
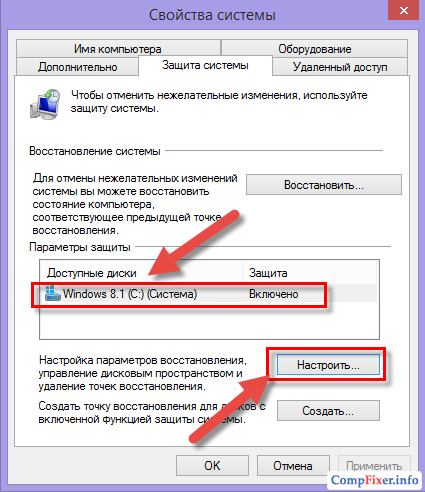
We called the window System... Click on the link System protection :

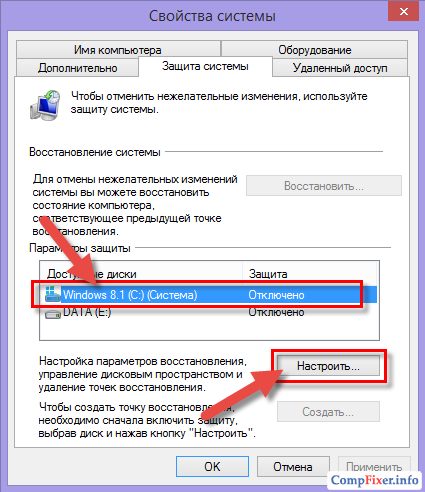
A window opens System properties in the tab System protection... Select the system disk with the left mouse button and press the button Tune :
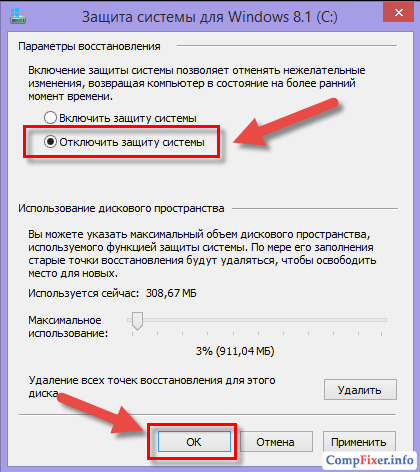
We set the selector to position Disable and press OK:
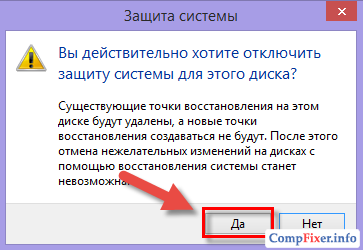
Push Yes to confirm your intentions to disable protection on this disk:
Partitioning a disk
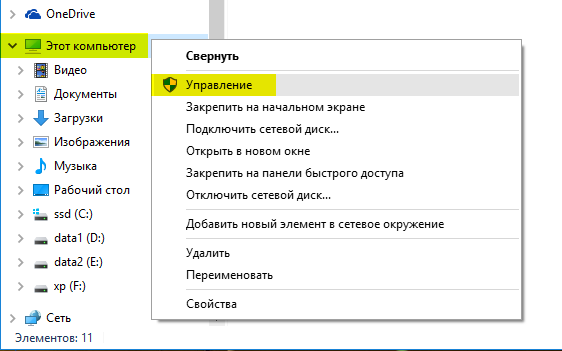
We opened the window Computer management... We see two sections: boot without a letter and system under the letter C:.
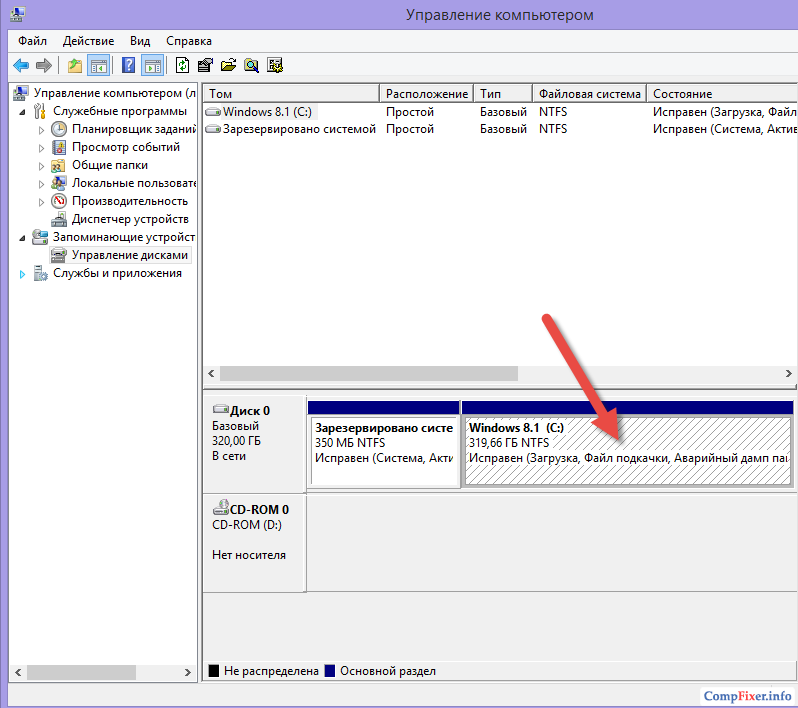
Push right click on the system disk (largest) and select the item Shrink volume :

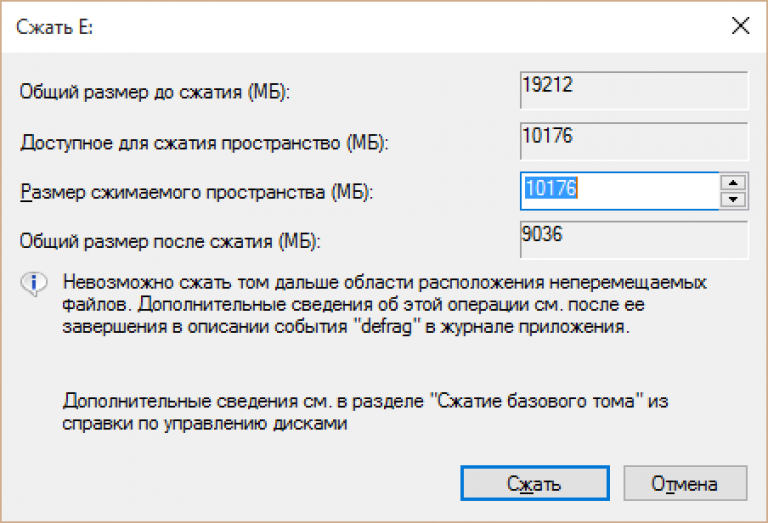
In the next window, we see a configurable parameter. In fact, this will be the size of the free space after the partition C:, which you can use for other sections. And the value Total size after compression Is the size to which you want to shrink the existing system disk C:
We recommend that you allocate at least 80 GB for the system partition. Don't overdo it with squeezing it. If you compress the system disk to 30-50 GB, then there is a high probability that it will eventually run out of free space and you will have to increase its volume.
So ask Compressible space size(to create new sections) with an eye on Total size after compression(drive C) and press Shrink:
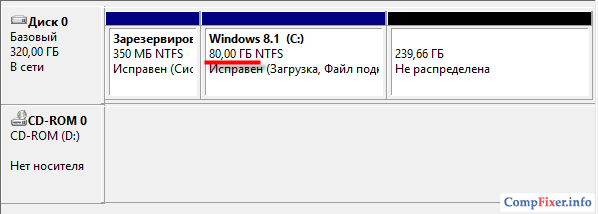
(In our case, we free up about 239 Gigabytes and leave 80 Gigabytes under the C: drive)

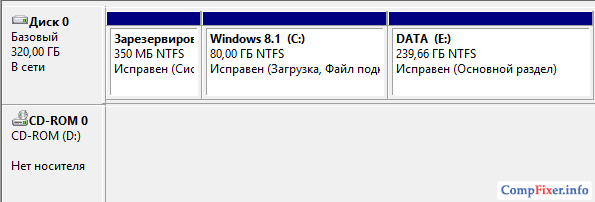
After completing the compression procedure, you will see two partitions on the map and unallocated space after them. The system partition no longer takes up all of the hard disk space, but only a part. In our case - 80 GB:
Now we need to create additional partitions (or one partition) using the unallocated space. Push right click by unallocated space to the right of the system partition and select in the context menu Create Simple Volume ... :

The Create Simple Volumes Wizard starts. Push Further :

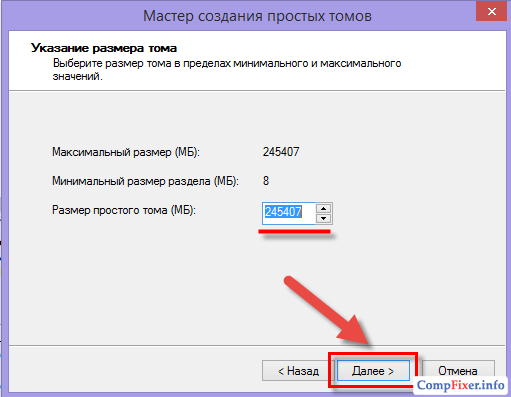
At the stage Specifying the size of the volume we have several options:
- leave the value unchanged - in this case we will create one partition that will occupy all the available free space;
- decrease the value - in this case, we will have free space to create other partitions.
In our example, we want to create one partition that will take up all the remaining space on the hard drive. Therefore, just click Further :
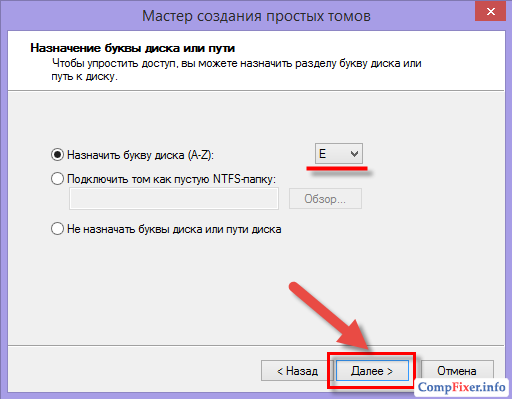
Select a letter (it can be changed in the future) and press Further :
We ask volume label for a non-system partition, mark the checkbox quick format and press Further :
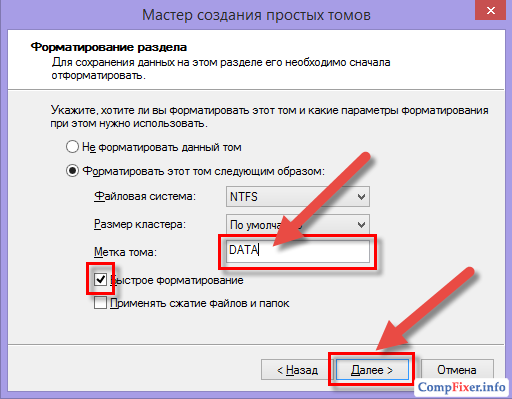
Push Ready to start creating a section and formatting it:

After a few seconds, we see a new section on the map:
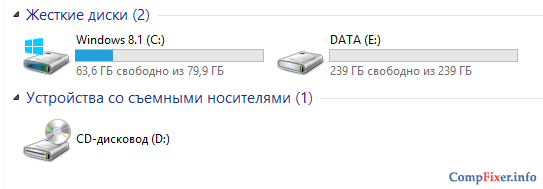
Entering the area This computer, we also see that we now have two disks: C: and E:
... put the selector in position Enable system protection and press the button OK.
At the forum, in recent years, in conversations, phrases "broke the disk", "divided the hard disk into two partitions", etc. have often started to slip through. And to be honest, I thought I had an article or video tutorial on this topic, what was my OS, when I climbed the site, I did not find anything! And then I saw the light - I need to write an article.
Why partition a disk, and when should you do it?
You can ask - why do you need to partition the disk at all and when should it be done?
To begin with, I will answer the second part of the question.
This should be done if you have one local disk on your computer, it is called something like this - "Disk (C :)" or "Vista (C :)" or something else, in any case, the name is present "(WITH:)"... This system partition, why is it called that, everything is simple - yours is installed there.
Well, now why? You can tell, I have one disk, well, let there be one, what's the big deal? To be honest, there is nothing wrong in principle. But still, there are some reasons why this action is worth carrying out.
- On this very disk (C :) system files installed... And if you store music, movies and install games on it, then a Trojan or some other virus can leak into the system unnoticed. And it is not always possible, sometimes you have to delete infected objects, but what if it is one of system files?
- Of course, if it is one of the system files, then you can easily roll back the system... But during the rollback, removed all files and folders that were not there at the time the restore point was created. Let me explain it easier, suppose the restore point was created on March 16, and on March 17, you decided to download your favorite TV series, downloaded 10 episodes, downloaded for a long time, about five hours. And soon, a window pops up with something like this "A virus was found, it infected such and such files, it could not be cured, I had to delete", something like that. And rest assured that in most cases viruses climb exactly to the system folder... You, of course, delete and keep watching the movie. But after a day or two, you start to notice some problems, or everything slows down, or reboots, or everyone has their own bugs ... You rush to ask questions on various forums, but few people understand what you are talking about or just these tips do not help. And some clever person says, "Why don't you worry, roll back the system and everything will work!" And then you think - "And I really will, besides Fedka has a cool lesson on this topic -" Recover, and about the horror - the series disappeared, and you only watched 2 episodes! And where did he go to download five hours again ?! If you remember, the restore point was created by a computer on March 16, and you downloaded the series on 17, and since the entire disk is being restored, everything that appeared on the disk after the 16th disappears, because at the time of the creation of the point, data files, folders , well, or serials, the disc was not.
There are actually more reasons and split disk or not, you have to decide for yourself. But if something happens and something necessary leaves, then do not blame anyone. And if you do make up your mind, then let me tell you how to do it.
Partitioning your hard drive
At the beginning, I wanted to tell you how to partition a disk using a program such as Norton Partition Magic or Acronis Disk Director. But after looking for information and asking around different knowledgeable people, came to the conclusion that should not be doing that. Many are inclined to believe that in fact these programs are only make an illusion"Crashed disks", that is, you seem to see two disks, but in fact as he was alone, he remained.
I'll tell you about standard way... It has one drawback, it can split the disc, only into two equal parts, but for me personally, this was not a big deal when I did it on my own.
So, first we find disk management section... Click Start -> Control Panel -> Administrative Tools -> Computer Management -> and then select Disk Management in the left.
You can go in another way Start -> -> enter this command there diskmgmt.msc and click "OK". You will see the "Disk Management" window

In my picture, the "C" drive is already broken, but I will show you how to split on the "J" drive, there is no difference. By the way, when you open this window, do not pay attention to what is already there there will be several sections, we only need the one where the letter "C" is present.
Right-click on the volume with drive "C" and select "Shrink Volume".
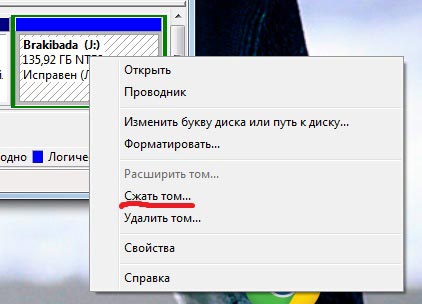
Such a window will pop up, everything is clear here.

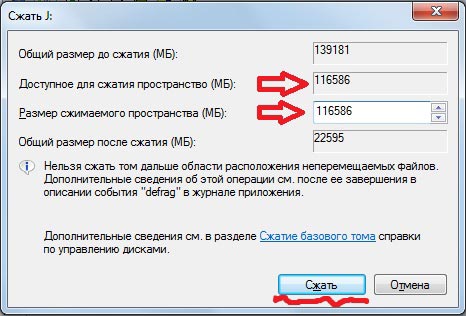
Next, a window will pop up in which you will have to choose the size of the new disk, my advice to you is to choose the maximum, anyway more than half, it will not work out. That is, enter in the item "Size of the compressible space" the number that is in the item "Available for compression space", the numbers can be entered using the keyboard. And click "Compress".
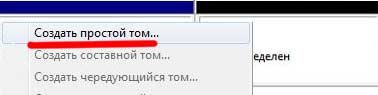
After that, another section will appear in the Disk Management window. With a black bar at the top, it will have the size written on it and the word "Not Allocated". Right click on it and select "Create Simple Volume"
Then the "Simple Volume Wizard" window will open. Select size to the maximum, click Next. Then put the point "Assign a drive letter" and select a letter, then what you like, click "Next". Put a point opposite "Format this volume as follows:", opposite " File system», select NTFS... Opposite "Cluster size", put "Default"... "Volume label" is the name of the disk that will be created, so whatever your heart desires. Same way check the box"Quick formatting", and tick "Apply compression of files and folders", put no need... Click Next. After that, at the final step, you will have an inscription in large letters - “Completing the wizard simple volume". Now we check again what we configured and click "Ready"... Everything.
After that, you will have a new local drive. You can go in and see. I will not show pictures, because everything is simple and understandable without them.
This is approximately how it is done, as you might have noticed, there is nothing difficult about it. In this section, you can download all movies, games, music, and so on, of course, having created, and not be afraid that when the system is restored, they will be deleted.
 Differences Between GPT and MBR Partition Structures
 Wipe Internet explorer clean
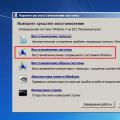 Windows updates are downloaded but not installed