Crafts from cotton pads step by step instructions. Crafts from cotton swabs: step-by-step master classes with photos.
DIY Christmas tree from disks- an interesting type of creativity for children and adults. Old CDs, which have been gathering dust on the shelf for a long time, will now take on a new life, becoming a bright decoration of your home before the New Year holidays. They can also be used to create original Christmas tree decorations, balls, snowflakes and garlands using the latest techniques and sophisticated materials. It will be interesting for children to create using cotton pads, because they used to work with them in kindergarten, when they made winter applications.
CDs have not been popular media for several years now, because films and music can be found on the Internet and burned to a USB flash drive, but do not rush to throw them away, because they can become excellent material for home creativity. If you are preparing for a New Year's party, where there will be loud music and fun, then collect all the old CDs at home, as well as borrow from friends, and lay out a large triangle on one of the walls of the room - a fantastic Christmas tree. He will sparkle all the lights of the party and set a special mood for the whole holiday.
DIY Christmas tree from disks
This is a present for your programmer friend, such a decoration can be placed on an office table. Such a gift will please the musician, the main thing is not to spoil the discs with his favorite music.
Today, old and unnecessary CDs are in every home, if 5-6 years ago they were in demand, now at home there are heaps of CDs with films, music and programs that we have not used for a long time. Increasingly, unnecessary CDs end up in a landfill, but creative people do not throw away unnecessary materials, but look for suitable ideas for creativity in order to breathe new life into them.
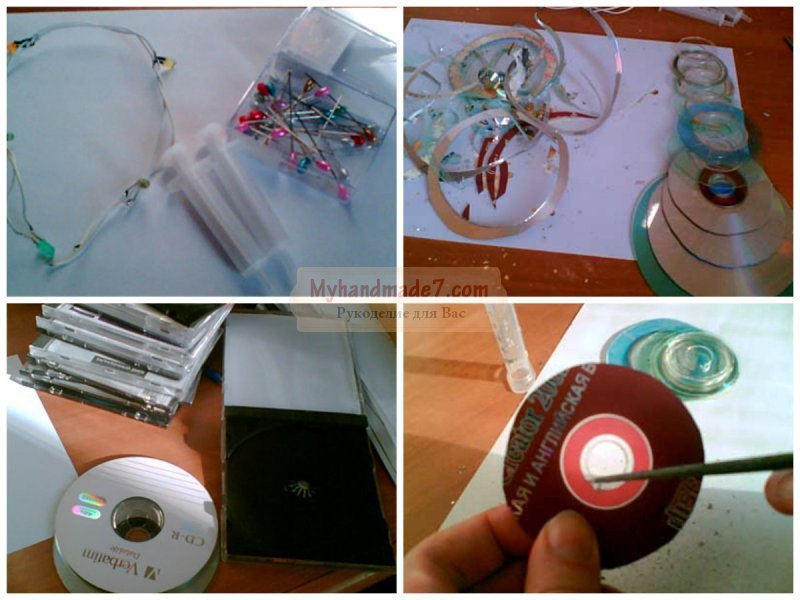
LEDs with a shiny surface are ideal for creating and handicrafts, by themselves they are bright and immediately striking, therefore they do not require special decoration and decoration. But in this case, we will make a real New Year's souvenir and decorate it with an LED garland, for it we need five LEDs, which will be connected in parallel, and to power them - batteries. We recommend using a 4.5 V square battery or replacing with two 1.5 V finger-type batteries connected in series. You may need the help of a male who understands electricity.
We will use two 5 ml syringes as a basis. For a pyramid imitating a herringbone, we will take 10 SD, since the herringbone should consist of ten circles with a gradually decreasing radius. Each next circle should be one centimeter smaller than the previous one. To cut an even circle, it is advisable to first draw a contour with a pencil on the side where the drawing is applied on the SD, although even if your circle is not perfect, it will not be noticeable in the final version of the craft.
Since we will also be threading the wire for the garland, in each LED it is necessary to cut a groove in which two wires would fit.

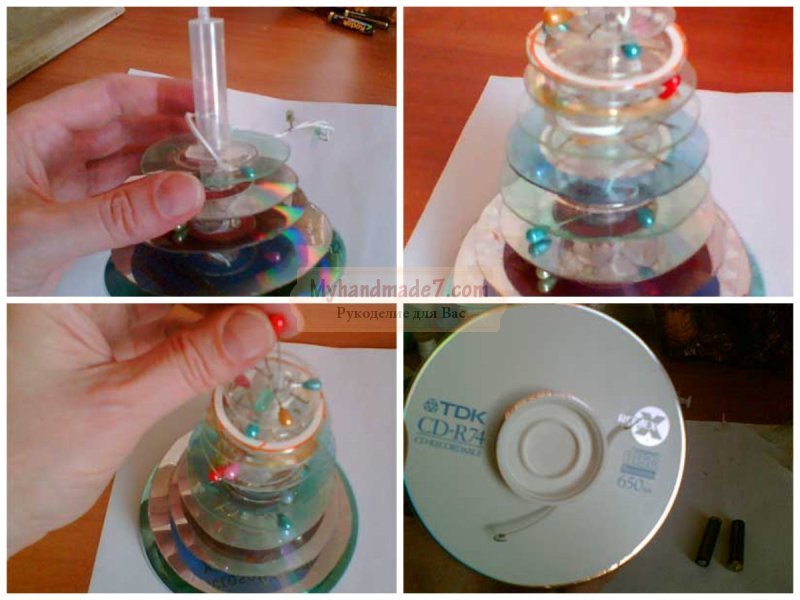
The easiest way to create a base is to use plastic syringes. The piston can be removed immediately, for this they are not needed. We put the first largest circle on the base syringe, and pass the garland through the central hole and fix it in the groove. Now, under the lower LED, we should have two wires from the garland. To secure the position of the lower disc, you need to secure it with a clerical needle. It is necessary to pierce almost close to the CD plastic case syringe. Thus, we will fix each next layer do-it-yourself Christmas trees from disks, photo process will guide you through the craft.
DIY Christmas tree from disks
We continue to consider a step-by-step master class, how to make a Christmas tree from disks with your own hands: we will fasten the subsequent SDs, now fixing them on both sides (bottom and top), while piercing in opposite directions so that the pin heads are located randomly along the base, because they will also serve as a kind of decoration.
For the next SD, you first need to prepare a place: pierce the base with a pin, stepping back about one centimeter from the previous one. Then slide the disc onto the base and secure it with a pin on top. When fixing the next layer, do not forget about the garland, which must be passed into the groove.
When the base of the first syringe ends, put the second on top and continue stringing the CD onto it. And the tip of the upper syringe must also be inserted with a pin, this will be our pick.
Now you need to arrange a stand where you can put the batteries. You can use the lid of a shampoo or medicine jar as a stand.
You can decorate the Christmas tree with tinsel, which fills the space between the layers. It is advisable to choose not too fluffy tinsel, if necessary, long hairs can be trimmed with scissors. After decorating, the Christmas tree should not lose its conical shape.
At the end, it remains only to connect the ends of the wires of the garland with the poles of our battery, and you will see how our do-it-yourself tree made of disks, master class helped to fulfill it, will light up and become a bright decoration of an office table. You can connect the poles incorrectly, therefore, if the Christmas tree does not light up the first time, the poles should be changed.

DIY Christmas tree toys
You can execute DIY Christmas tree toys in the technique of isothread. This technique allows you to create various patterns on the surface (in this case, we will use the circular surface of the disc as a basis). To create a pattern, you can use silk, woolen, floss or ordinary sewing thread.
In addition to the old CD, we will also need scissors, a needle, a ruler and a compass. The drawing must first be drawn on paper: we will circle the round base of the disk. Points need to be drawn on the drawing, which will then be used to create the pattern. Our template needs to be cut and transferred to the surface of the disc.
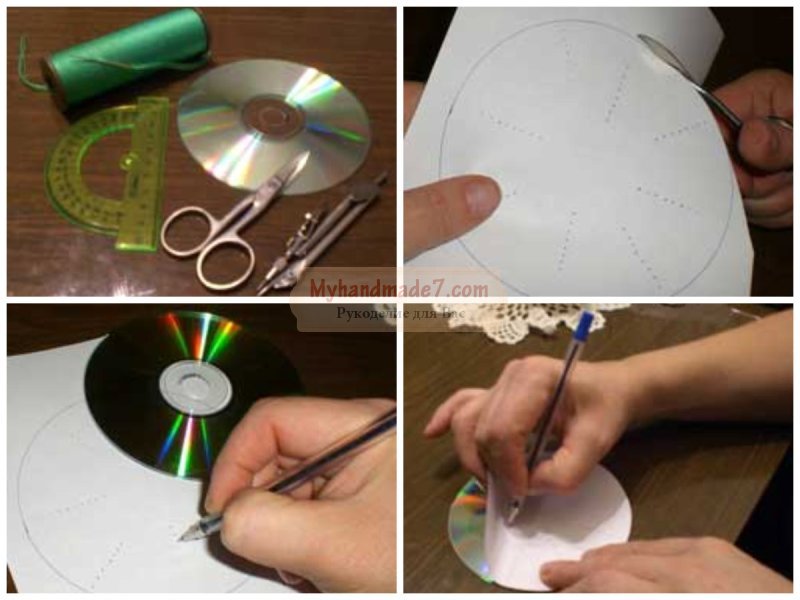
Holes should be made in the CD according to the template. To do this, we need a thick needle, which we will heat up on the fire and make holes with them. Since the needle will become completely hot when heated, you can use the pliers to hold it.
Next, you need to insert a thread into the needle, and start creating an original pattern, and you can find some patterns in our master class. Experienced craftswomen, who have been working in the isothreading technique for a long time, can come up with various patterns on their own. In the isothreading technique, you can combine various shapes: circles, triangles, ovals and rhombuses, different colors of threads, overlapping each other, create fancy ornaments.
By this principle, you can make a snowflake on an SD basis, but first the circle must be divided into 5-6 sectors, and a symmetrical pattern must be drawn for each ray.

There is nothing easier than performing in the "Disco" style; you can decorate a tree that stands on the street with such toys, and they will play with bright glare in the light of street lamps.
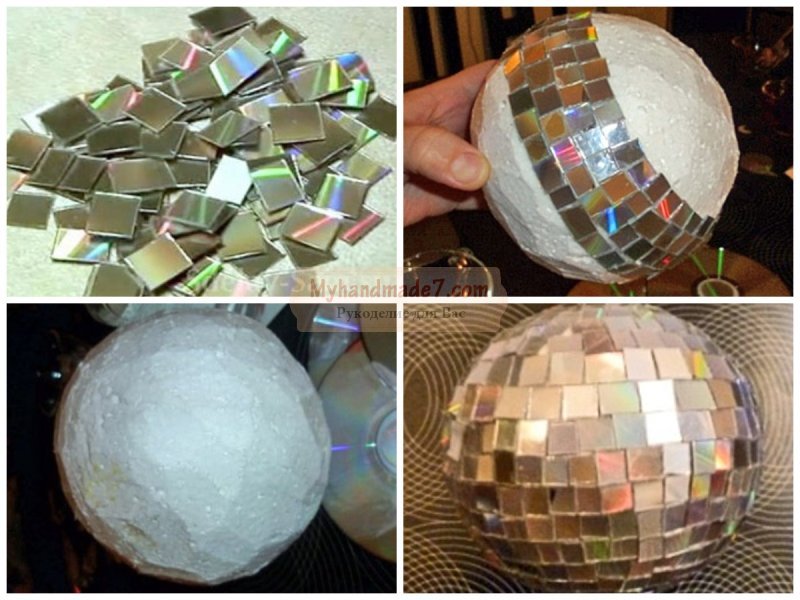
For such a ball, we need a foam round base and thermal glue, which will reliably glue the elements. The CD must be cut into small squares with scissors, which must then be glued to the base. We will glue the first row in the middle, placing the shiny squares close to each other. Then you need to glue them in a checkerboard pattern until the base surface is completely filled. On one side, you need to make a loop so that the ball can be hung on a tree branch.
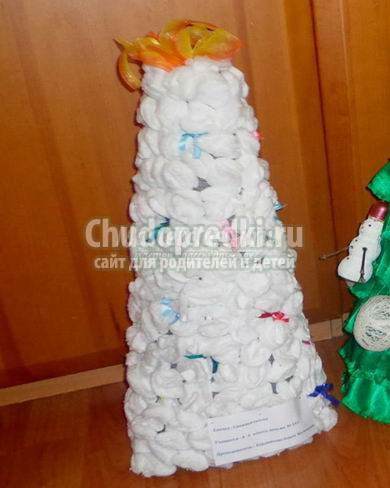
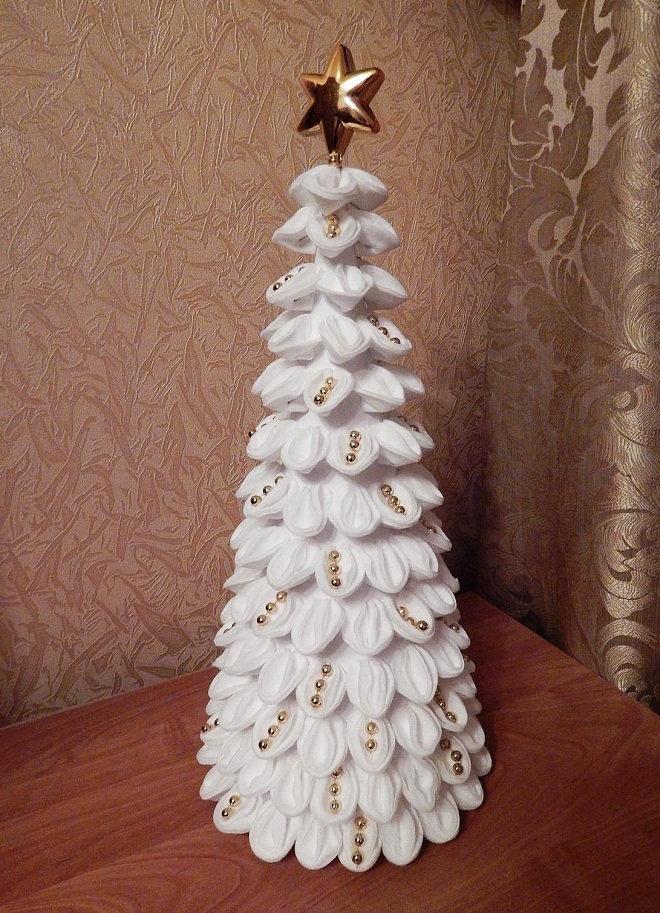
DIY Christmas tree: craft from cotton pads
Now we will consider other materials for creating an original New Year's decor, we have already done it, and now we have a beautiful do-it-yourself tree - a craft from cotton pads... This type of creativity will be interesting for children and experienced needlewomen.
As a result, we get a lush Christmas tree, shrouded in white flakes of snow, and for this craft we only need a Whatman sheet, glue and packing of cotton pads.
Not difficult at all make a Christmas tree with your own hands from cotton pads: the main element will be a disc folded in four (in half, and then again - in half, and fixed at the very tip with a stapler), and a paper cone will become the basis. Depending on what size you have chosen for your craft, you need to make a cone. A small base can be made from a sheet of cardboard, and for a large cone, you will need a Whatman paper. A sheet of paper must be twisted into a "little bag", glue the joints and cut off the excess part from below.
It is necessary to glue the cotton elements from the very bottom, placing them as close to each other as possible. At the very end of the crafts, we will give each element volume by straightening it. Next, you need to glue the next row and so move to the very top of the cone.
Do not forget to also decorate our beauty, for example, you can decorate the edges with sparkles: coat the edges with PVA glue and sprinkle with sparkles. Glue beads or artificial pearls in the center of the elements.
For our tree, you also need to come up with a decorative pot and trunk, as for any topiary, so that DIY Christmas tree from cotton pads took center stage in the festive decor.

DIY Christmas tree from cotton pads
DIY Christmas tree made of cotton pads is also a simple application for a preschooler. It is very simple to perform it, you need three disks, from which you cut three triangular elements of different sizes with scissors, and then glue them onto a cardboard base.
You can also make a fluffy herringbone on a tapered base, but this time the elements are created in a slightly different way. This craft is somewhat reminiscent of the facing technique known to every child from an early age, when he performs applications using napkins. The essence of facing is reduced to the fact that only the center of each element is glued to the base, and its edges "look" upward, creating the volume of the craft. In this case, each next element must be glued as close to the previous one as possible so that the edges do not fall apart to the side.
Christmas crafts from disks both adults and children like to craft, the first will like "homemade" made on the basis of shiny old CDs, and for the second, it is better to use pressed cotton wool as a craft material. , timed to coincide with the winter holiday, can be extremely diverse - you will be convinced of this thanks to our selection.
DIY Christmas craft from disks - magnet
With your own hands, you can make great presentations using, in general, such junk material as CDs. In addition, you can significantly save on the eve of the holidays, because they cost almost nothing.
You will not decorate the mirror side, which is why you should first remove all possible stickers and inscriptions, and then degrease the surface. The drawing will be very clearly visible if you paint the side white. It is best to apply a base coat of white paper and then allow it to dry thoroughly. This manipulation will also allow you to make the hole more reinforced, which means that the pattern inside will not "fall through."
As an image, you can use both a special decoupage napkin and a printout on laser printer the picture you like on the theme " New Year". Apply a layer of PVA to the surface of the disc. If you are using a napkin, then remove all layers, leaving only the top one with the pattern. If your choice fell on a printout, then thin the paper (of course, you cannot damage the image). Place the paper on the CD surface, it should lie flat, without creases.
After your "tinker" dries up, you will need to either open it with varnish, or smear it with diluted PVA water - this will give a glossy shine, and also significantly extend the life of the magnet.
Of course, you can decorate to your liking, for example, make some kind of inscription or circle the outline of the drawing with glitter, if you wish, you can add decorative elements.
On the wrong side, glue the magnet with a heat gun or super glue. So a wonderful gift is ready, make a few of these and present all your friends.
DIY Christmas crafts from disks - photo:
Many more can be done New Year's crafts from disks, because their shiny surfaces seem to be specially created so that you can decorate the Christmas tree. But you can apply additional "winter" patterns to them! Use a mixture of a small amount of water, PVA glue and toothpaste as paint. Use a thin brush for the ornamentation, or use a toothpick if you need extraordinarily fine lines. After the pattern is applied, you need to dry it thoroughly, then pass a ribbon through the hole, thanks to which you hang the decor. You can decorate a Christmas tree with a handicraft, or you can hang it on a chandelier, in a doorway, or on a window.

Christmas crafts from cotton pads
This material is ideal for both adults and children. It can be used to make a variety of applications, and volumetric decorations. In a word, you just need to connect your imagination and create a real winter miracle! Do not forget also about the environmental friendliness of such creations - they will be absolutely safe for health, and this is extremely important when it comes to children's creativity.
Craft Christmas tree from cotton pads
There are several options for making a holiday tree using pressed cotton wool. We will offer you two methods.
For the first Christmas tree, it will certainly be necessary to make a frame. For its manufacture, you can use paper, cardboard, as well as polystyrene (special cone blanks can be purchased at hand-made stores). If you have chosen colored cardboard, then you should certainly paint it with white paint, otherwise the frame will shine through the "needles".
Well, now you need to make the "needles" themselves - fold each disc in half, and then again in half. Pierce the corner with a pin. Make many of these blanks, and then simply poke through the frame material with pins, thus securing the blanks next to each other.
If the first method of making a Christmas tree seemed overly painstaking to you, or you want to create such a "tinker" together with the children (it is better for them not to work with pins, the risk of pricking a finger is too great), then give preference to the second method.
Make a tapered cardboard frame in the same way as for the first method. Use the most common watercolors, dip the brush in water, and then in paint, this colored water should be shaded off the edges of the cotton material. If you want your creation to shimmer in the sun, then by all means sprinkle the edges with sparkles, before that the prayer is a little glue.
Wait until the "needles" are completely dry, if you want to speed up this process, then put them on the battery. Now it remains only to glue the "needles" to the frame: start from the very bottom, glue in a checkerboard pattern to visually get the effect of a fluffy Christmas tree.
New Year's crafts from cotton pads - photo:
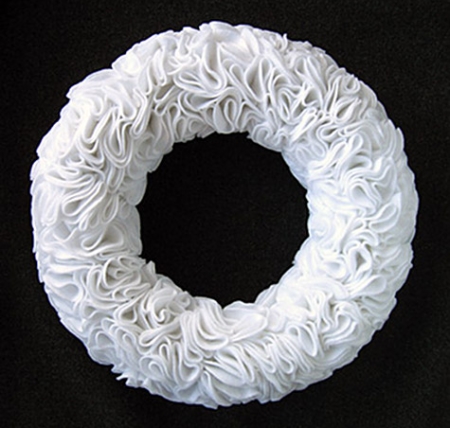
DIY Christmas craft from cotton pads - a wreath
You can use cardboard, newspapers, or a plastic corrugated tube as a basis for such a wonderful winter craft that can be used to decorate your home. Whatever you choose, but the frame should certainly be pasted over with strips of white paper so that the frame does not shine through.
Fold the cotton pads in the form of quarters and glue tightly next to each other on the prepared base - this will give the wreath additional splendor. If you want, you can make blanks in the form of roses - for this, the cotton wool needs to be cut in a spiral and rolled up in the form of a rose, in this case, you need to glue it to the base of the flower.

Well, now all that remains is to additionally decorate the wreath with accessories, choose a decor in red or blue, it will attract attention, in addition, such colors look incredibly noble. You can also use cones, and rowan bunches, and miniature Christmas tree decorations.
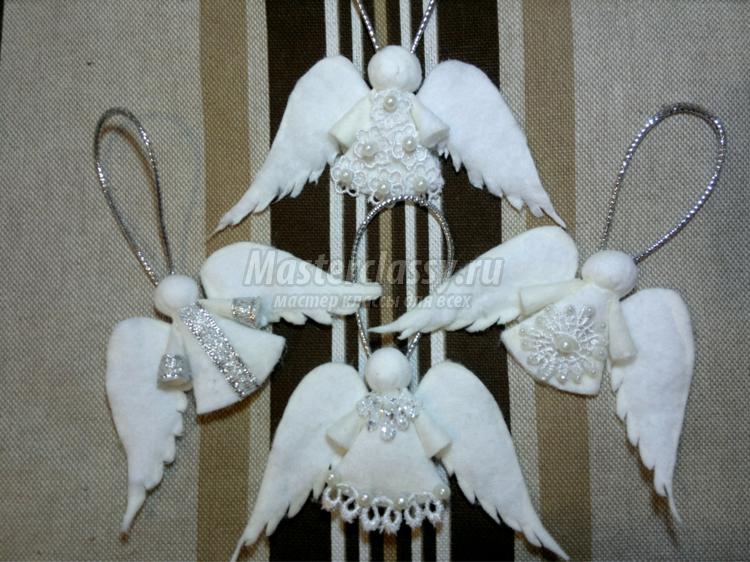
Angels
Making a cute angel will start from the head. It is necessary to divide the hygiene product in two and collect the cotton wool contained inside into a lump - it will play the role of the angel's head. Place the lump on one disc half, wrap it around the lump to form a head, secure the result with white thread.
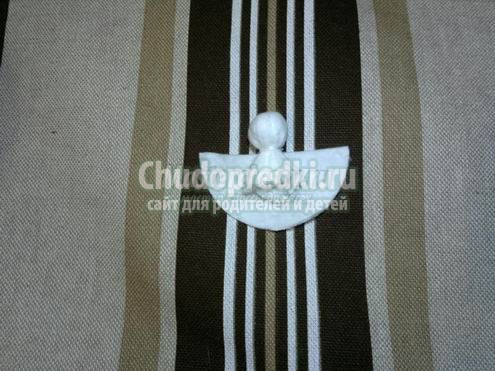
Adapt the other half for the calf - smear it with PVA half in diameter and fold it in half, then lay your head on it in the middle. "Swaddle" the figure - first wrap one edge, then the other, secure with glue.
For the manufacture of each wing, you will need one disk, you can draw the wing template yourself or print it from the Internet. Then simply cut out the soft wings according to the template. Their contour will not be even, which is why it is necessary to glue - place the glue composition along the contour between the two disc halves.
Cutting discs will also work - cut out small triangles, wrap each shape around the tip of a pencil or pen, secure the edges with PVA. If you wish, you can also cover the surface of the sleeves with the same glue (and we do just them), in this case they will turn out to be more rigid. Carefully remove the sleeves from the pencil and trim the edges evenly. Glue the sleeves to the calf where it joins the head. Glue the back and wings, placing them symmetrically.
The angel is ready, now all that remains is to decorate it. For example, you can cut out various lace details and attach them to the “dress”, you can also glue beads. Make a beautiful loop (you can use tape, braid, string for this purpose), glue or sew it on the back. You have got a wonderful one that will decorate the interior or serve as a gift.
New Year's crafts from disks - photo:

Children's New Year's crafts from cotton pads
Application "Snowman"
Glue a disc on the bottom of the black cardboard sheet, glue another one on top of it, and a third one on top (it needs to be cut at the edges so that it has a smaller diameter). The result is a snowman figure. Cut another one in half, glue the halves at the junctions of the second and third "balls" - these will be the hands. All the same material will be needed to cut out other details of the applique - this is a bucket on the head of a snowman and snowdrifts.
Using a stencil or by hand, cut out small paper snowflakes, glue them in a chaotic manner onto cardboard.

With felt-tip pens of different colors (for example, black and red), draw the snowman's eyes, a carrot nose and a smile.
Application "Christmas balls"
Even the smallest kids will love this applique. You need to cut out a few strips of green paper, fold them in half and cut them finely to create a fringe around the edges. Then the strips need to be expanded and glued in the form of Christmas tree branches.
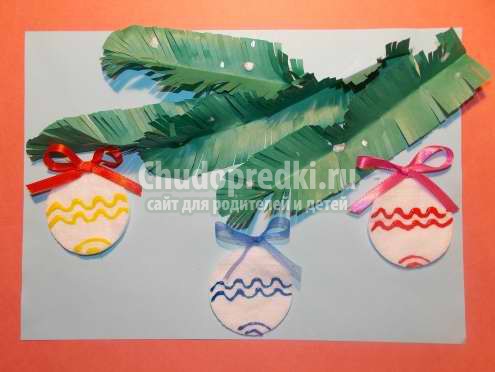
On three discs, which will play the role of Christmas balls, apply various ornaments with felt-tip pens, and then glue them under the Christmas tree branches. For additional decoration, glue bows on top as well.

Christmas crafts from cotton pads and sticks
Hand-made articles that depict the symbol of the coming year deserve special mention, so, for example, if you add cotton swabs to our main material, you can create a cute lamb or a formidable bull. In this case, flat hygiene products will be needed for making the body, and sticks for the feet.
And you can also make the application "Winter City", where the white disc halves will play the role of snowdrifts and snow clouds, and snowflakes will be made from pieces of sticks. By the way, you can just draw the stars and the moon, or you can use the same fertile material, only it should be painted yellow first.
Find out more, because such materials always give adults and children a lot of original ideas for creativity.
If you liked our site, please express your "thank you"
by clicking on the buttons below.
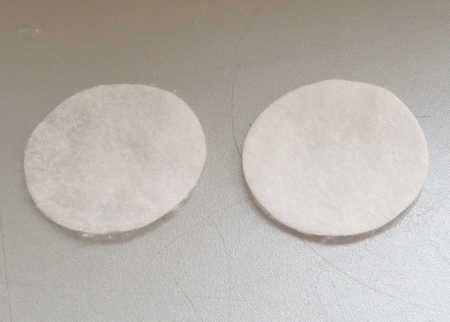
Cotton pads can be bought in almost any supermarket or pharmacy, and almost every woman has them in their cosmetic bags. Have you ever wondered how else, apart from their direct purpose, they can be used? We just thought about it, and prepared for you a small master class dedicated to the decorative functions of this inexpensive and affordable material.
A basic set of tools you will need anyway:
- Several packs of cotton pads
- Scissors
- Stapler
- Decorative items (ribbons, beads, sequins, pendants, etc.)
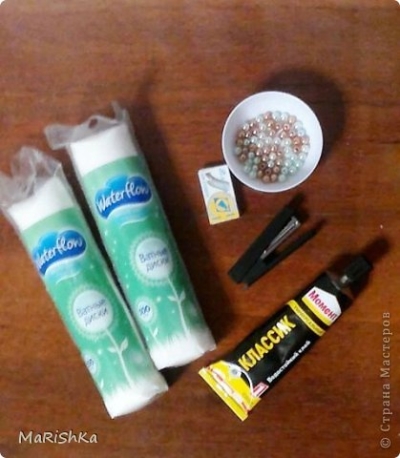
In addition to this, stock up on heavy cardboard, foam, large beads, white thread, sewing pins, toothpicks and paints. All this will be useful to you at certain stages of work on different projects.
Autumn is in full swing, New Year is not far off, and therefore our master class will be devoted to the most festive elements of decor - a New Year tree and decorations. Let's start with the tree.
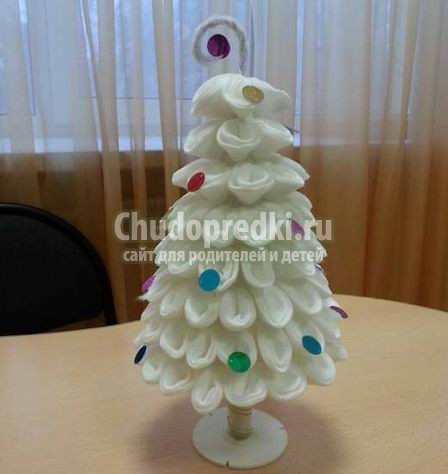
Step by step instructions with photos
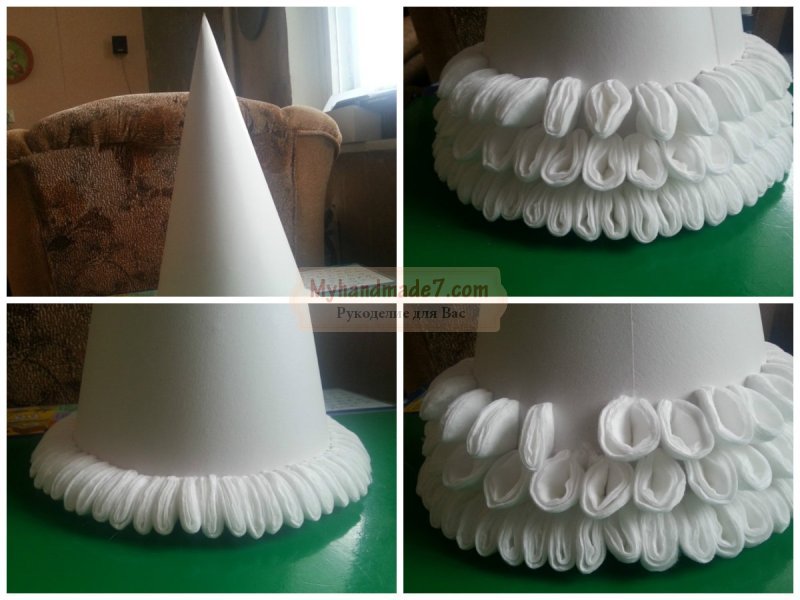
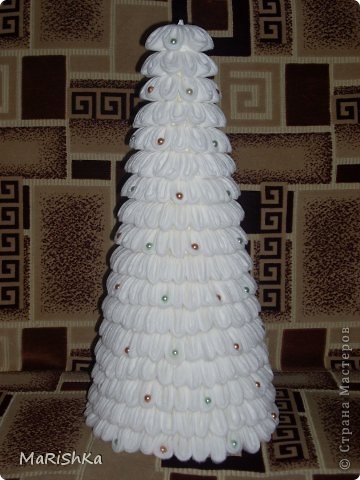
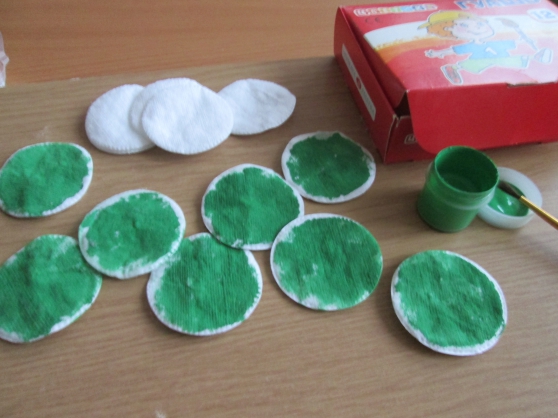
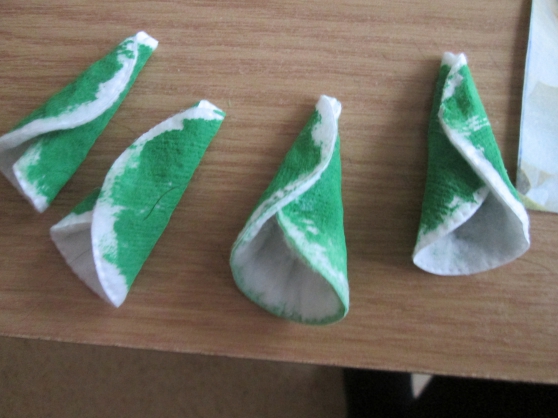
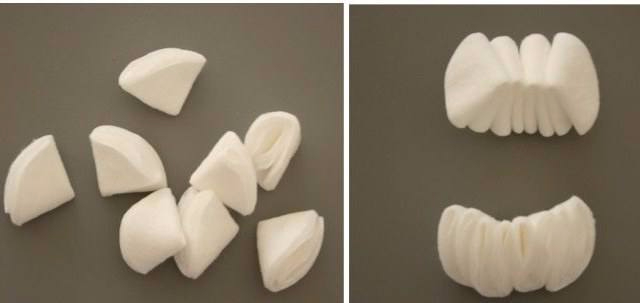
So, first of all, you need to acquire blanks (you will need a lot of them). It is very easy to make them - just fold each cotton pad in four, as shown in the picture:
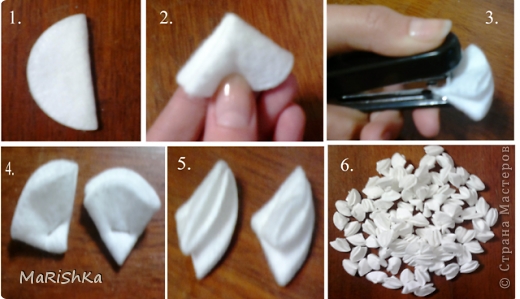
The corners can be stapled with a stapler or thread, whichever is more convenient for you.
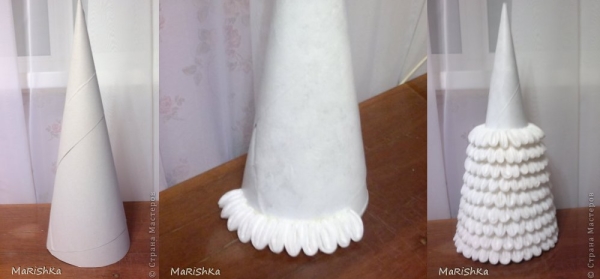
Next, using thick cardboard, scissors and glue, we make a cone-shaped base. Colored cardboard is best painted with white paint. The height of the cone can be any, at your discretion. The base must be very stable, therefore, it is better to additionally strengthen the bottom edge with a tape or a strip of cardboard glued along the inner circle.
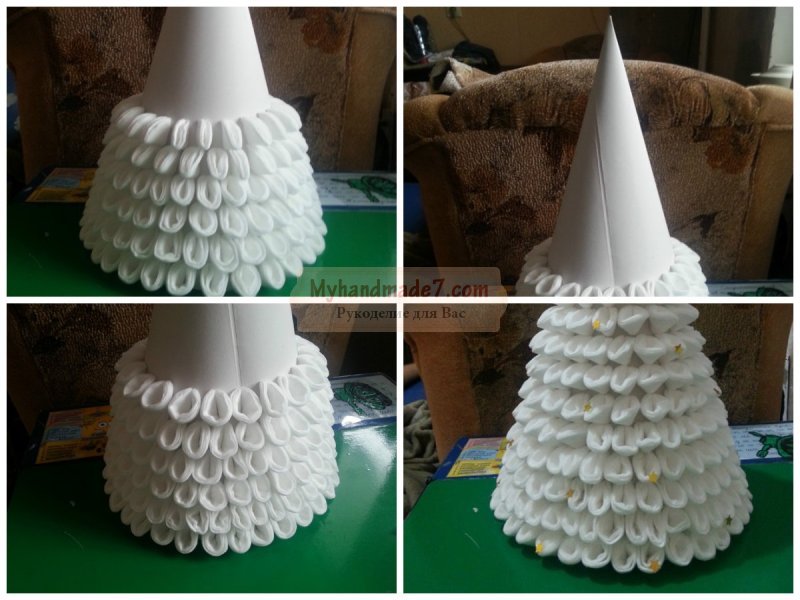
When the "trunk" is properly dry, you need to glue the "needles" to it. We start at the bottom:
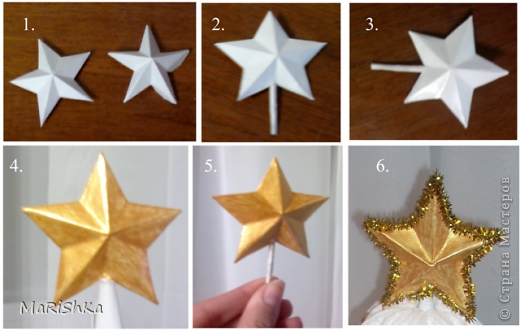
The finished tree can be decorated with glitter, beads and ribbons. At the top, we placed a bright cardboard star:
A star can be made like this. We cut out the blank according to the template and then proceed in steps:

And here is our final version:

By the way, by placing the blanks at different angles, you can get such a Christmas tree:
![]()
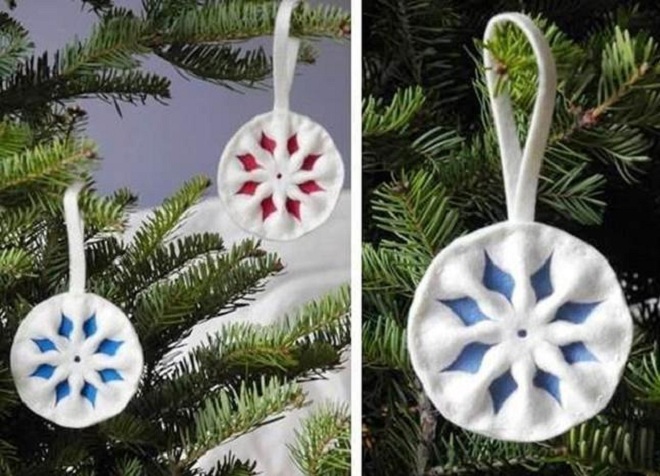
Now that you already have a Christmas tree, perhaps you want to decorate your apartment or office with a few more original holiday accessories? We will be happy to show you several ways to diversify the usual set of snowflakes and toys with something special.
Master class on creating crafts from cotton pads
Let's take a New Year (Christmas) wreath as a basis:
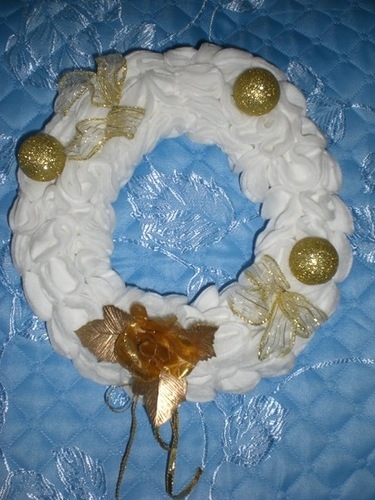
To do something like this, you first need a foam circle (you can also use a round synthetic insulation). You can look for a ready-made one in stores, or you can cut it out of a regular rectangular piece of Styrofoam and polish it so that there are no corners.

On the foam base, using sewing pins, we attach the folded four-wadded discs. You can paste over only one side if the wreath will hang on the wall, or cover all the foam around it if you plan to hang it on, say, a chandelier:
Do not forget about the ribbon, which will serve as a loop for hanging the finished product:

When the base is ready, simply pin or carefully glue the appropriate decorations over the discs.
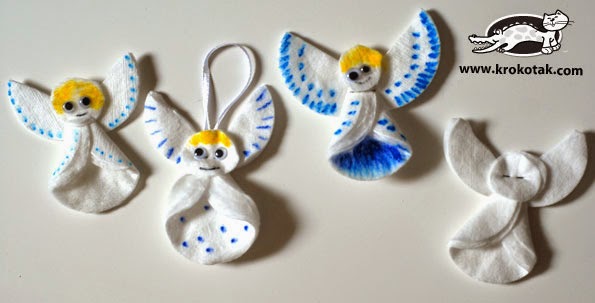
By the way, to support the theme, some of them can also be made from cotton wool. Let in our case it be an angel - a symbol of Christmas.
Do-it-yourself angel making

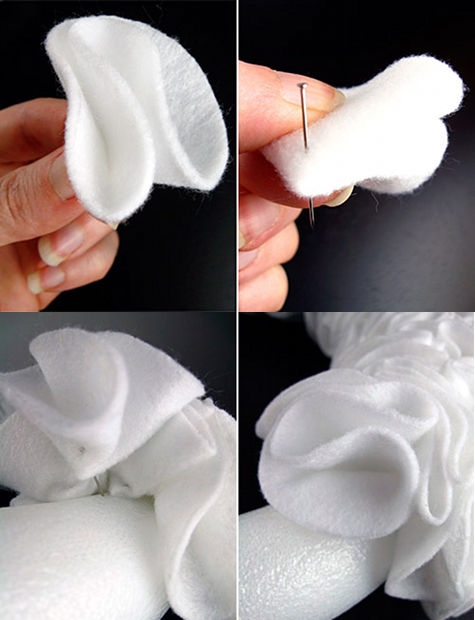
To make such an angel, divide the cotton pad into two thinner ones:

For beauty, the edges can be cut in waves to resemble a flower.
Put a round bead in the center of one of the resulting disks, wrap it with thread and straighten the figure so that you get the head and wings:


Now we need a slightly denser torso on which all this will hold. We add the second disk as follows:
In the center of the body, you need to place a "leg" from an ordinary toothpick and secure it with a drop of glue. To make a hanging figurine, simply attach a loop of thread to its head (you don't need a toothpick in this case). Then we glue both parts, and paint the wings with a felt-tip pen:
![]()
Such an angel can be stuck into the foam base of a wreath or used as a decoration for holiday baked goods.
Photos of crafts
Other crafts from cotton pads and sticks, get inspired!

Brooch
Flowers
Tree

Application
Many interesting crafts can be made from cotton pads. The article contains a lot of ideas and a step-by-step description of such crafts.
Most people use cotton pads as a hygiene item in the care of the skin of the face and body. But few people know that cotton pads can also serve as a cheap and affordable material for creativity. Yes, you heard right. You can create real masterpieces from cotton pads that will take pride of place in your interior. We will share ideas for creating such crafts.
How to make a rose from cotton pads by March 8?
For such a craft, you must have the following materials:
- Cotton pads
- Wooden skewers
- Corrugated paper
- Thread
- Paint (acrylic or gouache)
Preparation method:
- First of all, you need to paint the wheels. About painting methods below
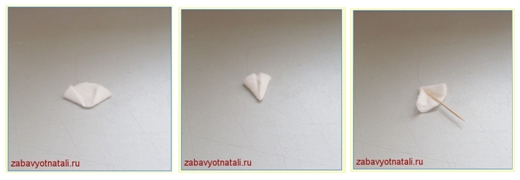
- Roll one cotton pad with a tube. Attach another one to it, attach it not too tightly
- Then attach another disc. Shape the petals as you wish
- Secure the petals with glue if there are already enough petals on the flower.
- Secure the bud on a wooden skewer with threads. Or you can glue it
- Wrap the skewer with corrugated paper
There are several ways to paint discs:
Method 1. Dilute acrylic or gouache in water, then soak discs in this solution. Then take out and dry the cotton pads. Once dry, you can add paint to some areas with a brush.
Method 2. Use a brush to paint the cotton pads with gouache.
Instead of gluing, the petals can be sewn with a needle and thread. In addition, you can cope with fixing the petals using a conventional stapler.
Important: If you want your rose to be firm, soak cotton pads in a starch solution before coloring. But in this case, it is impossible to paint by immersion in painted water, only with a brush.
 Roses from cotton pads
  Bouquet of roses from cotton pads
 Video: How to make flowers from cotton pads?
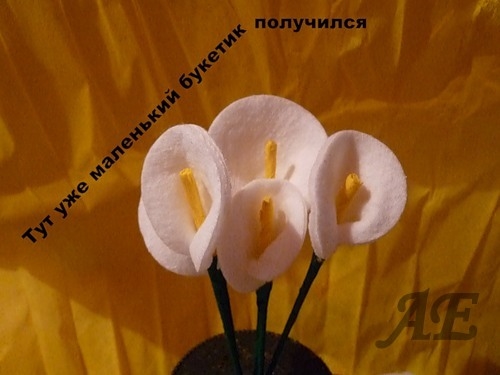
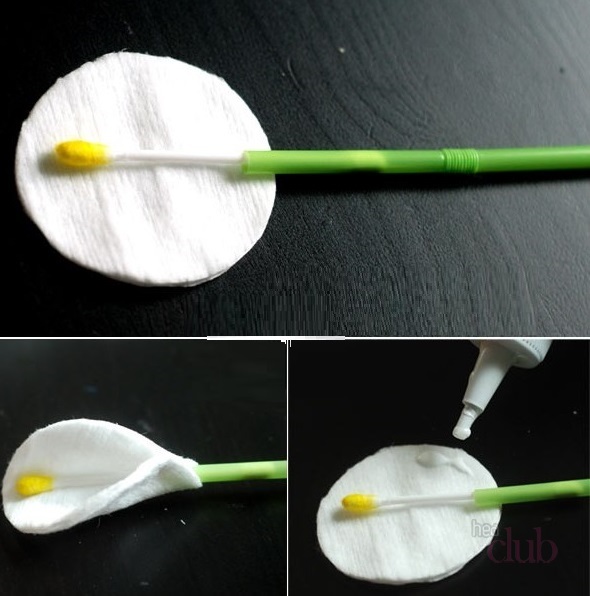
Craft - calla lilies from cotton pads: photo
Calla is a beautiful delicate white flower with a yellow core. Making it out of cotton pads is as easy as shelling pears.
For this you will need:
- Cotton pads
- Cotton swabs
- Cocktail straw
- Green corrugated paper
Preparation method:
- Cut a cotton swab in half. We only need one piece with a cotton head.
- Color the cotton swab yellow
- Insert a dyed dry cotton swab into a cocktail straw
- Wrap the straw with corrugated paper
- Now take one cotton pad and form a flower out of it, glue the edges
- Fix the petal with glue on a straw to prevent the flower from scattering
- You can add paper leaves to the stem
 The process of making calla lilies from a cotton pad
 Many beautiful flowers can be made this way.
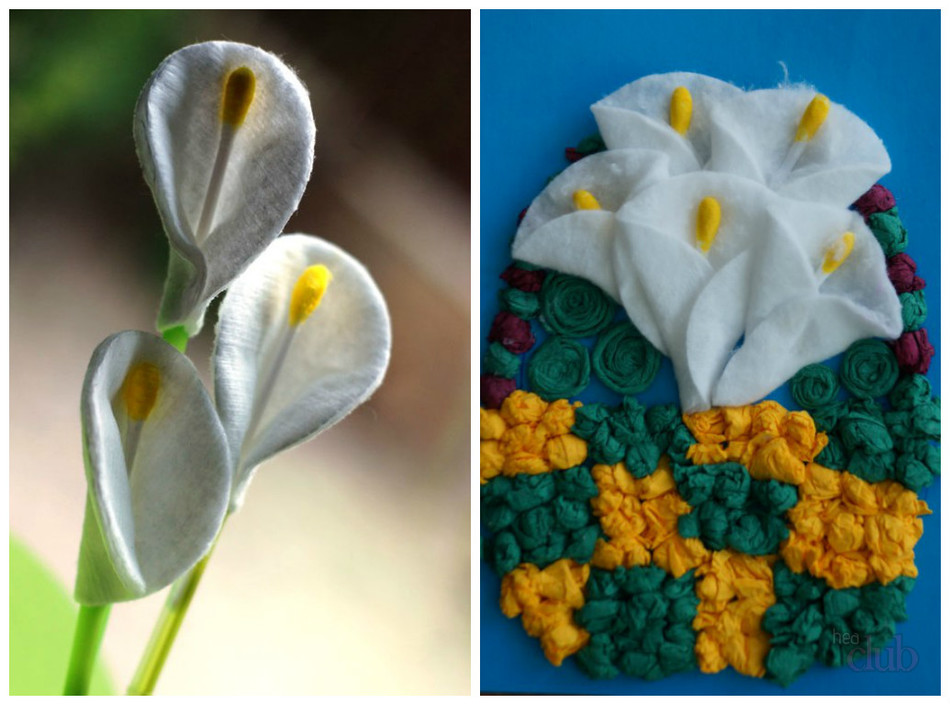 Calla lilies from cotton pads
 Craft - daisies from cotton pads: photo
You can also make chamomile from cotton pads. This is done in several ways:
Method 1:
- Take one cotton pad
- Use scissors to cut the petals, but not completely
- Make a round core out of yellow paper
Method 2:
- Glue cotton pads on the balloon holder, per disc is equal to one petal
- Glue the yellow paper button in the middle. Or you can make a yellow circle out of paper
Method 3:
- The petal is formed by folding the edges
- The core can be cut from yellow felt
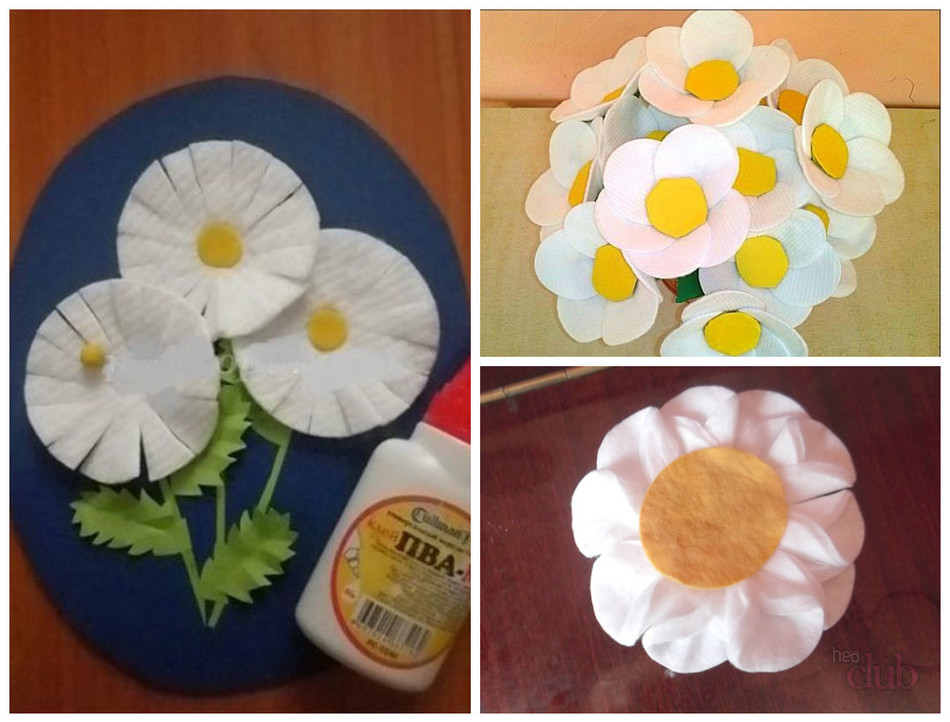 Three ways to make chamomile from cotton pads
 Craft - cotton pads snowdrops
To make snowdrops you will need:
- Colored cardboard
- Scissors
- Markers or green paper
- PVA glue
- Cotton pads
Master Class:
- Cut a snowdrop flower from one cotton pad
- Stick it on colored cardboard
- Then draw the stems and leaves with a felt-tip pen. If there are no markers, you can cut from colored paper
- Cut a few cotton pads in half, make snow from these halves
Children's crafts from cotton pads
Crafts with children is the development in a child of his creative potential, finger motor skills and logical thinking.
You can make simple but cute cotton pads with your children. From two to three years old, the child learns to work with a brush with glue, scissors. Parents or caregivers should monitor the process and help the baby. Crafts from cotton pads for children 4-5 years old are not a problem at all.
Looking at the photographs, you can see that such crafts are an exciting activity for children of different ages.
 Children's craft a snowman from cotton pads
  Craft sheep
 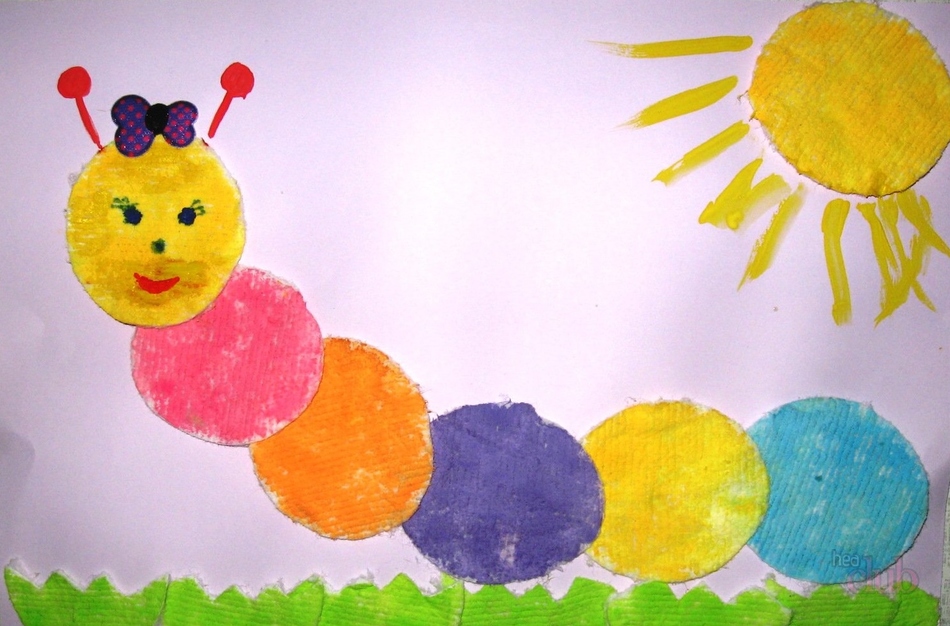 Caterpillar craft
 Craft - a bird made of cotton pads with a description: photo
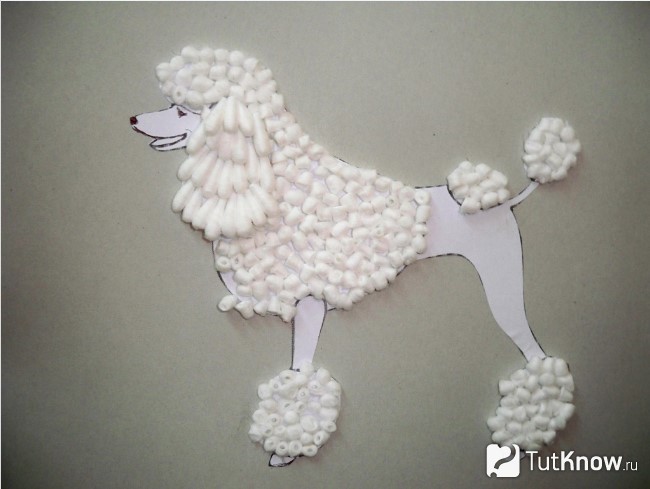
Almost anything can be made from cotton pads that your imagination tells you. For example, a white owl.
Necessary materials:
- Colored cardboard
- A4 sheet of white paper
- Markers
- Scissors
- PVA glue
- Cotton pads
- Simple pencil
Step-by-step description of the craft:
- Draw the silhouette of an owl on a white sheet of paper with a simple pencil
- Cut it out and glue it to colored cardboard
- Cut out claws, beak, and eye circles from black colored paper
- Cut out two more yellow circles, but smaller in diameter.
- Using scissors, cut out two feathers of the corresponding shape from each cotton pad.
- Glue claws, beak, feathers, shape eyes
- Use a black felt-tip pen to add color to the feathers
 Owl made of cotton pads
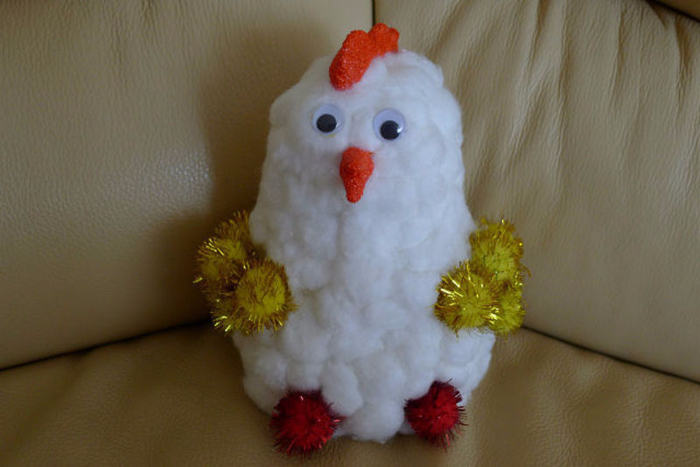
 Craft - chicken from cotton pads: photo
Important: It is convenient to make crafts from dense disks. Discs that are not very dense can fluff up during operation.
It is very easy to make chicken from cotton pads. Photo inspiration ideas.
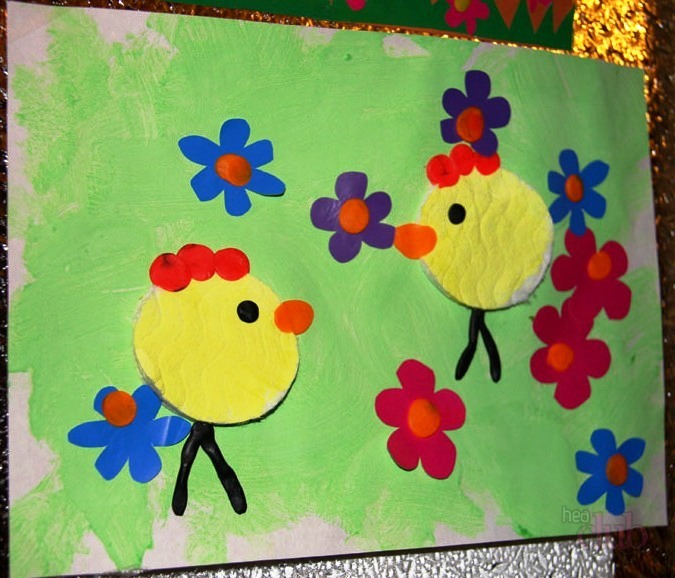 Chickens from cotton pads
 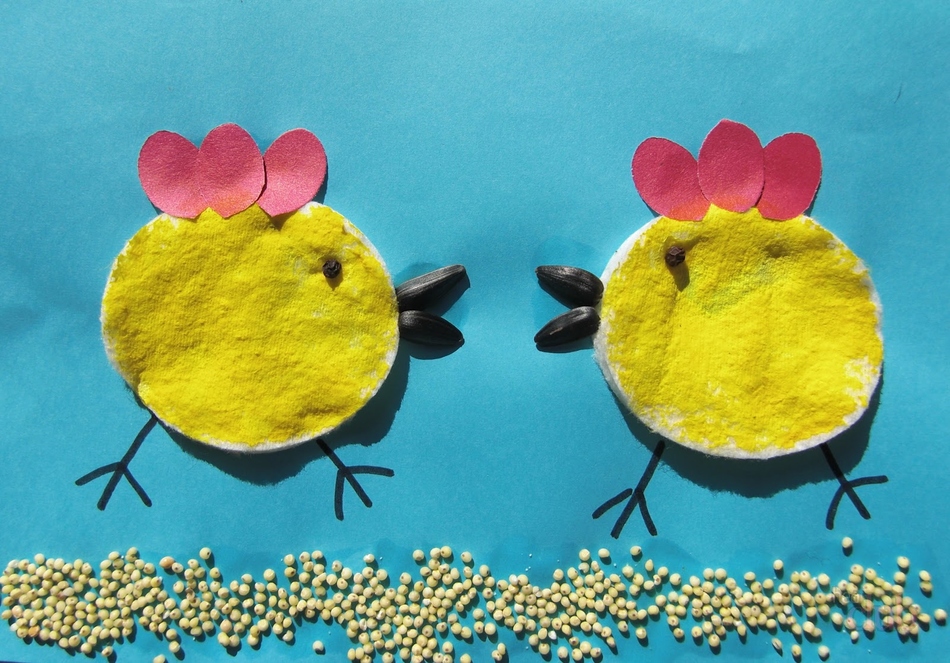 Making chicken out of cotton pads is easy
 Craft - a monkey made of cotton pads: photo
If you have brown paint, you can make a monkey. You can use not only brown paint, but also red, orange.
 Craft monkey
 Crafts from cotton pads on the theme of space: photo
Many boys dream of becoming astronauts. But while they have not yet grown up, you can invite them to make crafts on the topic of space.
Cotton pads in such crafts will be planets. They need to be painted with certain colors. You can also use plasticine or colored paper in such a craft.
 Craft on the theme of space from cotton pads
 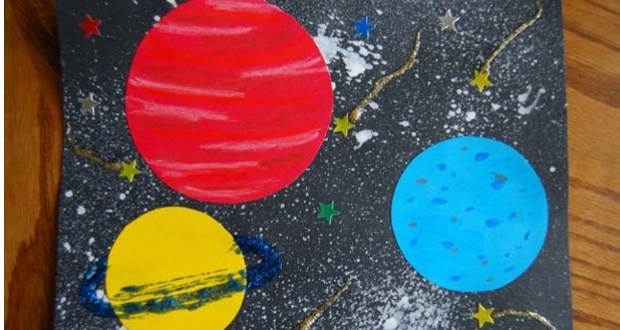 Planets can be made from cotton pads
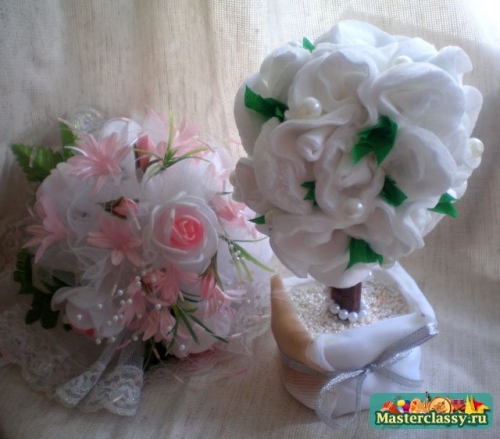
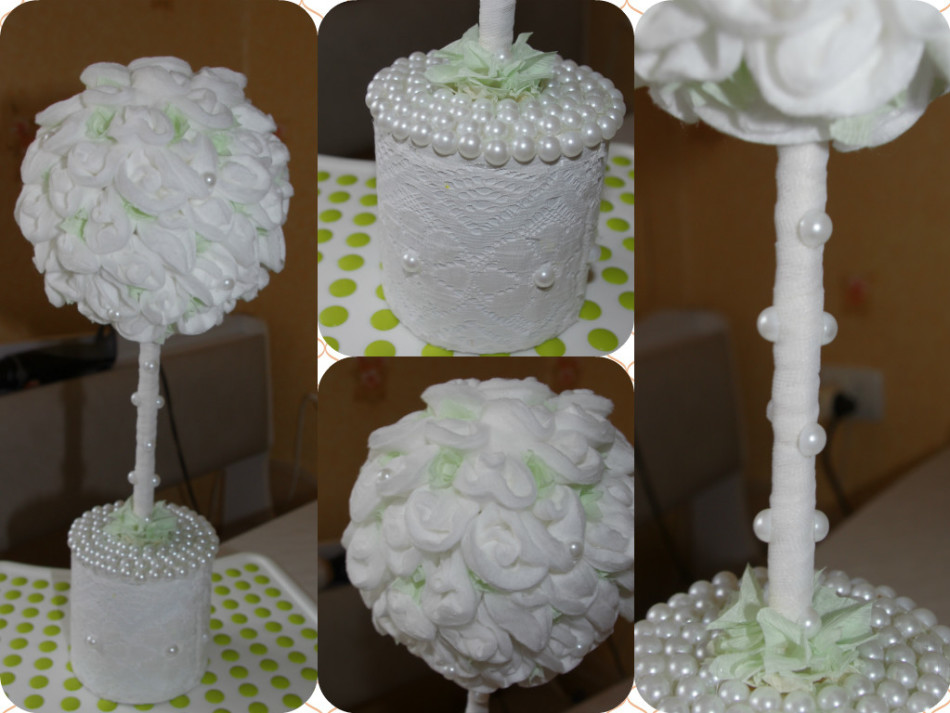
 Cotton pad topiary
You can make great topiary from cotton pads. You don't have to paint the discs, the snow-white flowers will look very delicate.
For beauty, you can add beads, ribbons, sparkles. Such topiary can be proudly displayed to your friends or used as a gift.
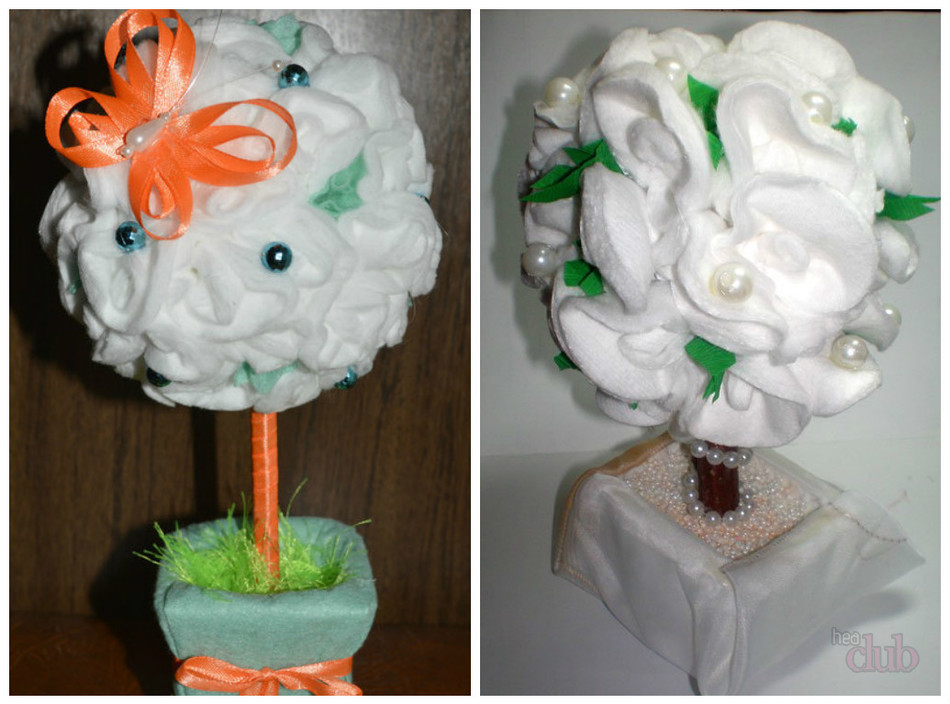 Topiary crafts
 Crafts from cotton pads for Easter: photo
In many families, it is customary to greet the light one not only with painted eggs and Easter cakes, but also to decorate the whole house. Cotton pads will come in handy in this matter.
You can make pendants in the form of eggs. The photo shows pendants made of felt, but felt can be easily replaced with cotton pads.
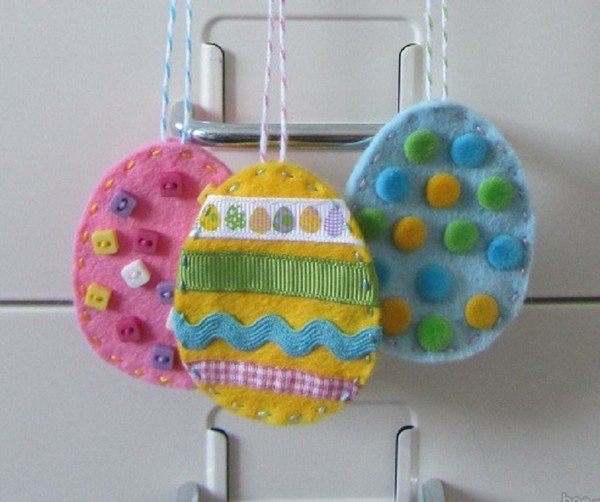 Easter pendants
 Or cute angels.
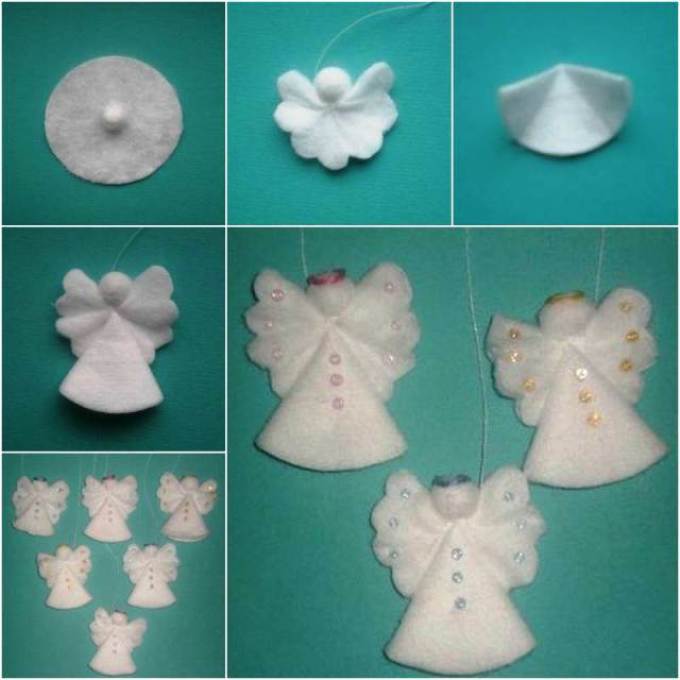 Craft angel for Easter
 As you know, Easter is a spring holiday. On this occasion, you can decorate your apartment with a delicate topiary made from cotton pads.
 Topiary for Easter
 Try to make crafts from cotton pads, it's interesting and exciting.
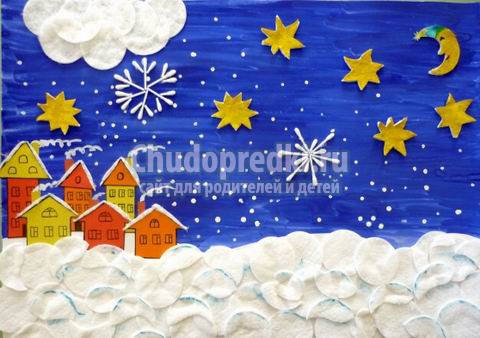
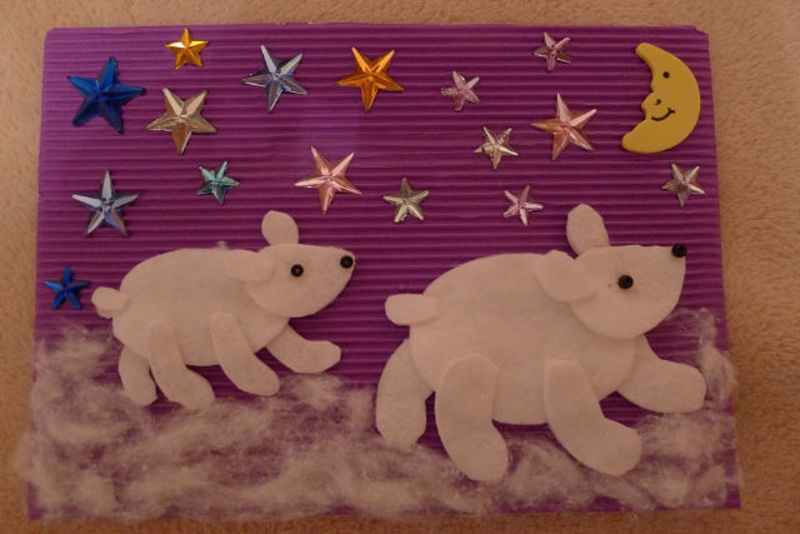
Volumetric application "Winter's Tale"
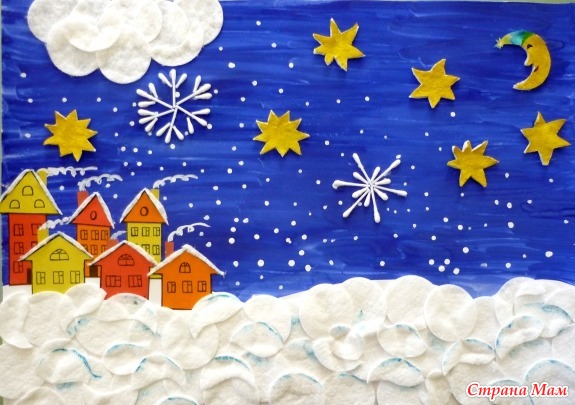
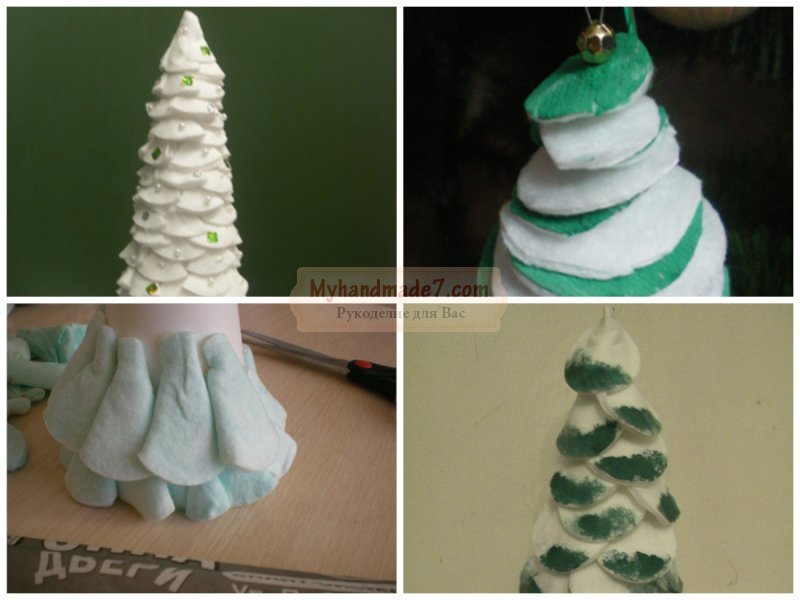
Volumetric application "Christmas tree and snowman".
For making crafts will need: cotton pads, blue cardboard, green gouache, pva glue, self-adhesive beads, snowflakes, blue self-adhesive paper.
First you need to paint cotton pads in green gouache, then roll up and secure with glue.

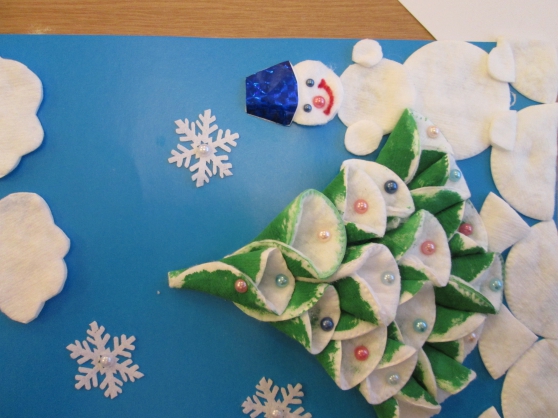
Of the whites cotton pads cut out snow drifts and clouds.
We collect a Christmas tree from green blanks.
Next to the tree we glue a snowman, use beads to make a face, decorate the bucket with blue self-adhesive.
For the sun, we take disk painted with yellow gouache.
We decorate the Christmas tree with beads.
We glue the snowflakes.
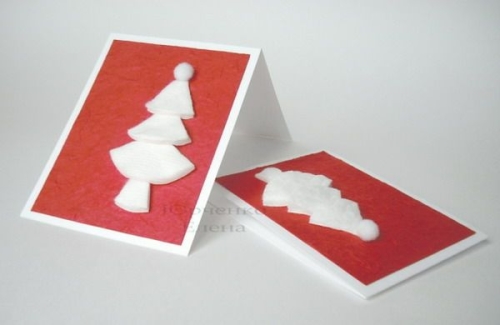
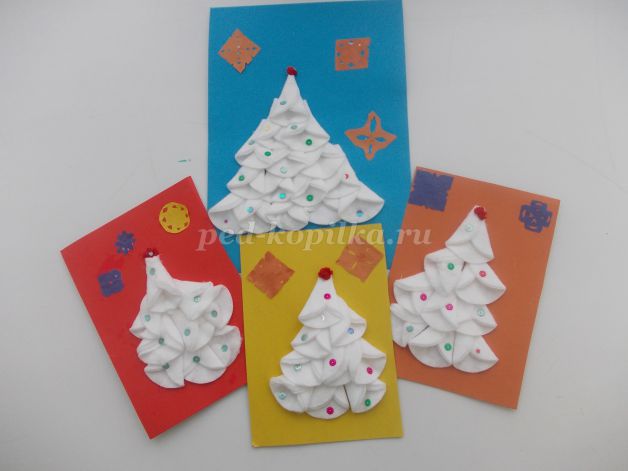
Craft "Bulky Christmas tree made of cotton pads".
The most common type of volumetric New Year's crafts made from cotton pads is a Christmas tree. As a rule, for their manufacture, they take a sheet of Whatman paper or thick cardboard and give it a cone shape, securely fixing the resulting figure with glue. To make this frame more durable, you can glue a strip of braid or cardboard from its inside.
After that, each cotton pad is folded in a certain way - first in half, and then in half again, after which the resulting sector of the circle in the lower part is fixed with a stapler. Such blanks are glued to the frame in a circle, moving from bottom to top and filling all available voids with cotton pads.
This Christmas tree can be decorated different ways- with the help of beads, bugles or beads, spruce or pine cones, satin ribbons and other decorative elements. In addition, it can be covered with multi-colored sparkles, and decorated with a bright iridescent star on top.


Crafts in the form of a Christmas tree from cotton pads can be flat. They are created using a technique that is very common among boys and girls of preschool and school age. For this, the outline of the future tree is drawn on cardboard or colored paper, after which it is filled with folded four-wadded discs and securely fixed with glue.
Such a craft can be designed in the form for your favorite teachers, close relatives or friends. To do this, it must be supplemented with the original text of the congratulation, and, if desired, with such elements as a lock, lacing, and so on.
Unusual ideas for New Year's crafts from cotton pads.
Crafts from cotton pads for the New Year can be very diverse. Garlands and air curtains made of this material are quite widespread. It is extremely simple to make them - for this, it is enough to string cotton pads on a thread or fishing line and fix it as you want. These garlands look especially good on windows, as they create an imitation of snowflakes.
You can also make greeting cards for family and friends from cotton pads. In this case, they are glued onto sheets of cardboard, creating various shapes, for example, a snowman. The resulting postcard is supplemented with the text of congratulations and handed over to the addressee.
"Winter City" from cotton pads.
You will need:
- Blue cardboard - 1 sheet
- Cotton pads - about 15 pcs.
- Sequins (snowflakes) - 5-7 pcs.
- Scissors
What to do:
- Draw a tree trunk with branches on the right side of the leaf.
- Cut out colored paper and windows. Stick them on.
- "Fill" the houses with snow - glue cotton pads at the bottom to make snowdrifts.
- Do not forget to glue the snow caps on the tree branches as well.
- The final touch is the falling snow in the form of sequins. If they are not at hand, cut them out of colored paper or foil.

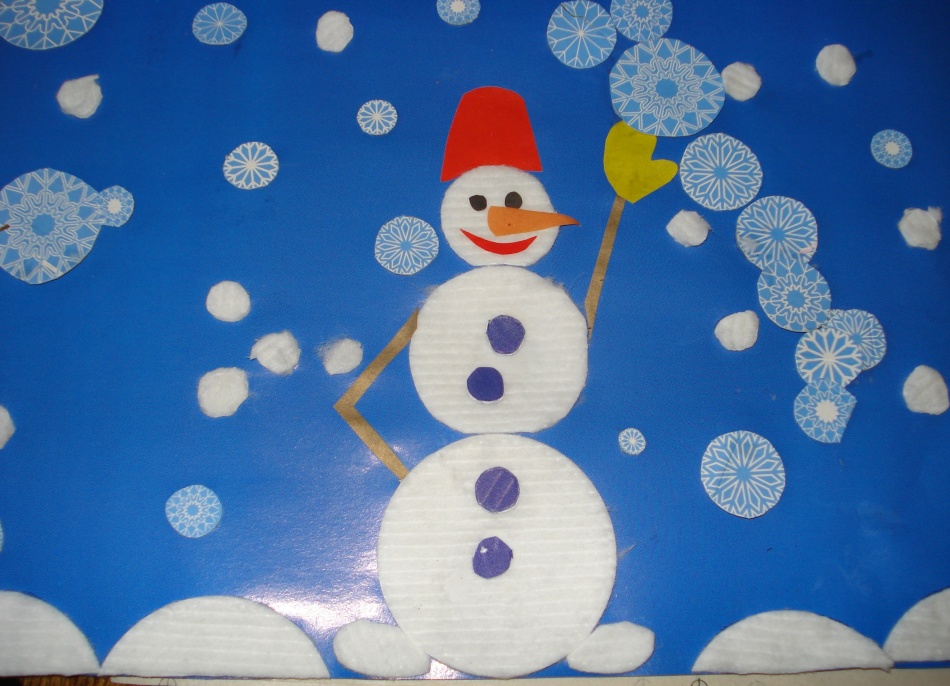
"Snowman in the forest" from cotton pads.
You will need:
- Blue cardboard - 1 sheet
- Cotton pads - about 15 pcs.
- Colored paper - yellow, red, orange, blue
- Sequins (snowflakes) - 5-7 pcs.
- Scissors
What to do:
- Draw a branchy tree on the right side of our base sheet.
- Glue cotton pads at the bottom of the work to create drifts.
- Do not forget to glue the snow and on the tree branches.
- Cut out the details of the snowman from colored paper: a scarf, a hat, eyes, nose, mouth, stick hands. The mouth and hands can simply be drawn with a felt-tip pen.
- Use two cotton circles to "blind" a snowman. Glue body parts and clothing to it.
- Glue sequins in the form of snowflakes - and then you will have real snow: bright and sparkling!


"Christmas toys" from cotton pads.
Cotton pads can also be used to create unique Christmas tree decorations. To do this, they are also folded in a certain way and fixed with a stapler, and then glued to a previously prepared frame. In addition, a ribbon or string must be attached to such a decoration, with the help of which it can be hung on the New Year tree. In this case, the frame can be made independently, or you can use a suitable object for this. In particular, the ping-pong ball looks very original, the surface of which is filled with folded cotton pads and covered with sparkles.

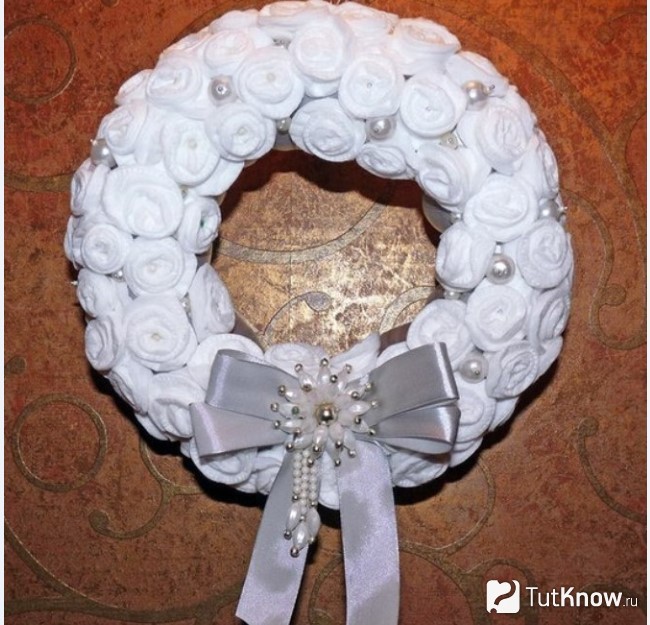
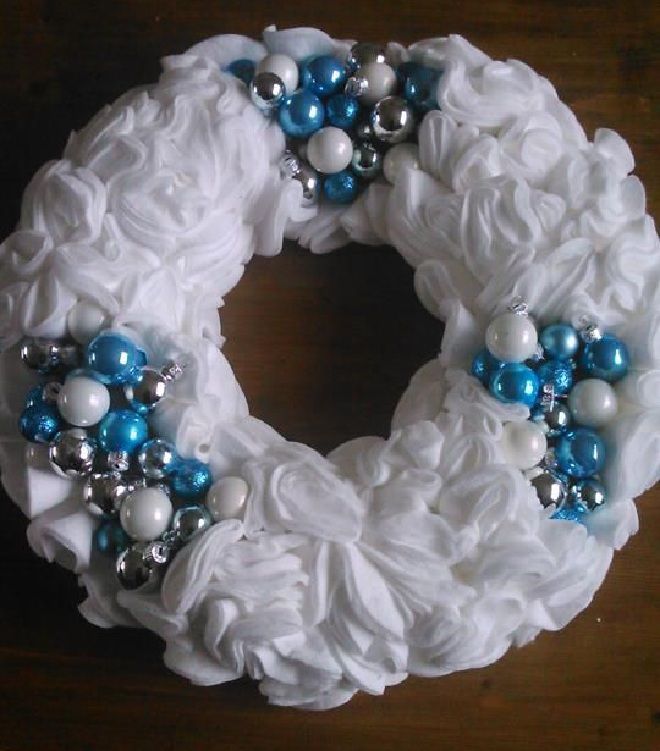
"Christmas wreath" made of cotton pads.
Such a New Year's gift wreath can also be made from cotton pads. First, you need to prepare the foundation. This could be a large foam or rubber ring. If you do not have such parts available, then fold several newspapers, gluing them to each other, give the desired shape. When the workpiece is dry, glue the elements from the cotton pads. To make the first, roll up the disk in the form of a bag, wind the second, third on it. Thus, you will get a rose twisted by your own hands. In the center of some flowers, you can glue a bead or sew it on. Glue the roses to the base of the wreath, placing them close to each other. Fill the gaps with large beads, decorate the New Year's wreath with a large satin bow.
"GIFT TOYS" from cotton pads.
You will need:
Cotton pads
Thread or tape.
1. Fold all the desired cotton pads into quarters and add glue to the tip of the resulting shape.
2. Glue 4 folded cotton pads together. Glue only the tips, not the entire shapes. Let the glue dry.
3. Bend the glued parts to form a half ball.

4. Repeat steps 1-3 to make the other half of the ball and glue both halves.
5. Connect the resulting cotton balls to each other by gluing to the frame of the toy.

"Cockerel" from cotton pads.
You will need:
- Plastic spoon - 1 pc.
- Cotton pads - 2 pcs.
- Colored and white paper
- Scissors
What to do:
- Cut out the wings of a cock from white paper and glue them to a disc.
- Place a spoon on top and glue another one on top of it so that it matches the "back".
- Cut the beak and comb out of red paper, glue them on the bird.
- Use black marker to paint on the eyes and feathers.

"Unusual Christmas tree" from cotton swabs.
For the New Year's holiday, you can decorate any corner of the apartment with a variety of subjects. For example, a panel with an elegant herringbone, which will be a highlight and decoration.
To make the craft beautiful, you need to stock up all components: with cotton swabs, the quantity cannot be accurately determined, so it is better to stock up on several packages; cotton pads; a sheet of cardboard of the selected size; nippers; paints and glitters; sparkles of silver and golden shades and thin ribbons of green and white; white plasticine and PVA glue; pencil and brush; ruler, compass; paper clips, a stapler and scissors.
Herringbone, appear!
On a sheet of paper, it is necessary to mark the boundaries of the tree - draw a triangle.
Stick the plasticine on pieces of cardboard, and the thickness of the first should correspond to about 2 mm, so that the sticks can be securely held in it.
The cotton swabs should be prepared for work by cutting off the pieces with cotton wool with pliers and leaving about 5 mm.
Now the latter should go to the plasticine with the part up, where the cotton wool is.
There should be practically no gaps between the elements. Now the cotton bud tree should look voluminous, a green ribbon will help with this. The border of the fluffy beauty should be covered, preferably several times, fastening the ends of the ribbon at the top with a beautiful bow or leaving the ends long and twisting with scissors.
With the help of a brush and paint, it's time to make colorful bright balls on the tree.
And the tree itself will not hurt to give it its natural green color.
When the paint dries, you need to apply multi-colored glitters to the balls.
If the panel bends, then on the other hand, using a stapler, it is better to add another sheet of cardboard. The top and bottom are connected with clips, and so that these parts are not visible, cotton pads are useful, which are divided into 2 pieces and cut, and then glued with an overlap, covered with glue, and sparkles on top. Then all panels can be covered with glue and sprinkled with small beads to match the color of snow or coconut flakes, semolina.
New Year's crafts made from sticks are unique snowflakes, decorations made of serpentine, satin ribbons, foil, cones, Christmas tree decorations. There can be many ideas.

Gift applique "Animals" from cotton swabs.

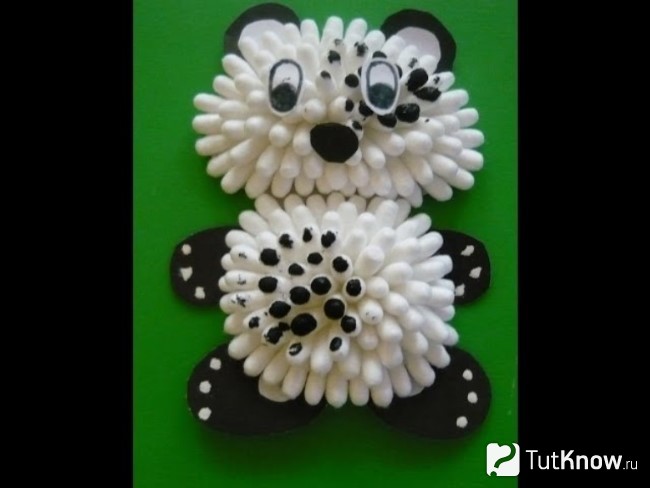
"Pando Bear" from cotton swabs.
For crafts you need the following:
- cardboard;
- black and white paper;
- cotton swabs;
- white plasticine;
- glue;
- black paint.
From cardboard you need to cut a panda with a round head and body, two ears and four paws. Attach this blank to black paper, outline, cut; and from the white sheet - the inner part of the ears.
Glue the black blank onto the cardboard, and the white one for the ears in its place. Cut out the claws from paper of the same color, attach them to the paws with glue.
Have the child knead the plasticine and stick it on the panda's face. Now you need to cut off the cotton swabs and stick them into the plasticine. Decorate the work from the outer edge, gradually moving to the inner edge. The belly of the beast is decorated in the same way. To make the panda look like a real one, you first need to dip a few cotton swabs in black paint, use them to make spots of this color on its body.
The oval eyes are cut from white paper. Draw pupils and borders on them and glue them in place.
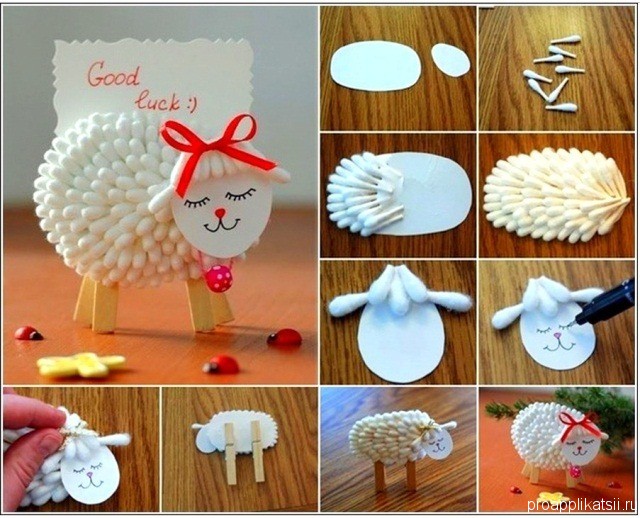
"New Year's snowflakes" from cotton swabs.
You will need:
- Cotton swabs - 1 pack
- Album or cardboard sheet
- Simple pencil
- Scissors
What to do:
- Take a blue base sheet and draw rays on it.
- For the finer details of the snowflakes, cut the cotton swabs into halves.
- Lubricate the drawn lines with glue and glue the resulting segments to them so that the cotton tips are located from the center.


Psychologist-consultant Statsenko L.V.
 How to put a melody (ringtone) on a call for ZTE Blade M, L4, V956, v815w Download ringtones zte
 How to put a melody (ringtone) on a call for ZTE Blade M, L4, V956, v815w Phone zte 320 how to set a melody
 How to hard reset on LG Optimus L5 and similar Lji androids