Search programs for windows 7. On this page. Indexing Options and Windows Search Services
Moving from Windows Vista, searching in Windows 7 only becomes more convenient and does not contain any special surprises. This cannot be said about many Windows users XP, who are just discovering day-to-day work in the system with such a convenient tool as Instant Search. Searching in Windows 7 is really easy. But, as with any search, the goal is to find what you need, and this can sometimes be difficult. With this article, I begin my story about how search works in Windows 7, how to set it up, how to search, and most importantly, how to find it.
Reset recent documents
To restore it, click right click Click Start and open Properties. Click "Configure" and select the "Recent Documents" checkbox.
Share your data with home computers

The new Residential Group feature lets you share your music, videos or photos among all the computers in your home with just a few clicks. Only limitation, to take advantage of this function, different machines must be equipped with 7!
On this page:
How search works
You've probably heard of an index, a collection of files that contain a variety of information about files and documents stored on disk. When you use search, it is the index files that allow you to quickly display the results. The index includes various properties of files, and this is not only the path, name or size. For example, for MP3 files, all tags are indexed - from author to bit rate. Office documents have data indexed, which can be seen in the file properties on the tab In detail, document content, and so on. If this search is new to you, I recommend reading a couple of Help articles for background information and searches. Minimize all windows, click F1 and in the field Search Help enter ... Search.
To create home group, open "My Computer" and enter "Group" in the search bar. Click Residential Group and check which items you want to split. The files to be merged are the files that are in your libraries. The password is automatically generated. To join a residential group, simply click Join in the Residential Group menu.
Of course, you must enter the password first! 
This mode allows you to view all files in a category on your computer. Just click "Music", for example, to browse your disco. In the upper right corner of the window, the Arrange menu allows you to change the display type. For music, you can browse by title, artist or album, and images by month or day.
Indexing happens all the time - if you add, delete or change a file in the folder, it will be immediately reflected in the index.
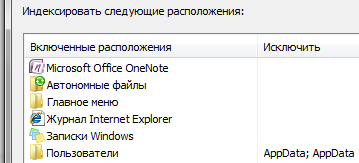
The screenshot shows the locations that are indexed by default. Therefore, if you store your documents somewhere in F: \ Documents, they will not be included in the index and quick search will not be found - they must be added to the index separately. Setting up a search will be discussed below.
To add shared items to your homegroup, open the folder you want to share. In the upper left corner, click the Share menu. You can define a share as read-only, that is, other members of the network will not be able to modify the contents of the folder, or, conversely, allow read and write access.
Right-clicking a folder allows you to quickly add it to the library by choosing Include in Library from the pop-up menu. "Create New Library" opens a new library with the folder name. This will simplify your subsequent searches. In fact, the opportunities offered operating system to quickly identify items that meet certain criteria are so broad and well-defined that they are likely to meet a wide variety of needs. We intend to continue exploring the subject by providing new ideas.
Search and indexing settings
To be honest, the standard search settings are quite good, and most users do not need to change anything in them, especially if documents and files are stored in standard folders. To customize your settings, open the Start menu and search for search parameters.

The selection menu that appears just below the search box gives you access to some interesting filters. For example, searches can be based on author, document type, or last edited date. By selecting the "Last Modified" filter, you can specify a date range that allows you to find files that have changed over a specific period.
Using a size filter: you can find all files occupying a specified space. However, it is strictly forbidden to prohibit the use of operators other than the standard ones. To make a specific example, the operators shown below the search box in the System Directory "Documents" are different from the operators shown in "Pictures" or "Music or Videos". For example, in the Music folder, you may notice that the default is Operators, Artists, Genres, and Album Duration.
So at ease we used one of the possibilities Windows search 7 - quick access to control panel items from the Start menu.
Change search options for files and folders
I will not duplicate the parameters, which are perfectly visible in the screenshot.

Pay attention to the following points:
It is also worth noting that verbose operators must be entered in full, without any space between one term and another. Also, after the two dots sign, you must not leave space. Obviously, you can always combine multiple operators.
In fact, the operating system always monitors all changes that occur to the contents of the indexed directories and maintains a database that reflects the contents of the index. To find out what indexed content is, simply enter your indexing options in the Start Programs and Search Files boxes. By checking the appropriate boxes, you can specify other folders whose contents you want to include in the index.
by default, folder search searches all subfolders
in non-indexed places, only file names are searched, and compressed files are ignored
you can use language search, i.e. compose search queries in a more fluent language - for example, video last week(there will be a lot of unexpected results mixed in here, especially in localized versions)
By marking the various fields, you can also add the contents of the indexes to the index. If it does not exist, it must be added manually by clicking the "Edit", "Add" buttons. Once installed, the system has a built-in feature, but it is slow and more often than not it doesn't find what you need.
Finally, so. you will be able to specify many of the search terms you want. It replaces the existing search engine, it is used for quick and advanced searches in files stored on your computer, such as documents, Email, photos, etc. He contains detailed settings for the whole indexing and searching process. It searches for multimedia files, pictures, messages and letters, contacts or documents of various formats. It indexes content in over 150 file types.
Indexing Options and Windows Search Services
There are many more options you can tweak here. To add folders to the index, click Change.
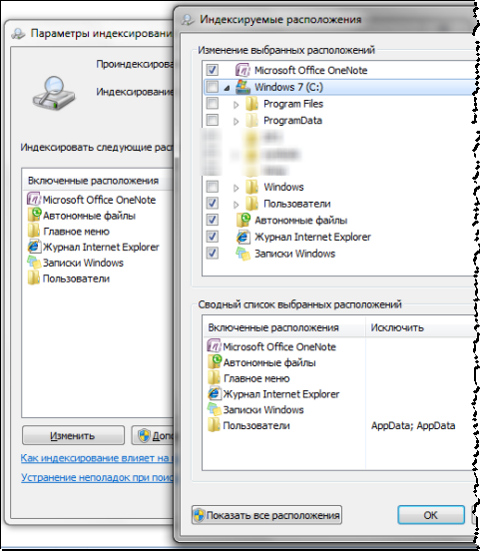
Windows and Program Files folders are not accidentally excluded from search - they will greatly increase the size of the index, and practical use will be small. Programs can already be found by searching in the Start menu - after all, the main menu is indexed by default.
You can search by file or its contents. Allows you to open a window based on the found document and display the first occurrence of the search query. Once downloaded and installed, the content hard disk indexed and search is ready to use. Hard Drive Search and Statistics 2 - Free Software This search system scans your drives, folders or files according to one or more specified keywords. It will display the entire list of found files, and you need to open the file in the appropriate program or internally.
By clicking Additionally, you get access to two groups of settings:
indexing technical parameters
indexing options for file types
In the first one, you can add encrypted files to the index, rebuild the index (which you may need in case of problems), and set a new location for it.
It contains recursive search, filters to find files by file, and supports wildcards. Results can be judged according to their relevance. Search for information within files. It also contains information and instructions on how to structure your search query so you don't need to open the files. It contains a lot of work.
There is also an extended version that is no longer free. The search is already in progress at the time of word assignment. The problem is that it doesn't index the file or disk exchange, remembers them and looks for them right after connecting. How and what to index, you choose in the same setting as the indexing interval. You can search not only by keyword, but also by last modified attributes created, last available, or file size. It has minimal system rods and simple controls.
For the file type (extension), you can:
include or exclude it from the index
determine if only properties will be indexed or also content
add new extension

For example, if suddenly your exchange client instant messaging preserves history in text files with the LOG extension or you just need to analyze the logs, their contents will not be indexed by default. But you can easily customize the search - just type on the keyboard log to move through the list of extensions and enable content search.
Indexing takes a few minutes and the results are saved in four files. The application is minimized to the tray tray. Users can also view views of the files found, so there is no need to launch applications to open them. You can assign keywords for each file, be it a photo or Text Document which, in simple terms, defines the contents of the file. These keywords allow you to more efficiently organize files on disk, rather than make it difficult to navigate to folders and subfolders.
How to search
When starting a search, it is advisable to immediately imagine whether the search object is included in the index. As I said above, the index covers the user's profile - libraries, files, etc. This is where you can find the files you need relatively easily.

But if you open the main search window and expect to find something in the Program Files or Windows folder, you may even get the impression that “the search is not finding anything” - after all, only the results from the index are displayed. We'll talk about searching in non-indexed places later, but now let's look at the general search methods in Windows 7. You can search for:
You can assign keywords to files in several ways. The easiest way is manual assignment. Just right click desired file, select Properties from the menu, and click the Details tab. Then click on an empty space for keywords to see the Add Keyword window. Then you can enter any number of words that characterize the file. It doesn't matter if they are case sensitive or not.
You can assign words to multiple files at the same time. In the lower part of the window, information about the marked files, including keywords, is displayed in the information line. The input method is the same as in the previous case. If you have an explorer open, you can directly enter any expression in this search box. You can also use keywords: just enter the keyword parameter in the search box: and then some words that you assign to the files. For example, to find tagged photos of a holiday, you can enter the keyword: vacation.
from the start menu
in the main search box
in libraries
in other windows of the explorer - folders, dialogs "Open" and "Save As"
Search in the Start Menu
When you search from the Start menu, the search results show not only files and documents, but also programs and Control Panel items. Now you can safely part with the habit of the times of Windows XP - careful sorting of applications in the menu Programs... It is enough to enter the first few letters of the program name to find it. This is much more convenient, especially if you have a lot of programs installed.
Please note that other search options are automatically offered to you. You can also use the search box in the Start menu, which works in a similar way. If you are not satisfied with the quick search results displayed in this menu, you can see more results by viewing more results.
In the upper right corner of each library, there is an "Arrange By" item where you can choose how to sort your files. The menu also contains a Tag item that displays a list of available keywords. Click on the appropriate item to view all files for which the corresponding keyword has been assigned. It is also convenient to sort files based on keywords. This is especially useful when you have dozens or hundreds of files in one folder. Then right-click the pane with individual columns and then select the menu to select Keywords.
If you use portable applications, just add their shortcuts to the% appdata% \ Microsoft \ Windows \ Start Menu \ Programs folder (you can create a subfolder for them). In the search results, they will appear in the group Programs.
In Windows 7, search results in the Start menu are very conveniently grouped, and the number of results in each group is immediately visible - this is an improvement over Windows Vista. As you can see in the screenshot, search by word word finds not only applications Microsoft Word and WordPad, but also offers results in other groups.
Now you can sort files by keywords, just like you used to sort by file names. If you are importing photos or videos directly from a camera, or mobile phone, you can also use bulk options for your keywords. When you connect a device or media, the AutoPlay dialog box appears, select Import Pictures and Videos. After a while, you will see the option to assign keywords to all imported files.
For example, this is useful for holiday photos, for example, when you assign a word to a holiday, for example, to all files. This documentation has been archived and is no longer supported. When a large number of files are stored in different folders or on multiple computers or devices, finding and managing files can be difficult. The help in this regard is the libraries. Generally speaking, libraries are a way of displaying files with common characteristics, even if they are in different locations.

The Start menu displays several results for each group, and clicking on the group name opens a search window with all the search results in the group.
Search in the Start menu is good when you have an idea of the name of a file or its contents - the first 5 - 10 results are visible immediately, and you don't have to go far. In addition, the Start menu is indispensable for quickly accessing programs and Control Panel items using search.
The Libraries feature allows you to view, organize, manage and search for files without having to arrange them in specific folders. Libraries make it easy to find multiple file locations at the same time. You can even organize and display files in libraries by some metadata. For example, the Arrange By: Month or Arrange By: Day view in the Image Library allows you to group photos at the same time. The video library allows you to sort files by length - you can separate shorter video clips from longer ones.
Main search box
An empty search box can be opened by pressing the keyboard shortcut WIN + F... In my opinion, it has somewhat lost its meaning, since it no longer contains advanced file search capabilities. Searching in explorer windows practically displaces it from the system. It seems to me that links to help on using search or a link to this article could brighten up its dull look.

However, the main search box still carries a payload. It opens with search results by typing a query in the Start menu and clicking on the name of a search result group, or by See other results right above the search field.
Libraries
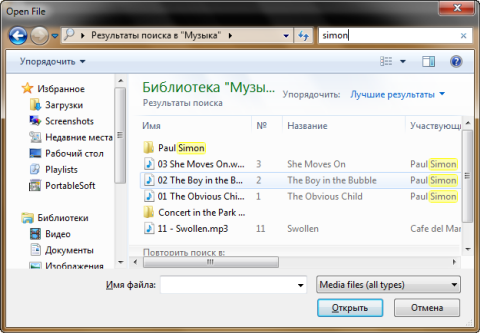
Now I will explain why I split the search in libraries and other explorer windows. Pay attention to how the search results in the library are displayed. They match the look of the files in it and are very well perceived visually. For example, for music files, album art, large song title, size are displayed, and there are also “music” options for organizing the results. This is a property of all libraries, which confirms the thesis - Windows capabilities 7 is best used together. In this case, it is a library search, which has other advantages as well.
This is what a simple query search in the library will suggest. Music.

While in Explorer, you can organize your search results by the available file properties. The default display order is top scores, but, for example, you can sort your music files by album or genre. This feature is available alongside the traditional sorting and grouping tools of Explorer (although the latter may be new to migrants with Windows XP).
In this case, the results will display several songs from each album. You can watch all the songs on the album, and then "fold" it if the desired one is not there.
If you don't find the file you want in the current folder, you can search again:
Other explorer windows
In folders and libraries, the search field is the same as in the main window. But do not forget that the same option is available in the "Open" and "Save As" windows, which are used even by those who prefer alternative file managers.
Searching in folders is more convenient when you know the approximate location of a file or document - in this case, you will not get lost in the results. In addition, this method is useful when it is known for sure that the file is not in the index. Finally, in the "Open" and "Save As" windows, you can use the search to quickly filter the contents of a folder.
I'm sure you have already tried simple queries search and, perhaps, they completely suit you. However, sooner or later you will need to find the file, and a simple query will not help you. Next, I'll show you how to use the advanced search capabilities of Windows 7 to find the files you want.
What's New in Windows 7 Advanced Search
To master search, of course, you need to practice using its capabilities. In the articles on Windows 7 search, I will provide a number of examples that you can easily reproduce on your own.
If you are migrating from Windows XP, everything will be new to you in your search for Windows 7. Compared to Windows Vista, Windows 7 looks like:
Search filters
When the name of the file or the subject of the document is approximately known, it is usually not difficult to find the desired file - you just enter a partial or full request into the Start menu search. But this information is not always deposited in random access memory of the brain, and it is simply often required to set special search conditions - size, modification date, or author of the file. Windows XP had Search Assistant, Windows Vista had Filters.

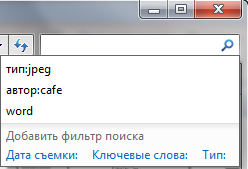
At first glance, there is nothing that visually stands out in Windows 7. In fact, the filters have not gone anywhere - they just become visible when you position your cursor in the search field.
To see more filters, expand the search field - place your cursor on the separator between the field and address bar and pull to the left.
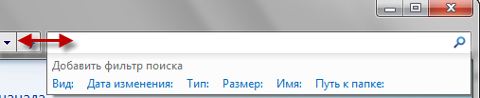
In the screenshot, you can see the standard set of filters in the main search window.
Hints
Your search queries are remembered if they were entered:
to the search box
in explorer folder or library
in the start menu (assuming you navigated to the results and not just open the file)
These prompts annoy some users, and they tend to turn them off immediately. And, in my opinion, they do it in vain. The tips remember not only search queries as such, but also filters search that you asked - for example, the size or date the file was modified. The hints are very handy if you want to use the full power of Windows 7 search. The old condition can be easily changed to match the current query, and it is faster than retyping it. And an unnecessary hint can always be deleted - just select it (with the mouse or cursor) and press Delete on the keyboard.
As I said above, the new features in Windows 7 are better shared. The link between search and libraries is not only in the display of results, but also in the formation of search terms. In the next part of the article I will cover:
using filters to search libraries and mail
search in Internet Explorer 8
search in non-indexed locations
search operators
Good afternoon friends! Today we will continue our lessons with the operating room Windows system 7 and find out one more secret - how to properly configure and search for files in windows 7.
It would seem, what's wrong with that? A search engine, he is a search engine. I switched to 7 about a year ago. And to be honest, in XP I tried not to use the built-in search engine. Absolutely inconvenient. And what is needed either does not find, or finds, but the process is sometimes delayed for several hours.
I didn't really expect anything from 7. But, just the other day, this OS pleasantly surprised me. I needed to search for one file in Windows 7, I didn't remember its exact name, but I typed part of the name .. and got my file in less than 2-3 seconds. Now I use only the built-in search engine.
Indexing Service in windows 7
Microsoft developers did a pretty good job. The search tool of 7 compares favorably with previous operating systems of this family not only in quality, but also in search speed.
My favorite browser is Chrome, and its search engine is very similar to that in Windows 7. Search starts as soon as you enter the first characters. In addition, there is a hint system based on the history of previous requests. If there are too many results for a search query, the system suggests using dynamic filtering by various criteria - date, file size, type, etc.
The basis of such an effective work of the OS search engine is a special indexing service. It runs together with the operating system, runs in the background, and creates a special database of information about files. Updating and restoring the index in the event of any failure also occurs automatically, without user intervention.
It should be noted that the OS allocates a certain system resource for the operation of this service. For the service to work efficiently, but not to the detriment of other programs, it must be configured correctly. We will definitely talk about this today.
Instant file search in windows 7
The 7-ke provides two ways to instantly search for files.
- 1. We are looking for using the "Start" menu... Click on the "Start" button and at the bottom in the search field enter the required search query... For example "Christmas trees".

In the process of entering data, the search results will be displayed directly in the "Start" window. It should be noted that the search is also carried out on the contents of the files.
If there are too many results, and you would like to see them in more detail, click on the button “See other results”.

The Search Results window will open. The files are already sorted by type and the search query is highlighted in yellow.
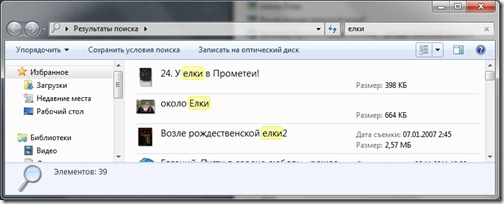
You can narrow down your search. To do this, scroll the list of search results to the very end.

And in the "Repeat search in:" section, select the appropriate option.
If you assume that the file you are looking for is in the OS Library, then select this option.
If you know approximately in which folder to search, select the "Other ..." option and specify a specific folder to search.
If you want to search the Internet, then click the “Internet” button.
If you want to repeat the search on the entire computer, then click on the “Computer” button. By default, the indexer traverses all files except OS system files and program files. This improves search speed and reduces the size of the indexer base. and it's true how often we look for system files? Not often, after all. By choosing the "Computer" option, the system will repeat its search, but only more thoroughly and accordingly will take a longer period of time.
- 2. The second option for instant search is a search in the “ Windows Explorer”. The principle of operation is about the same.
Configuring the Indexing Service
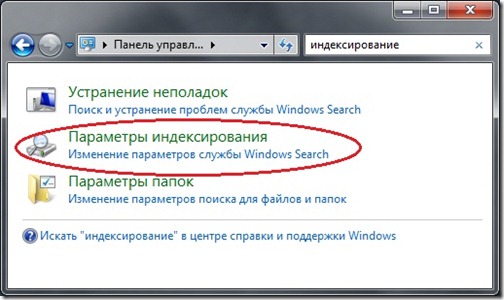
- 1. Go to "Start" -> "Control Panel" -> then enter "indexing" in the search area -> select the "Indexing Options" section.
- 2. In the window that appears, you will see all the folders in which the indexing service is running. If you want to exclude a folder from the search (for example, you know that one of the partitions on your hard disk is used for Reserve copy, then it, in principle, can be removed from this list), click the "Change" button.

And uncheck the box next to the folder that you want to remove from the search engine. Then click the "OK" button.
- 3. Next, click on the "Advanced" button. In the window that opens on the "Indexing Options" tab, uncheck all two items. In 99% of cases, we do not need these functions, and therefore there is no need for additional load of the indexing service.

- 4. If you want to transfer the index base from the system partition hard disk to another partition in order to free free space on disk, then for this you need to specify a new folder in the Index Location section on the same tab.
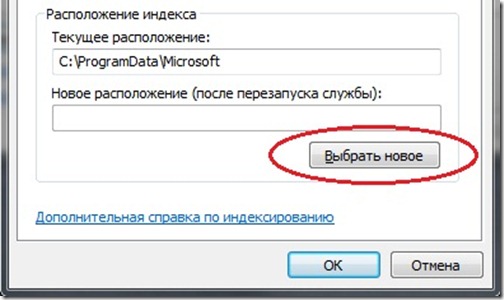
Remember to restart the Indexing Service or simply restart your computer to successfully change the location of the indexbase.
- 5. Next, go to the "File types" tab and edit the list of file types, leaving only the most essential ones (with which you work). Thus, you will significantly reduce the load on the system. By default, the Indexing Service processes almost all of the file types that it uses.
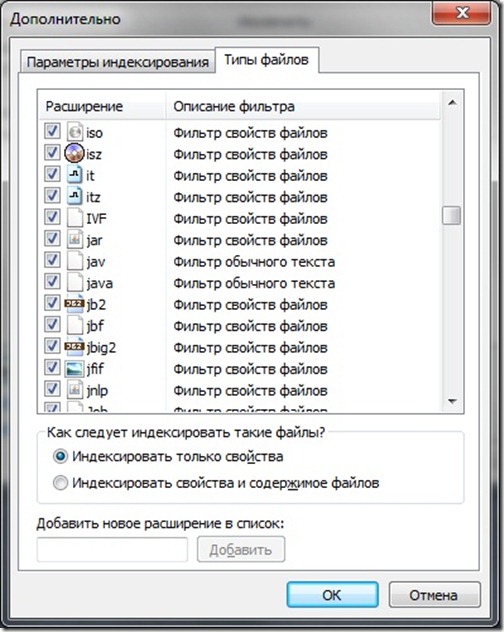
- 6. Finally, decide on how the indexing service handles files.
If you select “Index only properties”, then the indexer will only process the file name and its metadata (size, type, creation date).
If you select the option “Index properties and contents of files”, then the complete processing of the document will be performed, including its contents. This will take longer and require additional system resources, but will increase the likelihood of search accuracy.
It's up to you, my dear Reader.
- Then click "OK" and "Close".
Today we looked at the features of the Window 7 search service and how to configure it. In the next article I will share with you another interesting tool (albeit from a third-party developer) that allows you to search adapted to the Russian-speaking population, taking into account declensions and cases.
 Wireless Charging Smartphones A5 Supports Wireless Charging
 Why do not MTS sms come to the phone?
 Why do you need a full factory reset on Android or how to return Android to factory settings