How to draw a dotted line in Photoshop. Dotted line in Photoshop Photoshop how to draw a dotted line
Life hack how to create a dotted line in Photoshop- Every second PC user is familiar with Photoshop. For many users, this is exclusively a program for editing photographs, however, using fotoshop it is possible to depict drawing elements.
If there is a need to create a dotted line, then you should use a good and faithful assistant to the retoucher - a brush. The first step is to create one element - a dotted line. Should open new document arbitrary size and fill it with white. This is a necessary step to obtain desired result... Then we select the tool “ Rectangle"And set the parameters according to the recommendations in the images below:


The size of the dotted line can be adjusted to suit your needs. Next, by clicking on the white sheet, a dialog box opens, where the action is confirmed. The constructed rectangle shape appears on the screen. Do not panic if its size is too small in relation to the sheet. This is not critical. Then in the menu " Editing» - « Define brush"You need to enter a name and confirm the action by clicking OK.


Thus, the tool “ Dotted line"And you can try to create a dotted line
line.
1)
We choose " Brush"And among the palette we find the created tool.
2)
Press the key F5 and determine the intervals between the dotted lines. (using a special slider we adjust the distance).
3)
A guide line (horizontal, vertical) will be a good helper.

Then you should put the brush at the beginning of the guide, and using the button Shift without releasing the mouse, continue the dotted line. You can hide or show orthogonality by pressing the combination CTRL + H... If you do not doubt your skills, then you can draw a guide without using SHIFT... To build vertical axes, you must perform a series of actions: press the key F5 and see the image as in the picture.
Photoshop is not a program for creating drawings, but still sometimes it becomes necessary to depict drawing elements.
In this tutorial, I will show you how to make a dotted line in Photoshop.
Special tool for creating dotted lines does not exist in the program, so we will create it ourselves. This tool will be a brush.
First, you need to create one element, that is, a dotted line.
Create a new document of any size, preferably smaller, and fill the background with white. This is important, otherwise nothing will work.
We take the tool "Rectangle" and set it up as shown in the pictures below:


Choose the size of the dotted line according to your needs.
Then we click anywhere on the white canvas and, in the dialog box that opens, click OK.

Our figure will appear on the canvas. Don't worry if it turns out to be very small in relation to the canvas - it doesn't matter at all.


Give a name to the brush and click OK.

The tool is ready, let's take a test drive.
Choosing a tool "Brush" and in the palette of brushes we are looking for our dotted line.


Then press F5 and in the window that opens, set up the brush.
We are primarily interested in intervals. Grab the corresponding slider and drag to the right until there are gaps between the strokes.

Let's try to draw a line.
Since we most likely need a straight line, we will extend a guide from the ruler (horizontal or vertical, whichever you want).

Then we place the first point on the guide with a brush and, without releasing the mouse button, hold down SHIFT and put the second point.
You can hide and show the guides with the keys CTRL + H.

If you have a steady hand, then the line can be drawn without the key. SHIFT.
To draw vertical lines, you need to make one more setting.
Press the key again F5 and we see such a tool:

With it, we can rotate the dotted line to any angle. For a vertical line, this will be 90 degrees. It is not difficult to guess that in this way you can draw dotted lines in any direction.


Here, in a simple way, we learned how to draw dotted lines in Photoshop.
Here's an easy way to create dotted lines. The big advantage of this technique is the advantage over some in simple ways- the fact that you use the built-in brush presets, which opens up a bunch of possibilities. No other programs needed and no manual work with fancy pipes or complicated mouse work.
This is the result of a simple form. Let's start. Let's open a new document of any size with a small width, let's say 200 width and any height.
First, select the Pencil tool, make sure the settings are applied to all brushes. Before doing anything else, be sure to save your brushes if you already have a fancy curly brush set. You can play around with the settings and you can always load your previous set.

Double click on the second small brush in the palette window. Your palette should look rough when working with a pencil tool. We'll look at versions of the brushes with blurred edges later ...
You can now see the brush settings. An important change to make the dotted line effect. For the simple dashed line I created above, just changed Spacing, choosing 250% ... You can change this in any way up to 999.
Now just draw with your pencil and you will have your own dotted line! To keep your line straight, hold Shift pressed when you draw a line. Another way is to click at the starting point and then, while holding Shift, click on the end point; PhotoShop will make a dotted line between two points!
![]()
For practice, try playing with the brush size and dot spacing settings. Also you can download square brushes at Adobe Photoshop> Goodies> Brushes & Patterns> Square Brushes, this will give you square dots, use the same settings. Take the Brush ( Paintbrush) and see what effect it will give, the same thing, only with blurred dots. Apply the same settings to the Spray tool ( Airbrush tool).


Along with the size and distance between the dots, if you need to make oblong dotted lines that are on a line at an angle, just change the angle of the brush. You can change the angle of your brush, in which case the direction of the point on your line changes. You are now an expert on dotted lines in PhotoShop!
How to make a frame from dots, strokes, dashed lines in Photoshop

In this article, as the title suggests, we will look at ways to draw dashed, dashed and dotted frames. Let's decide right away: we will draw all the frames on a new layer! Looking ahead, I will say that the method described below refers to Photoshop versions CS5 and below.
Creating frames from points
Such frames are created using an ordinary round brush from the standard Photoshop set. The frames can be round, oval. rectangular, as well as any irregular shape, because they are described along the contour. Let's set up the brush first. If someone doesn't remember, to open the brush settings panel, select the Brush tool, and then click on the corresponding button in the settings panel. In the picture above, the following settings were applied for the inner round and inner square (click on the image to enlarge):
Now let's create a contour, according to the shape of which the frame should be, this can be done using any contour tools, Pen Tool, Rectangle Tool, etc. The contour can be either closed or open. Next, click right key mouse along the contour. Important: the contour tool must be active at this moment! In the window that appears, select the line "Stroke the path" (Stroke path). A new window will open where we will be prompted to select a stroke tool. In this case, a brush or pencil (Pencil) is suitable for us. As a reminder, the brush or pencil must already be set up. After selecting the tool, click OK, and points will appear on the path. The points made with the brush turn out to be somewhat blurry, so after applying the points it does not hurt to apply the Sharpen Edges filter, select the settings individually. Here is an example of a screenshot obtained using the above operations:

The following brush settings were applied: Text: pencil type, Size 3 pixels, Hardness 100%, Spacing 180% Underline: type - brush, Size 3 pixels, Hardness 100% , Spacing 205% Border: Pencil type, Size 6 px, Hardness 100%, Spacing 180%
Create frames from dotted lines
Rectangular frames, i.e. consisting of vertical and horizontal lines do not cause any problems. You can draw them using a rectangular brush from the default Photoshop set. Open the brushes control panel and load them as shown in the picture. Next, set the brushes with settings approximately the same as those set above for the round brush. Then we slightly stretch the shape of the print, this is shown on the screen:

You can draw a horizontal line with such a brush. But vertical will no longer work, or rather, it will work, but ugly:

To create a vertical dashed line, rotate the brushprint 90 or 270 degrees:

Now you can safely draw in the vertical dashed line:

But if I need a dotted line in a circle or along any curve, then this method is no longer suitable. Choose a round brush, set the print diameter to 9 pixels, spacing 170%. Create a path, stroke the path, as in the case of the points. Next, right-click on the path, select the "Make Selection" item with a feathering radius of 0. Here is the screenshot:

In this tutorial, I will show you how to make dotted lines. The easiest way: we will take the "pen" with you, select the "shape" mode, set the "fill" to "no color" and choose the color for the stroke that we wanted. Let it be blue. Also at this stage we need to choose how thick the dotted line will be. Let's say 2 pixels and choose what it will be. Whether it will be dots or will it be dotted lines. Let's pick them out.
And just draw an arbitrary line that we will ultimately need. After we press "Enter", the outline disappears, only a dotted line remains. This is the easiest way, but it doesn't always work. On some versions of Photoshop, this will not work. And for this there is a second way, in which we also need the pen tool.
Here we are already drawing in the "outline" mode. We also create the bend that we would like. Let it be just such a semicircle. And now we need to switch to the Text tool. Move the cursor to the path, and we will see that such a small dotted line appears next to our cursor. This means that when we click, our path will turn into editable, and here we can write some text. But since we are creating a dashed line, we just need to click on the dash many times. We got such a contour. Also, this contour can be outlined with dots. The second way is text.
And one more way, it is also outlining the path using the brush tool. The first step is we set up the brush with you. To do this, we need to make this brush first. We create a new document: Ctrl + N. The width is -27 pixels and the height is 6. At this stage, we need to set the size that will be equal to the size of the stitch. We choose transparent background... Click "OK". And fill this document with black. Now we need to define a brush: edit / define a brush. Let's name it and click OK. This document can be deleted.
Go back to our main document, select the "brush", and as you can see, it is already there. Set the brush opacity to 100% and go to the palette settings and slightly change its parameters. We definitely need to increase the amount of spacing, and go: brush dynamics / controls / direction. And then our brush will repeat the curves of the path. Also at this stage, set the color with which your brush will paint, and choose a size, it can be made a little smaller.
Now take the pen tool as well. We draw the path that we need. We also operate in contour mode. We bring the tool "pen" to the very path and right click With the mouse, call the "context menu / stroke the path / select our brush (the one that we set in the previous step will be selected. Click" OK ". The brush has completely repeated the curve of the path.
 How to put a melody (ringtone) on a call for ZTE Blade M, L4, V956, v815w Download ringtones zte
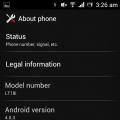 How to put a melody (ringtone) on a call for ZTE Blade M, L4, V956, v815w Phone zte 320 how to set a melody
 How to hard reset on LG Optimus L5 and similar Lji androids