Installing windows xp. Installing Windows XP from a disc. What to do after installing Windows XP on a computer or laptop
Friends, with this article we open new section on how to properly work with a computer. We will cover issues such as how to install Windows XP correctly, as well as update drivers and other programs for everyday use.
Many will say: “ What to put there? Is everything simple there?”. And you know that the incorrect installation of the OS in most cases is the main cause of malfunctions when working on a computer, ranging from banal freezing and braking, ending with errors at the hardware level.
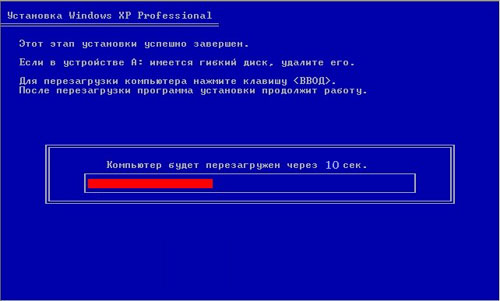
At the end of the copy, the computer restarts; upon restart, the system boots without booting from the CD. The setup routine does everything automatically and only a little information is required to complete it. This information: International settings: it is suggested to accept or change the keyboard settings, displayed numbers, etc. these settings can also be changed to installed system; This data cannot be changed "directly" on the installed system. There is no control over the data entered, you can enter the name and organization you want.
How you install the operating system on your computer will determine how well it will serve you. So, let's figure out how to properly install Windows XP.
We analyzed enough material on the Internet on this topic, but we did not find a simple and adequate disclosure of the topic. Also, as a simplification of perception and a better understanding of the OS installation process, a video story with a detailed description was prepared.
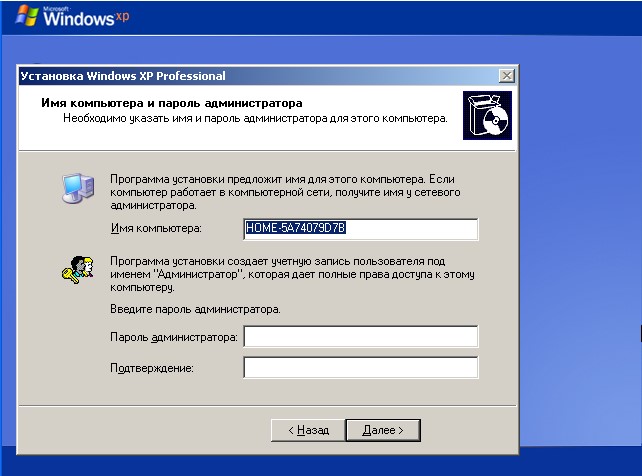
Computer name: Required to identify a computer by name. The system already offers an automatically generated name, but it is advisable to enter the corresponding name, which will identify your computer. If your computer will be connected to the network, make sure that the name you have given does not already belong to another computer. Network settings.
As in the previous case, it is recommended not to connect the PC to domains or workgroups during installation and then continue to assign the computer working group default and confirm it. completed the installation and restarted the computer, the system will automatically load the setup procedure. Create Users: You are prompted to create users who will use the computer. You must create at least one user. No password is required for users; password creation takes place in the system set by the control panel.
Little attention was paid to such trifles as “buying a disc with an operating system”, “whether it is necessary to read the license agreement”. We focused on the initial setup of the installed system.
Basic steps to install Windows XP
- 1. The first thing to do is change the boot order in BIOS to “boot from optical disk”. To do this, when loading the OS, you must click “ F2"Or" DEL", And go to the" BOOT”, Where by pressing the“ + " or " - ", Edit the loading order so that the entry" CD-Rom Drive”Was at the very top.

Internet Access Setup: Initiates the Internet access setup procedure. This procedure can be skipped. If these options are not displayed, user input is done from the control panel and then the system starts. If we have entered more than one user, the user selection screen will appear, otherwise the system will start loading automatically the profile of one system user. Before installation operating system make sure you have already created and configured a new one virtual machine using the New Virtual Machine Wizard.
- 2. We save the settings by pressing the button “ F10”. When you restart your computer, the message “ Press any key to boot from CD ..”, You must press any key to start booting from the installation disk.
- 3. Next, preparations will begin for installing the operating system. When the welcome window appears, the system will once again ask you to confirm your intention to install a new OS, press the “Enter” key.
- 4. When the license agreement appears, click “ F8”To accept it and continue with the installation.
- 5. If you reinstall the OS, the installer will try to restore installed version... We do not need this, we press "Esc".
- 6. Next, perhaps the most important thing. Selecting a partition to install. If you already have a priori HDD divided into logical partitions: system and one or more user, this is very good. Then it will only be necessary to delete the system partition, then create it, format it and install a new OS on it.

Follow the instructions below. This article provides instructions for installing the driver. Attach the virtual floppy disk to the virtual machine. The next section describes each step in more detail. Attaching a virtual floppy file to a virtual machine. To connect a virtual floppy disk to a virtual machine.
Click right click mouse virtual machine. Click Change Settings. Click on the virtual floppy disk and select "Connected." Select Use a disk image. Find the path to the virtual floppy file. When changing the controller that the client uses to boot, you must ensure that both drivers are installed in the guest operating system and that the virtual machine does not have a snapshot before any changes to the controller. In the hardware wizard, click Install from a specific list or path, and then click Next.
If your hard drive has not been shared before, then it must be done right now. For what? Everything is very simple. By dividing the hard drive into the system part and the user part, you create an airbag for yourself. if the OS fails, in the worst case, you simply reinstall the OS on a formatted system partition, but the user data will remain safe on the user partition.
Click Don't Search. Select a driver to install and click Next. Click "Open" and then click "Next". Click Finish and then restart the virtual machine. We'll see how to do it and well, installing or reinstalling an operating system is extremely easy. Partition the hard drive correctly. For full page with video tutorials.
This is a handy maintenance guide of about 120 pages that you can use to find solutions to many of the small problems that often hurt us. It contains material found on the Internet and material directly written by the author.
How to divide the hard drive correctly, see the video. As an example, a 10 GB hard drive was considered in the video tutorial. If your hard drive allows, make the system partition at least 20 GB.
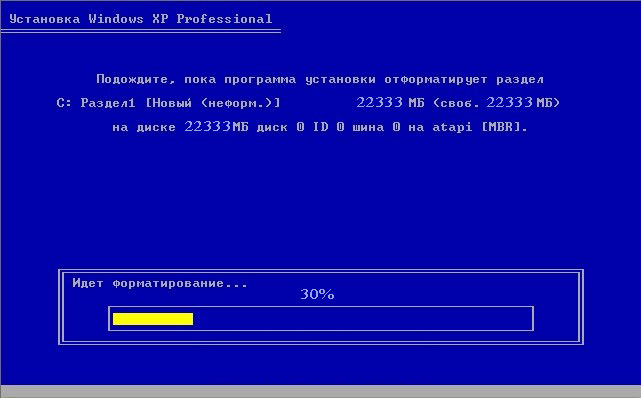
- 7. Next, you need to format the partition with the file type NTFS systems... Choose quick format.
- 8. The system will reboot, we will take a convenient moment and restore it to BIOS settings loading from hard disk rather than CD-Rom. We have already considered how to do this in the very first steps.
- 9. After rebooting, the system will continue with the installation. The first window that appears will be “ Regional settings window”, Where you need to select the keyboard layout.
- 10. Next, the installer will ask you to enter a Name and Organization name. Enter only the Name and click next.
- 11. In the window that appears, enter license key product. Be careful.
- 12. Set the Computer Name. Leave the admin password field blank for now.
However, in our other articles, we have mainly emphasized how to create a separate partition on the hard drive so that the operating system is installed in it is absolutely excluded. However, it is recommended that you create more than two partitions on one hard drive. A partition can always be used to store data, while others install multiple operating systems. This way, if the system won't start, you can start your Personal Computer using one of the other installed operating systems.
Spend required settings date and time. One thing, but at the moment we have legally canceled the transition to winter time. I advise you to install the corresponding update from the official Microsoft website (WindowsXP-KB2570791-x86-RUS). This can be done after installing the OS.
- 13. Next, you need to determine whether the computer will work in the domain network or not. We do not change anything, we press “ Further”. We are waiting for the installation program to finish its work and reboot.
Installing drivers and software
After the first part of the installation, the setup will continue with a second phase, a third phase and a first reboot. Always take great care, making sure more than what you are doing: overwriting or deleting a partition will result in the loss of all data stored in it! For example, make sure you don't delete the section containing your data and your personal documents. As mentioned earlier, always back up all of your data before making such delicate changes! When continuing the formatting process, we recommend choosing not the fast one, but for this standard: this way you will not have unpleasant problems when correct installation.
- 14. At the first start, the system will try to adjust the screen extension automatically. accept them if you are satisfied with the selected option. When the welcome window appears, click “ Further”, Postpone the settings automatic update, skip the settings to the Internet, postpone registration with Microsoft.
- 15. Create an account.
- 16. Initial OS configuration is mandatory. Watch the video and follow everything step by step. After completing all the settings, you will get an optimally configured computer prepared for work.
How to Install Windows XP Correctly Video
Watching the video, learning. If something is not clear, we ask questions.
Front backup create backups data on disk! This is the basis for any installation. One little information. To start the system, you need a tiny program, the bootloader, which is stored at the beginning of the disk.
- We divide the disk into several partitions.
- We'll go through the rest of the installation.
Follow these instructions. Unable to read boot disk that you specified. Check the boot path and hardware on the disk. Hardware manuals. The file is damaged or not found. Reinstall the file. In addition, you may experience one or more of the following symptoms.
Hello dear site visitors! In this article, I would like to talk about how to install Windows XP on a computer.
The thought about this article came to me after I wrote another article -. Then I thought that there was probably no point in talking about the installation of Windows XP. But within a few weeks after the posting of the article about the seven, I received a lot of letters where people asked the same question - why I didn't tell anything about installing Windows XP? And in this article, I would like to give a detailed answer to this question.
This occurs if one of the following conditions is true. To work around this issue, use one of the following methods. After completing these steps, restart your computer, and then select the first item from the startup menu. The installer will download the required files and display the action selection window.
The next window displays the existing sections. After a few minutes, the installer will restart your computer. After rebooting, do not press any key at the prompt to boot from disk. After selecting the regional option and entering the key, the installer will restart the computer in a few minutes. At this point, we can remove the board and restart the computer with the reset button. This is very important because it will allow us to access your old account and all the data we have on your desktop.
Getting ready to install Windows XP.

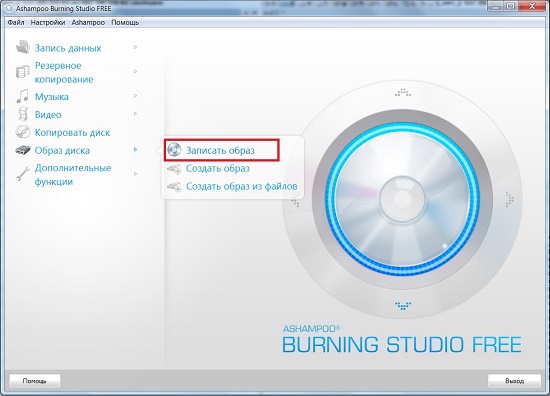
After downloading and installing it, run the program. You will see the main window in which you will have to select the item Disk Image -> Burn Image
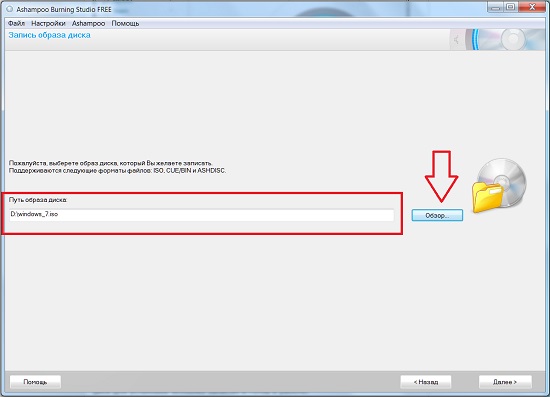
In the next window, select the location where the disk image is located using the button Overview.
After that, the repair will keep the fixes updated. The rest of the sections are formatted from the system level. We can also choose a way - quick formatting, when we delete the existing partition where the system is already installed; We use full version when creating partitions. We confirm your choice with a key.
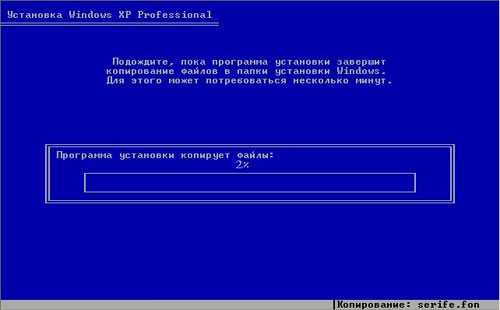
When the formatting is complete, the installer will start copying the files. After copying, the computer will restart. The installer can automatically restart your computer after a few seconds, or you can do it immediately by pressing a key. After rebooting, the installer will start in graphical mode and prepare desired setting... The first window that appears is the Regional and Language Options - click Next.
After you paste clean DVD-R or DVD-RW disc into the drive, you can click Next.
Of course, the drive must be a DVD-ROM, i.e. able to burn DVD discs.
Installing Windows XP.
The BIOS is configured, the Windows XP disk is ready, let's proceed with the installation.
We insert our disk, reboot / turn on a computer.
We write your name and organization. We give the computer name and administrator password. We check the date, time and time zone. Network settings - newbies choose Standard settings- click on the next one. The installer will copy and install the required files. then restarting again. Also, we don't respond to booting from the CD - we might even pop the disc out. The installer will adjust the resolution to our monitor.
The system will check if we are connected to the Internet - if we have no Internet passes. Who will be using this computer? - enter at least 1 user. Installation is complete - click Finish. We go into the system and install the necessary drivers.
Next, you need to do a few simple steps, although they will seem so scary. First, when the window titled "Welcome to the Installer" appears, click Enter... Next, a window will appear where you will be asked to accept the agreement, click F8.
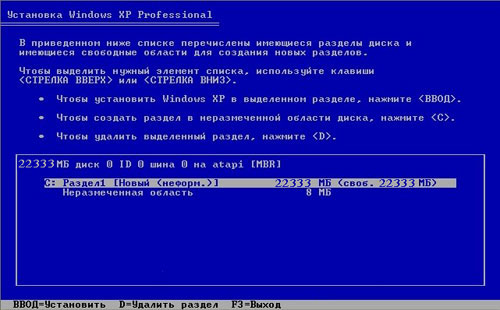
In the next step, you will need to partition the disk. If you are installing on a computer that did not previously have any OS (operating system), then you simply have unallocated area... If you are reinstalling Windows XP, then read a separate article
Fixed master boot record. From now on, we can choose a system. The second case is a little more complicated. The application starts by copying the contents of the boot sector to a file. Also enter the following commands. The program reacts by adding its own data.
With moderate use, reinstallation is usually not required for many years. The only thing I had was replacing the motherboard with another model. Well, the bottleneck even on existing computers is the disk. This is a 2.5 "drive, which is" laptop size ", so you need a suitable mount to mount it, which allows you to mount it instead of a 3.5" drive.
To partition a disk, follow these steps. Select the unallocated area

Click on C on the keyboard (create a new section).
I must say right away that we will divide it into two sections. I wrote about why it is necessary to split into two sections in the article
Now you need to enter the size of the disk on which our OS will be. For example, I have a 720 GB hard drive, of which 100 GB under my OS, and the remaining 620GB for my needs.
It does not vibrate the body or vibrates itself, it is insensitive. We buy, install, connect and run the installation. Therefore, first of all, you need to pay attention to how many files are in the system partition. What to delete, what to move - it's up to you. When we do this, we can begin.
Many of them are free. There is a lot of discussion on the forums about this error, but there is no solution. One works, the other doesn't. There were no surprises here. Have worked! It just "takes a little" to move. And the program then takes us by the handle. The operation requires a reboot, after which the system files... Everything works as fast as before.

Make this size at least 20 GB, there you need to enter in megabytes - this is 20480 MB. Then press Enter.
Next, you need to mark the remaining area for this, again select the unallocated area and press C. And enter the entire remaining size (all that remains is shown in paragraph "Maximum size of a new partition").
Preparing to install Windows XP from disc
Therefore, it is worth paying attention to what is called a garbage collector. And they don't use defragmentation at all. Defragmentation will shorten the life of the disk. Therefore, if your motherboard supports this mode, you must enable it. This feature is very useful. Other things to consider, as you can see in the tips on the internet.
Enable Write Caching Disable SuperFill Disable Prefetching Disable File File Disable System Restore Disable Hibernation. Dramatic change of action - the system is like an arrow, it starts up quickly, but what is most felt is very fast.
You will be prompted to format the drive, select "Format partition in NTFS system".

Wait for the formatting process to complete.
Then copying will start Windows files XP. Wait it may take several tens of minutes.
Well, as you can see, installing Windows XP from a disc is not that difficult. By the way, installing Windows XP on laptop, is no different from installing on an ordinary PC, tk. laptops also have a floppy drive.
That's all. Good luck!
 Architecture of a distributed control system based on a reconfigurable multi-pipeline computing environment L-Net "transparent" distributed file systems
 Email sending page Fill relay_recipients file with addresses from Active Directory
 Missing language bar in Windows - what to do?