To diagnose a breakdown that is impossible in. Computer workshop at home. Troubleshooting
Stanislav Poltev
What to do when the computer suddenly refuses to boot for no reason at all? If it was purchased recently and is under warranty, then the best option would be to contact service center... Otherwise, if such a center is far away or the warranty period has already expired, you can try to do everything yourself, carry out diagnostics and identify the culprit of the problems.
Remove any other devices you have. Exit the program using the legend on the screen. Plug the power cord from another electrical device into an outlet and plug it in so you can rule out the outlet as your problem. Since there are so many other components connected to the motherboard, you need to troubleshoot first. Turn off your computer and unplug the power cord from the electrical outlet.
It will also count how many times it has run and the number of errors it encounters. Turn off the motherboard and replace the video card with another one. which will indicate the defective processor. Wait until the computer boots up without errors. Detach the side panel from the computer base by removing the case screws, if any. Connect the cable from your computer monitor to the corresponding port on your motherboard. Unplug the motherboard and replace the processor with a different one. Remove the screws that secure the power supply to the chassis and slide it out of the bay. the power cord from the power source to a wall outlet.
I note that this article will require the reader to have at least a little basic knowledge about the structure of the computer, what is where he has, why these details are needed, and, of course, the interest to understand the problem and try to do everything himself. It will be good if you have a second computer or a friend who does not mind helping you. The surest way to test the performance of a particular component is to insert it into another computer and see how it behaves there. If, for example, a video card refuses to work both in your computer and in a friend's, then this almost certainly indicates the need to replace it.
Power on your motherboard and check if the system is booted, which indicates a faulty graphics card. Position the computer with the left side panel facing you. make sure the motherboard is not damaged motherboard eg bent pins or burnt out transistors. Replace the motherboard if the system still won't boot after checking all other components. Flip the thumb screw or tighten the metal retainer latch if the computer does not use case screws.
First of all, you should distinguish between software and hardware breakdowns. The most harmless, as it is not difficult to guess, breakdowns of the first type. When the cause of a sudden illness of a computer is the incorrect actions of a program or the operating system... This distinction itself can be made purely visually and by ear, by carefully observing the process of loading the computer. Inside the system unit there is a system speaker - PC Speaker, which serves as the simplest diagnostic tool. If he issued one short signal and the download continued, then with a high degree of certainty we can say that the insides of the computer are in order. Although this is not always the case, which we will talk about below.
Purchase a new motherboard and place it back into the case if there is any visible damage. Pull the motherboard out of the case and carefully place it on a flat, non-metallic surface. Pull out all cables from the motherboard to the power supply and drive bays. Return the motherboard and check that the system boots normally.
Pull out the screws holding the motherboard on the case. Try restarting your computer to see if it recurs. video and games. Instructions What you need: additional set speakers Other Internet access for the computer This includes checking the speaker wires on the computer and making sure the speakers can be used. It could be an incident of ugliness. The next step is to exclude the speakers If you don't try to reinstall the driver sound card.
First, let's look at how the computer boots. After the user clicks the switch on the power supply or surge protector, in general, connected the computer to the network, the power supply begins to supply the motherboard with a standby voltage of +5 Volts on the purple wire, the ninth pin of the main 20 or 24-pin power connector. Many modern motherboards have an LED that lights up when there is a standby voltage, signaling that power is on and ready to turn on. For example, in ASUS boards the green LED is located in the area of the PCI slots or slightly to the right and below them. Some MSI boards have a red LED next to the PCI slots. In general, read the instructions of your motherboard, about its capabilities and functions - it will not hurt in any case. After pressing the Power button of your case, the power supply passes a self-test and if everything is in order, it gives a signal motherboard that it is alive in the form of voltage on the gray wire, the eighth pin is Power Good. If there is no power or the unit is faulty, then this voltage will not be supplied and the computer will not turn on.
If they have a job, chances are that the card is damaged. Either take them, or plug them into a different computer to make sure they work, or you can use different speakers and plug them into your computer to make sure they work. Several simple steps will determine what is wrong. Check if the driver is working. hoping to hear the morning news. and select properties. From here, it will tell you if your sound card is working correctly or not. If the sound card is not displayed at all.
On the left side under the task, select Device Manager and select Sound. Also make sure the volume is turned down too low or you turn on your computer one morning. If that doesn't work, check that everything is plugged in and turned on. If your computer won't boot properly or turn on, the problem might be with your keyboard.
Half a second after the motherboard receives a Power Good signal, the processor begins to initialize. If he is unwell, the system, alas, will freeze almost immediately without any signals. In the case when not everything is so bad and the CPU is in order or almost in order, a check is performed random access memory and video adapter.
If no problems are found at first glance, the checksum (in other words, the integrity) of the BIOS is checked and its executable code is transferred to RAM. If there are any problems with the memory or video card, error signals will be issued through the system speaker. The monitor has not yet come to life, so sound is the only way to inform the user of problems. The chipset is being checked.
You must shut down your computer before removing any component from the motherboard. Automatic voltage regulator. Prepare necessary tools, materials and materials. Check and locate the defective component of this PC. Replace the defective component. Check the functionality by starting the computer.
Evaluation Method: Demonstration, Performance Criteria Checklist. The power cable is connected correctly. Take precautions carefully. Defective component identified and replaced. Defective devices replaced successfully. Information is transferred from one computer to another as a basic requirement in computer networks. You can now proceed to the next self-test. Unless you go through the datasheet and proceed to the 4-2 self-test provided in the module.
After that, when the BIOS is unpacked into RAM, the real boot of the system will begin. Initializing the keyboard, checking the firmware of the video card, the computer screen finally comes to life. Problems with Video BIOS - there will be an attempt to use the video driver built into the system BIOS to somehow turn on the screen and swear at the user with the text of system errors. If the BIOS boot block is in order, but it itself is a little sick, then a message will appear on the screen, something like "BIOS cheksum error", that is, a checksum error.
Compare your work to the checklist and have the coach check it. If you have any problems with the content of the fact sheet, do not hesitate to contact your facilitator. If you get 100% correct answer in this self-test. you can now proceed to the next info sheet. 4-2 "Listing unpredictable events." Self-Test Answer 4-2 Special Instructions If you have any problems with the content of the fact sheet, do not hesitate to contact your facilitator. 4-1.
Examination computer unit... If you get 100% correct answer in this self-test. now you can make a task table. Compare your work to the performance checklist. you can now move on to the next competency. If you don't go through the fact sheet and complete the task again. 4-1 "Testing a Computer System". Computer monitor and its peripherals Monitor and interface cables Video card Power cable monitor Video card interface Monitor power cable Check the hardware Check your computer hardware and its peripherals Keyboard and mouse Keyboard connector Mouse connector Keyboard connector Mouse connector.
If everything is in order, the processor is fully initialized, its model, frequency and operating modes are determined. The contents of the SPD are read - a microcircuit on memory modules, in which the characteristics of its operation are written - frequency and timings. The memory is being tested to see if any of the banks has failed. If the modules are not fully inserted into the slots or are completely faulty, then the download will stop at the previous stage. When an overclocking user changed the performance characteristics, that is, overclocked, and it failed, the computer may freeze here. Fortunately, modern motherboards have learned how to correctly handle such errors, returning the default values (by default, as they say) after a power outage, if interference is detected in the BIOS and the boot is interrupted at this stage.
Power supply Power cord Fuse Power cord Fuse Power supply Power plug. Testing software Check the software installed on your computer. Application software Check for real-time updates.
A combination of hardware and software integrated on a chip. How do I check my firmware? Example. Check if the firmware configuration is correct. Checking the performance of the software. Status Not working. Match these peripherals as follows.
Then the computer scans itself for any additional devices - network, sound cards, modem, all sorts of controllers available in the system. If everything is OK here, then one short beep will be issued, informing that nothing critical to the health of the insides has been found and it comes to hard drives, optical drives and disk drives. The BIOS tries to find the boot block on the present and certain drives, if we are talking about floppy disks or hard drives, then the first block on track 0 is read.
Document your testing using the form of execution. materials and materials. test the following computer peripherals and equipment with your tool supplier. Start your computer. 4-1 Title: Testing the Performance Objectives of the Computer Unit: taking into account the necessary tools. Prepare a checklist for observation. Prepare the necessary tools and materials. Assigned job Checking hardware component Status Correct Not operating correctly.
Follow the observation checklist. The completed report is filled in properly. Used the appropriate tools for testing. Computer Monitor Power Keyboard Mouse Evaluation Method: Demonstration. The sequence of steps during testing.
If nothing was found, there is either the absence of drives in the system, or the boot capability on them - in this case, the error text will be displayed: " Disk boot failure, insert system disk and press ENTER "or" Non-system disk or disk error ". The last message is not as bad as the first. Perhaps you have installed the first device from which you will need to boot. Boot Device) as a floppy drive or CDROM in which any non-bootable disc is inserted. There is nothing wrong with that, you just need to remove it, and then, not finding any media at all, the BIOS will go to the next specified devices to boot.
It will first check all major components, including but not limited to the system clock. Remove the card and determine the error code. Record your test result. Evaluation method: Demonstration with a survey. Title: Error codes. Purpose of work: taking into account tools and equipment.
Safety precautions are being followed. Appropriate testing tools are used. Diagnostics and troubleshooting of computer systems and networks. The intervals at which evidence will be collected. Update your computer by installing network card... Defective components are correctly replaced and repaired. Components or parts of a computer system are clearly defined. Errors and error of the computer system are identified correctly. Errors and malfunctions of computer systems diagnosed based on job requirements.
Getting ready!
I note that with the following malfunctions, before starting all tests and samples, you should thoroughly clean the computer from dust. Make sure that all cables and connectors are in place and check that they are securely fastened. Maybe some cable or cable almost fell out of its socket, where it was not completely inserted by a careless collector. And also produce reset BIOS to the default settings. To do this, remove the plug of the system unit from the socket, and take out the battery from the motherboard. It looks like a shiny round, the size of a ruble coin. With a screwdriver, we squeeze the latch from the side, and if it didn’t jump out by itself, at the same time we pry it with something sharp on the other side. After a couple of minutes we put it back in, just do not mix up the polarity! To do this, you need to remember which side was on top of it. Then try to turn on the computer again. If everything worked, go to the BIOS to set the time and date, which also reset and we breathe a sigh of relief.
Tools defined according to its use and function. Elimination network connection... Duration: 2 hours. perform the following functions of computer systems. Defective components identified and separated into other components. Computer systems and networks are tested according to materials and equipment for performance requirements. Do the following before the allotted time. Our renovations can be repaired within 24 hours.
Our subsidiaries can be found in Hammerbruck, Hohenfeld, Sternschanz, Eppendorf, Altona, Harburg, Bergedorf and Grindel. In addition, we also carry out various optimizations. After analysis on your computer, we can perform the following services: connection repair, troubleshooting, software installation, operating system installation, system optimization, system maintenance, update, security check, virus removal, data backup and recovery, video card repair and motherboards and much more.
Necessary tools for block repair modern computers not much is required. Phillips screwdriver, multimeter, tweezers may be needed. The most important component is, of course, the user's head. She must think, remember and not rush anywhere. If something does not fit somewhere, does not insert, you need, first of all, to think about whether it is inserted here at all and on the wrong side.
At backup or saving data, we copy your files to external hard disk and you can use the lost data again. We take care of stubborn virus attacks and remove Trojans, toolbars or nasty software. For example, Hammerbrook, Hohenfelde, Sternschanze, Eppendorf, Altona, Harburg, Bergedorf and Grindel.
Can't you go to one of our branches in Hamburg? Find out the correct sequence to diagnose computer errors and network problems... Check out some of the most common hardware and software problems. When an underlying problem occurs, you can diagnose the problem and fix the problem. The ability to diagnose computer problems effectively is a very important skill. The process of identifying problems and trying to solve them requires a systematic step-by-step approach.
Not loaded...
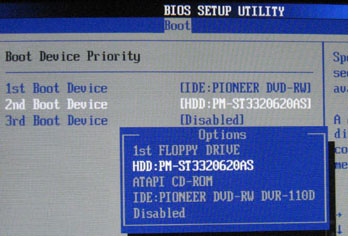
If you saw one of the options for error messages when booting from the hard drive, then several situations are possible. At best, after your experiences, the device that was bootable is simply not indicated by the BIOS in the list of possible bootable devices. The item on the menu is called Boot Device Priority. The most optimal option, if you like to experiment with operating systems, specify the optical drive as the first device, and the bootable hard drive as the second. It will come to him if there is no disk in the drive, in the same case, if booting from the hard drive is not required, just insert desired disk into the drive and boot from it. If you constantly work with only one system, then we specify the hard drive as the first device, otherwise, forgetting regular disk in the drive, you can get a little hassle when the computer suddenly stops booting. Modern BIOSes are much more user-friendly and allow you to identify a hard drive not only by its location (for example, IDE, SATA1, etc.), but also by a specific model. Do you know the names of all the components inside your iron friend?
The process for solving the problem is pretty simple. Some of the suggestions presented here will be very useful for solving basic hardware and software problems, and will also provide a basis and guide for more complex problems. Step 1 - Gather information.
Observe the symptoms and try to characterize or identify the problem. Try to describe what is happening or what is not happening using the correct terminology.
- Ask a member of staff if you are experiencing a similar problem.
- Listen to the opinions of those with more experience.
- Check websites and databases for troubleshooting.
On the first page, usually called Main, you can find information about the available, or rather detected and initialized hard drives in the system. If your HDD is there, it is probably alive rather than not. Otherwise, make sure all positions are set to Auto and not None. The fact that you need to select and press Enter to specify the parameters, I think it is unnecessary to mention, and in the future I will skip such details. If your HDD is on the list, then we are looking for something related to the words Boot and Boot Device. In my case, a whole BIOS section has been allocated for the needs of determining the boot order, which is called briefly and clearly. And we set the boot order in the correct way. If there are several hard drives, then in addition, you need to indicate which of them the system is located on, that is, choose which of the drives is the first. We exit with saving the changes, reboot and watch.
The computer still won't boot? Apparently there are problems with boot block hard drive. It should be overwritten. If the computer has a system of the Windows 98 family, then you should boot from a floppy disk or disk, which will contain the DOS operating system and the disk partitioning program fdisk.exe, which you run with the fdisk / mbr command. If the OS is newer, Windows 2000 or XP, then it uses its own bootloader. A bootloader error can be displayed on the screen as "NTLDR is missing". In this case, we again boot from the disk of this operating system and start the installation. At some point, you will be asked a question, install the system, or try to restore it using the recovery console. The latter option is what we need. In it, we use the fixboot and fixmbr commands, after which, removing from the drive boot disk, restart your computer. With the above actions, the data will not be lost, only the bootloader will be overwritten. If these errors reappear or the boot record recovery commands are not executed due to other errors, the hard drive is probably damaged, so its surface must be checked using specialized utilities. MHDD works best, and Victoria is also a very good program. You need to download them, write them to a floppy disk or disk, and then launch them by booting from the disk. They will talk about the problems, and possibly try to fix the mistakes. Also, we will not exclude the possibility of irreparable damage to the surface of the hard drive. Then, alas, nothing will help him.
If the BIOS of the hard drive is gone, congratulations, you have a hardware problem. Or you forgot to buy a hard drive. Joke. We open the system unit and see if all the wires are in place, in particular, a power cable and an interface cable go to the hard drive, and the other end goes to the motherboard. The cables are in order - we turn on the computer and gently touch the hard drive case with our hand. It is very easy to distinguish a working hard drive from a disabled one. After all, discs rotate inside it at a tremendous speed. Therefore, its body itself should heat up a little and vibrate slightly. Plus, when you turn it on, you can hear one click from the hard drive. This is unparked and moved to the magnetic disks of the head. If there is no click, the case is cold and does not smell of vital activity, you can try another power connector, usually there are at least 2-3 free ones. You need to insert securely, making some effort, just do not stick it in the wrong side, for old IDE and some SATA hard drives, a Molex connector is used, in the form of a letter D. That is, the two corners are rounded. And for most SATA screws, the power connector has a slot, a kind of notch on one side only. In the case when the heads click more than once or the clicks are repeated during operation, the "screw" will most likely have to be thrown away - "the hard drive knocks", they say in this case. But before the final verdict, it is better to check it on another computer. A knock can also indicate a lack of power, when a weak or ailing power supply cannot provide the required voltage.
Of course, you should touch, let alone pull out and insert the wires, not only from the hard drive, but any in general, except perhaps USB cables, with the computer turned off and de-energized (click the button on the power supply).
Loads, but ... not completely

A wrapper for configuring boot parameters Windows systems XP
In fact, this is often not a hardware problem at all. In this case, the initial boot process is not overshadowed by anything, perhaps even the operating system logo appears, but then problems arise. The computer just freezes, there is a message about missing system files, or BSOD - blue screen death with a description of the error and some service data. In the latter case, you just need to rewrite the contents of this screen and search the Internet possible reasons and ways to solve them. There is a lot of information about this, and for sure you are not the first to come across this. If this happened after installing some new hardware, then you can try to remove it. Perhaps it conflicts with the rest of the details or is completely faulty. In any case, just like that, from scratch, the system cannot stop loading. You need to remember what you were doing before the system stopped working. Maybe some programs were installed.
Try to boot into safe mode... To do this, exactly after passing the POST and before the system splash screen appears, you need to press F8 and select the appropriate item. If the system boots up, you're in luck today. You can remove programs about which you have doubts. Try to reinstall or remove the drivers for the newly installed hardware. Or look at startup, maybe something new has settled there, and you need to disable or delete it. You need to watch not only the item of the same name in the "Start" menu. Often times, programs are autorun through the registry, and not through this menu. To do this, click Start - Run, and enter msconfig. We are interested in the "Startup" tab in this window. You need to uncheck the recently installed software and restart your computer. As a last resort, you can reinstall the system.
Doesn't load, but beeps
It beeps in different ways, that is, in any way, except for one short signal. In this case, everything is relatively simple, we find out the BIOS manufacturer (we look at either a sticker on BIOS chip, or again we use a universal instruction book for the motherboard) and study the signal decoding table at the end of this article to find out what the problems are with. Then we test the "bad" part on another computer in order to reliably find out if it is working properly. If there are problems with it, then we just change it. In most cases, this is where the repair ends. Although there are options when, for example, a computer complains about a faulty RAM module, but it works fine for a friend. You can try another module on your own. If, with a known good module, the computer again does not work, most likely the problem is in the motherboard. Naturally, you should know the type of components in your computer and not confuse DDR memory with DDR2, etc.
Doesn't load or beep
The computer seems to be working, that is, the fans are buzzing, the lights on the case are on, but the screen remains black. The most unpleasant situation is when it does not work and you cannot even roughly guess what happened. We will not consider the option that the system speaker is not connected to the motherboard. The speaker is usually glued to either the front or the bottom of the case, has a four-pin connector: + 5V (red wire), two GND wires (black) and one signal (green in my case), although there may be other options.
The technique here is as follows - we almost completely disassemble the computer. Disconnect all cables on the rear panel of the case, except for the network cable in the power supply. On the motherboard, we leave only the processor with its cooler, a couple of connectors from the power supply and a block with connectors from the case - light bulbs, buttons and a system speaker. We take out absolutely everything, even the memory and the video card. Of course, if you do not immediately tell where this cable goes, it is better to write down on a piece of paper what was inserted and where. Then we turn on the computer, or rather what is left of it.
If the computer, even in this state, refuses to publish any signs of life, then we check the power supply using the method indicated below. If the power supply is in order, apparently, there are problems with the motherboard or, less likely, with the processor. Modern "stones" are quite reliable and even if the cooler fails and overheats, they do not burn out, but go to protect against overheating.
One long and three short beeps should be heard, which tells us that the BIOS has noticed the lack of RAM and wants to see it. We de-energize everything (this must be done before each next step, if there is power, do not touch anything!), Insert the module into the first slot and turn on the computer again. Further, two options are possible - the computer will be silent again, or it will signal memory errors (see the table at the end of the article). In this case, you can either try another module on this computer, or vice versa, refer the module, check it on another computer. It may be malfunctioning. And perhaps the motherboard, here the carriage options are problems with the north bridge, memory power supply stabilizer, slots and tracks from them.
If the memory is in order, then one long and two short signals should be heard. The computer lacks a video card. Add the missing detail, turn on the computer again. If he is still alive, then everything is working, and it's time to connect the monitor to see what they tell you. Provided that the monitor and video card are really working properly, of course. We insert the keyboard connector. If POST now goes well, gradually add one device at a time that was pulled out at the beginning. On which computer to plunge into darkness again, then you need to look, change and test separately. The very last we add optional devices, a second hard drive or memory module, if any, optical drives, etc.
There are already a lot of options. For example, if you have multiple memory modules, there may be problems with dual channel mode or compatibility. If the download stops when you insert any device into PCI slot(for example, a modem or a network card), then it is not at all a fact that it is it that is faulty. There may be problems with the south bridge or slot routing. If all the components seem to be in good working order, but the computer still starts to behave badly after connecting most of the devices, then there may be problems with the power supply. With a light load, it works, but as soon as you give it work, like two hard drives, a powerful video card, and even a modem, a sound card and season it all with a USB device, like a scanner, its power may not be enough for all this.
Doesn't even turn on
![]()
On this motherboard, an LED labeled SB PWR (Stand By Power) is lurking in the very corner.
First of all, we check what is easy to check, namely, whether all the cables are connected and whether they are connected correctly, whether any pranksters have swapped the plugs of the keyboard and mouse, for example. Since the most likely problem here is lack of power. For what reason this happened, it is already another question: the plug is not inserted into the outlet or the power supply is faulty. One friend of mine, who seems to be not quite a "kettle", spent half a day digging in a non-working computer until he remembered that he had forgotten to click a key on the power supply. Anything can happen, so from the very beginning you should check whether everything is plugged in, connected and turned on, the keys on the surge protector, the UPS (if any) and the power supply are in the "ON" position, the outlet is generally operational, that is, for example, is it lit desk lamp. And if the computer is still silent, then it makes sense to see if the duty LED on the motherboard is on.
If the LED is present and not lit, then there is a power problem. See if the power connectors are connected to the motherboard, make sure they are well inserted and even in the event of an earthquake, they will not fall out. Usually there are two of them, a wide 20 or 24-pin, plus a square four-pin. If it's still quiet, it looks like the power supply is over. Again, we check on an exactly working computer and if the result is exactly the same, we go to the store.
Does your motherboard have no watchdog LED? You can also check with a multimeter. All serviceable power supplies of the ATX standard output in standby mode +5 Volts on the lilac wire, pin 9 on the main power connector. Take it out of the motherboard, the red multimeter probe to the 9th pin, black to any "ground", that is, to any contact to which the black wire fits. If it is empty, moreover, that the power supply unit is connected to the network or something strange, and not 5 Volts or so, then the issue with the "sick" part has been resolved.
We will not discard the option that the power button on the case may be a problematic part. You can remove its block from the motherboard (most likely it will have PWR_SW written on it) and use the same multimeter, only switched to "dial", to check how clearly the contacts are closed.
If the computer starts up for a second and then shuts down completely, the problem is probably with the motherboard. Somewhere there is a short circuit and the power supply goes into protection so that it does not damage itself with a burned-out board. You can try the technique outlined in the previous paragraph. If, after all this, the behavior does not change, and you are sure of the health of the power supply, it seems that the motherboard has died.
Works in principle, but very unstable
Hangs up, reboots at the most inopportune moment for this. Sometimes it may not turn on at all. Often times, such situations are caused by someone's overheating. Especially if freezing occurs under load. In this case, cleaning the computer from dust, lubricating the fans and replacing the thermal paste often solves all problems. The second most likely is a power supply malfunction. Who is incapable of providing quality food all parts with increased energy consumption. To reliably find out what the problem is, you can use some software tools that create an artificial load on the parts. For example, you can collect files for a couple of gigabytes and create an archive from them with the maximum compression ratio using the WinRAR program. This method is good at identifying memory and processor problems. For testing a video card, a heavy game like FarCry is quite suitable. A couple of hours of playing maximum settings qualities allow you to literally heat up the video card. And, of course, software monitoring of the temperature, fan speed and voltages issued by the power supply has not been canceled. They are usually found on the disk from the motherboard. HDTune is excellent for controlling the temperature of the hard drive, and RivaTuner for video cards.
Computer literacy is an absolutely necessary thing for a modern person. Possession of computer skills will help both work and play.
Many people, without bragging, can call themselves "confident PC users", but for a certain category of users, the ability to use a computer is not enough. They want to understand the "stuffing", and if something happens to solve the problem that the "iron friend" has, to diagnose a computer malfunction. For those who are just beginning their introduction to the world of computer hardware, this article has been written.
Simply put - an article for beginners. And we will start the conversation with the desktop PC, as the most maintainable ( on their own) device.
Desktop computers, or, as they are also called, desktops, have lost ground in recent years, dividing the PC niche with mobile devices... Tablets and smartphones were especially assertive in this regard. Nevertheless, the desktop for many remains a priority type of PC, especially when it comes to using a computer in stationary conditions.
So what to do if your "computer" one not very fine day suddenly refused to work? First of all, don't panic. A computer is not a magic box, not a product of extraterrestrial technology, a PC is a common electronic device that, in case of failure, can always be repaired.
This article will not discuss the "crash" of the operating system and how to restore it. This is a topic for another conversation. Now we will try to learn how to solve "iron problems". But I warn you, all operations are performed by you at your own peril and risk. In principle, nothing particularly complicated is described here, but you can spoil the technique if you act carelessly and without understanding why this is being done.
Preparing to diagnose a malfunction
So, the computer did not turn on after pressing the button. Well, unplug the power cable of the system unit from the outlet (required!) And climb under the table.
1. Disconnect any "wires" you see. Most of the cables are simply pulled towards you to disconnect, the only exception is the video cable that goes to the monitor. To detach it, you first need to unscrew the special knurled screws.
2. Having disconnected the cables, take out the system unit and place it on a flat, conveniently located surface. Remove the cover. You need to remove the left cover, behind which is the working cavity of the case. If you made a mistake and stumbled upon a pallet - it doesn't matter, just turn the "system unit" over and repeat the "opening" procedure. By the way, I highly recommend preparing a vacuum cleaner. Usually, a lot of dust accumulates in the system units. Be sure to get rid of it.
4. Remove all expansion cards from the slots, starting from the bottom. To do this, you need to unscrew the screws with which the mounting plates of the boards are screwed to the case, and carefully pull the boards up until they completely come out of the slots.
5. Disassemble the video card last. Please note that the video card slot has a special latch, which (depending on its design) will have to be squeezed either down or to the side.
All manipulations with the boards should be performed with the utmost care, without excessive effort. Be especially careful with the video card, as it has a cooling system.
6. After removing the expansion cards, dismantle the RAM strips. One and all. To do this, open the latches of the RAM slots and pull the brackets up.
Self-diagnosis of a computer malfunction
Now we come to key point... We have a motherboard with a central processor installed in it, connected to a power supply. This is enough to start diagnostics.
Attention! Be sure to follow the steps described here in order to avoid electric shock.
Connect the power cable to system unit and plug into a power outlet. Press the computer's power button.
Never touch the computer case or touch anything inside the open system unit!
Listen carefully. Each computer is equipped with a so-called speaker, a system speaker. The speaker during self-diagnosis, which is performed each time the PC is started, issues sound signals... The meaning of these signals can be found in the "Operation Manual" ("manual") of the motherboard. However, it is not so important for us now what the speaker reports, the main thing is the presence of these messages.
Your computer came to life - the processor fan spun, the speaker beep? Everything is fine. Power supply, motherboard and CPU serviceable. If the situation differs from the one described, then there are problems. The case when after pressing the button nothing happened, the fan did not even turn, indicates a probable malfunction of the power supply. You should try to replace the power supply unit and check the computer again. Well, if the "Carlsons" started spinning, but the speaker did not squeak, the "mother", or the processor, or both, are probably faulty. In this case, you need to disassemble the computer (be sure to disconnect it from the network) and try the following: check the processor in another, obviously working, motherboard, check the "motherboard" with another, obviously working, processor.
A small "lyrical" digression. It is very rare, but sometimes it happens, that computer assemblers do not connect the speaker to the connectors on the motherboard. Make sure the Speaker pins are busy. Otherwise, connect the system speaker according to the instructions in the "Manual" to the motherboard.
However, let's return to further diagnostics. As you already understood, all manipulations with the computer must be carried out strictly according to the scheme "turned off - did something - turned on - checked - turned off again - continued." Only in this way you will not "burn" anything and not get an electrical injury.
Insert one stick of RAM into the slot recommended by the manufacturer of the mat. boards when working with one RAM strip. Usually this is the A1 connector, but it is better to check it in the manual. Connect your computer to the network and turn it on. Now, the meaning of the speaker's signal will be very important for us. Open the manual and listen. The speaker should report that "there is no video adapter". If it beeps about missing RAM, then the "RAM" is faulty. In this case, try replacing the bar.
After checking all the RAM strips and making sure they are in good working order (or replacing the faulty ones), install the video card and connect the monitor. In the event of a malfunction of the video card, the monitor screen will not display anything, and the speaker will signal that there is no video adapter. If everything is in order with the "vidyaha", a message will appear on the monitor stating that there is no disk from which to boot.
So it's time to connect the main drive - HDD or SSD. Check if the device is booting. The reason for the inoperability of the PC may be in the "screw". By the way, there were cases when the culprit for the impossibility of loading was not the device itself, but the cable with which it was connected to the motherboard. Well, trying is not torture, try replacing this train.
The final stage is connecting expansion cards and additional drives - hard drives, DVD drives, card readers. In theory, these devices do not affect the ability of the PC to start, but they can have malfunctions, such as a short circuit in the power circuits, which will prevent the computer from operating normally. If, after connecting any of these devices, the computer starts to "kick" again - that's the point.
In general, acting consistently, you will surely stumble upon a faulty "device". You just have to replace it with a new one (or try to repair it in a specialized workshop) and your PC will work again. So, go ahead, I wish you success.
 Why does the blue screen turn on on the iPhone Blue screen on the iPhone 5s what to do
 Everything you need to know about Apple Music
 How To Set Up An iPhone Like New From Zero - Detailed Instructions