What is vpn iphone. VPN on your phone: what is it, why, and how to activate it on iOS and Android. Using VPN through built-in settings
Now I am in Crimea for work, while I regularly experience problems with the Internet and mobile communications.
Either the provider connects to the network from Ukraine, then it uses the communication channel from Russia. So when accessing the network from a rented apartment, some sites may be unavailable, when connecting from a cafe or shopping center, other sites no longer respond, but through mobile network still others refuse to function.
What is the need for VPN
You always need to have a VPN client on hand for quick access to all the sites, services and applications you need. It's not just social networks, but in a banal mail check, which for years collected addressees and subscriptions, but in an instant was unavailable.
In addition to bypassing the visit restriction VK, Mail.Ru and services Yandex I use VPN to listen to music. Cool service Spotify we have not launched it, we have to periodically "move" to the United States for its work.
Some payment services simply refuse to work when they see my location.
Nobody canceled saving on hotels and air tickets when planning trips. We check sites from different parts of the world and choose the most affordable option.
And I also want elementary protection when accessing the network from public Wi-Fi points.
How VPN services differ

Most VPN services work in a similar way. Developers rent servers and data centers in different countries and redirect traffic of connected users through them.
One service differs from another in the number of such servers, their geography and capacity. Otherwise, everything works almost the same.
Only the way each service is monetized may differ significantly.
Some offer a paid subscription, others embed ads in the application, and still others sell the so-called digital portrait of users. In other words, the owners of the VPN "leak" the sites visited by the user to advertisers.
Paid VPN or free

Completely free VPN services should be avoided. They can easily make secretly visited sites public. You will never know how a visit to this or that site will turn out sideways and after what time someone will find out about it.
Maybe nothing bad will happen, but later advertisers may be bombarded with advertisements for products from the "18+" category or start intrusively offering adult videos on all computers and smartphones in the home network.
The ability to remain anonymous must be paid for.
Real monetization can be either with regular subscriptions from users, or with banners paid by advertisers. A one-time payment when purchasing a program will never recoup the cost of maintaining the service.
Whom to bypass

Initially, you should not be distracted by applications that promise safe and anonymous surfing for only 99 rubles. This does not happen.
Among free software we also discard those where not paid subscription or embedded ads.
What did I choose for myself

The Vpn Unblocker application was registered on my iPhone for a long time.
The app is free, but with built-in ads. Instead of annoying offers to pay for a subscription, you can watch a short commercial and turn off banners for several hours. Great option, in which everyone is happy: the developer, the user, and the advertiser.
Of the other advantages, I like the lack of registration. Just installed the application and you can work. Even if you had to use a colleague's smartphone or tablet, you don't need to register or log in under your account.

The service for anonymous visits to sites does not want to light up the phone, e-mail or card details.
Unlike many competitors, this app does not store a custom cache. All data remains only on the smartphone, and after the end of the session, there is no trace of our visit on the servers.
Now Vpn Unblocker allows you to connect to one and a half dozen servers in different countries. The connection is simple and carried out with the push of a button.
It's that simple without SMS, registration and codes.
On the Internet, you can face a situation when you cannot get to the site you need due to the fact that you have limited territorial access to it. That is. the site is not available to citizens of Russia, for example. But in such a situation, there is a solution, and setting up a vpn will help here.
Virtual Private Network is translated as virtual private network. This setting allows you to encrypt your Internet connection, and you can use any opportunity to get online without fear of virus attacks. At the same time, you will always be anonymous on the sites you visit.
Initially, such a connection was used by companies to enable personnel to access systems remotely. For example, while on a business trip or from home. Now such connections are used by individuals to obtain a secure Internet connection in public access points to the network. Or to be able to use the Internet in countries with limited access.
Why VPN on iPhone 6?
How vpn works is pretty simple. Your phone generates a request to connect to a VPN service. After that, he gets off the net. Whereas, all traffic goes through the VPN. Figuratively, it is an imaginary link between your device and the entire Internet that allows you to obtain an IP address. This address masks your actual position.
How to set up vpn on iPhone 6?
There are several ways to enable vpn on your iPhone. The simplest and most popular is the installation through the special TunnelBear application. You can install it for free from the Internet. When the application download is complete, you will be automatically prompted to install the utility profile. Next, you need to choose a country from the proposed list, the server that you are going to use and connect to.
If this option did not suit you, you can download free app v App Store for IOS - Cloak. The principle of operation is the same here. You download, install and set parameters. The VPN enable will be displayed in the upper corner of your device in the form of corresponding letters. If you often need to use public Wi-Fi networks, then having such applications on your phone comes in handy.
There is also a free application for VPN settings on a smartphone - Betternet. Simple and easy-to-use design: two disconnect buttons and connect ... With the first launch, you will need to install a profile. With the subsequent entry into the application, you do not have to do this. Actions will be used: connect or disconnect. The application does not have a limit on the volume of traffic, which is a plus in comparison with the programs above.
You can also set up a VPN on the phone itself without installing special applications from the Internet. To do this, you need to go to the main settings of the device and go to the VPN attachment and click "add VPN configuration" here. Next, you need to fill in the "description" column with a lowercase letter in Latin, for example, supermyvpn. Next, fill in the "server" column, for example, us.suprfreevpn.com. In this case, the first pair of letters indicates the country that will replace your IP address.
In the blank field for the account, write a name for the user. After that, select the desired password and additionally duplicate it somewhere so as not to forget. Next, you need to set "auto" in the encryption tab. "For all data" we put on. Click "on" for the "proxy" field. After all these actions, you need to click "save".
RecommendedWhat is VPN for iPhone?
VPN is a service of a secure communication channel, like a tunnel inside your Internet connection, directly to the servers of the VPN provider. Good providers offer military grade encryption, just like banks, government, and military organizations use. Even if attackers are able to intercept the channel, the data will be impossible to decrypt (it will take decades).
You can set up a VPN on an iPhone using the standard built-in feature, but most users prefer third-party, private servers. Apple already strictly monitors its users, and sometimes it is required to maintain complete anonymity, or at least not provide the company with as much data about itself, including all search histories, online activities, etc.
Better to use separate apps from private companies, choosing whichever you like, rather than the built-in VPN functionality in the iPhone.
Why do I need a VPN for iOS?
In addition to the fact that all your data in some way has access Apple, more and more countries around the world are allowing ISPs to sell search traffic data outside parties, that is, advertisers, marketers, etc. Do you want someone to know about everything that you do online, what you are looking for, what interests you? Most people don’t do anything reprehensible, but it’s unpleasant nonetheless. However, protection against total surveillance is not the only reason to download VPN for iPhone.

Best free and paid VPNs for iPhone
Cyber security experts recommend starting your acquaintance with VPN services with good and proven applications from world leaders in this area. Because, unknowingly, you can install programs on your phone that will show ads, install unnecessary applications for you, sell your traffic, or even worse - use your phone as a link in a chain (through it, strangers will perform any of their actions on the network) ... Best VPN for iOS are:
ExpressVPN for iPhone
The service provides the fastest speed in the world, unlimited number of reconnections without breaking the connection, unlimited streaming and download speeds. Software compatible with all platforms including iOS 11.

NordVPN for iPhone
Compatible with all iOS versions, offers the most powerful encryption in the world, which includes TOR for iPhone, double encryption methods, kill switch and no logs policy. Slightly slower than ExpressVPN.

PureVPN for iPhone
Easy to use and compatible with all iOS systems. AutoConnect selects the fastest server out of 180+, download speeds are fast, and streaming is smooth and unbuffered. Very beneficial if you take a large package.

Ivacy VPN for iPhone
The service does not keep logs, the iOS application is convenient and does not require delving into the settings. Unlimited server switching, unlimited channel, P2P file sharing and the ability to choose a server according to your online activity.

Paid services provide moneyback service for 7-30 days: if you want to try another one, you will simply return the money.
Windscribe VPN for iPhone
This service offers a free basic version, in which only 11 countries are available for connection and 10GB of traffic is given per month. The speed is somewhat slowed down, but for emergency cases it may well be suitable.

Compare Windscribe with paid services VPN

Remember that all your data goes through the VPN connection on the iPhone. And choose a provider responsibly.
VPN is a feature available on iPhone, iPad and iPod touch, which allows you to replace the IP address of the device when accessing the Internet. There are several ways to take advantage of it.
What is a VPN for?
The use of a VPN leads to the fact that when accessing the Internet, all sites and other objects requesting your IP will not receive your individual number, which says from which location you enter the network, but another, tied to another place or another country ...
This function can come in handy in cases where you need to get to a site that is blocked in your country, or enter any resource blocked by the settings of the Wi-Fi network through which the connection is made. VPN provides anonymity, that is, no one will know that it was from your device that a particular Internet resource was entered.
That is, if you are, for example, in Russia, then with using a VPN can set such an IP for its connection, thanks to which it will be displayed everywhere that you are, for example, in Italy.
VPN use is officially prohibited in Russia.
How to use a VPN
On iPhone, iPad, and iPod touch, there are two ways to use VPN services: through your device's built-in settings, or third party application.
Using VPN through built-in settings
To use this method, you will have to find a site that provides VPN services in advance and create an account on it.
- Expand device settings. Opening the Apple device settings
- Go to the main parameters.
 Opening the main Apple settings
 - Select "Network".
 Go to the "Network" section
 - Select the VPN sub-item.
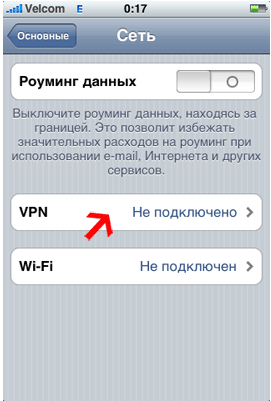 Select the VPN subsection in the "Network" tab
 - Start creating a new configuration.
 Click on the "Add configuration" button
 - Indicate that you want to issue PPTP protocol. Fill in all the fields: "Server" - the site that you found in advance, "Description" - can be obtained on the site, " Account"- the name of your account, RSA - leave the factory value," Password "- the code for the account, if any," Encryption "- absent. After filling in all the cells, save the entered data.
 Fill in empty configuration cells
 - Make sure the options you created are selected by default.
 Setting the default configuration
 - Go back to general settings and activate the use of VPN. If you want to interrupt the VPN connection, then click on the slider again to make the function inactive.
 Turn on VPN in device settings
Video: configuring VPN using the system
Using a VPN through a third-party app
There are many VPN programs available. One of the best is Betternet, which can be installed for free from the App Store. To connect and disconnect the VPN, you need to press just one button, and the time of using the VPN is not limited. That is, you do not have to manually enter settings, create accounts or use any other additional services. It is enough to install the application, go into it and press the Connect button to connect and Disconnect to disconnect.
 Connecting or disconnecting from VPN via Betternet
 Also, you can independently choose which country the VPN will bind you to.
 Choosing a VPN server over Betternet
 Video: VPN setup with Betternet
What to do if the VPN icon is missing
If the device is connected to the network via VPN, then the icon in the top notification bar will correspond to this. The disappearance of this icon means that you are still connected to the Internet, but redirection through the VPN is over. That is, the VPN connection is interrupted, it can be deactivated on its own due to an unstable Internet connection or problems on the server providing VPN services. In this case, you must manually reconnect to the VPN again using one of the methods described above. You may need to reboot the device first and then reconnect.
 VPN icon in the notification bar
 What to do if VPN doesn't work
The VPN connection may not work for two reasons: an unstable Internet connection or a problem with the server providing the VPN service. First, check if your connection is stable to mobile internet or Wi-Fi networks... Secondly, check the correctness of the entered settings if you used the first method described above, or install any other application other than the one described above in the second method, if you used it.
The best way to get rid of the VPN connection problem is to choose a different service or app. The main thing is to find the VPN that will work in your area.
VPN allows you to use services blocked in your area. You can use it through the settings of the Apple device or a third-party application.
Setting up a VPN on a modern iPhone is a breeze if you're using a dedicated app or built-in support for specific protocols. This article will highlight the simple steps that you need to go through for this.
There are three ways to set up a VPN on an iPhone thanks to native support for LT2P / IPSec (the less popular Cisco IPSec is also supported). You can install your provider's app, use a third-party utility, or manually enter connection details into your iPhone's settings.
We'll cover all the methods in this article, and you will have a secure connection in a matter of seconds.
What do you need
To set up a VPN properly, you need an iPhone with the latest iOS version... We are using an iPhone 8 Plus with iOS 11.3.
You will also need a VPN provider account. It doesn't matter which one you choose. You can use the trial version to get started if you're not willing to pay for a monthly subscription. Please note that some providers provide a free trial after downloading and installing the app, not on their website.
If a VPN is new to you, we recommend that you start by downloading your provider's app from the App Store and follow the steps from Method 1. After making sure everything works, you can experiment with Methods 2 and 3, which require a little knack.
Method 1: VPN app
Most providers provide their own apps as this is the easiest way to connect to your VPN. In our example, we're using ExpressVPN, but the steps we'll show remain pretty much the same for the rest of the VPNs.
Once a connection has been established, it will remain active until you turn it off or restart your phone yourself.
Before starting, we advise you to register with your provider and check your email for a confirmation letter.
It would also be nice to have a look at the Software Updates section to make sure you have latest version iOS
- Find and download ExpressVPN on the App Store.
- Open the app and click "Login". However, you can create new account and in the app if you haven't had it before, but don't forget to confirm it via email.

- Sign in to your account using the same details that you provided when registering on the website.
- Click "Allow" for the app to create a connection on your iPhone. The app will ask for confirmation using Touch ID.

- Select a notification mode. This function optional.

- Click Allow if you want the app to send data to ExpressVPN for analysis. This function is optional, leaving it off will not affect your connection in any way.

That's all. ExpressVPN is installed and configured.
The app will automatically choose the location that is best for you. But you can change it if necessary, for this just click "Choose Location".

After a successful connection, the corresponding VPN icon will appear in the upper left corner.

Method 2: OpenVPN
OpenVPN Connect is a third party VPN app for iPhone. If your VPN provider provides downloadable .ovpn profiles, then you can use OpenVPN Connect to set up your connection, avoiding using your provider's app.
This third-party application will connect you to your ISP's server network via the OpenVPN protocol using the data provided by your ISP. The application and protocol are open source products, so they are much more customizable than many applications.
There are some things to keep in mind if you choose this method:
- Each server has different .ovpn files. So if you want to connect to one or two servers, this is a very quick process. But if you need access to dozens of servers, you will have to spend a lot of time configuring.
- You may encounter a "fragment directive" error. It is very easy to overcome it. To do this, you need to edit the .ovpn file in text editor and remove the unnecessary line. We will tell you which one below.
Finding your .ovpn file
Most quick way to configure access to your first server is to download the .ovpn file from the provider's website and then send it to yourself by mail. Then you can open this file using the mail app on your iPhone.
If you are very concerned about your safety, then you can choose other alternatives, for example, cloud storage such as DropBox or Google Drive. If you're on a Mac, you can use AirDrop. However, in our example, we are using the simplest way, just to show how it works.
Create OpenVPN Connection on iPhone
- Log into your account on the provider's website.
- Find settings for manual configuration with OpenVPN. If you are using ExpressVPN, you can find the information you need by clicking Set Up ExpressVPN and then Manual Config at the end of the list.
- On the right side, you will find a list of server locations. Click on the continent you need and select the server to download the .ovpn profile.
- Attach your profile to email and send it to yourself (or save it to Draft).
Leave the browser window open; you will need a username and password shortly.
On your iPhone:
- Open your mail app to view the sent email. Open and click on the attachment.
- Mail will present you with several options with which you can open the attachment. Search for OpenVPN and click open.
- OpenVPN will notify you when the file is ready to import. Click on the green plus sign.

- Click "Allow" to create a VPN connection. Confirmation with Touch ID will be required.

At this point, you should go back to your computer and look at the instructions in the Manual config that you used earlier:
- Enter the username and password provided in this section on your iPhone in the User ID and Password fields. Remember: this data is different from what you enter on the site. So if you try to enter your mail, it won't work.

- If you want to save your login data, then click “Save” in the drop-down notification.
- Click Connect to test the connection and then click Yes.

How to deal with an unsupported Fragment Directive error
If the connection was not established, then you may see a message stating that Fragment Directive is not supported by your application.
To solve this problem, go back to your computer and open the .ovpn file in a text editor.
Move your cursor to the word fragment, delete it, and save your changes. It is important that the rest of the file remains unchanged and that the resolution of the file remains .ovpn.

Email yourself the file again and repeat the steps above.
Method 3: Manual setting
Setting up a VPN connection manually is a surprisingly quick process. Also this good way save space on your device as all connection data is usually stored in the iOS settings app. It will take a little longer to set up the connection this way.
If you are already using the application to connect, you will probably want to uninstall it before starting.
We warn you in advance that by choosing this method, you will be limited by the L2TP / IPSec protocol, and additional functionality, for example, Killswitch, will not be available to you. Similar features come with the app.
You don't have to download anything. You need to find the manual configuration data from your provider's website. If you are using ExpressVPN, then in order to find the information you need, you should go to Manual Config and then to the LT2P / IPSec section.
- Open Settings on your iPhone, then go to General and tap on VPN.

- Click Add VPN Configuration.

- Click on Type and select L2TP.

- Fill in the fields as follows:
- Description: Absolutely any text
- Server: Write the name of the server that your ISP provides you
- Account: Your L2TP / IPSec username
- RSA SecureID: Off
- Password: Your password for L2TP / IPSec. This is an optional field. If you leave this field blank, the iPhone will ask for a password every time you connect.
- Secret: 123456
- Route All Traffic: On

Save the profile and then click on the switch to activate the connection. Your VPN connection will work in background while you use other applications.

Best iOS VPNs in 2019:
Where to find help
Setting up a VPN on your iPhone is a breeze. However, different providers have different connection data requirements. If you have any connection problems, contact your provider's technical service with a description of your problem.
In most cases, there is a dedicated provider application. It will organize your connection in a matter of minutes.
 Architecture of a distributed control system based on a reconfigurable multi-pipeline computing environment L-Net "transparent" distributed file systems
 Email sending page Fill relay_recipients file with addresses from Active Directory
 Missing language bar in Windows - what to do?