Why wi fi is slower. How to limit the possible WiFi connection speed for other users
How to limit the maximum speed of wifi distribution on your equipment for other users?
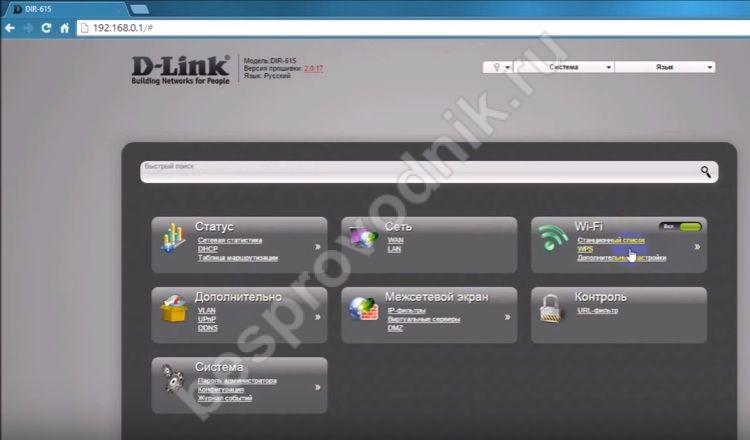
To do this, go to. We dial the standard address 192.168.0.1, drive in the required data by login and password, and get to the desired page. Further actions may differ slightly depending on the specific model of equipment.
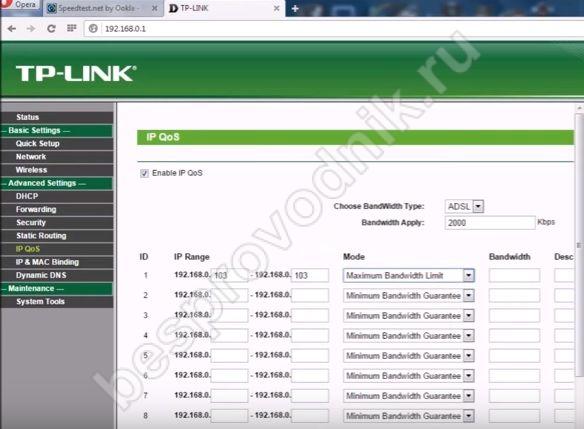
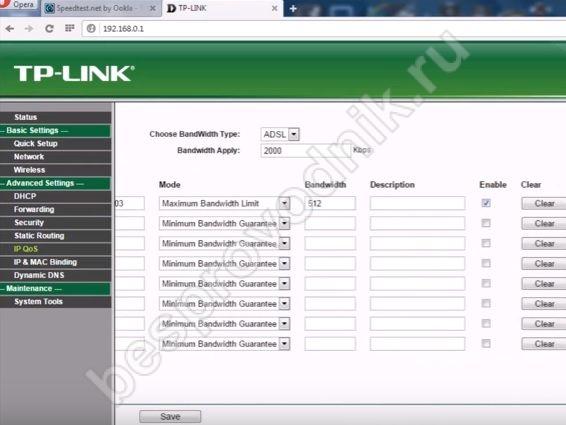
How to limit the maximum wifi upload speed on a router? For the TP-Link router of the TL-WR 340 G version, to regulate the WiFi speed, open "Advanced Settings", find the item "IP QoS". We make a binding for a specific device: we drive its address into the "IP range". By repeating the same combination in both fields, we limit the settings to only one device. In the "Mode" list we find "Maximum Bandwidth Limit". In the "Bandwidth" field, we prescribe the limit on the speed of distributing wifi. In the "Enable" field, put a check mark.
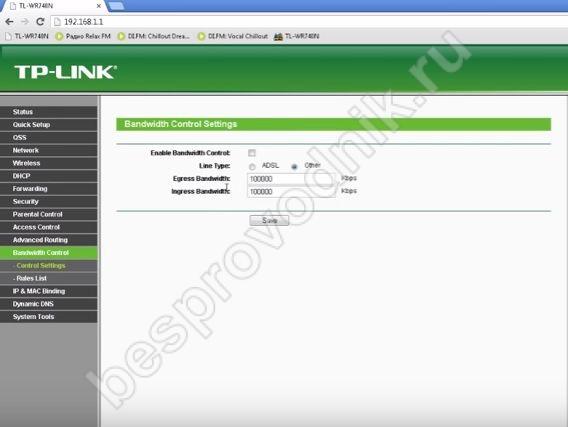
The TL-WR740N model has a “Bandwidth Control” item in the settings. In the settings, we set a limit on the speed of sending and receiving data via WiFi, and also register the required IP addresses. Don't forget to save the created parameters.
Other brands
Besides Tp-Link, there are others popular brands routers. Consider the following manufacturer options:
- Rostelecom;
- Asus;
- D-Link.
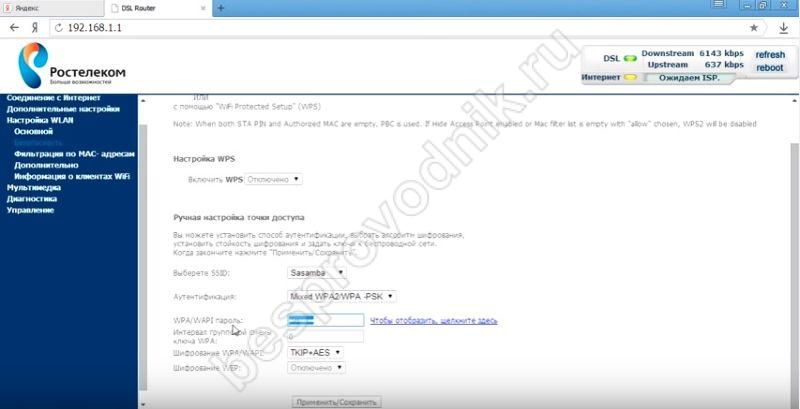
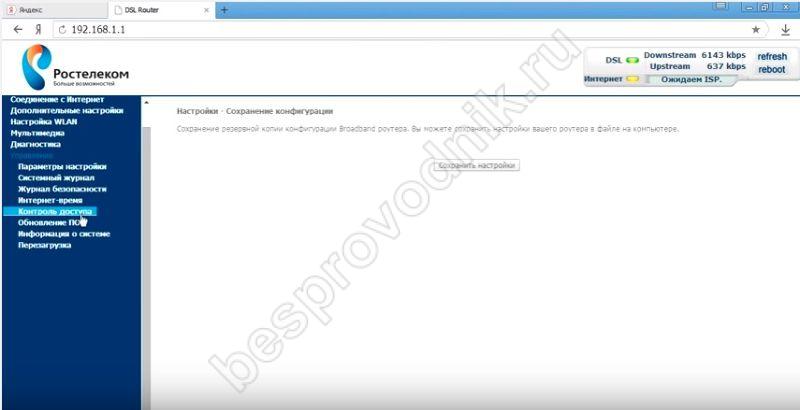
The Rostelecom router has its own options that allow you to control access WiFi distribution networks. In the "Security" section of the "Configuring Wlan" section, the network password is set, which restricts the entry for outsiders. And in the "Management" section there is a special option for access control.
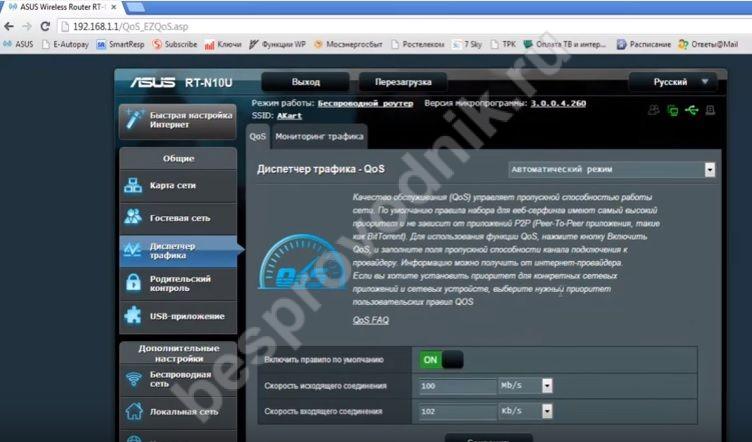
The asus router has a Traffic Manager function. By analogy with TP-Link, we find an item called QQS. We set speed limits for data reception and transmission. Disabling this option is available if desired.
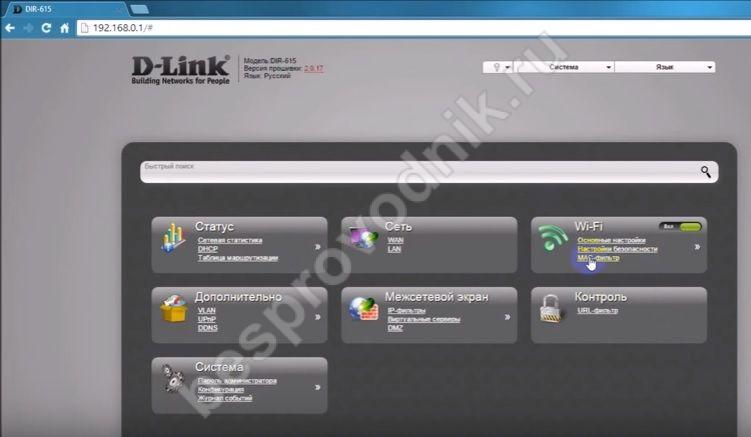
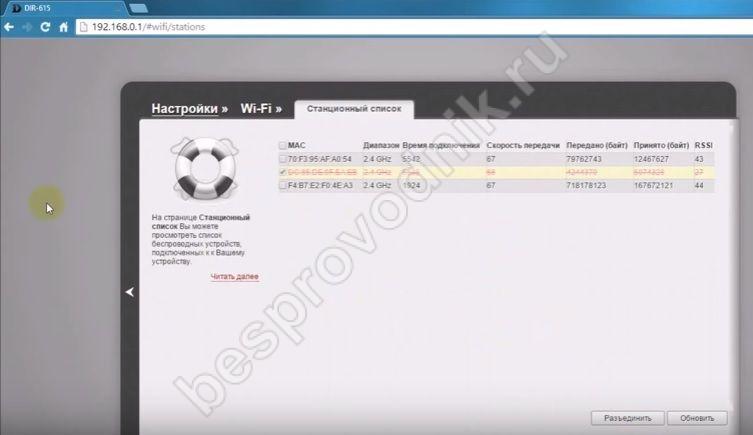
How to restrict the ability to access Wi-Fi and distribute data to a specific user? A variety of options are available in the D-Link router to create the necessary parameters for distributing the network. In the "Wi-Fi" section, restrictions on user connections are set using a MAC filter. The system automatically recognizes the devices connected to you, and you select the address that you want to exclude from the distribution with a tick and save the specified parameters.
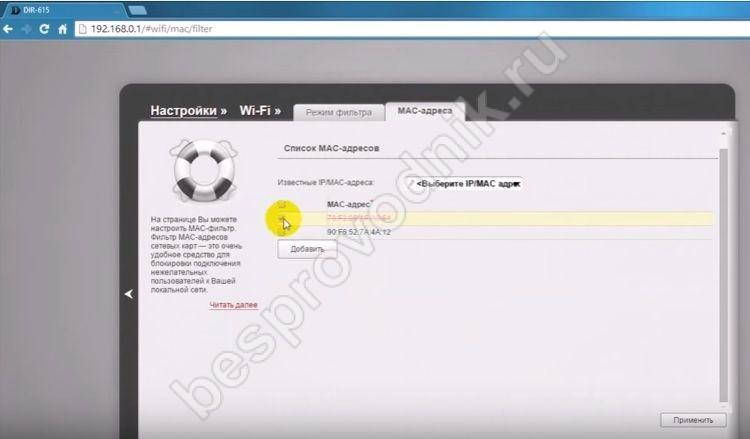
The "Station list" is set in the settings. This section also restricts the connection for unwanted MAC addresses: click the checkbox opposite the device, excluding it from the allowed list.
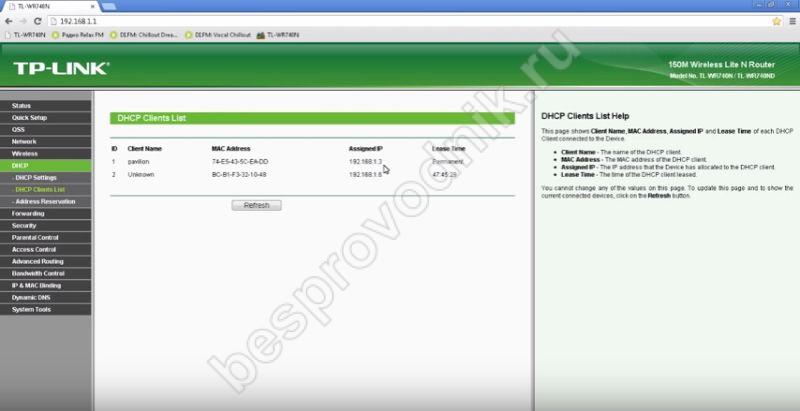
How do I limit the number of wifi connections? On TP-Link equipment, check the existing connections in the "DHCP" tab. If you find unwanted connections, go to the "Wireless" section. There we set up the security of the connection for distribution, and also set a filter for MAC addresses. Add new parameters: activate the filter function with the "Enable" button, add an unwanted user device, identifying it by the Mac address. We confirm its activation status "Enabled" and save the created parameters. Similar options for limiting distribution to users exist in other equipment models: only their location differs in accordance with the design of the settings page of the manufacturer of your router.
How you can limit the speed for the host home network internet center?
Starting from the firmware version 2.05.C2 and 2.06, the function for bandwidth control for interfaces and hosts (nodes) is available in the Internet centers. local network.
In order to limit the speed, you need to install the firmware component Bandwidth control of network nodes and interfaces.
Information on updating NDMS V2 firmware components in Keenetic series routers can be found in the article:
You can limit the speed only for registered devices on your home network.
To do this, go to the menu in the Internet center Home Network> Devices and select the desired device (click on its entry in the list of home network devices).
In the opened window Registering the device on the network in field Speed limit specify the required speed in kbps (this is an integer from 64 to 1,000,000) and click the button Register.
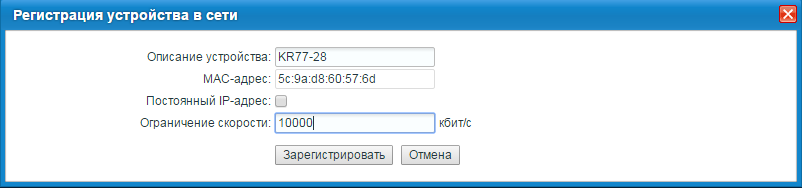
Attention! This speed will be installed for both incoming (download) and outgoing (upload) traffic.
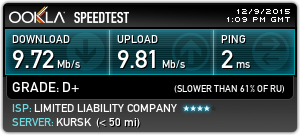
In our example, the home network device was set to a limit of 10,000 kbps (10 Mbps).
To check the connection speed, from the device for which the limitation will be in effect, measure the speed using the web service http://www.speedtest.net:
Note
1. If you have additionally configured the speed limit on the interface Home according to the article, then for the hosts that are registered, the specified restriction will apply, for all other hosts, the restriction on the interface will apply.
Let's give an example:
(config)>interface Home traffic-shape rate 1000
After that, be sure to save the settings in the device's memory. Execute the command system config-save
3. Please note that the Keenetic operating in the additional mode Adapter or Amplifier cannot control the bandwidth of the hosts connected to it.
4. The team ip host traffic-shape
there is an argument schedule
, with which you can enable or disable the rate limiting on the host on a schedule.
To do this, you need to set up a schedule with a specific name and then bind it to the host.
For example:
4.1. Create the required schedule in the web interface;
4.2. Register a specific host on your home network;
4.3. In the config, see the name of the created schedule:
schedule limit01
description traffic1
action start 0 16 4
action stop 35 16 4
in our example, the name of the schedule limit01;
4.4. In the config, look at the MAC address of the registered host:
known host TEST 5c: 9a: d8: 60: 57: 6d
4.5. Run the command:
ip traffic-shape host 5c: 9a: d8: 60: 57: 6d rate 5000 schedule limit01
4.6. Give the command to save the settings in the device memory:
system config-save
As a result of executing the above command, the host with MAC address 5c: 9a: d8: 60: 57: 6d will have a 5000 kbps rate limit on Thursdays from 16-00 to 16-35.
It often happens, especially with public Wi-Fi points, that it is necessary to artificially reduce the Internet speed for some users in order to use it normally, for example, on an administrator device. In our article today we will talk about how to limit the speed of Wi-Fi distribution for all users evenly or for each separately, which is also sometimes very necessary.
First of all, you need to connect to the router and then enter the browser you are using. By the way, we will carry out further consideration using the example TP-Link devices with latest firmware... V address bar browser, enter the address 192.168.0.1 or 192.168.1.1, after which you will be redirected to the login and password entry page (by default, both there and there are admin).
General limitation
Now we will, in essence, look at how to distribute Wi-Fi speed for all devices that are connected. Inside on the left, select DHСP and, going to the tab, put a mark, as shown in the screenshot. In this case, everyone who will be connected in the future will receive a fixed address from the list.
Now we go back to the menu on the left, and look for "Bandwidth Control" there, go and check the box, and then prescribe the incoming and outgoing speed - they must correspond to the speed provided by the provider. At the end, click on the "Save" button and wait for the end of the router reboot, after which you will be returned to the settings.
Now in the previous paragraph on the left we are looking for the “Rules List” sub-item, and in it the “Add New” button.
Now you need to check the box, write down the range of those addresses that you saw in the DHCP tab, and set the speed a little lower. “Egress” is a recoil, so you can safely set it not too high, and “Ingress” is a technique, you can set it a little more. After that, again, click on the "Save" button.
After the rule has been created, you can edit it repeatedly by simply clicking on the "Modify" button, or delete it with the "Delete" button.
User restriction
Now that you know how to restrict Wi-Fi sharing to a range of users, you can move on to restricting individual devices if needed. After going through the steps of the instructions with the DHCP tab, do not rush to move somewhere further. You need to find in the same section a subsection called "Address Reservation" and in it again find the "Add new" button.
On new page in the MAC field, enter the address of the user's adapter, and below the IP address that it will receive upon connection.
The first you can get in two ways - look in the router in the "Clients List" sub-item or through command line on the client computer. To do this, we look for cmd in the programs, and after opening it, enter ipconfig / all and press "Enter", after which we get information (where to look is indicated in the screenshot).
Most modern TP-Link routers are capable of limiting the connection speed. This function is also called shaping or shaper. In this article, you will see how to configure speed limiting in TP-Link routers.
Uniform rate limiting for all clients
In this section, we will consider a situation when all connected users need to set the same connection speed.
Push the button "Start Checkout".

After measuring the speed, we get the results. They should roughly match the speed that you specified in the client limits.
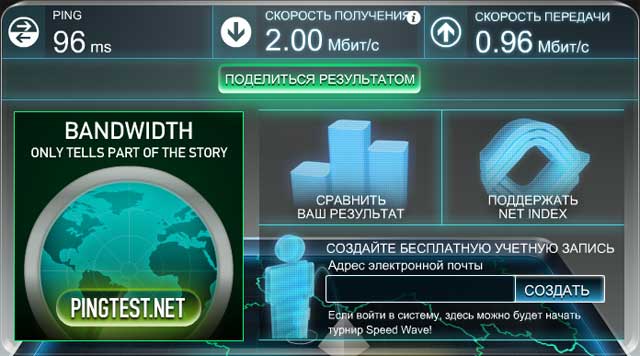
The rate limiting for our client is working.
We add restrictions for other clients in the same way.
Protection against changing the client's MAC address
Rate limits will work for every wireless client that you bind an IP address to a MAC address. However, if the client changes the MAC address of his network adapter, it can fall into the general speed limits of the router, i.e. get access to maximum speed Internet connections.
To prevent this from happening, you need to create a list of MAC addresses in the router that are allowed to connect to the router. All clients not on the list will not be able to connect to the router.
Go to the menu Wireless - Wireless MAC Filtering and press the button AddNew ...
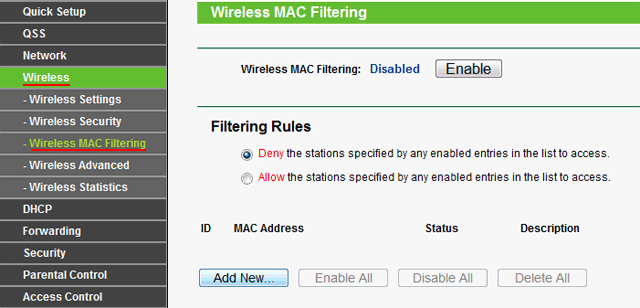
First of all, you need to add your wireless devices from which you configure the router. Otherwise, after applying filtering, you will not be able to connect to the router.
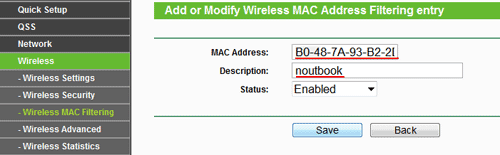
In field MAC Address: enter the allowed MAC address.
In field Description: we indicate the description of the computer.
In field Status: should be chosen Enable.
Push the button Save to save the settings.
In the next window, we activate filtering by MAC addresses m. We choose Filtering Rules - Allow and press the button Enable.
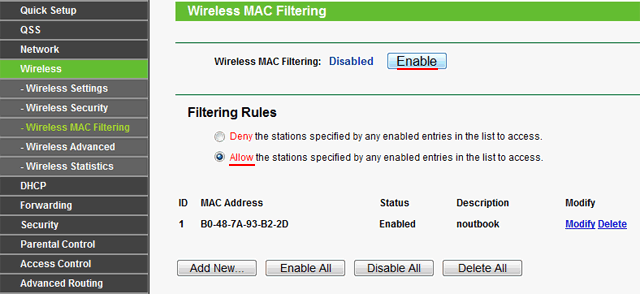
Now only clients whose MAC addresses are included in the allowed list will be able to connect to the router.
July 3, 2014 | comments: 0
Now I will show you how to limit the speed on a Wi-Fi router.
Method 1
If you are using a router or router to create a wireless access point, open its settings menu. To do this, enter the IP address of this equipment into the browser line and press the Enter key. Open the setup menu wireless network... If the capabilities of this router model allow you to enable the operation of the 802.11 network (without letters), then the channel speed will automatically be limited to 1 Mbps. Please note that this value will be divided by the number of connected to Wi-Fi networks devices.
Method 2
If Wifi router does not work with this type of radio signal, then find the item "Connection Speed" or Connection Speed. Install desired value from 1 to 54. Save the settings and reboot the router.
Method 3
If you use stationary computer and Wi-Fi adapter to create a wireless access point, first try to lower the channel speed using the functions Windows systems... Open the properties for My Computer and go to Device Manager. Find your wireless adapter and click right click mouse by its name. Select Properties. Open the "Advanced" tab and enable the 802.11 operating mode.
4 Method
If this Wi-Fi adapter does not support this type of radio signal, then install the NetLimiter software and run it. Now find the device you need in the displayed list and set the parameters of the Internet access speed for it. Be sure to fill in both items: Incoming and Outgoing. The speed values in this utility are specified in kilobytes.
5 Method
As an alternative to NetLiniter, you can use the TMeter and Traffic Inspector utilities. Be sure to save the created filters to avoid having to re-configure the utility after restarting your computer.
 Differences Between GPT and MBR Partition Structures
 Wipe Internet Explorer cleanly
 Windows updates are downloaded but not installed