Download firmware htc one me phone. Flashing or flashing HTC phone, smartphone and tablet. Updating HTC One manually
Almost every user of HTC phones on the Android platform is faced with the need to flash their own gadgets. This allows you to save your phone from many problems and freezes, improve performance and change the interface.
However, this is quite difficult to do. In our article, we will tell you how to flash htc android yourself.
Preparing your phone
Initially, the phone needs to be prepared for the firmware. To do this, follow these steps:
- Get ROOT rights. To do this, you need to download and install the z4root program.
- Download the Unrevoked program.
- Turn off Desire and start it in HBOOT menu mode. To do this, press the Volume Down and Power keys simultaneously.
- Connect the phone to the computer using a USB cable (you need to wait for the next text message- HBOOT USB PLUG).
- Open "Device Manager".
If you did everything right, you will see the unidentified there android device... Click on it right key mouse and select "Update drivers".
To exit the HBOOT menu, you need to turn off the phone, and then start it in standard mode.
Main part
- Download the required firmware. It is recommended to download the necessary files from the official website htc.com.
- Save all important information on your gadget. Please note that for Reserve copy files and programs, you can use the Titanium Backup utility.
- Charge your phone (at least 60%).
- Clear all user information. To do this, you need to go to "Settings" through the phone interface, and then select "Privacy" and "Reset data". This is required so that there is no mismatch between the firmware modules.
Installation
- In recovery, select "install zip from sd-card".
- Find the downloaded zip firmware.
- We launch the program. If everything is fine, the installation will start and you will see the corresponding labels. When the firmware is finished, you will see the message "Installation completed".
- We reboot your phone and wait for the download to start.
As practice shows, HTC can be flashed in fifteen to thirty minutes. The first start-up after this operation can be lengthy. Don't worry about this. If you do everything right, you will get current version Android.
Potential risks
If you plan to flash your device yourself, without resorting to the help of specialists, then do not forget that there is always the possibility of certain problems:
- Loss of official warranty. Today, any change in the phone software will result in the loss of the warranty.
- Inability to turn on the device. This can happen for a variety of reasons. It is possible that something did not install correctly or the user made a mistake. However, you shouldn't worry. As practice shows, the phone can almost always be reanimated without contacting service center.
For the firmware to be successful, follow all the steps described above carefully and carefully. In addition, you can always find a tutorial video that shows you the step-by-step procedure for flashing HTC.
One is no longer the last novelty from the manufacturer, having acquired a worthy successor, but the smartphone is still highly popular due to its functionality and reliability. If you like to use the device's capabilities to the maximum, you should update HTC One OS in a timely manner, which is possible in two scenarios: using OTA updates, or using custom ROMs.
By choosing any of the procedures, the user will be able to access all the latest innovations, as well as increase the performance of the device. It should be noted that updates often open up new possibilities for personalization. Now let's take a closer look at how to accurately update the HTC One operating system.
It's no secret that automatic OTA updates of HTC One have always been and will be the simplest way, but you should pay attention to the following nuance: OTA updates do not arrive at all devices of the same model at the same time. This factor depends on the operator, manufacturer and region where the smartphone itself is located. If OTA updates to HTC One are not yet ready, but they can already be found on the network, you can install it yourself. In this situation, the device warranty remains valid. Another option when you need to manually install official updates is to switch from unofficial custom to official Android OS from HTC.
If you want to receive additional opportunities and dramatically increasing the performance of your HTC One, it's worth installing a custom ROM. This implies the need, and the installation of a custom recovery image or. The Extended Features Pay is a factory warranty. However, you can get it back by downloading and installing the official latest version firmware HTC One.
What do you need?
PC or laptop
Disabling antivirus protection temporarily
Smartphone battery charging at least 50%
Backups meaningful data and settings, including Nandroid backup
Confidence that these updates are specific to this HTC One model
Awareness of the share of risk and personal responsibility for installing a custom ROM.
Updating HTC One with OTA
1. Check if HTC One is connected to a WiFi network.2. Go to the smartphone menu, open the settings option.
3. Click on the System option, HTC Software Updates sub-item.
4. Select Check now.
5. If there are new updates available, install them on HTC One.
6. The installation process will be automatically completed after restarting the smartphone.
Updating HTC One manually
1. Install on a PC that matches your HTC One model.2. Following the instructions, launch the Update Utility.
3. When USB help cablez HTC One is connected to the computer.
Updating HTC One with custom firmware
1. (in the absence of applications in this firmware) download to a personal computer.2. You do not need to unpack them.
3. Connect the smartphone to the PC and transfer both files to HTC One.
4. Turn off the smartphone and reboot into recovery mode.
5. We make a wipe ( wipe data factory reset and wipe cache partition, as well as wipe dalvick cache from the menu section advanced).
6. We go back to the main menu, select the following options: install zip from SD card and choose zip from SD card.
7. Install the update file first, and then Gapps.
8. Go back to the main menu of the recovery mode, restart HTC One.
Applying this theoretical material in practice, one should not forget about the high degree of responsibility for this procedure, which is entirely assigned to the user. mobile device, at his own risk.
Complete guide to flashing HTC One (m7) smartphone, installing ClockworkMod recovery, unlocking Bootloader and installing custom firmware.
1. Download the files for working with adb and fastboot and the driver for connecting the phone to the PC HTC Driver 4.8.0.002 You will need them almost always.
2. Unpack the archive to the c: \ android folder. There should be 4 files in the folder
3. Connect your smartphone to your computer using the original usb cable(the one that came with the smartphone)
4. Install the drivers (loaded earlier). The smartphone in the computer device manager should be defined as MyHTC
5. And now more about unlocking the bootloader on HTC One (m7)
You need to unlock bootloader on HTC One (m7) phone
Important! Unlock Bootloader process will reset your phone to factory default!
Register on the site https://www.htcdev.com/ Select "Unlock Bootloader" and click "Get Started"
Select the "All Other Supported Models" section from the list and click "Begin Unlock BootLoader"
Agree to all the conditions and go to the page with the manual (key "Unlocking Bootloader Instructions").
Put your smartphone into fastboot mode (into the bootloader): turn off the smartphone by pressing the Power key and hold until it reboots, then release Power and immediately press the Volume down (-) and hold until you enter the bootloader (bootloader)
Check how the smartphone is detected in the device manager. You need to have MyHTC.
Start a terminal. In the c: \ android folder, while holding down the Shift button, right-click anywhere and select - Open command window. The command line will start, in which it will be written c: \ android>

V command line type fastboot oem get_identifier_token


Select and copy the text (right-click, select Mark, press Enter) as shown in step 9 on the HTCDev website
Paste in the form "My Device Identifier Token:" on htcdev.com and click Submit (step 10)
Through time on your e-mail you specified during registration, you will receive a notification with the attached file Unlock_code.bin. Download it and save it in the c: \ android folder
In the command line enter fastboot flash unlocktoken Unlock_code.bin
A menu with Unlock bootloader should appear on the phone. Select Yes (volume rocker) and press the Power key.

The smartphone will restart. Ready!
To be sure that the bootloader is unlocked, reboot the phone into the bootloader and the inscription *** UNLOCKED *** should appear in the upper corner of the display, which indicates the successful unlocking process of the HTC One bootloader
6. Installing custom recovery (in this case CWM)
Download custom recovery and rename to recovery. img. (There is no big difference what kind of recovery to install. Often the firmware developers advise to install some kind of specific recovery), for example, like this - recovery.zip If you downloaded a zip archive, you need to remove the recovery.img file from there
Place the file you downloaded in the same folder as Android files i.e. C: \ Android
Put your smartphone into fastboot mode and enter this code in the command line:
fastboot flash recovery recovery.img
fastboot erase cache
Recovery has been successfully installed on the smartphone. In order to enter the recovery, you need to - put the smartphone into fastboot mode, select Bootloader with the volume keys and press the Power key, then select Recovery and press the Power key again
7. Download any firmware you need (you can download firmware for HTC One (m7)) and place it in the smartphone's memory, for convenience it is better to put it in root folder(to look for her less in the future). If this is a firmware based on CyanogenMod, then you also need to download Gapps - a Google application ( Play Market etc.). You can take them
8. Reboot into recovery
9. Then make a backup of the existing firmware. For this, in the recovery, you need to select the Backup section: in CWM - Backup and Restore / Backup, in TWRP - Backup. It is better to save the resulting backup on a computer, since in the future it will be necessary to return to its initial state (especially important for "rare" smartphones) *
10. Make wipes, that is, bringing to the factory form.
In CWM - Wipe data / factory reset, wipe cache partition, Advanced / Wipe dalvik cache. In TWRP - Wipe, swipe to execute. You can manually select partitions for cleaning: Dalvik Cache, Cache, Data, System. To do this, click Advanced Wipe.
11. Install the firmware. In CWM - Install zip from Sdcard → Choose zip from sdcard → select the downloaded firmware → confirm. In TWRP - Install → select the downloaded firmware → confirm.
12. Everything is ready! The firmware will be installed! If you chose a firmware based on CyanogenMod, then you need to install Gapps - just like the firmware
13. Reboot the machine
It is much more convenient to reboot into recovery or bootloader using ADB commands** (enter on the command line):
1.adb reboot recovery - to reboot in recovery
2.adb reboot bootloader - to reboot into the bootloader
Well, that's all, your smartphone with the unlocked bootloader will be flashed to the new firmware.
But I still want to start with general points. What is MIUI and why shouldn't it be confused with shells, as sometimes happens? The shell offers some functionality, often very good and deep, in the sense that it touches many parts. operating system, however, the matter does not go beyond some areas, and the shell is simply unable to cover many things. Take, for example, the now very popular Go Launcher - an excellent shell for Android with a bunch of functions, convenient desktops, its own program menu, and so on. However, as soon as you want more, you need to put additional programs, albeit also from these developers, in our case the GO Dev Team. First you need to install their program for working with contacts, then for SMS-messages, keyboard, task manager, widgets and much more. As a result, after installing all the utilities and widgets, the "bare" Android device, "freshly hard-wired", is crammed with software. Sometimes this is not bad, sometimes - the smartphone just starts to work not so quickly and smoothly, and some just do not like to install dozens of programs.
With MIUI, everything is different - this is the firmware, and it is installed instead of the standard Android firmware your device, bringing with it all the basic functionality, but not the standard one, but from the MIUI set. This firmware has a proprietary lock window, its own notification panel, contacts, a dialer, a menu for working with messages, desktops, a settings window, and so on. Little reminds of Android here, except for the general principles of working with firmware on touch screen, and so MIUI, if desired, can easily be mistaken for both Android and iOS with due diligence of a certain user to make it similar to these systems.
What do I like about MIUI first of all?
The ability to select hundreds of themes and settings for each of them in detail. There is flexibility here that no modern system has dreamed of, and that was not even on the S60 during the heyday of this OS. You can take a design style from one theme, attach program icons from another, take a picture and styles for individual elements from a third, and transition effects and lockscreen from a fourth.
A lot of small settings and developers' attention to details, which one cannot even dream of in basic firmware for smartphones: the battery level as a percentage in the status bar, displaying the current speed of the Internet connection in the same place, the ability to change the type of grid for placing icons on desktops, you can choose 4x4 or 4x5.
And now about how to install MIUI on HTC One X and how interesting the device is with the new firmware.
Preparing HTC One X for MIUI installation
I must say right away that when you look at the instructions, the links to which I will give below, it may seem to you that all this is very difficult and will take three days without sleep and food, so you decide not to even try. In fact, preparing a smartphone for installing custom firmware is easy and simple if you strictly follow step by step instructions and read them carefully, it takes no more than 30-40 minutes, maximum an hour.
In order to install the official MIUI or one of the assemblies of this firmware on your HTC One X, you first need to unlock BootLoader in your smartphone, this is done using the official HTC website for developers. Then you will need to flash the recovery menu with a custom and use it to install the selected firmware. Below I give a link to a detailed description of how all this is done, you just have to follow the instructions carefully, and everything will be fine.
Important! When you unlock your smartphone's Bootloader via the official website htcdev.com, you will automatically lose your device warranty. If something happens in the machine mechanical problem or a defect that does not depend on the software, it will be repaired in the service center, but with problems like "does not catch the network", "does not see the SIM card" and so on, it will no longer be possible to contact the service center for free repair.

After the unlock and installation is done custom recovery, it remains to choose the version of the MIUI firmware for the device, which you will install. You can take the firmware from the official website miui.com, from the Russian-speaking miui.su with support for the Russian language and high-quality translation, or you can take the assembly from KOJAN on the site w3bsit3-dns.com.

Installing the firmware on an unlocked device is very simple - you need to reboot CWM recovery and select the installation item from the zip archive, and then indicate your firmware in this archive, pre-loaded into the smartphone's memory. The installation process takes less than 5 minutes, after which the device reboots, and now you are already working with HTC One X on MIUI.

MIUI on HTC One X. Impressions
First of all, I need to say that MIUI is very different in appearance, you can literally blind anything from the device on this firmware. Want HTC One X with a shell from Apple iPhone 4S or with a lock screen. How in Windows Phone? Please. Or a theme from Samsung Galaxy S III? Or HTC One X's native Sense interface? All this can be done with the help of themes, of which there are a lot for every taste. If nothing fits, you can mold your theme from different components.

Of the shortcomings, I want to note one important point, in my opinion, - the inability to change the set of shortcuts on the lock screen. Yes, you can choose a theme with six shortcuts instead of four, but that doesn't solve the problem.

But, of course, there are many more positive aspects. I like the attention to detail. For example, here's what the lock window looks like while charging a smartphone, you can clearly see the charge level.

And in the notification panel at the top, you can customize the type of display of the charge level by making it a green bar along the top of the screen or by selecting a percentage.

In general, there are a lot of settings for such an area as the notification panel in MIUI. Up to the point that you can choose which programs are allowed to leave information here, which ones - to prohibit.
 |
 |
 |
 |
Everything related to calls and dialing in MIUI is also done on the highest level... Firstly, there is a convenient and at the same time beautiful address book. Secondly, there is a function quick search contacts through numeric keypad(smartdial). Thirdly, there are full-screen photos of subscribers, if you reassign them to all the necessary contacts. It looks cool.
 |
 |
 |
 |
If a stranger calls you, a picture from the lock screen is displayed. And if the subscriber calls to whom the picture is assigned Low quality, then the system will not stretch it to full screen, which Android usually does, but will show a photo as a mini-picture to the left of the caller's name. This is what I call attention to detail.
Well, and most importantly, as I said above, the system becomes very beautiful. This applies not only to themes and icons, but in general. The quality of drawing of all buttons and interface details, effects, smooth operation of the system - all this makes MIUI very high quality. In my opinion, MIUI is the most beautiful thing that exists for Android now, the graphics in it, again, for my taste, are even better than in Sense, except for a similar weather widget.
 |
 |
 |
 |
To summarize briefly, I am "happy with the MIUI installation on my HTC One X like an elephant." Of course, I like the standard HTC Sense, and fresh update Jelly Bean, which I recently looked at on the Galaxy Nexus, leaves a pleasant experience. But now, almost a year later, I returned to MIUI and again I feel that this is exactly the version of Android that is closest to me.

As for stability, I've only been using MIUI on HTC One X for two days, and so far I haven't had any glitches. Of course, the period is very short, but even during this period I can say that the device did not sit down faster, work slower or catch the network worse, everything is still in order with it. Well, if after two weeks of operation I get a lot of impressions (glitches, crashes, bugs, or, on the contrary, HTC One X suddenly starts working for two days), then I will definitely share with you, dear readers.
Should you upgrade to MIUI?
It is generally accepted that custom firmwares are unreliable and problems constantly occur with them. It seems to me that this opinion came from ancient times and blossomed when many different custom Windows Mobile devices were released, because now I see a different picture. According to polls of friends who set themselves custom, they are doing well, Evgeny Vildyaev, our author, also does not complain, while he often changes the firmware. I myself rarely dabble in installing new firmware, but when it happens, I also have no problems. I do not at all urge everyone to rush to install MIUI or other popular custom firmware, because if you are satisfied with absolutely everything in your device, then why look for good?
It's another matter if you use a smartphone for almost 30,000 rubles and some of its features are not to your liking, I'm not talking about a short battery life now. If some features in the device do not suit you, why not try changing the firmware and look for the one that you like and will delight you? And the MIUI project is a very high-quality firmware for Android, which, in my opinion, every self-respecting fan of this system should try at least once, at least for familiarization.
Artem Lutfullin ()
Every smartphone owner wants to make his device better, turn it into a more functional and modern solution. If the user cannot do anything with the hardware, then everyone can easily improve the software. HTC One X is a high-end phone with excellent technical characteristics... How to reinstall or replace the system software on this device will be discussed in the article.
Considering the NTS One X from the point of view of the firmware capabilities, it should be noted that the device “resists” interference in its software in every possible way. This state of affairs is due to the manufacturer's policy, therefore, before flashing, you should pay special attention to the study of concepts and instructions, and only after fully understanding the essence of the processes, proceed to direct manipulations with the device.
Every action carries a potential danger to the device! Responsibility for the results of manipulations with a smartphone lies entirely with the user who performs them!
As with other Android devices, the success of the procedures for HTC firmware One X is largely determined by the right preparation. We carry out the following preparatory operations, and before carrying out actions with the device, we study the proposed instructions to the end, download the necessary files, prepare the tools that are supposed to be used.

Drivers
The easiest way to add components to the system for interaction of software tools with the One X's memory partitions is to install HTC Sync Manager - the manufacturer's proprietary program for working with smartphones.


Backing up information
The use of the methods described below for installing the system software in the device in question assumes the erasure of user data contained in the smartphone. After installing the OS, you will have to restore the information, which is not feasible without a previously created backup. The official way to save data is as follows.


Necessary
For operations with partitions of HTC One X, in addition to drivers, you will need to have functional and convenient software tools in your PC as a whole. Be sure to download and unpack the package with and to the root of the C: drive. Below, in the description of the methods, we will not dwell on this issue, implying that Fastboot is present in the user's system.

Run in different modes
For the installation of various system software you will need to switch the phone to special operating modes- "BootLoader" and Recovery.


Unlocking the bootloader
The instructions for installing modified firmware below assume that the device's bootloader is unlocked. It is recommended to carry out the procedure in advance, but this is done using the official method proposed by HTC. And it also assumes that Sync Manager and Fastboot are installed on the user's computer and the phone is fully charged before doing the following.
- Follow the link to the official site of the HTC Developer Center and press the button "Register".
- Fill in the form fields and press the green button "Register".
- Go to the mail, open the letter from the HTCDev team and click on the link to activate your account.
- After activating your account, enter your username and password in the appropriate fields on the HTC Developer Center web page and click Login.
- In the area of "Unlock bootloader" click "Get Started".
- In the list "Supported Devices" you need to select all supported models and then use the button "Begin Unlock Bootloader" to proceed to further steps.
- We confirm the awareness of the potential danger of the procedure by clicking "Yes" in the request window.
- Next, we set the marks in both checkboxes and press the button to go to the unlocking instructions.
- In the instruction that opens, skip all the steps.

and leaf through the instructions to the very end. We only need a field to insert the ID.
- We put the phone into mode "Bootloader"... In the list of commands that opens, select "FASTBOOT", then connect the device to the PC with a USB cable.
- Open the command line and write the following:
cd C: \ ADB_Fastboot

- The next step is to find out the value of the device ID required to obtain permission to unlock from the developer. To get information, enter the following in the console:
fastboot oem get_identifier_token

and start executing the command by pressing "Enter".
- The resulting set of characters is selected using the arrow buttons on the keyboard or with the mouse,
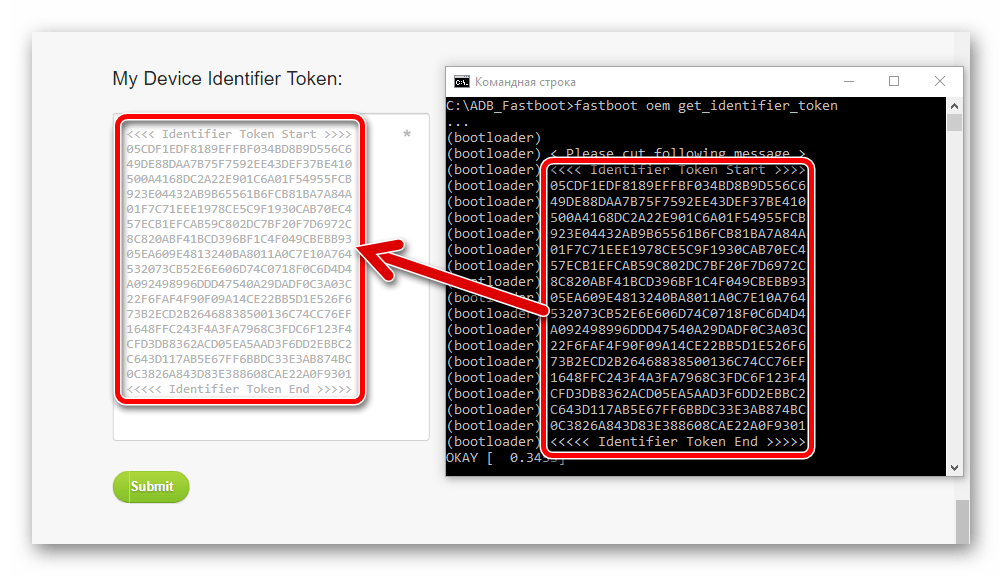
and copy the information (using the combination "Ctrl" + "WITH") into the appropriate field on the HTCDev web page. It should look like this:

To go to the next stage, press "Submit".
- If the above steps are completed successfully, we receive an email from HTCDev containing Unlock_code.bin- a special file for transferring to the device. Download the file from the letter and place the downloaded file in the Fastboot directory.
- Send the command via the console:
fastboot flash unlocktoken Unlock_code.bin
- Executing the command above will lead to a prompt on the device screen: "Unlock bootloader?"... We set a mark near "Yes" and confirm the readiness to start the process using the button "Turning on" on the device.
- As a result, the procedure will continue and the Bootloader will be unlocked.
- Confirmation of successful unlocking is the inscription "*** UNLOCKED ***" at the top of the main mode screen "Bootloader".


Installing custom recovery
Any serious manipulation of the HTC One X system software will require a modified recovery environment (custom recovery). Provides a lot of opportunities for the model under consideration. Let's install one of the ported versions of this recovery environment into the machine.


Firmware
In order to bring certain improvements to the software part of the device in question, to upgrade the Android version to more or less relevant, as well as to diversify the functionality, you should resort to using unofficial firmware.
To install custom and ports, you will need a modified environment, which can be installed according to the instructions above in the article, but first you can simply update the version of the official software.
Method 1: Android application "Software Updates"
The only method of working with the system software of a smartphone officially authorized by the manufacturer is to use the tool built into the official firmware. "Software Updates"... During the life cycle of the device, that is, while system updates from the manufacturer were released, this feature regularly reminded of itself by persistent notifications on the device screen.

To date, to update official version The OS will either be convinced of the relevance of the latter, it is necessary to do the following.


Method 2: Android 4.4.4 (MIUI)
Third-party software can breathe new life into your device. The choice of a modified solution lies entirely with the user, the available set of different packages for installation is quite wide. As an example, below we used the firmware ported by the MIUI Russia team for HTC One X, which is based on Android 4.4.4.

- We install the modified recovery in the way described above in the preparatory procedures.
- Download the software package from the official website of the MIUI Russia team:
- Putting the zip package in internal memory apparatus.
- We load the phone in "Bootloader", further into "RECOVERY"... And we ALWAYS make a backup by selecting the corresponding items in CWM one by one.
- We do wipe (cleaning) of the main system partitions. To do this, you need the item "Wipe data / factory reset".
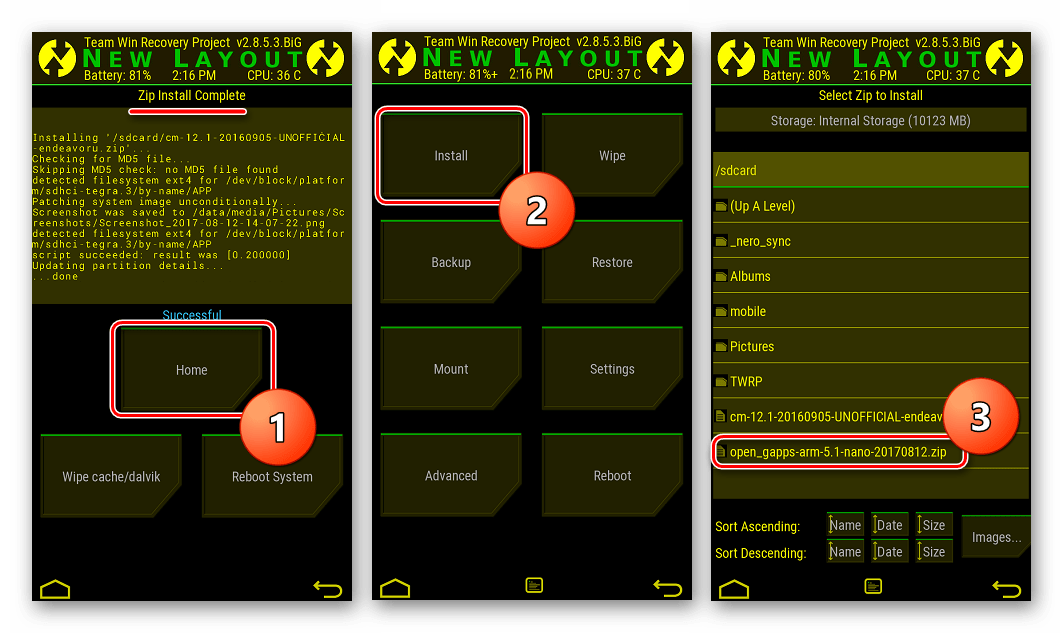
- Go to Install zip on the main screen of CWM, indicate to the system the path to the zip-package with the software, having previously selected "Choose zip from storage / sdcard" and start the installation of MIUI by clicking "Yes - Install ...".
- We are waiting for the appearance of an inscription confirming success - "Install from sd card complete", return to the main screen of the environment and select "Advanced", and then reboot the device into the Bootloader.
- Unpack the firmware with an archiver and copy boot.img to the directory with Fastboot.
- We put the device into the mode "FASTBOOT" from the Bootloader, connect it to the PC, if disconnected. Run the Fastboot command line and flash the image boot.img:
fastboot flash boot boot.img
- Reboot into updated android using paragraph "REBOOT" on the menu "Bootloader".
- You will have to wait a bit for the initialization of the MIUI 7 components, and then carry out initial setup systems.

It is worth noting that MIUI on HTC One X works very well.


Additionally. If the smartphone does not boot into Android, which makes it impossible to copy packages to memory for further installation, you can use OTG capabilities. That is, copy the package from the OS to a USB flash drive, connect it through the adapter to the device and, with further manipulations in the recovery, indicate the path to "OTG-Flash".


Method 3: Android 5.1 (CyanogenMod)
In the world of Android devices, there are not many smartphones that have been successfully performing their functions for more than 5 years and at the same time are popular with enthusiastic developers who successfully continue to create and port firmware based on new versions of Android.

Probably, the owners of HTC One X will be pleasantly surprised that a fully functional Android 5.1 can be installed in the device, but after doing the following, we get exactly the same result.
Step 1: Install TWRP and New Markup
Among other things, Android 5.1 carries with it the need to re-partition the device's memory, that is, resize partitions to achieve better results in terms of stability and the ability to perform functions added by developers to the new version of the system. To carry out re-partitioning and install custom based on Android 5, you can only use a special version.


Step 2: Install custom
So, the new markup is already installed on the phone, you can proceed to install custom firmware with Android 5.1 as a basis. Install CyanogenMod 12.1 - an unofficial firmware port from a team that needs no introduction.


- "Platform" - "ARM";
- "Andriod" — "5.1";
- "Variant" - "Nano".
To start downloading, press the round button with the arrow pointing down.


Unpack the package cm-12.1-20160905-UNOFFICIAL-endeavoru.zip and move boot.img from it to the directory with Fastboot.

Fastboot flash boot boot.img

Then we clear the cache by sending the command:
fastboot erase cache


and enjoy our work new version Android modified for the smartphone in question.

Method 4: Official firmware
If there is a desire or need to return to the official firmware from HTC after installing the custom, you need to turn again to the capabilities of the modified recovery and Fastboot.

- Download the TWRP version for the "old markup" and place the image in the Fastboot folder.
- Download the package with the official firmware. The link below is for the OS version 4.18.401.3 for the European region.
- Downloading an image of the HTC factory recovery environment.
- Unpack the archive with the official firmware and copy boot.img from the resulting directory to the folder with Fastboot.

We put the file there. recovery_4.18.401.3.img.img containing stock recovery.
- Flashing boot.img from official firmware via Fastboot.
fastboot flash boot boot.img - Next, install TWRP for the old markup.
fastboot flash recovery twrp2810.img
- Disconnect the device from the PC and reboot into the modified recovery environment. Then we go the following way. "Wipe" - "Advanced Wipe"- mark the section "Sdcard" - "Repair or Change File System"... Confirming the start of the change process file system button "Change File System".
- Then press the button "FAT" and move the switch "Swipe to Change", and then we wait for the end of formatting and return to the main TWRP screen using the button "Home".
- Selecting an item "Mount", and on the next screen - "Enable MTP".
- The mounting performed in the previous step will allow the smartphone to be identified in the system as a removable storage device. We connect One X to the USB port and copy the zip package with the official firmware to the internal memory of the device.
- After copying the package, click "Disable MTP" and return to the main recovery screen.
- We clean up all sections except "Sdcard", going through the points: "Wipe" - "Advanced Wipe"- selection of sections - "Swipe to Wipe".
- Everything is ready to install the official firmware. We choose "Install", indicate the path to the package and start the installation by sliding the switch "Swipe to Confirm Flash".
- Button "Reboot System", which will appear at the end of the firmware, will reboot the smartphone into the official version of the OS, you just need to wait for the latter to initialize.
- If desired, you can restore the factory recovery with the standard Fastboot command:
fastboot flash recovery recovery_4.18.401.3.img
And also block the bootloader:
fastboot oem lock
- Thus, we get a completely reinstalled official version of the software from HTC.


In conclusion, I would like to reiterate the importance of scrupulously following the instructions when installing the system software on HTC One X. Run the firmware carefully, evaluating each step before taking it, and the desired result is guaranteed!
 Which is better iPhone 6s or 6 plus
 Where are screenshots and games in the Steam folder?
 How to delete or restore all deleted VKontakte dialogs at once?