How to disable prevention mode on Lenovo. Methods for disabling the touchpad on Lenovo laptops. Disable through BIOS settings
There is an Fn button on the laptop keyboard, which is used when calling the additional mode of the F1-F12 keys. At the same time, in new laptops, manufacturers are gradually replacing the main mode of keys from the F row with a multimedia one. Therefore, to perform basic functions using these buttons, you must additionally press Fn. For some this is fine, however, there are those who do not welcome the additional use of the key. Therefore, it will be about how to disable Fn on Lenovo laptop.
Keyboard shortcut
You can disable and enable the Fn key on a Lenovo laptop using the keyboard. This is not for everyone, as Lenovo has a fairly diverse lineup. The fact is that the set of additional functions on the top row of buttons may differ depending on the device. However, many will find this method useful and will not have to look for other methods to solve this problem.
Take a close look at the keyboard of your laptop. If it has a padlock button for Fn lock / unlock, check it. Most often, the icon is on Esc, although the manufacturer may place it on other F-buttons. It remains to press the Fn + Esc combination, which will disable or enable additional operations of row F.

If there is no lock on the button, look for “FnLk” or “FnLock” instead - this is the same function.

This opportunity can be used not only on Lenovo laptops, but also on Dell or ASUS. On the latest Acer or HP, this solution is not provided.
Changing BIOS settings
Changing the priority of the Fn button using the BIOS is described in the following video:
You can switch the mode of using row F from multimedia to functional and leave the working Fn button using the BIOS. You need to change the corresponding settings there.
Today, on almost any laptop, you can change modes only there. Moreover, by default, the new computer uses the multimedia mode, which allows the user to adjust the brightness and volume, control the rewinding of songs and perform other operations.
For Lenovo models, you only need to do a few things:
- Go to BIOS after turning on the laptop. To do this, you need to press F8, ESC or another key (depending on the model).
- Use the arrows on the keyboard to go to the "System Configuration" section.
- Change the "Action Keys Mode" option to "Disabled" or "Enabled".

- Exit BIOS and save changes.
After restarting the computer, if Action Keys Mode is set to Disabled, the multimedia mode in the F row will be disabled, and the Fn button can be assigned to the operating system to perform another operation. Enabled will enable the Fn button on a Lenovo laptop and return the ability to work in multimedia mode.
Installing the driver in the operating system
For the Fn key and its associated F-row to work smoothly, the operating system must have an appropriate driver installed. If it is not there, you need to find it. To do this, you need to open the manufacturer's website and go to the support or software section, where you can download the driver for your model.
In the list offered on the site, you need to select the version of Windows installed on your computer and select the necessary software to download. In the case of Lenovo, its name will be something like this:
- Lenovo Energy Management;
- Lenovo Power Management;
- Lenovo OnScreen Display Utility;
- "Advanced Configuration and Power Management Interface (ACPI) Driver".
If anyone is wondering why the Fn button is needed, watch the following video:
Other solutions
Another solution to enable or disable the Fn button on Lenovo laptop is to install the Magic Keyboard program. It is universal for all laptops and has an intuitive interface, so there should be no difficulties with turning Fn on / off.
For Linux distribution users, we recommend installing the Solar application to change keyboard and mouse settings.
There are several ways to enable or disable the Fn key on Lenovo laptops. You can change the settings in the BIOS, install additional software, or press the appropriate key combination. The process itself is not complicated and does not require specialized knowledge.
Safe Mode is a very useful feature that can solve a lot of problems. Firstly, if you have a performance problem, then this feature will help you a lot. Secondly, it helps if you have installed an application that slows down your device. And in general, if your system is "clogged".
But often this feature gets in the way, because turning it off is often more difficult than turning it on. In addition, it is possible that this option was turned on by accident, when it is not necessary at all.
In this article, we will tell you how to disable Safe Mode on Lenovo. If, after following all our instructions, you still do not see the result, then you need to go to the service center, because the problem may be in the firmware itself.

Before you learn about how to disable Safe Mode, you should learn more about what it is.

Safe mode is a state of the device in which only system applications work for you. This helps in cases where there is a performance or autonomy issue. But if you don't have such problems, then this feature will only hinder you, because it disables the performance of all downloaded applications and even hides their icons.
In general, this option is used to remove unnecessary programs. Let's say you have a lot of garbage that slows down the system of your smartphone so much that you simply cannot clean it. Then you just need to turn on Safe Mode and delete everything you don't need. But the main problem is not to enter, because Lenovo's phone enters safe mode very easily, but to return everything back.
Ways to Disable Safe Mode on Lenovo Phone
There are many ways to disable this mode, but it is far from the fact that at least one of them will work.

The very first thing you can do is pull out the battery. This method is the most ineffective, since many smartphones have a monolithic body and a non-removable battery. But if you have a removable cover, why not give it a try. Moreover, it does not harm the phone.
If such manipulation did not give a result, then you should try pressing the button " Home».
If nothing happened, then the only correct option and the last chance is to reset to factory settings. This is a very responsible procedure, because you can get a "brick". If you have not forgotten your gmail-mail or password, then you simply will not be able to unlock your smartphone. And Google does not have technical support, only a collection of popular questions. Therefore, if you want to try this solution to the problem, then first make sure that you have access to your account, save all important data, and only then proceed.

If these methods did not answer your question, how to disable safe mode on Lenovo, then you need to go to the service center, because there are simply no other ways to disable safe mode. In addition, it is recommended to glance at the main screen from time to time, as some phones automatically receive messages asking you to remove Safe Mode.
Removing the battery
Let's start with the simplest. If you are wondering how to turn off safe mode on your Lenovo tablet, then the first thing you should do is remove the battery. But not for long, for only 30 seconds, and then you need to put it back and turn on the smartphone. This helps with a very small degree of probability, but there are still cases when this is exactly what becomes the solution to the problem.
With smartphones, everything is more complicated. In 2018, most phones have monolithic bodies, so this method of solving the problem is unlikely to suit you.

Using the button " Home»
If the method with the battery did not help you, then you can try to exit safe mode using the " Home". In order to implement this method, you just need to put your smartphone on reboot and, while turning on the device, hold down the button under the screen. It is important that you hold down the " Home"Until the end of the reboot.
If the question of how to remove safe mode on Lenovo remains open, then you can try similar methods that differ only in buttons. In the same way, set the device to reboot, only instead of the " Home»Press the volume key down or up.
It turns out that you need to restart your smartphone 3 times. But don't try too many times, as excessive reboots harm your device.

Hard reset
If all of the above did not help you, then your last hope is to roll back the settings. This works 100% to disable safe mode.
This is a difficult procedure to prepare for. First, you need to write down the password and login from your Google account, because, as practice shows, most users forget about it the day after registration. If you do not remember this data, then you can get a "brick". Secondly, you need to create a copy of all the data that is important to you. It can be some photos, music, documents, etc.

After you've done all this, it's worth starting a factory reset. You can do this in two ways:
- You need to go to " Settings"And select the item" Factory reset". The smartphone turns off, clears and displays a new user registration window.
- Just turn off the smartphone and, when turned on, hold down the volume up and down keys + the " Home". Will start " Recovery Mode» (« Engineering menu"). In it you need to select the line “ Wipe data / Factory Reset". Moving up and down is carried out using the buttons to increase and decrease the sound, and the choice is made by the button " On / Off". After confirming the start of the process, wait until the phone or tablet system deletes everything, and restart the smartphone by clicking on the line with the word “ reboot"To boot the device normally.
If this does not help, then only a flashing or a service center will help your device.

Video how to turn off Safe Mode
After reading our instructions on how to disable Safe Mode on Lenovo, you have a rough idea of how to do it. But it's still better to watch the video instructions so as not to press anything extra. The video shows all the ways you can get out of Safe Mode. If none of these methods helps you, then you need to go to the service center, because you yourself will not do anything if you do not have at least minimal experience in solving such problems.
The touchpad is a device that has many advantages, but also has certain disadvantages. By default, it is the touch panel that replaces the functionality of the mouse manipulator. This is convenient when it is impossible to work with a mouse, but sometimes it also brings its disadvantages - because the sensor, due to its sensitivity, can elementarily interfere with typing - and turning it off would be an ideal choice.
There are ones that will fit almost any laptop, or you can use those that will work exclusively on laptops of certain brands - for example, Lenovo. Let's take a look at the methods for disabling the touchpad.Disable in Synaptics settings
Most standard laptops, regardless of the manufacturer, are equipped with a Synaptic touchpad (and, therefore, the necessary software support - drivers), and, accordingly, to disable its functionality, you will need to go to the settings.If the laptop is equipped with a similar system, it will not be difficult to disable it:
- Through the "Start" panel go to the "Control Panel".
- Find the "Mouse" option, and in the list of devices the device we need.
- In the properties tab, go to the "Device Settings" item and put a tick on the shutdown. Here you can also use the function of deactivating the touchpad in automatic mode in case of connecting a manipulation device via USB. To do this, you need to activate the "Disconnect when connecting an external device" item.
Disconnect via "Device Manager"

Using the hotkeys Win + Break (or Win + R, which will allow you to launch the system component), you can go to the "Device Manager" and through the "Mouse" tab select the device you need to disconnect from the drop-down list of devices.
Thus, the touchpad will be instantly disabled and will automatically start the next time you turn on the PC.
Disable Lenovo laptop touchpad
For such laptops, there is a special combination of hot keys - Fn + F4 or Fn + F8, which allows you to disable or enable the touchpad functionality at any time. Usually, in this case, the corresponding indicator appears on the monitor screen.
It should be noted that if after pressing the hot keys there is no reaction, this will mean that there is no necessary utility responsible for their work. The problem can be easily fixed by downloading the necessary HotkeyFeaturesIntegration program from the company's official website.
Disable through BIOS settings
In the absence of the necessary software, the touch panel can be disabled through the BIOS settings by finding the item with the InternalDevice settings.Disconnect via TouchFreeze or Blocker
Disabling the touchpad through special utilities that provide the necessary functionality - for example, TouchFreeze or Blocker. But these programs may not work correctly on all devices, so it is advisable to limit their use.What remains to be done for our client, users of devices on the Droid, seeing the new logo, in the midst of the installed applications, ask questions, what is Talkback, how to use the application and how
disable
Talkback. Here we will analyze for our client the most noteworthy topics about the application from Google and learn how to stop and turn off Talkback.

TalkBack
Is a free service that would allow people with visual impairments (or lack thereof) to comfortably use devices running on the Android operating system. The Talkback application reads the interface elements, text, and provides a sound alert for vibration feedback. This application is supplied by default on most Droid devices, it is also automatically updated. TalkBack is turned on when you first start the device, or at any time after its activation. It is reasonable that if you do not want to use the application, and it has started, it is better to disable Talkback. After turning on, the application begins to voice the text on the display, and what remains for our client to do the rest of the conducted actions; reports on notifications and other events. And when you turn off Talkback, you will not receive any notifications from the program.
Turning on TalkBack
You can activate the Talkback application, as mentioned above, when you first start your device on Android 4.0 or later versions of the platform. When you start the device for the first time, it is better that you have headphones under your hand (you need to enter a password, for example, for a Wi-Fi network). By default, passwords are voiced in this case if headphones were connected to the device, but later you can change this point in the settings. And in order to
disable talkback
Read also
![]()
![]()
Henry T. Casey February 21, 2020Android 11 Code Reveals Feature of Pixel PhonesAndroid 11 has a great new feature that could help the Pixel even more, including the upcoming Pixel 5. A code called Columbus, a pre-code for Android ...

Our customer remains electrical devices now have functions that ensure their safety. For example, different passwords for opening, graphic keys such as a picture that needs to be shown, and today access by ...

Facebook Messenger. it is one of the popular instant messaging apps, although it is not the most popular Facebook app. this is WhatsApp, which is also the only one that offers end-to-end encryption immediately. Short...

December 27, 2019 4:07 a.m. PST The 2019 AAPL results are the best since 2009, with more than 80% value growth over the year. Apple hit the headlines when it surpassed the $ 1 trillion mark for the first time in 2018.

The 2017 13-inch Apple MacBook Air usually costs 999. Order yours from Amazon today and get 249 off. You can even pay for it in 12 monthly installments when you apply for the Amazon.com store card. Complement your portable ...

The 15-second video clip also showcases the camera app. In a couple of weeks, we will officially announce the launch of the flagship Oppo Reno smartphone in China, which is scheduled for April 10th. Even though the company is actively teasing the feature 10x ...
How disable
Talkback function?
How to disable function Talkback on Android / How to turn off Talkback on Android Hello! You are on my channel. Here you are.
How to turn off TalkBack on Android
Sokol491: Subscribe to my channels Game channel: Main.
To run the Talkback program on Android 4.0, you need to draw a closed triangle on the display, and immediately after you do this, the device will beep. If you are the owner of a device on Android 4.1 or later, then you will need to touch the screen with 2 fingers and not let go for some time; as the device recognizes this gesture, the Talkback program will be launched and the user control will open.
Read also

If you want to protect your personal data from unwanted intrusion, put a password on the iPhone applications. If you do this, then only a person who knows the assigned code safely will be able to open individual applications or our client will be able to use the application ...

Configuring TP-LINK TL-WR841N Router Wireless N Series Router, up to 300Mbps traffic tp link-wr841n / tp link-wr841nd CONTENTS General device. Device connection. Configuring the router. Indicator meanings COMMON DEVICE Power button ...

If your enterprise needs to record a video from the screen of your iOS device, there are several methods to do this. In this case, one of them, recording video from the iPhone and iPad screen (including with sound) on the device itself (without the need ...

If the initial setup has already been done, then to enable the service on Android 3.2 and earlier versions, you will need to check the boxes in “Special. opportunities "and" TalkBack "; on Android 4.0, select TalkBack and switch the switch to ON (after which you will need to return to the previous screen and turn on the Audio prompts function); on Android 4.1 and later, you should enable TalkBack and simply set the switch to ON.
After turning on the program, a screen will be launched with a list of extensions that are needed to read the text on the display. To use them just click OK. If you realize that they are not necessary for you, just cut out
Talkback
Answering and ending calls with TalkBack features
Every time your phone receives a call, TalkBack will automatically announce the caller's name (unless you have disabled this feature, of course). There are several ways to accept or reject a call:
- to answer an incoming call, tap the bottom of the screen and slide your finger to the right;
- to reject a call, tap the bottom quarter of the screen and slide your finger to the left;
- to reject the call and write a text message, simply swipe up on the screen.
Note that Nexus devices have a Phone application instead of TalkBack, which contains slightly more functionality than TalkBack.
Disable TalkBack

To turn off control of the device using TalkBack, you need to go to Settings - Special. features - TalkBack. In the window that opens, turn the program to OFF, then click OK. Talkback will turn off until activated.
I don’t know about you, but I don’t use the touchpad. I always connect a regular front sight to my laptop and use it. And in this article, I will show you how to disable the touchpad (touchpad) on a Lenovo laptop. Or how to make the touchpad automatically disconnect when the mouse is connected and turn on when it is disconnected.
The problem is that the touchpad is not very convenient to use. Especially on inexpensive laptops, where the quality of the touchpad itself is not very good, to put it mildly. It is not always convenient to use it even for navigating sites, folders, etc., not to mention working in some programs where you need to accurately and quickly interact with small interface elements.
Therefore, I disable the touchpad on my Lenovo laptop. This is not difficult to do. But if you do not turn it off, then the cursor moves all the time while typing, in games, and in general you touch it all the time.
This manual is suitable for all Lenovo laptop models, including the Thinkpad and IdeaPad line, B590, B570E, E531, G580, Z570, etc.
There are several solutions:
- Disabling the touchpad using the function keys.
- Through settings in Windows 10, Windows 8, Windows 7.
- Disable the touchpad automatically when the mouse is connected.
- Disable touchpad completely in Lenovo laptop device manager.
- Disable via BIOS.
Let's start with the simplest solution:
Function keys to disable touchpad on Lenovo laptops
My Lenovo IdeaPad 320-15 laptop has a dedicated key to quickly disable the touchpad. Your laptop should also have such a key.
I just press the F6 key (with the touchpad icon) and it turns off. I press again - it turns on.
In most cases, this function key should be used with the Fn key. It turns out a keyboard shortcut, for example, Fn + F6.
In my case, in Windows 10, after pressing the F6 key, the corresponding indicator appears on the screen.
If this method does not work, there is no reaction after pressing the function keys, then most likely you need to download from Lenovo's website and install the utility that is responsible for the operation of these keys. If I am not mistaken, then it is called Hotkey Features Integration.
Controlling the touchpad of a Lenovo laptop in Windows 10
In the search, type "Mouse options", or go to Options - Devices - Mouse. Click on "Advanced Mouse Options".
In the new window, on the "ELAN" tab, click on the "Stop device" button. And confirm to disable the touchpad.
To turn it back on, just click on the "Activate device" button.
Automatic disabling of the touchpad when the mouse is connected
In the settings that I showed above, it is possible to make it so that when the mouse is connected to a Lenovo laptop, the touchpad turns off automatically. And when it was turned off, it turned on. I think this is better than turning it off manually all the time. And it is logical, if the mouse is connected, then why do we need a touch panel.
To do this, just check the box next to "Disconnect when connecting an external USB mouse". As far as I understand, this feature does not work with Bluetooth mice.
If you do not have such a section in the settings, then it is quite possible that you need to install a driver on the touchpad for your laptop.
Disable the touchpad in device manager
Another solution. We go into the device manager and open the "Mice and other pointing devices" tab.
There should be a device like "ELAN pointing device". Click on it with the right mouse button and select "Disable device".
After these steps, the touchpad on my Lenovo laptop stopped working. We turn it on in the same way as we turned it off.
Last way: disable via BIOS
I checked on my Lenovo IdeaPad 320-15 but could not find the touchpad settings in BIOS. Perhaps this feature was removed on newer models.
But usually, in order to disable the touchpad, it is necessary in the "Advansed" section, opposite the "Internal Porting Device" item, to set the value "Disable".
Also, the item itself can be called "Internal Device Settings". Look for these settings in your laptop's BIOS menu.
Just note that the touchpad won't work anywhere, and you won't be able to enable it in Windows. BIOS only. I only recommend using this method if you don't use the touchpad at all. That is, you want to turn it off everywhere and forever.
 Alternatives to Replace Microsoft Office Visio Command Line Key
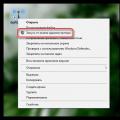 Mhotspot installation and setup Computer did not restart after installation
 A tale of three buttons. Column by Evgeny Zobnin. We get customizable on-screen buttons Home, Back and Menu on any Android device (Floating Soft Keys) Assigning buttons on the phone