Windows 10 wifi hotspot from laptop. Create desktop shortcuts for direct distribution control
We will tell you in detail how you can distribute WiFi from a laptop, where Windows 10 is preinstalled, most are familiar when the Internet is only on one gadget, but there is no router.
Hot spot
In Windows 10, starting with the 1607 release, a built-in "Mobile Hotspot" function has appeared, which allows even the most inexperienced users to share WiFi from a Windows 10 computer without much effort. So:
- Menu "Start" → with the left mouse button (hereinafter referred to as LMB) select "Parameters" (the gear is shown) → "Network and Internet"

- "Mobile hot spot" → move the slider to "On"

There is no hot spot function in the parameters.
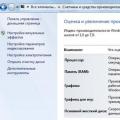
First: check the version and build of the OS, you can see it here:
- Click right key mouse (RMB will be found in the text) "Start" → "Control Panel"
- "System and Security" → "System"
If the information in the folder is presented as a list (see screenshots below), then select: "System"
V top line the version and build of the OS will be indicated - everything below Anniversary_Update must be updated.
- Run the update center and get the latest build.
- Download the update package from the official Microsoft website and install it manually.


- "Change" → enter the network name and password - whatever you want.

Thus, setting up a new Wi-Fi point is successfully completed, users can already see WiFi. One-time connection, maximum 8 gadgets (screenshot below), your hotspot list will display users with name, IP and MAC (unique network card number) addresses. 
There is another way to create access to Wi Fi from Windows, suitable for more advanced ones, and there is no binding to the OS version.
CMD will replace the router!
Often, users have a question of how to distribute the Internet from a laptop without using a hotspot in Windows 10. Really, it is very simple and you will not need additional utilities. Before you start, you need to check the technical availability. Details on our website, and now how to log in from under the admin:
- RMB to "Start" → "Command_line (administrator) (also called cmd)

- Type carefully, without errors with spaces "netsh_wlan_show_drivers" → next [enter]
As a result, pay attention to "Hosted_Network_Support" to contain "Yes". 
Possible warnings and error:
! The system (hereinafter referred to as "system" returns the answer: "No"
Download drivers for wi-fi and install them correctly. Upon completion of the reboot, the above steps must be repeated.
"The Wireless AutoConfig Service (wlansvc) in not running"
The message says that the windows service is not running, enter:
- "Net_start_Wlan_SVC" and press "Enter" - with spaces
After receiving the message:
“The WLAN_Autoconfiguration_Service was started successfully »
We were able to launch the required service.

After making sure that the technical implementation is possible, we begin to create a point WiFi access on a laptop or PC. Call cmd (Administrator), type:
- "Netsh_Wlan_Set_Hostednetwork Mode = Allow SID =" _Network_Name "Key =" _ password / password_ "", (_ replaces a space), name / password without quotes.
The name must not contain spaces, and the password must be at least 8 characters. System, you should return a response that the SSID has been successfully placed and the passphrase has also been successfully changed. 
To share WiFi with laptop windows 10, you need to run the created network through the command line:
- "Netsh wlan start hostednetwork" → click

It also happens like this: the network has been successfully created - but it gives errors at startup, then do the following.
- Turn off Wi-Fi adapter, and then turn it on - restart is needed.
- If restarting doesn't work, remove the wifi adapter and update - to install.
- The reason may be hidden hardware that just needs to be activated. Go to:

Final steps:
- PCM "Start" → "Network Connections" → PCM to connect to the Internet - select "Properties"

- “Access” → check the first box “Allow other network users…” → OK.
Situations arise - the network has been successfully created, but cannot start, then, follow these steps. 
We have successfully implemented the distribution of the Internet via the command line from a computer on which Windows 10.
We distribute the Internet playfully.
There are many software products and small utilities for operational - read more in the article on our portal. And now about a few decent utilities.
- Virtual Router Plus - Russian version is available, free, a few clicks and access to the network is open.
- CONNECTIFY HOTSPOT 2016 - supports all OS assemblies, Demo version is available, not Russified.
- MYHOTSPOT - free, not Russified, for all versions operating systems.
- MYPUBLICWIFI - absolutely free, not Russified, supports all Windows assemblies.
Now you know how in Windows 10, it's easy to share Wi-Fi from your PC / laptop, enjoy your surfing!
![]() Earlier we already wrote how to distribute Wi-Fi from a computer or laptop under Windows control ten . In this article, we will talk about how to turn your PC or laptop into a Wi-Fi hotspot without third-party programs using only the Windows command line.
Earlier we already wrote how to distribute Wi-Fi from a computer or laptop under Windows control ten . In this article, we will talk about how to turn your PC or laptop into a Wi-Fi hotspot without third-party programs using only the Windows command line.
How to share Wi-Fi from a laptop or computer on Windows 10
To configure the distribution of Wi-Fi from a PC or laptop, we will use the capabilities of the operating system itself, namely the command line. This method not as difficult as it might seem at first glance, it is enough to follow the guide below exactly.
- Run Command Prompt as administrator: right-click (RMB) on "Start" → Command Prompt (Administrator) → Control accounts→ Yes;


- In the command line, write the following command without quotes: “netsh wlan set hostednetwork mode = allow ssid = alpinefile key = 12345678a". Replace the values alpinefile and 12345678a with your own, since ssid is the identifier and key is the password of your wireless network(it must not contain less than 8 characters);

- Press the "Enter" key;

- To activate the Wi-Fi network, enter one more command (without quotes): "netsh wlan start hostednetwork";

- Press "Enter";

- Now we can connect any smartphone, tablet and so on to a laptop, but we will not be able to access the Internet using this or that device. To fix this: right-click on "Start" → Network Connections;

- Open the Access tab → check the box “Allow other network users to use the connection this computer"→" Connection home network"→ choose" Connect by local network* 3 "(connection created with command line, your designation may be different) → OK.


That's all, apparently nothing complicated. Now we can freely use the laptop's Internet connection on any other devices (smartphones, tablets, TV, etc.) directly, without Wi-Fi router.


 However, after each reboot of the laptop, the above procedure will have to be repeated again, which is not so convenient. However, this process is easy to simplify.
To easily turn on the distribution of the Internet (so as not to enter everything manually each time), you can do the following:
- "Notepad" will open - regular text editor Windows → enter the already known commands there (as in the screenshot): netsh wlan set hostednetwork mode = allow ssid = alpinefile key = 12345678a and netsh wlan start hostednetwork;

- This file can now be used (double-click with the left mouse button) to enable the distribution of Wi-Fi from a laptop or computer after each reboot or power-on;

- If there is a need to periodically turn off Wi-Fi, then you can create another file by analogy, for example, Wi-Fi ON (Wi-Fi ON bat);


As you can see, if you need to distribute Wi-Fi from a laptop running Windows 10, then it is quite possible to do without third-party programs and applications, using only staff funds Windows.
Connecting to WiFi on a Windows 10 laptop or computer is easy.
In the tray, on the "Network" icon, click on the left mouse button:
Note. If the network icon in the tray looks different
 this means that you do not have a WiFi adapter, or it is disabled. See the section at the end of this article.
A panel will open with a list of available WiFi networks (access points). You need to click the mouse on the network to which you want to connect. After that, the "Connect" button will appear:


After that, a field will appear in which you need to enter the password for this access point:

Note... In order to see the text of the password that you wrote, you need to click the "Eye" button at the right end of the field. The password text is only displayed when the button is held down!
Enter the password, click "Next" and if the password is correct, then in half a minute or a minute the connection will be established. The network icon in the tray will change its appearance. In this case, all parameters, except for the password, for the new Windows connections 10 will install automatically.
After connecting to a point Windows access 10 will ask you to assign the type of this network:

If you click the "Yes" button, you can exchange files and other resources on this network (for example, print over the network). If you click the "No" button, then this network will only have the Internet.
The connection is established and you can use the Internet:

How to change WiFi settings on Windows 10
In the tray, on the "Network" icon, you need to click on right button mouse and then from the menu select "Network Control Center"

In the Network Control Center, click on the connection name (in the illustration it is "sQuad 7.82 3G Wireless Network":

A window with the status of this connection will open in it, you need to click the "Wireless Network Properties" button:

And after that a window will open in which you can change the settings for this connection:

How to use WiFi
WiFi is very easy to use. After you have created a connection, you can turn it on and off through the network icon in the tray.
However, you need to understand that the ability to use WiFi is highly dependent on external factors. Since the radio signal is affected by the external environment. Obstacles such as walls, ceilings, floors weaken both the signal of the access point and the signal of the client device. Windows shows the signal strength from the access point in sticks. The pictures at the beginning of the article show the signal level in one or two short sticks. This is a very weak signal. with such a signal, you will most likely not be able to use the Internet.
There are programs that show the signal level in numbers - dBm, for example 60 dBm or 40 dBm. The larger this figure, the weaker the signal - a good signal is a figure less than 50 dBm. However, you need to understand that the accuracy of such numbers varies depending on the adapter and the driver of this adapter. Under the same conditions, one adapter can show for example 71 dBm, and another adapter 82 dBm.
In addition to passive barriers, the quality of WiFi signal transmission can be adversely affected by sources of electromagnetic radiation. So, even if you have the best WiFi adapter installed on your laptop, this does not mean that you can always use the Internet via WiFi.
In a bad signal situation, using an adapter with an external antenna can help. For example, the TP-Link TL-WN722N / C USB WiFi adapter is equipped with an external antenna. Moreover, it is removable and, if necessary, it can be replaced with another one with a high gain.
What does the presence of an external antenna give? Continuing the same example - under equal conditions - the same access point, the same time and place of connection, the presence of passive barriers between the access point and the client - as a result, a weak signal in both directions:
- The internal "native" WiFi adapter of the laptop connects to the access point, but practically does not provide an opportunity to use the Internet due to low speed and frequent drops.
- TP-Link TL-WN722NC with its own antenna provides a stable Internet connection at a good speed.
If WiFi doesn't work
If your computer does not have a "Wireless Network Connection", the reason may be one of the following:
- Your computer doesn't have a WiFi adapter at all. You can find out through the Device Manager. There must be a wireless network card in the device list.
- On your computer WiFi there is an adapter but it is disabled. For example, many laptops have buttons to turn off the WiFi adapter. It can be a separate button or one of the F buttons in combination with the Fn button. If the WiFi adapter is built into motherboard, it can be disabled in the BIOS.
- There is an adapter, but no drivers are installed on it, in this case it will appear in the list of devices as an unrecognized device.
- There is an adapter, but it is disabled by software.
There is no WiFi adapter in the list of devices:

There is a WiFi adapter in the list of devices, but it is disabled (the icon in front of the adapter name):

If the "Wireless network connection"is, it shows a list of networks, but it cannot connect to the desired network, then the reason may be that:
- The signal between your adapter and the access point is too weak. Long distance, thick walls, etc. Moreover, the signal level of the access point may be decent, but the signal of your adapter does not "finish off" the access point. Because the signal of the adapter is generally weaker than the signal of the access point. Especially if the adapter is built-in, such as in a laptop.
- You entered an incorrect password. This is especially true for Windows XP because the password characters cannot be seen there.
If the connection to the access point is established, but the Internet does not work, then the reasons may be:
- WiFi router (access point) is not connected to the Internet. For example, a technical failure with a provider, or a lack of funds in your account with a provider.
- Technical failure of the provider's DNS servers.
Private WiFi network
WiFi security
Since when using WiFi, all information is transmitted over the radio wave, this makes WiFi networks much more vulnerable than wired networks. The fact is that the radio signals sent by the access point (WiFi router) and devices that are connected to the access point are available for interception by any similar device that is within the "audible" radius of the access point or from the client of this access point. That is, intercepting network traffic becomes very simple, affordable and invisible. And intercepting network traffic allows you to collect information necessary to attack a WiFi network. As more and more hotspots become available, WiFi increases and the number of people willing to "hack" the WiFi network increases.
The most common motivation for hacking WiFi hotspots is connecting to the Internet over WiFi for free. A fairly common picture today - you have a WiFi router installed in your apartment and not only your devices, but also the computer of one of your neighbors are connected to it. You pay for the Internet, and your tech-savvy neighbor gets the Internet for free.
But "stealing" the Internet is not the only reason it is "hacked" WiFi networks... The fact is that if an attacker gains access to your access point, he can get access to all devices that are connected to your WiFi router through it. And this gives him the opportunity to steal your personal data. For example, passwords to mail, to Internet banks, your documents - in one word to everything you own.
Therefore, use WiFi with caution. Here are some rules to follow.
Do not connect to open public WiFi networks through a laptop that holds valuable information. And if you need access to the Internet via open networks WiFi, then use a firewall and antivirus on your laptop. It's even better if you install two operating systems on your laptop. One main, which will store all your valuable information. And the other is empty, only to access the Internet through open wifi networks.
If you are using WiFi router at home or in the office, you must correctly perform WiFi setting router:
- Use WPA2 security type.
- The password for protection must be long - preferably 10 - 15 characters, and must consist of an arbitrary set of characters. Password marina1234 very bad - it will be hacked in a few minutes. Password nve5k-sjehr)
 Processor Testing Program
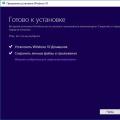 Free Windows Software Free Download Latest Wine 10 Updates
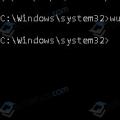 Free Windows software download for free Update Windows 10 to a new one