How to fix the top line in a Word. How to freeze the top row in a Word Freeze a row in a word table
This bias against tables is deeply rooted. To be honest, a dozen years ago the tables could not boast of convenience due to the imperfection of the program as a whole. But a lot of time has passed since then. Microsoft has done a great job of correcting its bugs and doing everything it can for the convenience of its users. It is a pity, of course, that many of those same users do not know about this and still work in the 2003 edition. office suite... Doesn't it remind you of the story of hedgehogs and cacti? :)
I just humanly recommend to everyone stuck in the past to upgrade to at least the 2013th version. Microsoft Office, and better - right before the fresh, 2016th. Believe me, it only seems to you that you are working in an environment that has become a classic; in fact, it has long been overgrown with moss and mold.
Use templates
Office everyday life is full, including tables. We take one electronic piece of paper, cut out a part of it, insert it into new document and edit the details. Nice technique, but it seems to me that working with templates is a little easier and faster. By the way, in the Word templates are called express tables.
Click on the "Insert" tab, click on "Table" and go to "Express Tables". Pay attention to the item "Save selection to collection".
Here you will find several quite useful options and, most importantly, you can save any other table or its fragment, including your own production, as a template.
Draw tables
Remember the bear that walked over your ears and hands in an unrestrained gypsy dance as a child? Since then, you have disliked singing and brushes, and since then you have stubbornly ignored the "Draw Table" option in Word. Shake it up, grown man! Time to crush the furry monster! This is easier than it sounds.
Click on the "Insert" tab, click on "Table" and go to the item "Draw Table".

And don't be afraid to make a mistake: there is always an eraser at hand. Sometimes a pencil and a washer greatly simplify the creation of complex tables with small elements.
Insert rows and columns quickly
Beginning with Word 2013, adding rows and columns has gone from heart-pounding torture to fun. Do not think, the archaic "Insert columns left / right" and "Insert rows above / below" have not gone anywhere, but now you can forget about them.
Hover your cursor over the space between rows or columns outside the table and click the plus that appears.

In the future, I would like to see something similar for the delete function.
Apply a ruler
Each person has favorite and repulsive numbers that he indiscriminately uses or avoids in his life. Even in the parameters of their tables. I know those. :)
If you are used to accurately setting the padding values, width and height of cells through the table properties, try an alternative - the ruler.
Move the cursor over the border of columns or rows, grab it, hold down the Alt key and use the convenience of a centimeter ruler.

You can do the same trick with indentation and indentation markers. Move the cursor over them and hold down the same Alt key.
Use hotkeys
Be me a developer software, I would call the hotkeys soul buttons. After all, sometimes you just want to hug a laptop just because they are. As far as Word tables are concerned, the three most common combinations I use are:
- Alt + Shift + Up / Down quickly moves the current line one position higher or lower (just an irreplaceable thing).
- Ctrl + Shift + A instantly transforms uppercase letters to all caps, which is very useful for headings.
- Ctrl + Tab adds a tab stop in a cell, while a normal one Tab moves the cursor to the next cell.
Convert text to table
A bit of magic to brag about in front of an astonished audience. Instead of creating tables in the usual way, try a couple of other, more sophisticated options:
- Cell arrays copied from Excel are pasted into Word as a table with invisible borders.
- Well-structured text easily converts to a table regular means Word.
Select the text, click on the "Insert" tab, click on "Table" and select "Convert to Table".

Pay attention to the auxiliary parameters: the conversion quality depends on them directly.
Control cell sizes
If you want to know a person, throw him a table with a tyrant text. A slightly loose interpretation of the well-known opinion, of course, but it hits the mark. Just look at the screenshot, or rather at the first column and the word "philological" is an ugly thorn.

According to my observations, in such cases, people first express themselves indecently, and then resort to not the most optimal way out - reduce the font size. But it's better to fit the text in a different way.
Click in a cell right key, select the "Table Properties" item, switch to the "Cell" tab, go to the "Parameters" and put a tick in the "Fit Text" column.
Word will pull its strength and return the escaped letter to its place, and peace will reign in the world again. By the way, for clarity, the "inscribed" text will be underlined with a blue line.
And also, it happens, you borrow someone's table and rather hum to yourself: "Only you, the fish of my dreams"! Good job by someone else's hands! You start to fill it with your data, and then an uncontrollable devilry happens: some columns sprawl due to the weight loss of others. The head becomes sober, and the reality ceases to please. How to be?
All jokes, but it happens that you are sent a table of a strict format, with which you cannot fail. At the very least, do not be lazy to send it back with the same dimensions. This allows the recipient to see what he expects to see. To do this, turn off autosize by content.
Click in any of the cells with the right mouse button, select "Table Properties", go to "Parameters" and uncheck the "Autosize to Content" box.

The same option will save your spreadsheet from collapse if you need to fill some cells with images: they will fit in the form of a thumbnail instead of full-scale.
Anything to add? Write in the comments.
Writers, copywriters, office workers take a long time to work in the Word text editor. It is much more convenient to type texts if the bookmarks and their contents are customized for a specific user. Not everyone knows how to dock a toolbar in Word. Setting up command buttons, tools is not a super difficult task.
Docking a new tab
On a new tab, you can place the necessary tools and shortcut buttons for work.
- To fix a new tab on the toolbar, you need to click "File", and select the "Options" item at the bottom left.
- In the opened parameters text editor"Customize Ribbon" is selected.
- The Customize Ribbon and Keyboard Shortcuts window appears. In it, the button "Create a tab" is pressed at the bottom. This window can be opened faster by right-clicking on the ribbon and selecting the "Customize Ribbon ..." item in the context menu.

In Word 2010, a completely blank tab appears on the ribbon called New Tab. Now you can fill it with the necessary buttons and commands using the ribbon settings.
Adding buttons and commands
You can choose the combination of commands in a new tab at your discretion, regardless of their location in other tabs.
- Open the ribbon settings, on the left you can see a list of buttons and commands used when working with text.
- The right column - buttons already displayed on the ribbon tabs, you can edit and pin new tools in each. For this, a "New Group" is created in each tab.
- The required command is selected in the left column, for example "Create", in the right - the location. In our case, this is "New group (custom)". Word highlights the selected items in blue.
- Then the "Add" button is pressed in the middle of the page.

New commands can be seen on the ribbon tab, the fewer the new tools, the larger they are.

You can move the tab to the right in the "Ribbon settings ..." by clicking on it with the left mouse button and pulling it up or down.
Quick Access Toolbar
You can pin buttons from the toolbar that you use all the time to the Quick Access Toolbar. Moreover, add not only the points suggested by the developers, but also other text editing tools.
- Opening context menu Quick access panels, select the item "Other commands"
- A window with two columns will open. In the left one you can choose necessary tool, the right side displays the buttons of the Quick Panel.
- Having selected the necessary item on the right, we press the "Add" button.


The more tabs and icons there are, the smaller they are, and it becomes inconvenient to use them. Before you dock the toolbar in Word, be sure to consider the functionality of the new commands.
In a programme Microsoft Word toolbar disappeared? What to do and how to get access to all those tools, without which work with documents is simply impossible? The main thing is, do not panic, as it disappeared and will return, especially since it is quite easy to find this loss.
As the saying goes, everything that is not done is for the best, so thanks to the mysterious disappearance of the Quick Access Toolbar, you can learn not only how to get it back, but also how to customize the items that appear on it. So let's get started.
If you are using Word 2012 or higher, you just need to press one button to return the toolbar. It is located in the upper right part of the program window and looks like an upward-directed arrow located in a rectangle.

Press this button once, the disappeared toolbar returns, press again - it disappears again. By the way, sometimes it really needs to be hidden, for example, when you need to fully and completely concentrate on the content of the document, and so that nothing unnecessary is distracted.

This button has three display modes, you can choose the appropriate one just by clicking on it:
- Automatically hide the ribbon;
- Show only tabs;
- Show tabs and commands.

The name of each of these display modes speaks for itself. Choose the one that will be most convenient for you during your work.
If you are using MS Word 2003 - 2010, to enable the toolbar, you must perform the following manipulations.
1. Open the tab menu "View" and select the item "Toolbars".
2. Check the boxes next to those items that you need to work.
3. Now they will all be displayed on the Quick Access Toolbar as separate tabs and / or groups of tools.
Enabling individual toolbar items
It also happens that not the entire toolbar “disappears” (disappears, as we have already figured out), but its individual elements. Or, for example, the user simply cannot find a tool, or even a whole tab. In this case, you need to enable (configure) the display of these same tabs on the Quick Access Toolbar. This can be done in the section "Parameters".
1. Open the tab "File" on the Quick Access Toolbar and go to the section "Parameters".

Note: In earlier versions of the Word, instead of the button "File" there is a button "MS Office".
2. Go to the section in the window that appears. "Customize Ribbon".

3. In the "Main Tabs" window, check the boxes next to the tabs that you need.

- Advice: By clicking on the "plus" next to the name of the tab, you will see the lists of tool groups that these tabs contain. Expanding the "plus signs" of these items, you will see a list of tools presented in groups.
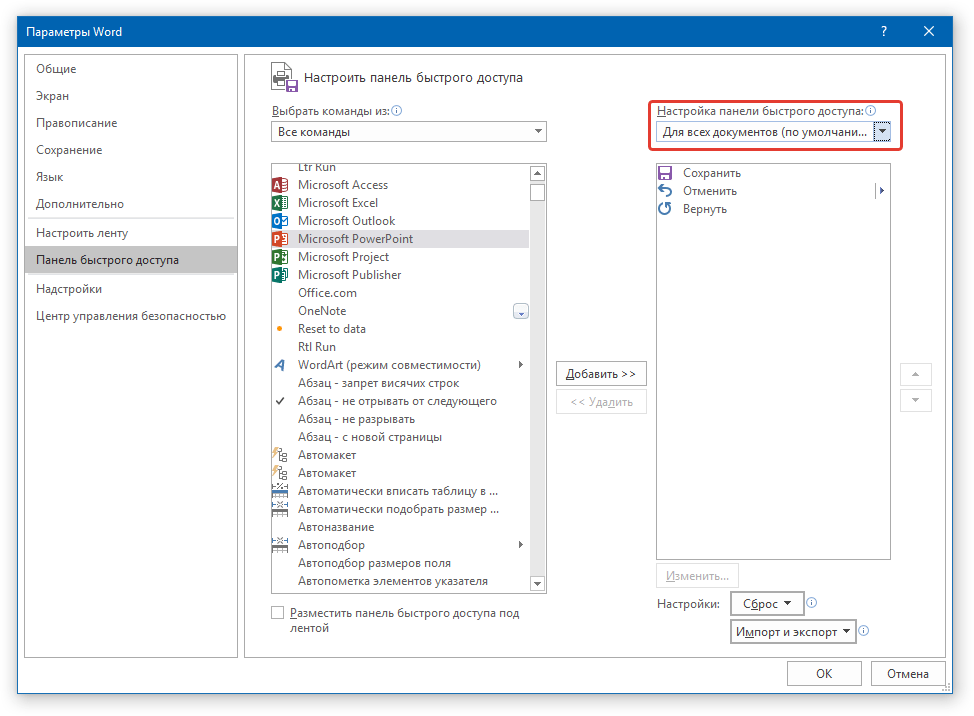
4. Now go to the section "Quick Access Toolbar".

5. In the section "Select teams from" select item "All teams".

6. Go through the list below, having found the necessary tool there, click on it and press the button "Add" located between the windows.

7. Repeat the same step for all other tools that you want to add to the Quick Access Toolbar.
Note: You can also delete unnecessary tools by pressing the button "Delete", and sort their order using the arrows located to the right of the second window.
- Advice: In chapter "Customize the Quick Access Toolbar" located above the second window, you can choose whether the changes you made will be applied to all documents or only to the current one.
8. To close the window "Parameters" and save your changes, click "OK".
Now on the quick access panel (toolbar), only the tabs you need, tool groups and, in fact, the tools themselves, will be displayed. By properly configuring this panel, you can significantly optimize your working time, increasing your productivity as a result.
The Microsoft Word text editor is very functional. In addition to typing and formatting text, here you can create various shapes, graphs and tables, perform a few simple actions with pictures. Where are all the necessary tools for this? That's right, on the Toolbar.
It is located at the top of the page. open document, and with Word 2007 on it you see not only tabs, but also the main buttons that are used for work. In this article, we will figure out what to do if the toolbar in the Word has disappeared, and instead of the usual view, only the main names are visible at the top. I will also tell you about the quick access panel, and how to add all the necessary buttons to it.
If the Word document that you opened looks like the screenshot below, then to restore the toolbar, just click on the small arrow pointing down in the upper right corner of the window.
After that, all the usual groups and commands will be visible again. And if you need to leave only a sheet on the page, then you can hide the upper ribbon by clicking on the same arrow, only now it points up. This can be used if you want nothing to distract while working with the document.

If you have Word 2013 or 2016 installed, then to display the toolbar you need to click on the button Ribbon Display Options, which is located to the right of the file name, near the minimize buttons, to Full Screen and close.

After clicking, a small menu will open. The first item automatically hides the ribbon - the window expands to full screen and it hides, when you move the cursor to the very top, it appears. When you click on the second item, only the menu items "Home", "Insert", "Design" and others will remain. If you choose the last option, then it will turn out to fix not only the names of the items, but also the commands - in fact, this is what we need.

Now let's figure out what to do if not the control panel itself has disappeared, but some of the tabs on it. Go to the top on "File" and select "Options" from the left list.

This window will open. Go to the tab "Customize the Ribbon".

I, for example, did not have a tab on the toolbar. Therefore, I put a tick in front of it. To save the changes made, click "OK".

After that, the item we need will appear, and you can use all the commands that it contains.

In addition to the toolbar, the Word also has a quick access panel. You can add icons of those commands that you use most often to it. It is displayed either under or above the tape. By default, it has three buttons: save, cancel or redo.
To customize it for yourself, click on the little black arrow pointing down and select from the list "Other commands".


Search in the list the command you want, select it by clicking the mouse, and then click "Add".

Everything that will be in the area on the right will appear on the Quick Access Toolbar.

If necessary, all items can be arranged in a suitable order for you. To do this, select one and change its position using the up / down arrows on the right. To save the changes made in the Word for all other files, in the upper field, select "For all documents"... When done, save by clicking on "OK".


Removal takes place in a similar manner. Open the familiar window, select the unnecessary command and click "Delete". Save by clicking on "OK".

That's all. Now you know not only how to get it back hidden panel tools, but also how to customize it and the Quick Access Toolbar in Word.
Rate article:Almost all users who have opened the Word editor at least once remember the program's workspace: in the upper part there is a control panel with various sections and functions. After analyzing the sequence of user actions, the developers grouped the commands into separate blocks, thereby making it easier to find the required option. In this article, we will show you how to pin the toolbar in Word if it is "hiding" under the document.
The hidden tape mode is especially convenient to use on netbooks, laptops with a small screen. It allows you to increase the view of the page and not be distracted by unnecessary details.
Proven methods:
id = "a1">- Method number 1: you can pin the toolbar in Word by double-clicking on the panel, in the same way you can display it again.
- Method number 2: near the quick access panel, which is responsible for saving the document and canceling actions, you will see an arrow, by clicking on which you will open the contextual list. Checking the box next to the Minimize Ribbon command will hide the panel, and removing it will display it again.
- Method number 3: click right click mouse on any empty field will bring up a short list of commands, among which there will be "Minimize the Ribbon".
The state of the ribbon is retained even after the document is closed, regardless of which of the listed methods you used. In the minimized position, the menu will open commands when you hover the mouse over the required tab, and then “hide” the commands again.
 Solving the problem with the missing brush outline in Photoshop
 Technical details of PSD files
 Free download various watercolor textures with stains