DIY valentine mailbox. Valentine gift box. Valentine card made of paper strips
The popular holiday of Valentine's Day, or Valentine's Day, is getting closer and closer. Surely you have already prepared surprises and gifts in advance (or maybe not), but in any case, if you are a little constrained in funds or just want to be original, create a box for “valentines” with your own hands. It will take very little time and effort, but the result is able to please everyone: the total who did it, and the one to whom it was presented.
Remember the main thing: the size can be any! Just scale up the proposed schemes to the desired scale.
Though v classic version- this is exactly a small box, in which it is easy to put a couple of small hearts with wishes and some kind of pendant or keychain - a symbol of the holiday.
What do you need to make?
So you will need thick paper - colored cardboard which you will cut out according to the pattern, glue, scissors and various decorations: beads, beads, ribbons - everything, even buttons - are used.Cut and fold the resulting parts according to the diagram.
Glue in the marked places.
Let dry.
Insert one piece into the other.
Decorate as your taste and imagination dictate.
So our cute box for valentines and little surprises is ready!
By the way, even a child can make it, and such a product will certainly be a good (and, most importantly, original!) Gift for a classmate or classmate. Happy holiday to you!
And even more - to do something nice for your soul mate by giving something as a keepsake. I suggest you make it with a secret message inside.
For a valentine you will need:
A box for matches or its template ( save, );
- thick colored paper for the box, paper for congratulations;
- scissors and / or office knife;
- pencils;
- a ruler for precise bending of cardboard along the lines;
- glue;
- decorative decorations for valentines.
To work!
But first important information! If you decide to make a valentine from a matchbox, glue it over with colored paper and decorate it with bright ribbons, artificial flowers, hearts and the like. If according to the template, print the diagram on hard colored A4 paper and cut out the details of the future valentine.
Here are two options for a valentine box.
First- in the form of an ordinary matchbox.
Second- in the form of a festive envelope box.
We begin to produce a box.Valentine's Day- a holiday of love, smiles and positive emotions. How much on this Day you want to receive a gift from your loved one! And even more - to do something nice for your soul mate by giving something as a keepsake. I suggest you make an original valentine from a matchbox with a secret message inside.
1. Print out templates for valentine boxes on A4 paper. To make sure the box is the correct size, do not scale or resize it. Remember, the box needs heavy cardboard or heavy paper. Although it is possible to print templates on plain paper, stick them onto cardboard and cut them out.

2. Cut the box patterns along the black lines. Using the ruler, bend the details in the places of the gray lines and fold the boxes of future valentines as shown in the photo.

3. Apply glue to the light gray areas of the paper inside the box.

4. Now attention! Bend all sides of the template in half inside the box (you should have double walls). And small parts need to be inserted into the slots that appeared after you folded the sides of the box in half.

5a. To make a regular box: tie the inner box with paper for the outer box (on the template on the right), check if everything fits, if the box fits snugly. Then glue the parts together.
5 B. For an envelope box: anoint the inner sides of the part with glue, as shown in the photo (you can insert the inner box, but then you will need to remove it). In order for the parts to stick well together, they need to be pressed from the inside of the box and held for a few seconds.

6. The box is ready! It remains only to properly decorate it.

What will be inside the valentine? Do not give it empty ...
Making a booklet!
Here are three valentine box brochures. The first is the simplest and has only two pages. The second has the form of an accordion of five pages for a Valentine. The third consists of eight folded pages.
Follow carefully and you will have a wonderful valentine for the holiday of all lovers.

1. Print templates for brochures on plain or heavy paper. Choose the color to your taste or make it to match the whole valentine. Cut the first two booklets along the black lines and fold over the gray ones. The third template must be additionally cut in the middle along the black line.

2. Fold the booklet in half lengthwise.
3. Take two pages from the center, two folds should come out - two leaves of the future valentine.
4. Make a book from the leaflets of the brochure and use a ruler to align all the folds and edges of the valentine.

5. You can decorate the booklet with different hearts, you can also draw flowers or a decorative frame. Be sure to write a congratulation and give this wonderful valentine to someone you really love.
Hello everybody! I want to remind everyone that soon we are going to celebrate the next holiday called Valentine's Day, which is celebrated every year at the same time on February 14th. What do you think, in most cases, is given on this day? Of course, small and cute valentines made of paper that resemble postcards, but only they are made in the form of hearts and decorated with love and care.
Nowadays, you can safely go to the store and buy such a charm, but still there is nothing more beautiful to make such original pictures and give to your loved ones.
Do you know where this holiday came to us from, write your stories below under this note? I think so, so I will not dwell on this issue, but I will immediately start with the most important and basic, I will teach you and show you in stages various ideas for Valentine's Day crafts, so let's get started.
Of course, you can knit such creations, or even sew, I saw recently how they made a heart from beads and even from felt. By the way, for those who are fond of felt toys, I suggest looking into this
It's no secret to anyone that even a child can make paper products, because there is such material in every home, the main thing in this matter is to competently approach and do everything as the author recommends. Therefore, see this step-by-step instruction and repeat, the result will be simply stunning and very beautiful.
I propose to make the first option for two halves at once, for example, a husband and wife, and hang such a decoration over the bed.
We need:
- paper
- paints
- ribbon
- scissors
Stages of work:
1. As you can see, everything is pretty easy and quick, dip your fingers in paint, that is, apply it to the surface of your palms, and then make a print that will resemble a heart symbol.
2. Cut with decorative scissors and thread the ribbon.

The next way to make a valentine from what you have, so to speak from scrap materials, is to take cardboard, preferably pink or red, and plus colored paper. You will also need glue, a pencil and scissors.
We need:
- colored red cardboard - 1 sheet
- sheet of pink colored paper - 1 pc.
- pencil
- scissors
Stages of work:
1. Everything is extremely simple, fold a sheet of cardboard in half and cut out the heart, then you have to make thin stripes out of pink colored paper, which you cut as if you are making grass or something like that, twist each such strip on a pencil.

2. Glue the flowers on the layout and you can also decorate with sparkles and something else to your taste if you wish. It turns out a slightly voluminous and at the same time elegant craft, which you can happily present to your mother, sister and tell how you love them.

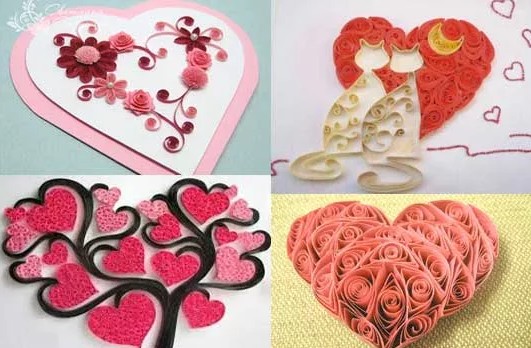
And a similar idea that captivated me too, it also uses interweaving of strips of paper:

But that's not all, if you turn on your imagination, then you yourself can come up with your own patterns, because there is nothing difficult here, see what can happen. Well, if you think that you cannot cope, then contact me and I will send you stencils, according to which you can make these adorable creations.

I really liked these views, there are stencils in an enlarged form. By the way, such crafts are called intertwined paper hearts.

The simplest thing is that you can do this and decorate this ordinary heart with any jewelry, letters, rhinestones, etc.

Master class of paper valentines for children
Undoubtedly, in schools now there is still such a tradition as to put mailboxes and toss there anonymous wishes, which everyone then receives. This is so cool and tempting that it makes this holiday unique for everyone.
Therefore, most schoolchildren, and just preschool children, love to create great postcards, and then give them to all those whom they love and adore.
Therefore, if you have children, then you can easily make such a gift with them.
For children in kindergarten and at home, by the way, you can use this type of work as a group to make such a drawing, crumple a heart shape from ordinary toilet paper jugs, and then dip it in paint and fill in the entire Whatman paper. Even a 2-3 year old child can cope with this task.

And if you still have not learned how to draw a heart, then you can use this stencil.

After all, children can simply decorate it with felt-tip pens or pencils and draw their own patterns, or use nothing else. Drawing antistress, or as it is called coloring.

Various ideas can be found if you want a bunch of such anti-stress, of course, this work will be more addressed to high school students and schoolchildren. I have several coloring pages in my piggy bank, if you are interested, write.

Or make a bookmark for this topic, cut out the hearts out of paper yourself, and the child should glue them with an example, but something like that.

You can also make origami, because such an activity will certainly delight kids. Make a boat with them, and instead of a sail, a symbol of lovers on a stick.


Original card Heart for February 14 with a diagram
While I was preparing for this post, I found several ways of how you can beautifully and unexpectedly surprise your beloved or beloved. Indeed, on this day you really want something that will make your head spin. For example, if your betrothed will give you a ring, but not just like that, but in a purse. It will look dignified and romantic at the same time.
You will need to cut out two of these shapes from paper using ordinary sharp scissors:

And then connect them together, but in advance you will need to fold them in half, where you see symmetry, make a small incision where the antennae of the butterfly is.

You get something like the following:

Now it remains to glue the ribbon or make it out of paper and put in the cherished gift with wishes or a bill.

It is more difficult to offer such a craft, for those who are familiar with the technique of cutting out stencils, it will be easy for that, this is a method of sticking out with a special knife, as the people say vytynanka. You can get the stencil itself completely free of charge, if you write a comment below, I will definitely send it to you.

You can also whip up such a masterpiece using your palms. I think that the process of making such a product is already clear.


Looks gentle and of course with love. The beloved will definitely be delighted and smile and give you a kiss.

In America and other countries, they very often give their loved ones pictures related to this topic, you can use newspaper publications, you do not need to be an artist to create such a work, see for yourself.

Well, one more type is vytynanka, they are also appropriate to apply here. And I will write about them below. To be honest, such a souvenir can be attributed to a competition in a kindergarten or school.

Here is its template, cut out with a cutter or a special sharp knife.

We make voluminous valentines at home
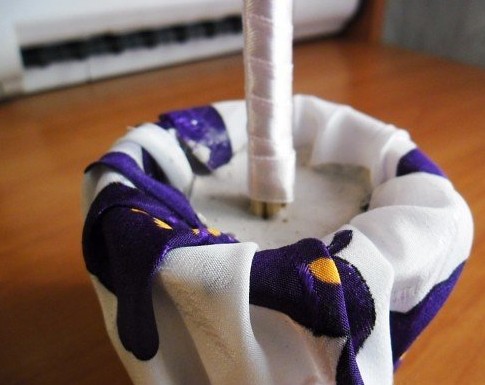
As for such large and seemingly voluminous figures for this holiday, I propose to first go the easiest way and make a heart outline out of cardboard, and then with the help of woolen threads, you can take different colors, or you can take a single color. Tie, that is, wrap as shown in this photo.

In the first version, we made flowers and glued them to the workpiece, you can also do it in this case.

You can also easily and quickly cut out according to such a ready-made sample, and then glue the sides, the box.

And then decorate it with all kinds of decorations, such as scrapbooking kits. I found a similar option in this video, I share with you:
While I was writing this note, one idea came to my mind, but it did not come to me by chance, my eldest son was sitting and collecting a mosaic from puzzles, so that's what I came up with. How did you see it?

Video on how to make crafts for Valentine's Day
Make such a romantic postcard in the form of your pens, here everything will be clear without words.
Or do something more interesting:
Volumetric valentine in origami style
On the Internet there are a lot of all sorts of crafts on the theme of Valentine's Day, especially using such a famous technique as origami, you can fold hundreds of different patterns.
You can make an origami heart yourself using this step-by-step diagram, follow it and you will succeed. After all, it looks really beautiful and original.

The steps are simple as always, you just need to fold the paper correctly.

And after the result will not be long in coming, practice first folding these adorable valentines on plain white paper, and then move on to colored ones.

Or use this kind of work.

You can also bake a delicious one, and then stick special toppers on sticks into it. To do this, you just have to cut out the hearts from paper, and then roll them up like an accordion and stick them on a stick.

Catch these templates, you can copy them, and then easily print yourself on the printer.

3D hearts are very popular now, you can also make them if you watch this video from YouTube:
You can request a stencil for this video from me in the comments below, I will definitely send it to you.
And also very original and super cool hearts with origami flowers, which I really liked very much.

Do you know how these are made? Now I will show you the instructions with which you can make this wonderful thing.

Repeat the entire sequence, the main thing is not to rush and be careful.

Then everything will certainly work out.
Happened? Then go to the next steps))).

Glue the rhinestone and make a handle. Voila, beauty.

Quilling heart
You know what this unique and at first glance means interesting word, quilling? In fact, a technique that makes it very funny to fold paper into little funny things. I think all those who love creativity and crafts are familiar with this type of work, or have you ever seen such cute souvenirs.
If you know how to use and make such valentines, please share your work with us, I can only offer you such ideas that I liked myself.
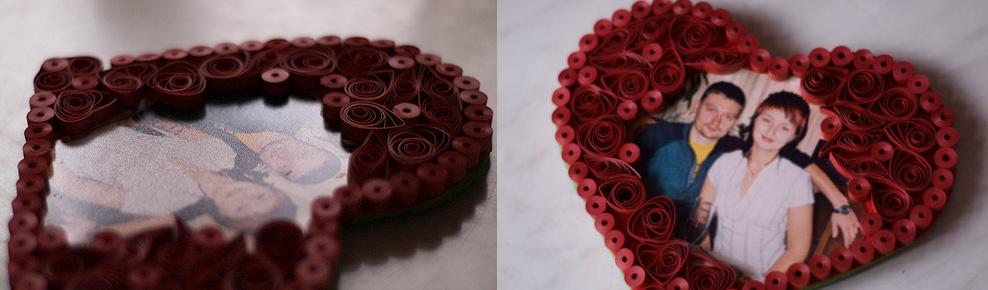
I suggest you make a photo frame and something else, take a look and decide for yourself what is closer to your soul.
Or make such a small but nice thing out of strips:

We need:

Stages of work:
Take a ready-made heart template or make it by hand using a compass, or something round. Then attach the stencil to thick cardboard and cut out the blank. Next, attach the blank on colored paper and make some more stock, as shown in the figure.

Paste this green cover on. Then cut a heart out of red colored paper and glue it on the back of the blank. On this side, you can write a love note or a poem.
After that, make figures for quilling, wind strips of paper on a pencil, use a special ruler and a toothpick.

When the washer works, leave it in the circle of the same engineering ruler.
Take your love photo and trace it to the desired shape, and then glue it onto double-sided tape or tape.
Now it remains to glue all the elements. And this is how wonderful and magical it looks.
And you can also build such a red pendant, a symbol of love.


Card with corrugated paper roses
Well, now I propose another fairly common version of roses, which are easy to twist, if you take the desired type of paper, we are talking about corrugation.

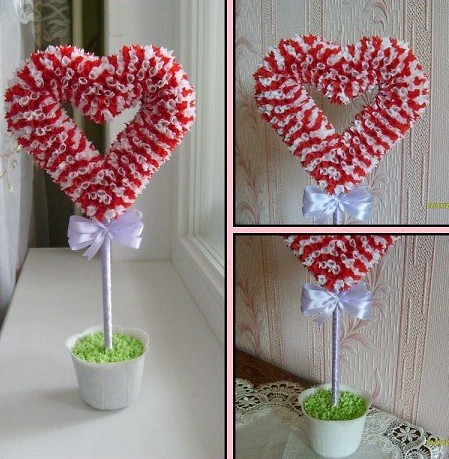
There is also a great idea for a very large valentine, which is made in the style of toppiaria, looks great, at first glance you might think that such a charming invention is beyond your power, but in fact, believe me, your eyes are afraid, but your hands are doing it.

Now you will see the necessary basics and based on this information you can easily build such a thing. Moreover, after all, it can be presented not only for Valentine's Day, but also for March 8 or Birthday.
Stages of work:
1. Take regular polystyrene and cut out the symbol of love from it, the thickness should be about 3 cm.

2. Next, take a stick or pencil, for this purpose, barbecue sticks are very suitable and stick it into the heart. Hide the stick using a decorative ribbon. Then insert the stick into the jar, it also needs to be decorated, wrap the dishes with cloth or paper, in general, with improvised means, you can even use plasticine.
To prevent the stick from falling in the pot, fill everything with plaster.
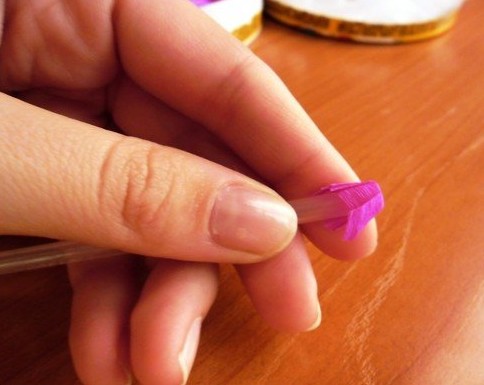
3. Now prepare the following materials for work, this is glue, it is better to take something like liquid nails, it is more convenient for them to work. Then you will need corrugated or crepe paper and a core from a gel pen.

4. Now make the bevelling. At first glance, the word is not easy, but there is nothing difficult.
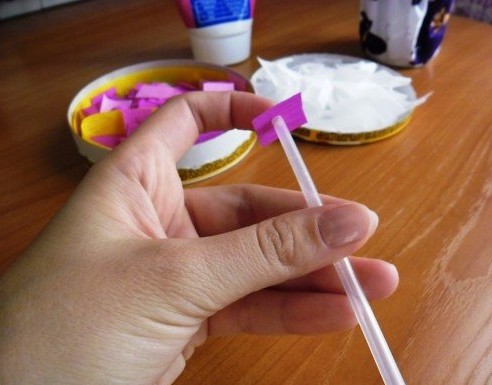
5. Stick the rod into the center of the rectangle (cut the paper into small pieces of the same size) and then crumple.
6. Now aim straight for the heart, glue the blank to the foam.
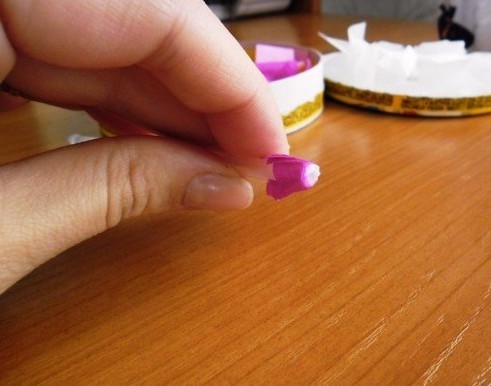
Remember, the best way to apply the glue is to the paper itself.

Using this method of facing, you can also make such a fluffy and voluminous postcard on cardboard.

Pictures and templates for printing
So we got to the very last option, it will be unexpected, but also pleasant at the same time. In one magazine I saw such a cool cool novelty for the interior, decor in the house.
I remember that when the new year came, many of you asked me to send them templates on the window, so why not implement it here too, decorate the window by February 14 with the necessary symbols, it can be hearts, angels, pigeons, etc. How are you look at this, see how you can do it in an original way.


I really like this incarnation, and write your suggestions and reviews))).

And I honestly really liked these images of a girl and a boy. And you? There is also a sketch of a cupid and a fairy, as in the photo on the window. There is in my piggy bank a boy and a girl kissing in the heart and much more.

Therefore, if you also want to decorate your apartment with your children, then you can request all the schemes and templates for free, I will, as always, send it to everyone by e-mail.
Well, and for those who did not like such a creation, I give you small blanks that you can also print on a printer and present to your loved ones and friends.


Here's a selection, I hope my findings will be useful to someone. Have a good day, good mood and positive! Bye!
Best regards, Ekaterina Mantsurova
Good afternoon, in this article I have collected the most interesting ways to make valentines with your own hands. Crafts-hearts you can give to your loved ones and loved ones for Valentine's Day... After all, how nice it is to receive gifts made by OWN HANDS. For each craft, I will try to make a drawing (if not ready-made templates) and explain in detail what and how to do step by step. We will cut out valentines from paper, from cardboard, fold into boxes, and make valentine envelopes and other Valentine's Day crafts. Here are the most interesting ideas make a paper heart in different volumetric techniques.
So let's begin our heartfelt affairs ...
Paper valentines
IN CUTTING TECHNOLOGY.
Here's the simplest thing to do. Which even children in kindergarten... The middle group or the older one, when they are already good enough to cut with scissors (without trembling hands and a sweaty forehead), can easily make this valentine with their own hands.

Everything is simple here. Flatten the sheet in half. Draw a half heart and horizontal lines on it. Cut through the lines and cut out the heart itself. Expand the heart and put it on the table with the edge of the fold down. And then the most interesting thing for children. You need to pull the strips UP with your fingers - but not all, but after one - we leave one, pull the second, skip one, pull the second up (changing the fold to the opposite). We get a ribbed heart. Below we see a visual template for this paper craft of a volumetric heart. A simple and quick DIY valentine card for children in kindergarten.

You will find many other ideas for simple children's Valentine's Day crafts in a special review article.
And here is another beautiful craft for children - in the form of a puff valentine. Where the layers of the heart are located in different planes.
We bend the sheet in half. Draw the outlines of the heart on the sheet. And we highlight with bold lines, places where you can cut with scissors, and with dotted weak lines, places that do not need to be cut. Explaining to the children which lines to cut.
And then with our fingers we bend the inner heart forward with the fold edge, and the outer heart with the central fold edge back, and the card itself becomes the fold forward edge. It turns out as in the photo below. A quick valentine from paper - in just 20 minutes of kindergarten class.

THIS IDEA does not have to be copied exactly. It can be changed, played. For example, change the notch area and bend area on the same contours (as shown in the drawing above).
That is, to change the FOLD ZONE of such a heart contour (the zone indicated by the dotted line on the diagram) and get a new volumetric postcard craft, where the heart is already protruding from the other side.

Take a closer look at the photo above. On this valentine, a large heart is held by an UNCUT LOWER CIRCUIT. And the inner little heart is held by uncut top and tip on both sides of the centerline... This is how these changes look in the diagram.

The most interesting thing is that you yourself can continue EXPERIMENTS IN THIS TECHNIQUE. Make cuts in the shape of a heart, or a half-heart and bend them in different directions. And one day you will get a cool author's craft.
For example, if the half-hearts are arranged in a CIRCLE - then cut through the contours of the half-hearts and bend these contours - then we will get such an interesting round handicraft HEART CHOIRT.

This is how the conceived drawing looks like - drawing half-hearts, in a circle.

This openwork layered applique can be stuck on a card for Valentine's Day. You will get a beautiful designer valentine card with your own hands.
For even more Valentine's Day greeting card ideas, check out our dedicated article.
Valentines do it yourself
WITH NOTES.
On Valentine's Day, we say warm words to our halves. Declarations of love can not be said in words (after all, at a solemn moment, all the most tender phrases can fly out of a head in love). Therefore, their mur-mur-phrases can be written on notes- twist these notes into rolls and hide them in the buds of paper roses on this Valentine's Day craft below.
See how beautiful - each rolled paper bud contains a small white twist-note. Such a craft with notes for Valentine's Day is easy and simple to do with your own hands. I will now tell you exactly how to quickly and conveniently do this kind of work with your own hands ...

We take a piece of thick cardboard (for example, the lid of a pizza box, it's just big). In stationery we buy packaging of red office paper(it is just double-sided and dense - that's what you need).
Cut the paper into wide stripes... We fold each strip in half ALONG(so that it is doubled - so the rose will turn out thicker and more magnificent). And then we twist this double strip with a roll (around the pencil). We remove the twist from the pencil, slightly loosen it, give it a little spin and fix the twist tail with glue(so as not to protrude).
We make a whole lot of such paper twists-roses - so that they all tightly fill our cardboard heart. And then we attach them to a cardboard base - you can use glue. A better on double-sided tape- holds great - cover the entire surface of the cardboard heart with strips of scotch tape, remove protective film and this sticky base poke our roses. Then we put a note in each bud with warm words, promises, confessions, heartfelt vows and intimate hints ...
Second craft with a note.
HEART WITH A SECRETIC.
You can also put a love confession inside a PAPER HEART with a slit in the middle.

Here is a detailed master class on making such a VALENTINE WITH A SECRET.
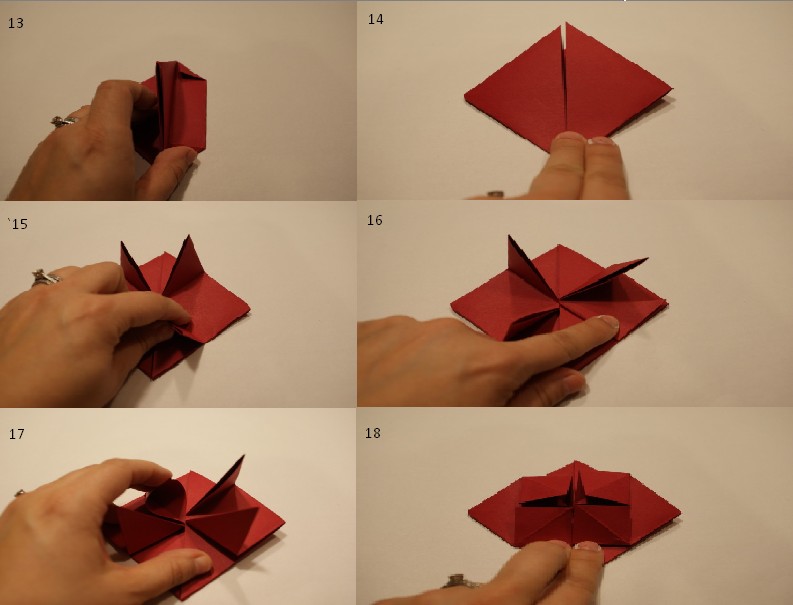
We take a square sheet of paper - and fold it in half - up and down. To make it four-fold along the folds - cross to cross (as in the first photo).
Bend the bottom edge of the square up to the middle horizontal fold line (photo 2).
Turn the sheet over, down with this fold (photo 3). Then we bend the right and left corners to the vertical midline (photo 4).

Turn the sheet over again with the other side up, corner down (as in photo 5). And bend the upper corners to the middle vertical line (photos 6 and 7).
And again the same upper corners - we bend again to the middle vertical line (photo 8).

And now we fold our module (which has the shape of a hexagon) in half. That is, the upper corner of the hexagon falls on its lower corner. And then such ends appear at the top (photo 9).
These protruding ears-ends need to be folded (as shown in photo 10) - that is, we put our finger on the corner of the ear (the one where the fold angle is) and press this fold edge to the edge line of the module. And as a result, our ear was flattened (as in 11 photos).

Now look at our module has 2 layers - 2 triangular halves, lying one on one. We take the upper triangular half and put it in the POCKET on the lower triangular half (there is just such a wonderful pocket there (photo 12, 13).

There is a little touch left. Change the shape of the ears sticking out above the module so that the ears look like the rounded hills of the apex of the heart.
First, we bend the rectangular ends of the ears - so that the ears begin to have a thermal shape (photo 14)
And now that the ears have become triangular, you need to smooth out the sharp corners of these triangles. That is, bend them down (as in photo 15). And all the valentine is already ready with our own hands - we turn it over to the front side.

You will find even more techniques for folding a paper heart on our website in a special article.
And we continue ...
VALENTINES-CONVERTICS
Do it yourself from paper.
And here you will find ways to make a heart-shaped envelope from thick paper or cardboard.
On a sheet of cardboard, draw a template for the future valentine, as in the photo below. You can copy the picture or draw by yourself according to the sample. The sizes can be any (according to your task) - the main thing is to observe the proportions. That is, the width of the half of the heart should coincide with half the width of the central rectangle of the envelope itself. All other sizes can be any according to the size of your letter.
You can put a small gift in such a valentine envelope - for example, earrings. To pin earrings on a heart-shaped cardboard (for example, from a beautiful velvet cardboard) - punch two holes and insert earrings into them. And put this velvet heart with earrings inside such an envelope. Nice and cool.

You can make the envelope simpler. Here's one. Cut out a heart from cardboard or thick gift paper. Draw a rectangle inside the heart - so that the HEIGHT rectangle and HEIGHT zones above none m were EQUAL.
That is it is not necessary to copy this template exactly from your computer- you yourself can draw a heart of any size and shape (thick or elongated - it doesn't matter). The main thing is that the height of the rectangle is equal to the height of the zone that is located above this rectangle. And everything else is not important. You will have an envelope anyway.

You can also make a do-it-yourself valentine letter inside tight paper boats. Fold a sheet of pink (or beige) paper in half. And we put the palm stencil so that the fold line falls on the back edge of the palm. We outline the stencil - we cut out two layers of paper at once along the contour, without expanding. And when the silhouette is cut out, we unfold the folded stencil - and we get two open palms. And inside the paper heart we glue (folded). On a paper heart, write a love note or warm words to a loved one.

And when we want to make a gift for Valentine's Day, then the envelope will not be enough. We need a whole box so that we can put a voluminous object (souvenir or gift) in it.
Therefore, let's see what simple valentine boxes we can cut and fold from a sheet of cardboard or flat paper.
VALENTINE BOXES
How to do it yourself
Heart-shaped boxes.
Here is the first version of a simple heart-shaped box that is easy to make with your own hands from cardboard. You can see a stencil template for such a Valentine's Day craft in the diagram below.


And if the same template is slightly changed. Then you can make just such a valentine in the form of a box - with double entry of one box into another... The stencil will be exactly the same - with only one nuance - in it the lower corner of the heart should be DIRECT - that is, it should have 90 degrees. And the intermediate walls (between the hearts) should not have a sharp edge at the bottom - but instead they should have the same straight walls as above). Now I will try to draw such a diagram for this template so that it is easy and understandable for everyone.

To make everything clear, I drew a diagram below. You can see for yourself that the stencil differs little from the previous template - only the walls between the hearts are rectangular (not triangular) and the hearts themselves have an angle of 90 degrees (so that you can close them by sticking them into each other).


Therefore, go to this thematic article to learn how to quickly and easily make such boxes with your own hands.
And since I started about boxes-hearts, then I need to tell you a little about what you can put in them. Below are beautiful ideas for original DIY FILLINGS for these valentine boxes.
You can put crocheted toy hearts in a box. For example, in the form of delicious plump donuts, decorated with knitted glaze and beaded sprinkles. Such toys can be used as pendants for a Christmas tree - that is, they will faithfully serve your family for a long time at every New Year's celebration.


You can bake real Gingerbread Hearts from dough, cover them with jelly red icing and decorate with white egg white icing and icing sugar

Any gingerbread dough recipe will work for those sweet valentines. We bake gingerbread cookies in the shape of a heart. Cool it down. Dilute red jelly blue in a saucepan. Soak 40 grams of gelatin in 100 grams of cold water, into which 1 packet of food coloring was thrown. After the gelatin swells, heat the mixture in a water bath, but not to a boil. We immerse the whole gingerbread in this glaze, with tweezers and put it on a dish in the refrigerator for solidification.

And if you do not like to bake. You can buy ready-made square cookies in the store and decorate them with sweet mastic. The mastic dough is made in 1 minute - we buy Marmeloshaw marshmallows in the store, heat them in the microwave - we get a sticky mass, similar to plasticine. Pour icing sugar on the table - and in this powder (as if in flour) we knead our marshmallow dough. We get ready-made sweet mastic, from which you can sculpt decor for cookies for Valentine's Day

We take part of the mastic dough and roll it out with a rolling pin - cut out squares from the rolled sheet to the size of the cookie. We glue the squares on the cookies. We roll part of the dough onto thin sausages - these will be the seams of the envelope. And we mix part of the dough with red food coloring - we make hearts from it, decorate our sweet envelope. If there is no food coloring, it doesn't matter- hearts can be cut from red marmalade.
You can make such sweet Valentines with your own hands on the basis of waffles, cookies, cupcakes. We buy ready-made flour products and decorate them with sweet mastic from Marmeloshaw marshmallows melted in the microwave (our Soviet marshmallow is not suitable - only bourgeois rubber).
Valentines PLEETENKI
With your own hands.
And here is the classic school paper heart craft. Wicker valentine in the form of a checkerboard weaving of stripes threaded one through one.

This is how such a heart is made. Fold the white sheet of paper in half - with scissors cut out HALF OF THE OVAL. We cut three or four or five cuts at the oval - from the fold line and deep into the oval without going into the zone of its round top with scissors. We do the same with a red sheet of paper. And then we insert two modules, alternating its strips, as shown in the diagram below.

This simple classic craft has found many creative interpretations. Depending on the curvature of the strip, we can get a different weaving pattern ...

Let's see how this happens. If we modify the braided module like this with rounded knobs, we get a braided heart with a pattern in the form of many small hearts.

If on the four lines of our module we make recesses in the form of 2 round ears on the left and 2 ears on the right. Then when we fold the valentine with our own hands, we will get a flower with four petals in the center.

And if the tubercle is only ONE - and only in one direction - then we will get a HEART SILHOUETTE in the center (as in the photo below).

We can ourselves try to be a creator-creator and draw our braided lines at random. Collect a valentine's craft and see what unexpected pattern comes out in the end.
Moreover, we can decorate not only the wicker part of such a valentine with our own hands, but also decorate the round EARS of the heart with curly carvings (as is done in the photo below).

DIY valentines
LARGE ABUNDANCE.
Here is a Valentine's craft that I really like. She looks very chic and rich. And it's done very simply. Therefore, this valentine can be a topic for a kindergarten class or a craft in class at school.


Below I show the module for valentines-LESENKI in three tiers.

We take a sheet of cardboard. And we put it in three layers - that is, in a triple fold. Then we unfold this sheet. And we cut it in half - diagonally. The angle of inclination can be any (this will not affect the essence of the craft). And then we supplement each such oblique strip with cuts. In each of the three foldable parts of the strip, cut EXACTLY IN THE CENTER, reaching with scissors somewhere to the middle of the strip thickness.
The cuts in the strips are different - pay attention - in one strip, the cuts alternate at the bottom, top, bottom. And in the second strip, on the contrary, the cuts alternate like this - above, below, above.

Then we dress our walls with these slots in each other. And we get the basis-backbone of the future Valentine's Day crafts with our own hands. And on this wicker base we glue hearts, flowers, lace, rhinestones and other decor made of paper and cardboard.
And it is not necessary to make three folds on this module. The wall of the accordion can be as many as you like - 4, 5, 6. The more, the more tiers with a heart-shaped decor such a ladder craft will have.
Valentine pendant
In a frame with your own hands.
You can make a very simple Valentine's Day craft. We bend a sheet of white cardboard in half like a postcard. In one half we cut a square window so that the half becomes a frame for a future Valentine's craft. And now we hang a double heart made of cardboard inside such a vertical postcard.

Cut out two hearts from cardboard and hang them on a thread, piercing one and the second heart with two stitches.

Valentine Crafts
Made of cardboard with paper flowers.
We have collected these ideas for Valentine's cards with our own hands for you in this article. Good luck with your creativity, the way you will get original crafts.
Olga Klishevska, specially for the site
If you liked this article
And you want to encourage our author, then you can send any amount convenient to you
to his personal wallet wallet YAD - 410012568032614
Tatiana Korepanova
Master class on creating a mailbox for valentines.
When the valentines were almost ready ( watch a master class on making valentines "I blinded her from what was ..." , the daughter remembered that she was asked to make a mailbox for valentines, which puzzled me even more. After thinking a little, I looked box(found a box from under the tonometer).

Took another pink printer sheets and with the help tassels and PVA glue pasted over the box on the sides.

Glued to the top and bottom self-adhesive red paper, and glued it so that you could open the box.

Then from self-adhesive paper in pink and gold colors cut out the hearts and decorated the box. Above stationery knife cut through the slot for valentines. It turned out kind of cute!
The next day, the daughter said that the class teacher praised her box. I was pleased.)
Thank you for the attention!
Related publications:
This year I have New Year was associated not only with the Christmas tree, Santa Claus, Snow Maiden and gifts, but also with a cozy house out of the box.
I bring to your attention a master class on making a box in a nautical style. For its manufacture we need: - paper for a copier.
On the eve of the Defender of the Fatherland Day holiday, all teachers are puzzled over what kind of gift to come up with so that children can make and.
Materials for fish: 1. fabric of four colors, threads for trimming 2. synthetic winterizer for stuffing 3. scissors 4. stationery clips 5. sequins Stages.
Hand-made gifts have many privileges over souvenirs bought in the store, their main advantage is exclusivity.
To make a gnome, you will need: 1 large bead (head, 4 small beads (feet and palms, fleecy wire sticks (torso,.
Workshop on making a "Fire Truck" from a cardboard box. This year, for the first time, the "Yuna Firefighter" competition was held in our area.
 Architecture of a distributed control system based on a reconfigurable multi-pipeline computing environment L-Net "transparent" distributed file systems
 Email sending page Fill relay_recipients file with addresses from Active Directory
 Missing language bar in Windows - what to do?