How to speed up the forced termination of applications when you turn off your computer. Ways of shutting down programs Shutting down an application
When you turn off or restart your computer operating system often displays a message about the impossibility to complete work on its own. In this case, the reason is indicated, and most often it is an open application. The user is immediately prompted to execute forced reboot... When the corresponding button is pressed, all holding processes will be closed and the computer, depending on which action the user has chosen, will shut down or go to reboot. To some, this function may seem unnecessary, slowing down the process of restarting the computer, in fact, it can be very useful.
The application may open important documents with unsaved data, and if you forget about it and forcibly terminate the process, all the work may be wasted. But if you are sure of your actions, or still think that the shutdown or reboot speed is more important, the option to display such messages can be disabled. If you disable the function of displaying messages about the forced shutdown, slowing processes will be closed without any questions, which means that Windows will restart a little faster.
Now how to implement it. The first step is to make sure that the auto-complete process is enabled. Start Registry Editor and go to the section HKEY_CURRENT_USER / Control Panel / Desktop.

There will already be many different parameters. Looking for a string (REG_SZ) parameter AutoEndTasks and set its value to one.

If parameter AutoEndTasks for some reason in subsection Desktop it will not turn out to be necessary to create it manually, and then set the value 1 ... This will enable automatic process termination, but it will not disable force shutdown messages, although the system will successfully shutdown after a certain amount of time.
Exactly how long this delay is, you can find out by looking at the parameter value WaitToKillAppTimeout located in the same registry branch. In Windows 7 it is usually 10000 milliseconds, in Windows 8 its value can be 20000 milliseconds. By changing this value, you can adjust how long the force termination message is displayed.
Probably everyone windows user, starting his acquaintance with the operating system, knows where the START button and the button are Completion of work... Her appearance has changed somewhat over the past few Windows versions, but the meaning of her work has not changed a bit. She still does only one thing - shuts down the computer. You yourself have done it thousands of times. But do you know that you can shut down the computer in other ways without using this button at all. Now I will show you how the Pros do it.
Keyboard shortcuts
One of effective ways to invoke the shutdown window is a keystroke Alt + F4 and then Enter from your desktop.
You can quickly switch to the desktop at any time by pressing the keys Windows + D.
Another option is to press Ctrl + Alt + Del, click the power icon and press To finish work.
Changing the action of the power button
This method involves using the power button located on the case. system unit or on a laptop. By default, the physical power button is configured to put the computer to sleep. If you prefer to use it as a button to turn off the screen, follow these simple steps:
1. Open Control Panel and go to section Power supply.

Off timer shortcut
Another tricky way is to create a desktop shortcut that turns off your computer after a certain amount of time.
Click right click mouse on the desktop, select Create - Label... Enter shutdown.exe -s -t XXX, where XXX is the time in seconds, which means how long it will take to shutdown the computer.
For example, to delay the shutdown by three minutes, you would enter shutdown.exe -s -t 180.

You can also create a shortcut that will undo the effect of the first shortcut. Those. if you suddenly want to cancel the shutdown that was caused by the first shortcut, just create a second shortcut and enter shutdown.exe -a.
Force shutdown
Often at the time of completion Windows work asks to wait until the applications you open are completed. If you have not closed all your applications yourself before shutting down, Windows will wait for them to close automatically. To change this behavior, there are three different registry values:
- WaitToKillAppTimeout: Windows will wait 20 seconds to save applications before giving the option to force close them.
- HungAppTimeout: If a program does not respond within five seconds, Windows thinks it is hanging.
- AutoEndTasks: After these five seconds, Windows will give you the option to force shutdown.
You can edit all of these values in the Registry Editor.
Then on the following branch in the registry:
HKEY_CURRENT_USER \ Control Panel \ Desktop
From the main menu select Edit - Create - String parameter and enter one of the three variable names described above, for example:

You can create or edit (if already created) all three parameters in this way, if you like.
After you have created a parameter, double click on it to change it and specify a value.
For WaitToKillAppTimeout and HungAppTimeout enter these values in milliseconds.
For AutoEndTasks- value 1 if you want Windows to automatically close programs on shutdown and 0 if you want to do it yourself.
Like these ones simple ways can vary the options for shutting down your computer.
Closing the program (application) window means the end of its work. There are several ways to close the program in Windows.
· Click on the button to close the window.
· Double click on the system menu button of the program window.
· By clicking on the button of the system menu, open the control menu of the program window and select the last item Close in it.
· From the File menu, select the Exit command.
Window
Windows are one of the most important objects in Windows. Absolutely all operations in Windows occur either on the Desktop or in some window- a rectangular area of the screen. Distinguish folder windows, dialog boxes, help windows, application windows and document windows.
The folder window is a cont e Inner, the contents of which graphically displays the contents of the folder. Double click on the folder icon opens its window and allows you to familiarize yourself with its contents. This way you can dive deeper into the folder structure to the last nesting level.
Dialog boxes provide the ability to define the parameters of some commands.
Windows programs, like the operating system itself Windows system, provide help for their use in help windows.
Some applications use windows that are split vertically, horizontally, or even in both directions. The resulting rectangular panels are called regions. As shown in fig. 2.6, the size of the area can be changed with the mouse.
Many applications allow you to work with several documents at the same time. Document windows are located inside application windows. If the application can work with not one, but with several documents, you can expand, minimize, restore, move and resize the windows of these documents, but they always remain within the window of your application.
There are two main types of windows - application windows and document windows. Application windows contain programs or folders, they can be moved anywhere on the desktop, maximized to full screen or minimized, leaving only the buttons on the taskbar.
Rice. 2.6 Resizing the area with the mouse
Application windows
Application window elements
In fig. 2.7 presents a typical window and shows the elements that are available in almost all windows: window borders, title bar, menu bar, toolbars, work area, status bar. Document windows are located in the working area of the application window (Fig. 2.8). If the program does not support multi-document operation (for example, the standard program Windows Notepad), then a single document occupies the entire Workspace.
Title bar
In the title bar ( top line window) displays the program name and / or the name of the current resource. If the window is not maximized to fill the entire screen, by pointing to the Title bar, you can drag window to another place on the screen. Double click on the Title Bar, you can expand the window to full screen if the window does not occupy the entire screen, or if the window occupies the entire screen, restore the window to its original size.
System menu
On the left side of the title bar, a picture is displayed that corresponds to the given task. The documents created in the program will also be marked with the same pattern. Clicking on it opens window control menu also called system menu... The system menu provides a basic set of commands that are common to all applications. With rare exceptions, the system menus of all programs contain the same commands. It allows you to resize and move the window using the keyboard, as well as minimize / maximize and close the window. Clicking on a menu item executes the command. To the right of the command name, for some commands, the corresponding keyboard key combinations are given - the so-called Hotkeys... Pressing the hot keys leads to the execution of the command without accessing the system menu. For example, you can close an application, folder or dialog window by pressing Alt + F4. Double-clicking on the system menu button closes 
windows, which corresponds to the termination of the program.
Rice. 2.7. Application window elements
Window control buttons
On the right side of the title bar are 3 window control buttons .
The right of the three buttons is used to close the window. Clicking on it terminates the work with the window.
Clicking on the collapsed (left of the three) button removes the window from the Desktop, leaving only the button on the Taskbar. The application remains open and continues to run, but the window no longer takes up screen space. The window can be expanded again by clicking on the corresponding taskbar button or by pressing Alt + Tab.
The middle of the three buttons, depending on the degree of the window's maximization on the desktop, can have the Restore 2 icon or the Maximize 1 icon. The Restore button switches the window to an intermediate state - it is present, but does not occupy the entire screen (in the intermediate state, the window has Borders). At the same time, you can simultaneously see several applications on the screen, the size and location of which can be changed. You can change the location of the window on the desktop by dragging the mouse while placing the mouse pointer on the window title. The Maximize button enlarges the window to the size of the desktop (when maximized, the window does not have the Borders element and its location is invariable, because it occupies the entire area of the Desktop that is free from the Taskbar). When working with an application, it makes sense to maximize its window in order to use the entire usable screen area.

Rice. 2.8 Application window with document windows in the Workspace.
Boundaries
In the non-maximized display mode, the window has borders. You can resize the window by dragging the corresponding borders with the mouse. To change the width of the window, set the mouse pointer to its left or right border, to change the height - to the top or bottom; to simultaneously change the width and height of the window, point the mouse to one of the corners of the window (when you point the mouse at the window border, the outline of the mouse cursor takes the form of horizontallyÖ, vertically × or a diagonally located double-headed arrow (or). drag the specified border to the desired location.
Menu bar
The system menu and the menu bar are the two main elements of the menu system Windows applications... The system menu "drops out" of the icon on the left side of the window title, and the menu bar is a line with commands located directly below the title.
As a rule, all program commands are available through the menu. The menu bar is specific to each program, although many of the commands overlap in different tasks. Clicking on a menu item brings up a drop-down menu from which to select the right command... For example, the File menu includes commands for opening and closing files, the Edit menu contains commands for making changes to a document, and so on. Menu commands whose names in the list end with a triangle 4 symbol, when hovering over them with the mouse cursor, show a new menu level. In cases where the program needs to execute a command Additional Information(such menu commands end with an ellipsis …) , the screen displays dialog box, in which you can fill in the input fields or select one of the proposed options. Menus and dialogs provide a consistent and predictable user experience across all Windows applications.
Note: When working with expanded document window the following appear in the menu bar: on the left - the control menu button of the document window with the application document icon; on the right - three control buttons for the document window.
Toolbars
Most serious Windows applications have added icon bars in addition to the menu system, freeing you from the hassle of navigating menus and submenus. The row of icons below the menu bar in Fig. 2.9 is an example of a toolbar. In most applications, if you hold the mouse pointer over an icon, explanatory text appears: directly below the icon, in a pop-up window below the icon, or possibly in the status bar at the bottom or top of the window.
Rice. 2.9. Toolbar Standard.
Many programs allow you to customize toolbars, which makes it possible to include only those commands that you use most often. Many programs allow you to opt out of using such panels. By removing the toolbar, you can increase the usable area of the program window. Some programs allow you to move the Toolbar.
There can be one or several toolbars in the program window. The tool can be:
· button, clicking on which leads to the execution of the command;
· combo box(for example, the Scale tool on the Standard toolbar), which provide an opportunity to open the list by clicking the button with a triangle 6 and by clicking to select a parameter value from it, or by clicking on the input field to switch to text editing mode, enter a new value instead of the selected one, or edit the parameter value after second click in the input field (to deselect). To complete editing, press the Enter key.
· Button with a set of command options, which allow you to select one of the dial buttons that drop-down when you click on the button with a triangle 6 to the right of the main command button. The main command button has the icon of the command option previously selected from the set. If the icon of the previously selected command coincides with the command option you need, then click on the main button of this command.
Status bar
Often, the status bar is located along the bottom border of the window, in which help information on the operation being performed is displayed (for example, the position of the cursor or data on the selected file, etc.).
The window space between the Toolbar and the Status Bar is occupied by the Workspace, in which program objects (documents or elements file system). For example, the Folder window in the workspace contains the elements of the file system contained in an open folder (Fig. 2.10)
. 
Rice. 2.10 Workspace in the Folder window.
If you are faced with the Explorer problem, then you need to understand that there can be a large number of reasons for its termination, so we will research and find sources. So, you got the error “ The Explorer has stopped working", What to do?
Option # 1 - Fixing "The Explorer has stopped working" with the ShellExView utility
This tool helps to get rid of Explorer errors in most cases. You can download this link: http://www.nirsoft.net/utils/shexview.html
- After running the program, click on the column Type, this is how we sort the list;
- In this column, you mainly need to look after the type Context Menu, also column File Extensions must have an asterisk opposite certain points, we will need this today;
- Items that relate to Microsoft are not of particular interest to us, so we will cut down third-party ones. Select a parameter with the mouse or arrows and turn it off by clicking F7;
- Disable one of the items to begin with, and then restart the computer. We check the conductor. If an error appears, we continue to work.
As I said, this method often helps. In a special case, we proceed to the following methods.
Option number 2 - Run the explorer through safe mode
You need to go into safe mode and make sure that the conductor is stable. Is everything working perfectly? So the reason is in some application installed on the computer. Think back to what you were doing before the problem arose. Viruses can also be the cause, so you need to check your computer for their presence.
If the problem is safe mode observed, then the reason is in the system files. Read the solution below.
Option number 3 - Check system files for errors
A common way to solve many problems is. This is done using command line with elevated privileges. We open it and enter the command:
sfc / scannow

The result of the check may be positive, or a message will appear that some files could not be checked or restored. Then you need to look at the information in the logs. We go along this path and look: C: \ Windows \ Logs \ CBS \ CBS.log.
Option # 4 - The problem is in viruses
As I said before, virus software is also the cause of many problems. You should use the following materials that should help:
Option # 5 - The reason is a system or driver update
If the system was updated, or the driver, then the software could be installed crude with flaws, so it will have to be done in other ways. How to do this is written at the specified link.
Option number 6 - Ask experts
If none of the above helped, then ask experienced specialists who can be found on various computer forums or write in the comments below.
In the next article I will tell you about. I hope you were able to fix the "Explorer stopped working" error.
 Wireless Charging Smartphones A5 Supports Wireless Charging
 Why do not MTS sms come to the phone?
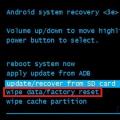 Why do you need a full factory reset on Android or how to return Android to factory settings