How to clean a cooler on a hp pavilion g6 laptop. HP G62-b51SR disassembly and cleaning instructions step by step
Disassembly of the HP Pavilion dv6 notebook will be carried out in order to eliminate overheating. First, I strongly recommend that you read the article where I tell you how to independently determine if overheating is taking place and whether it is worth disassembling a laptop at all.
Suppose that we have diagnosed overheating and we need to take the necessary measures. First of all, check if the warranty period has expired. after disassembling the laptop, the warranty will be void.
A warning: all responsibility for the result lies with you. Before doing anything, please read the article to the end in order to adequately assess your capabilities.
Disassembly of the HP Pavilion dv6 laptop will take place in two stages - disassembly and then cleaning.
HP Pavilion dv6 disassembly
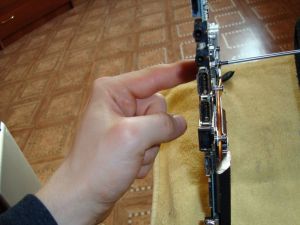
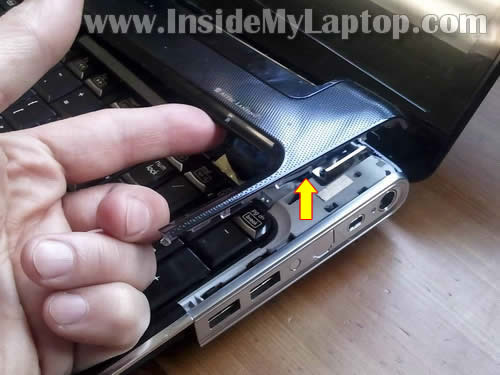
We remove the battery. To do this, move the latch as shown in the picture.
Unscrew 4 screws and remove the cover.
Disconnect the ribbon cable under the cover hard disk(pull the ear up) and take out HDD.
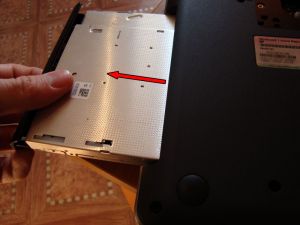
Unscrew the screw that holds the DVD drive. We take out the drive.
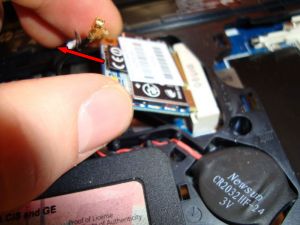
Disconnect two wires from the WiFi module (remember their location).
There is a loop next to the WiFi module, which must also be disconnected.
Unscrew the remaining 16 screws.
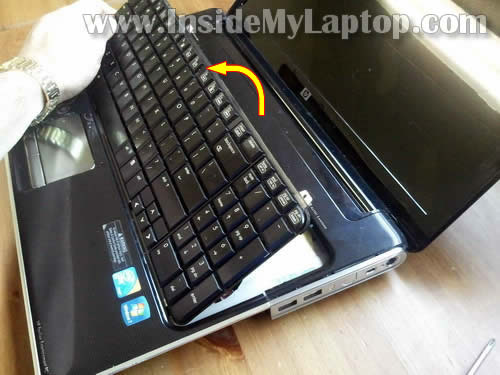
We remove the keyboard. You need to pick up the keyboard from above and lift it. This must be done carefully so as not to damage the cable that holds the keyboard.
If the keyboard won't budge, you can push it through the hole in the bottom of the laptop.
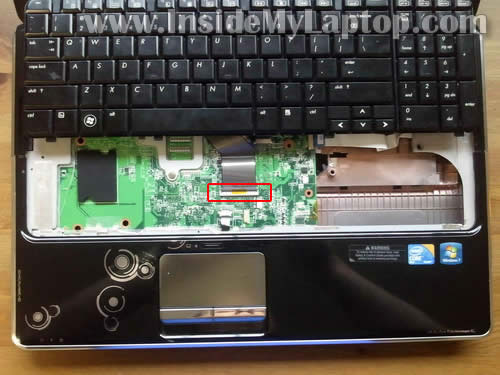
Disconnect the ribbon cable under the keyboard. To do this, you need to open the eyelet.
Three loops will become available, which also need to be disconnected.
The top panel can now be removed. Under it we get access to motherboard where you need to disconnect four loops.
A screw is hidden under the cable from the matrix, which must be unscrewed. Unscrew the screw and remove the black plastic piece.
We remove the fee. Disconnect the power cable.
Everything. The board is in our hands. You can proceed to the next stage.
Cleaning the laptop from dust
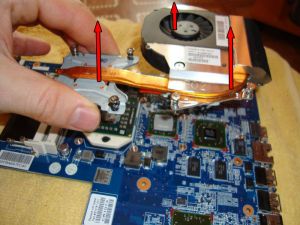
We unscrew the four screws that secure the heatsink to the board. Turn off the power supply to the fan.
We remove the cooling system. Then we open the fan case. To do this, unscrew four small screws.
We remove dust wherever we see it. Old thermal grease should also be removed from both the heatsink and the chips. Then you need to apply a thin layer of new thermal grease and replace the thermal pad.
Never use thermal paste instead of thermal pad. I also do not recommend using a cheap Chinese thermal pad. It has poor thermal conductivity.
Putting it up in the reverse order. Good luck!
How do I remove the lid from a laptop?

During the operation of a laptop, sometimes it becomes necessary to open its lid in order to clean or replace a failed element. Removing the lid of a laptop is quite simple if you follow the instructions. In this article, we will show you how to remove the cover from a laptop.
Before proceeding with the removal of the cover, you need to prepare the following tools and materials:
- a suitable screwdriver;
- saucer for screws;
- paper;
- pen.
Removing the cover
In order to remove the laptop cover, you must follow the instructions:
- Close all programs and turn off your laptop. If plugged in, unplug and disconnect the cord from the laptop.
- Disconnect all external devices from the laptop: flash drives, modems, various cables.
- Close the laptop.
- Turn the laptop upside down.
- Remove the battery.
- Using a screwdriver, unscrew all the screws, try not to press too hard so as not to damage the threads on the caps. If they are of different sizes, and you are afraid to confuse their location, write on a piece of paper where and which screw should be located.
- After all screws have been removed, remove the laptop cover. Remember to remove back cover a laptop is possible, but you must start from the top. If you feel slight resistance while pulling out, press down on the bottom of the lid and pull it slightly towards you.
If the laptop cover is not fixed by screws, then you need to find a locking latch with which you can open the back cover of the laptop. Slide it all the way, and with your other hand, gently push down on the cover. Remove it from the laptop without making any sudden movements or using force.
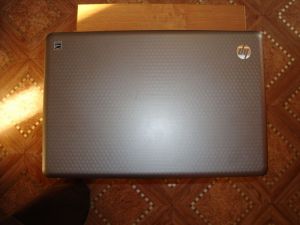
Other modifications of the HP G62: 120ER, 450ER, a05ER, a10ER, a14ER, a15ER, a16ER, a20ER, a25SR, a30ER, a35ER, a40ER, a50ER, a52SR, a54SR, a55ER, a60ER, a65SR, a70ER, a75ER, a80ER, a82ER, a8311er, a84ER, b b12er, b13ER, b14ER, b15ER, b16ER, b17ER, b18ER, b19ER, b20ER, b21ER, b22ER, b23ER, b24ER, b25ER, b26ER, b27ER, b50SR, b51SR, b52SR, b53SR, b70SR, b71SR, b72SR, b73SR, b73ER, b74SR, b75SRAppearance before disassembly:
Attention! Often, self-disassembly leads to serious damage, so if at any stage of this manual you feel doubts, please contact us to clean your laptop from dust.
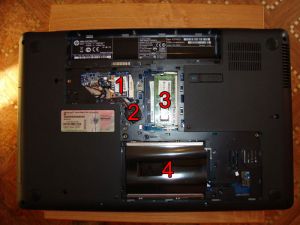
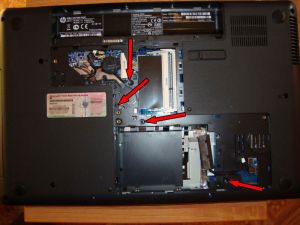
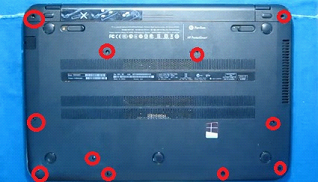
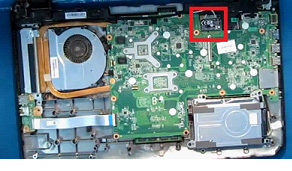
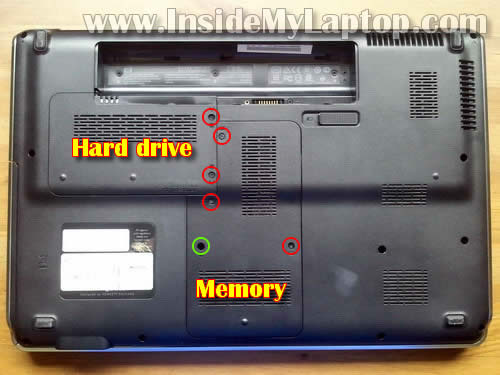
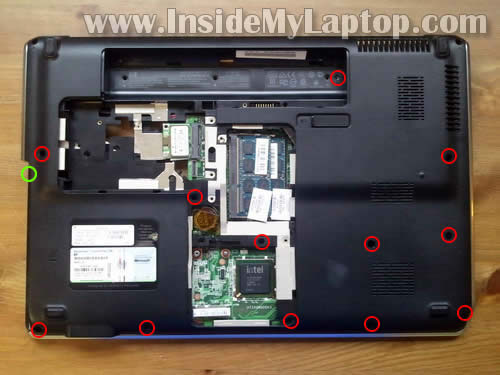
We take out the battery by sliding the latch to the open position, then unscrew all the screws from the bottom. Long screws are indicated in green, medium ones in red, short ones in yellow.
![]()
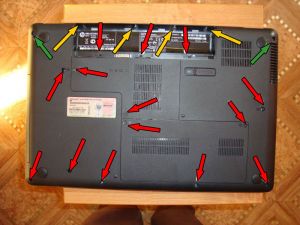
The figure shows: 1) wi-fi; 2) bios battery; 3) RAM; 4) hard drive. Removing the RAM occurs by disconnecting the side mounts and taking them out at a certain angle from the motherboard socket.

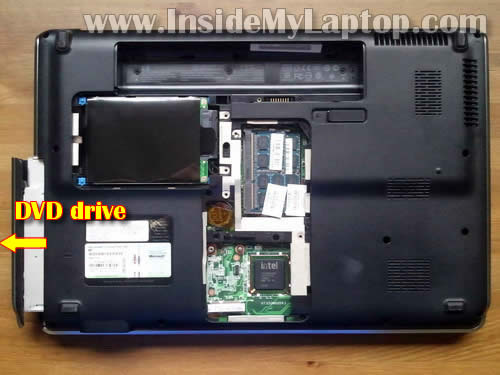
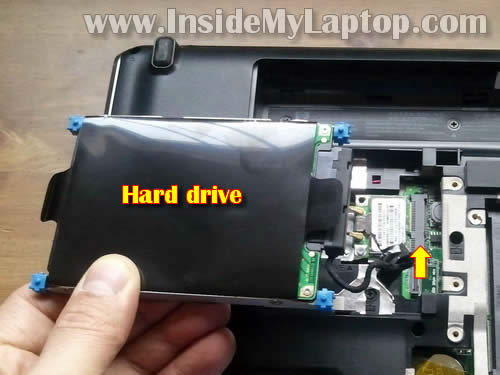
For further disassembly of the hp g62, dismantle the hard drive, first remove it from the slot, and then disconnect the ribbon cable.
After disconnecting the hard disk cable, it is necessary to remove it from the chute so that it does not interfere later. to clean the laptop from dust, you will need to remove the motherboard with this contact. Next, we disconnect wifi.

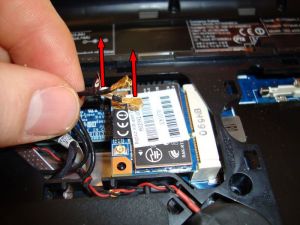
Wi-fi adapter can be removed by unscrewing the screw, then removed from the gutter battery bios, you can, of course, disconnect the contact, but not desirable, since your BIOS settings will be lost, so it's easier not to disconnect.
At the next step of disassembling the hp laptop, you need to unscrew the indicated screws and remove the drive; for this, it is enough to pick up the drive and pull it towards you (do not forget to unscrew the screws shown in the figure).
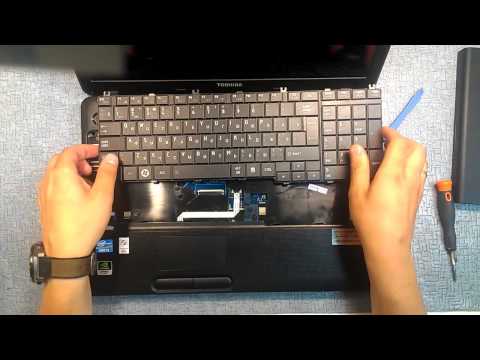
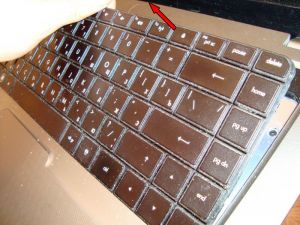
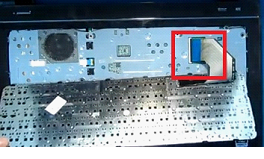
Having picked it up from 2 sides, we disconnect one more contact. Next, we turn the case over and hook up the keyboard, otherwise cleaning the hp g62 laptop from dust cannot be done. We don't remove the keyboard, just hook it up.

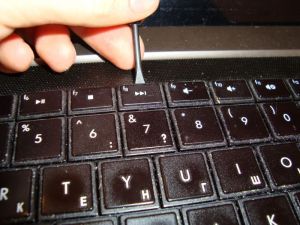
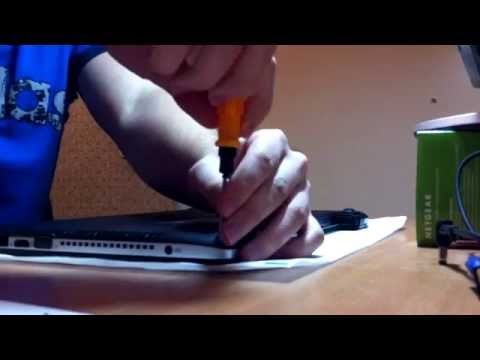
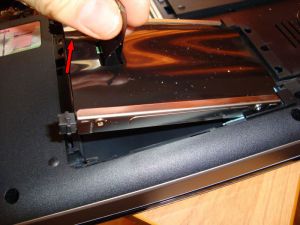
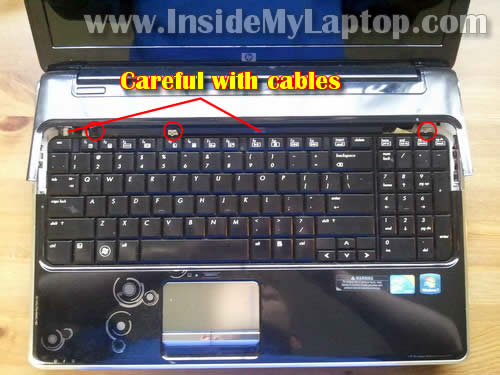
The keyboard is glued with glue, if it is not detached correctly, using strong force can damage it. In order to more clearly show the process of disassembling the keyboard, the figure in red shows the areas where the surfaces are glued. The following figure shows an item - a long screwdriver that can be used to safely disconnect the keyboard.

We also need a flashlight, because dark under the keyboard :). So, we shine and gently hook up the area where the glue is located with a screwdriver, while doing our best not to touch the cable from the keyboard. Once the keyboard comes in, you can gently flip it over.

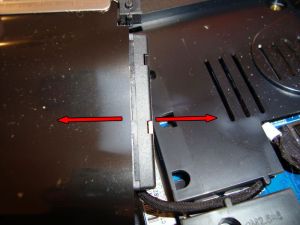
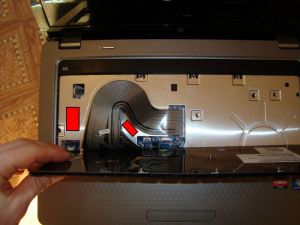
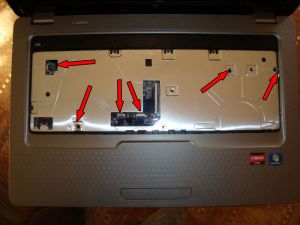
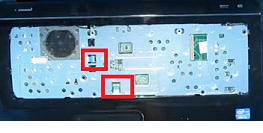
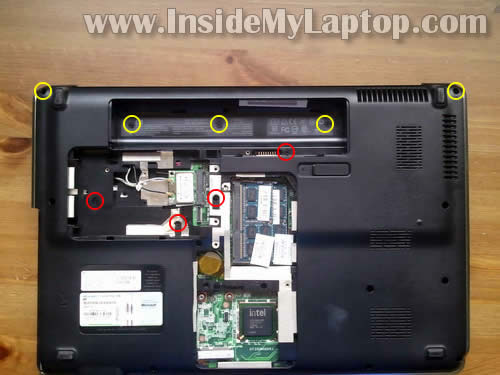
To disconnect the contact, open the lock upward and pull it out. We also remove the rest of the contacts and unscrew the screws.

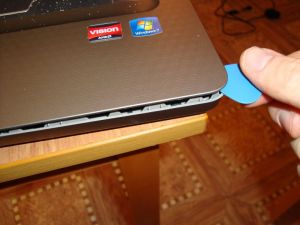
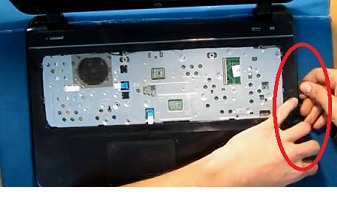
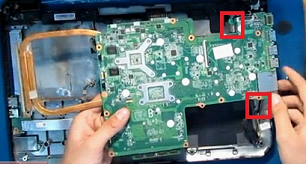
It is convenient to separate the contact in the lower left corner with 2 flat screwdrivers. It is better to disassemble the case with a flat plastic object - for example, a SIM card or a guitar pick. metal can scratch the plastic cover.
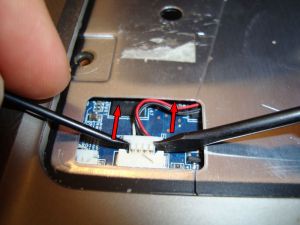
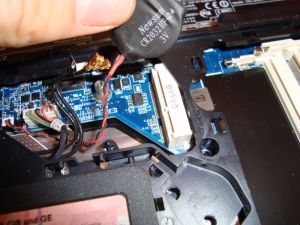
After removing the cover, we find the motherboard, only after removing which, you can start cleaning the hp g62 laptop from dust. So, we disconnect 2 loops by pulling up.


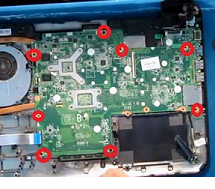
Then the rest of the pins and screws and you can take out the motherboard.
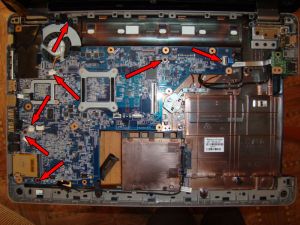
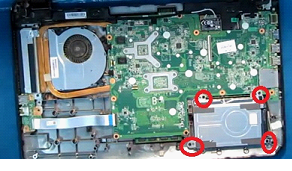
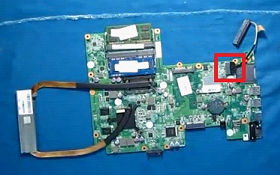
After disconnecting the motherboard, as a result of disassembling the case of the hp g62 laptop, it is advisable to put it on a soft surface - for example, a towel, in order to avoid possible damage when unscrewing the screws. Cleaning the hp g62 laptop from dust can only be done by disconnecting the cooling system, for this it is necessary to unscrew the indicated screws. Due to the fact that screws, as a rule, are unscrewed with force, it is recommended to unscrew them by weight (in a vertical position), i.e. so that the motherboard does not bend at the moment of unscrewing, you can hold it on the opposite side (exactly in this place).

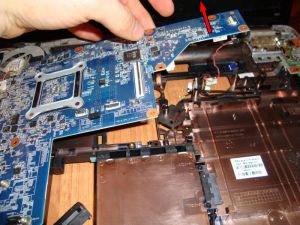
Then we disconnect the cooling system of the hp g62 laptop for further cleaning from dust, while some effort may be required. thermal grease glues surfaces. At the same time, you need to be careful, because if used forcibly, the motherboard may be damaged. The figure shows: thermal pad and thermal paste, because the thermal pads are well preserved, then we do not touch them, but we remove the old thermal paste.

Removing old thermal grease is convenient cotton swab moistened with alcohol, vodka or a special solvent. Ultimately, you should have a smooth surface.
Hello. This article will guide you on how to properly disassemble your HP Pavilion 15/50 EW Notebook PC.
How to get started
We start by extracting battery... We also unscrew all the screws on the back of the laptop.
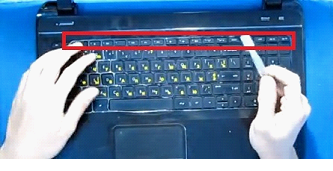
We turn the laptop over and open the lid. Now you need to remove the keyboard. To do this, take a small flat spatula and gently snap it off. The latches are located above the top row of keys. This work must be done with care so as not to damage the laptop case or break the latches.
Lift the keyboard and disconnect the ribbon cable that connects it to the base of the laptop.
After that, we disconnect all visible cables and unscrew all the screws.
Next, you need to remove the laptop case. To do this, we use the same flat spatula (you can use a pick, plastic card etc.). We draw it along the groove along the entire perimeter of the computer, slightly prying the case up. This will release all the latches that hold it in place. Carefully remove the upper part of the case.
Removing the hard drive and motherboard
Now you need to remove the hard drive. To do this, first unscrew the screws that hold it.
Lift the hard drive slightly and disconnect the ribbon cable that connects it to the laptop. You also need to snap off the antennas on the Wi-Fi module. Then we unscrew the screw holding the module and take it out.
We snap off all the other visible trains.

The next thing to do is remove the motherboard from the base of the laptop. First, unscrew all the screws on it.
We also unscrew the screws that hold the cooler. We disconnect the cooler and put it aside so that it does not interfere with our further work.
After that, carefully lift the motherboard, disconnect the power cable and the hard drive cable. Only after that do we completely remove the motherboard from the laptop.
We start working directly with motherboard... First, remove the cable from it to the hard drive.
Now you can change the memory module, change the hard drive, or another defective part. That is, the process of disassembling a given computer model itself is not difficult. But in order to eliminate even the smallest malfunction, you have to disassemble the laptop completely.
After troubleshooting and replacing faulty parts, we assemble the laptop in strictly reverse order.
A detailed video instruction can be viewed at:
Today we are taking apart the HP Pavilion dv6 laptop.
This guide is divided into two parts. In this first part, we will look at the disassembly of the main parts of the laptop. In the second part, we will look at disassembling the display module and replacing the LCD screen.
A warning
This article is not a guide to action! You are solely responsible for collecting and disassembling your device.
Many manufacturers do not assume warranty obligations if the device has been disassembled by the user. If you do not want to void the warranty for your device, check the warranty terms in the documentation or with the device manufacturer.
Used tools:
Before starting disassembly, be sure to turn off the laptop and remove the battery.
1. Remove the 6 screws from the hard drive and memory module compartment covers.
One of the screws (marked with a green circle in the picture) also secures the DVD drive.
2. Remove both covers and slide the DVD drive out of the laptop.
3. Lift up the hard drive module and disconnect the hard drive cable from the connector on the system board.
4. Both memory modules are installed in a compartment at the bottom of the laptop case.
You can remove both memory modules. But in our case, let's leave them on the motherboard.
The non-volatile memory (CMOS) / system clock battery is also located under the memory module compartment cover and can be easily removed and replaced without disassembling the entire laptop.

5. Remove the 5 screws securing the panel above the keyboard (indicated by the yellow circles in the picture below).
Remove the 4 keyboard screws (marked with red circles).
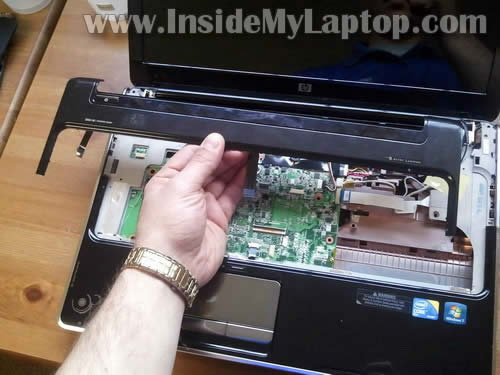
6. Lift the edge of the cover above the keyboard and continue to remove it with your fingers.
Be careful! There are two cables leading from the panel above the keyboard to the motherboard. They are shown in the following picture.
7. Slide the panel above the keyboard towards the display until you can access the three screws that secure the keyboard.
Remove the three keyboard screws.
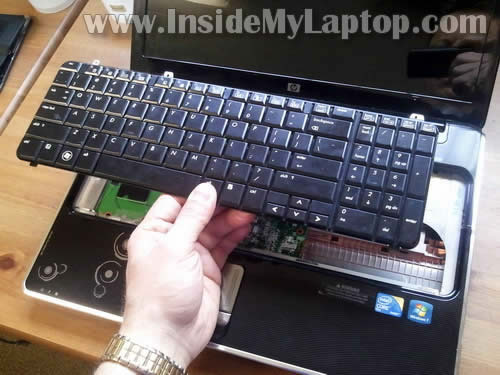
8. Lift the top of the keyboard as shown in the following picture.
9. Slide the keyboard towards the display to reach the ribbon cable connector under the keyboard.
Before removing the keyboard, you need to bend the loop retainer and pull the keyboard loop out of the connector.
10. Fold up the brown tab at a 90 degree angle to expose the connector.
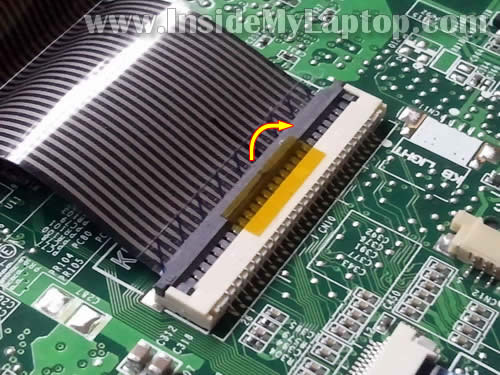
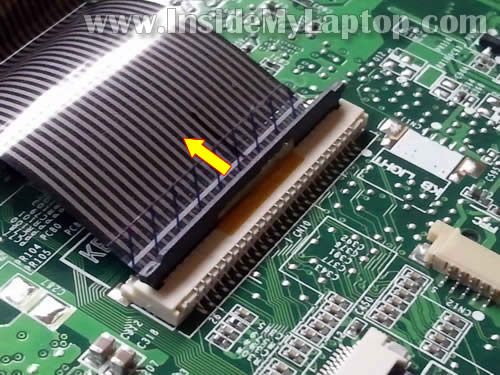
11. The following picture shows the keyboard cable connector in the open position.
Now you can pull the keyboard cable and pull it out of the connector.
12. Remove the keyboard.
13. Disconnect the two cables from the panel above the keyboard (which were mentioned in step 6) from the motherboard.
The connectors on these cables are not secured. Just pull the cables and slide them out of the connectors.
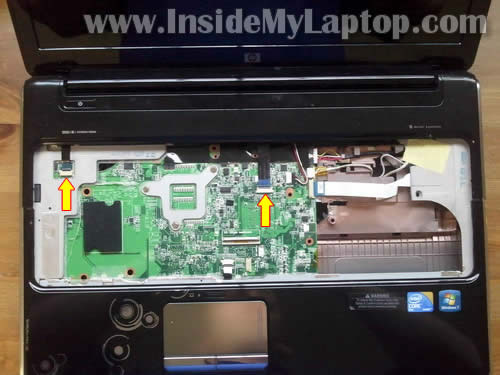
14. Remove the cover above the keyboard.
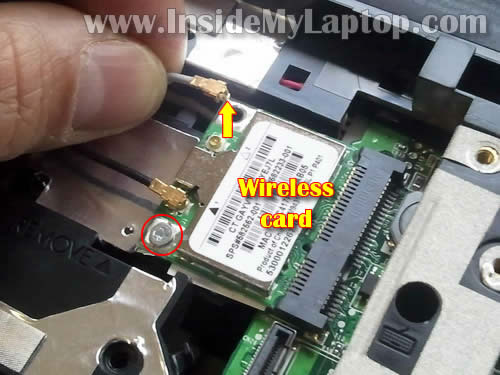
15. If you plan to remove the display panel, you will need to disconnect both antenna cables from the wireless network card.
Remove the screw that secures the wireless network card and remove the card.
16. Disconnect the two cables (one of them is the video cable) from the motherboard.
Route the antenna cables through the hole in the bottom panel.
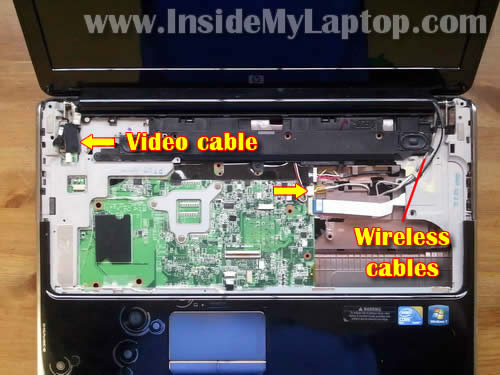
To disconnect the video cable, simply pull up on the black tab.

17. Remove the 4 monitor hinge screws.

18. Lift up and remove the monitor module. We will cover how to replace the LCD screen in the next tutorial.

19. Remove any remaining screws from the bottom of the laptop.
One of the screws (circled in green in the picture) is located in the DVD drive bay.
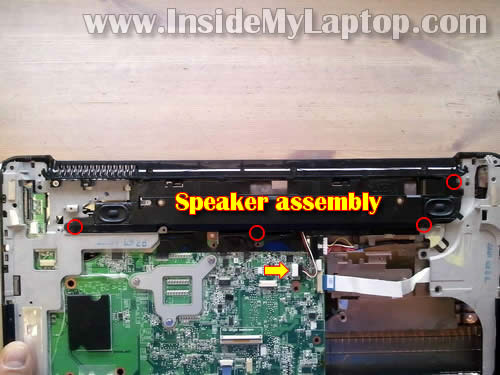
20. Remove the 4 screws securing the speaker module.
Disconnect the speaker cable from the motherboard.
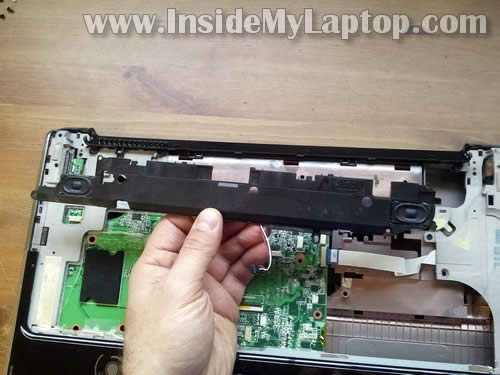
21. Lift up and remove the speaker module.
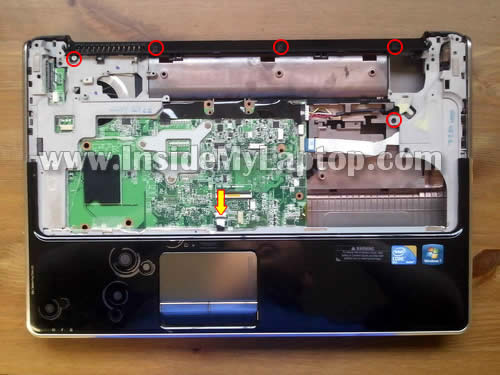
22. Remove the 5 screws securing the top panel.
Disconnect the touchpad cable from the motherboard.
23. Begin to separate the top of the case from the bottom.

24. Remove the upper case.

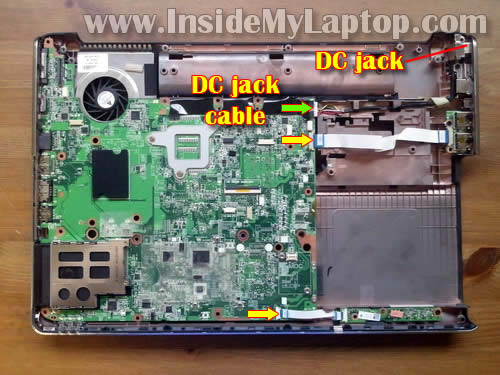
25. Disconnect the 3 cables from the motherboard.
In the HP Pavilion dv6 notebook, the power supply connector is not soldered to the motherboard. The power supply connector is attached to the wires and can be easily replaced without soldering.
26. Remove the screw that secures the motherboard. It is located in the lower right corner of the motherboard.

27. Carefully lift up the motherboard from the right side.

28. Remove the motherboard from the case.
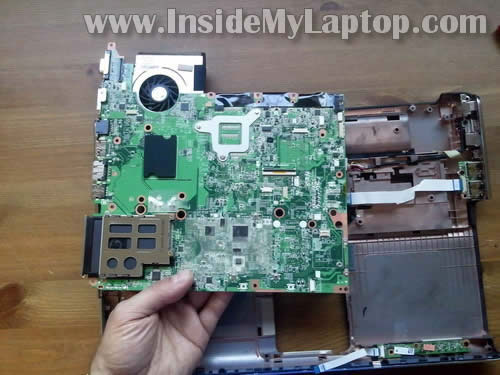
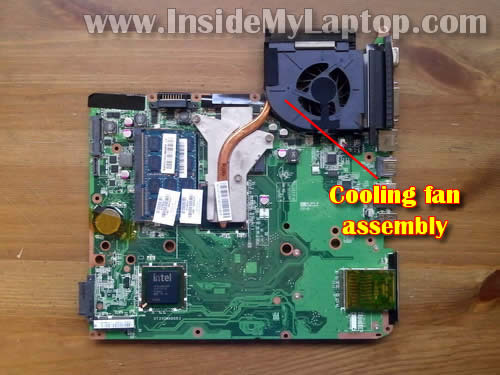
29. You will see that a cooling module is attached to the back of the motherboard.
Now you can clean the heatsink and fan.
And it is also possible to replace the cooling module in the event of a malfunction.
Disassembly is complete. Reassemble in reverse order.
Thank you for the attention.
 Odnoklassniki: Registration and profile creation
 E is. E (functions E). Expressions in terms of trigonometric functions
 Social networks of Russia Now in social networks