WP Mega Menu plugin: functionality, installation, configuration. Max Mega Menu - multifunctional WordPress menu plugin Widgets and plugins to add menus in WordPress
More recently, such a feature as Mega Menu was the lot of exclusively premium plugins and themes. But today, dear readers, I will present to you two completely free plugins that will allow you to quickly, easily and, of course, completely free of charge, build a powerful navigation menu on your site, which is not so much inferior to paid counterparts.
What is Mega Menu anyway? Yes, the same, familiar navigation menu with which you have probably already encountered and customized more than once. It's just that, unlike the standard functionality, there are also additional features for customizing and displaying individual elements. For example, adding not only vertical, but also horizontal submenus, adding icons and individual images to the menu, detailed setting appearance for all menu items and so on. All of this is in our plugins we are reviewing today.
Another great opportunity to add a super awesome navigation menu with plugin to your website is Mega Menu by WooRockets.com. Installation and activation of the plugin are standard.
This plugin is somewhat more difficult to learn, but it also offers more opportunities than the above-described competitor. Menu building here is very similar to page building in standard Visual Composer.
Go to the section WR mega menu in your admin area and click on Add New... We get to new page to build a new menu. Those who have already dealt with Drag & drop composers before will immediately feel at home. The process of building a menu is not much different from building a page.

First, make sure that at the top of the menu - Location exactly the menu that you need is indicated. Or click on Menage Location to select a menu.
Click - Add Element and select the type of content in the pop-up window that you want to add to the menu. At the top left, you can choose one of the standard suggested options or add WordPress widgets.

If necessary, add rows with a break into the required number of columns. On the left are tabs for dragging menu items up or down, and on the right are tabs where you can enable editing or deletion. Do not forget to press the familiar button on the right - Publish or - Refresh to preserve the results of their labors.
In general, any texts, pictures, and, if desired, any widgets can easily be placed in your new menu. Appearance the menu can be changed by clicking on the button Styling or insert your tables next to the button Custom CSS.

A very functional contraption, in short. No wonder the authors, in addition to this plugin, also have: a contact form and, of course, a composer, which apparently served as the basis for the mega menu plugin. You can watch a working demo in all its glory here.
Great and powerful plugins with which you can practically create the menu of your dreams. The only thing that can darken the joy of users a little is the issue of compatibility with different themes. Unfortunately, as far as I remember, premium plugins sometimes had this question. I tested both plugins on a standard theme and did not notice any problems or bugs. What I wish you too, friends!
Dropdown mega menus- an excellent design find. Site navigation containing a large number of pages has always been a problem. Classic static sitemap-style menus grow rapidly as the number of pages grows and take up a lot of space. Dynamic drop-down menus can significantly save page space, but ease of use is sacrificed - active and fairly accurate mouse operation is required for navigation. I missed a little and the wrong menu is revealed.
The impetus for the development of the mega-menu concept was probably the ribbon interface. Microsoft Office 2007. This concept falls right between a simple static menu and a dynamic dropdown menu. On the one hand, such a menu is quite informative and intuitive, on the other hand, it significantly reduces the necessary mouse manipulations. Expanding, it can use all the available screen space, which allows the user to take a look at all the points offered in this context, and, if necessary, hides.
Be that as it may, but the mega-menu is now, as they say, in a trend and if you haven’t used it yet, then you should take a closer look at it.
UberMenu: WordPress Mega Menu Plugin
This multifunctional plugin can be safely put in the first place in this review: mega-menu completely, has an incredible number of different options, including control of background and font color, font size, etc. And all this is done from the powerful and easy-to-use settings panel.In addition, the menu also has a number of other great features such as:
- Built-in responsive grid
- Customize the width of each column and set the default width
- Combining menu items into groups
- Centering menu items in horizontal lines
- Customized background images
- Scrolling submenus containing a large number of items.
Cost: $ 19

Mega Main Menu
A very popular and widely used plugin Mega Main Menu knows how to keep a balance between functionality and simplicity. There are over 10 different tools at your disposal to create dropdown menus, which may contain text, images, links and widgets... Plus, unlimited color options and over 600 Google fonts.Cost: $ 15

Liquida Mega Menu
Liquida Mega Menu is a modern and multifunctional plugin that will suit both regular users and developers - you can easily embed it into your own theme being developed.The plugin offers ample opportunities for creating a menu with a modern and stylish design: vertical or horizontal orientation, the ability to include in menu items links, images and even cards WooCommerce products or Easy Digital Downloads, which can come in handy when developing online stores.
Cost: $ 19

Sky mega menu
Three design options for mobile devices, 9 color schemes, custom grids, shapes and 360 vector icons. This set allows Sky Mega Menu to take its rightful place among their kind.Cost: $ 6

WP Mega Menu
Plugin from the must have category. Many settings and options, work with categories, subcategories and messages, SEO optimization and two preset color schemes (dark and light), which, however, can be easily changed to your liking.Cost: $ 29

NOO Menu
To understand the settings panel NOO Menu you don't even have to read the documentation - everything is so intuitive. Having at hand preview in real time, you can simply change the values and move the sliders, observing the effect produced. The color scheme can be changed completely arbitrarily and each option can be saved under its own name, and the number of these options is unlimited.The content of the menu items can be text, links, images, videos, forms and various widgets... It uses its own 12-column grid to accommodate all of this.
Cost: $ 15

Hero Menu - Responsive WordPress Mega Menu Plugin
Hero Menu allows you to bind links to posts, categories, external URLs to menu items, as well as display blog posts in them along with a featured image. The latest version announced full support for the WooCommerce platform. For comfortable work has a built-in drag-and-drop editor.The design is modern and stylish and of course completely.
Cost: $ 19

Superfly - Responsive WordPress Menu Plugin
So called fly menu is the latest trend in the world of web design. Such a menu quietly "slumbers" in the corner of the page in the form of an icon, practically taking up no space, and upon hovering the cursor opens, shifting the elements of the page, rather than overlapping them.One of the representatives of this type of mega-menu is Superfly - Responsive WordPress Menu Plugin. An impressive tool in both design and performance.
Cost: $ 22

Toggle Menu
With the growing popularity of mobile devices, pop-up (or contextual) menus are becoming important as they can significantly save screen space.Toggle menu is very simple minimalist menu which nevertheless does an excellent job of its main function.
Cost: $ 5

WP Floating Menu Pro
WP Floating Menu Pro is a 2 in 1 plugin. Navigator menu for one page site and menu stickers. Moreover: with this plugin you can, by at least visually, transform your traditional site into a modern one-page site. WP Floating Menu Pro will provide smooth scrolling from one part of the page to another.At the disposal of the developer, WP Floating Menu Pro offers 13 and 7 different layouts on the page, customization options, colors, content and number of items.
For screens with a resolution less than 480px, it is possible to automatic shutdown menu.
Cost: $ 17

Flexi Menu WordPress Plugin
Flexi Menu offers 5 different, fully customizable menu types: fly menu, wide (by page width), wide + descriptions, wide + images, and vertical.Cost: $ 14

Max Mega Menu (Free)
Very good plugin with drag-and-drop menu editor and the ability to embed almost any widget into menu items - from contact forms to Google maps.Able to automatically convert existing regular menus into one mega-menu with full control over the conversion process and saving or reassigning appropriate actions.

Hey! As always, a lot of events happen in my life, so it is very difficult to find time for a blog. Yesterday we bought tickets to Sri Lanka and are leaving soon for 4 months, come visit! And now I am looking for the most beautiful wedding dress :))
Today we'll talk about how to create a menu in WordPress, as well as add these blocks in arbitrary areas of the template.
We will learn how to customize the menu and edit it to our liking.
Editing and customizing menus in WordPress
First, let's take a look at the functionality available to us in the blog admin panel. In new templates compatible with latest versions WordPress, displaying the menu is quite simple and customization is not too difficult.
After we have created a child theme that can be modified without affecting the main theme, add the following function to its function.php file.
| 1 2 3 | register_nav_menus (array ("additionalmenu" => __ ("Additional Menu", "Name of Your Topic" ) ) ) ; |
register_nav_menus (array ("additionalmenu" => __ ("Additional Menu", "Your Topic Name")));
If you are not creating a child theme, then we add it to the main function file of your theme.
This function will allow us to add an additional WordPress menu to our template and create another area for it.
After adding, go to the admin panel in the "Manage areas":

An additional topic area should appear with the name that we set in the function.
Click "Use new menu" if you want to change the sections for the additional area, or select "Home". Then the new area will display the same sections as in the Primary Menu.
In our case, we create a new menu called Additional:

Select the "Additional Menu" theme area for it.
But now we need to associate this area with the blocks of the template. For example, we need to make an additional menu under the header of a WordPress site. Go to the header.php file or copy it to the child theme. After the body tag, add the following:
| 1 2 3 | <div id = "additionalmenu"> (array ("theme_location" =>"additionalmenu")); ?></ div> |
Let's see the result:
We have an additional menu above the header. Now we need to style it, align the items to a line and move the block under the header.
We make the following changes to the style.css file:
| 1 2 3 4 5 6 7 8 9 10 11 12 13 14 15 | #additionalmenu nav (width: 940px; / * container width * / margin: 0 auto; ) #additionalmenu li (display: inline; padding: 10px; / * padding * / margin: 20px 0;) #additionalmenu (width: 100%; top: 420px; / * Top margin * / background-color: # 000; / * background color * / position: relative; ) |
#additionalmenu nav (width: 940px; / * container width * / margin: 0 auto;) #additionalmenu li (display: inline; padding: 10px; / * padding * / margin: 20px 0;) #additionalmenu (width: 100% ; top: 420px; / * Top margin * / background-color: # 000; / * background color * / position: relative;)
Let's see what happened:

The display of the menu we have created is still far from ideal, but, if necessary, you can bring it to the appropriate form for your blog.
Widgets and plugins for adding menus in WordPress
I suggest watching a video about creating a menu in WordPress:
The article about mentioned the Custom Menu widget. Let's analyze it in more detail.
Go to "Appearance" - "Widgets", find the "Custom Menu" widget and drag it to an area available for your theme and suitable for a blog:

In our case, the menu block has been added to the sidebar. For it, we selected the sections of the Additional block we created.
Accordingly, the following block will be displayed in the sidebar on the right:

In addition to the standard widget built into the theme, there are also many additional plugins designed to create various types of menus: vertical, horizontal, drop-down, etc.
For example, here's a plugin for creating a vertical multilevel menu in WordPress: Navgoco Vertical Multilevel Slide Menu.
Or the advanced customization Dropdown Menu Widget.
Also popular are widgets with jQwery effects for menus, for example: jQuery Slick Menu Widget.
Let's take an example of how it works.
After installing the JQuery Slick Menu Widget, go to Appearance - Widgets.
A new one installed by us should appear among the list of available widgets. We move it to the accessible area, in our case the sidebar:

We reveal its settings:

We select the name of the menu (the sections that we created), Tab Text - the name of the block that will be displayed on the site, the placement (select Left - on the left), Offset - the offset from the top edge in pixels, Animation Speed - the animation speed (Fast). You can select Auto-Close Menu to make the block disappear automatically. And choose the color of the block. Click save and see the result:

A slide-out menu appeared on the left in the header. When you click on the tab, a display of sections appears:

When pressed again, the block will disappear again.
This is just one of the ways to install, edit and display menus in WordPress.
Choose the most appropriate and convenient way to create a menu for your WordPress blog. Good luck!
For reading 8 min. Published 01.11.2016
Hey! We continue to take apart the most interesting and most useful plugins for a WordPress site! Today you will learn about a super useful plugin that will allow you to create a horizontal dropdown menu. You can insert any widgets, text, editor, photo, video, form, html code into the drop-down menu.
You will be able to completely customize the appearance of the menu and customize the dropdown menu. You can add up to 8 eight columns to the horizontal drop-down menu. You can turn off the dropdown menu for mobile devices. A very flexible plugin, you can make a Super menu!

You can install the Super Plugin directly from your WordPress admin panel. Go to the page: Plugins - Add New, enter the name of the plugin in the search form, press Enter, install and activate the plugin.


General Settings .
– Click Event Behavior, click behavior. Here you have two options to choose from:
- First click will open a sub menu, second click will close the sub menu, the first click opens the submenu, the second click closes the submenu;
- First click will open a sub menu, second click will follow the link, the first click opens a submenu, the second click on the link.
- Leave as default, do not change anything.
– Mobile Menu Behavior, behavior on the mobile menu,
- Standard - Open sub menus will remain open until closed by the user, Standard - an open submenu will remain open until closed by the user.
- Accordion - Open sub menus will automatically close when another one is opened, Accordion - open submenus will automatically close when another is open.
– CSS Output, leave as default, nothing needs to be changed here.
– Menu Item Descriptions, enable or disable descriptions for menu items.
– Active Menu Instances, Some themes will display the menu layout multiple times on the same page. For example, your theme might display the menu location after the main menu, then again for the mobile menu. This option can be used to ensure that the Max Mega Menu only applies to one of these instances.
– .
Menu Themes .
– Select theme to edit, here is the menu that you will be editing. You can create and select a different menu.
– Theme Title, the title of the menu theme, leave the default.
– Arrow, you can select the arrow that appears in a menu item with a drop-down menu.
– Line Height, height line.
– Z Index, the Z Index can be left as default.
– Shadow, you can customize the menu shadow.
– Hover Transitions, enable transitions when hovering over menu items.
– Reset Widget Styling, disable styles of Mega Menu widgets.
Menu Bar .
– Menu Height, menu height.
– Menu Background, menu background color.
– Menu Padding, upholstery menu.
– Menu Border Radius, the radius of the menu border.
– Menu Items Align, location of menu items.
– Menu Item Background, background color of menu items.
– Menu Item Background (Hover), the background color of the menu item on hover.
– Menu Item Spacing, spacing of menu items.
– Font, font options, color, size, position, family, etc.
– Font (Hover), font options on hover.
– Menu Item Padding, padding menu items.
– Menu Item Border, options for the border of the menu item.
– Menu Item Border (Hover), options for the border of the menu item on hover.
– Menu Item Border Radius, options for the border radius of the menu item.
– Menu Item Divider, menu separator.
– Highlight Current Item, highlight the current menu item.
Mega menus .
– Panel Background, the background color of the dropdown menu.
– Panel Width, the width of the dropdown window.
– Panel Padding, upholstery.
– Panel Border, color and size of borders.
– Panel Border Radius, border radius.
– Item Padding, padding a menu item in a dropdown menu.
Widgets .
– Heading Font, font options for the widget title in the dropdown menu.
– Heading Padding, heading padding.
– Heading Margin, indents from the borders of the widget title.
– Header Border, border border options.
– Content Font, font in the content of the widget.
Second Level Menu Items .
– Font, the font of the second-level menu items.
–Font (Hover), font on hover.
– Background (Hover), background color on hover.
– Padding, upholstery.
– Margin, indent.
– Border, border, border.
Third Level Menu Items ... The same settings, only for menu items of the third level.
Flyout menus .
– Menu Background, background color of the second or third level dropdown menu.
– Menu Width, the width of the menu.
– Menu Padding, upholstery.
– Menu Border, the border.
– Menu Border Radius, border radius.
– Item Background, the background color of the menu item.
– Item Background (Hover), the background color of the item on hover.
– Item Height, the height of the menu item.
– Item Padding, upholstery item.
– Item Font, the font of the text in the menu item.
– Item Font (Hover), font on hover.
– Item Divider, item separator.
Mobile menu .
– Toggle Bar Designer, here is how the menu looks like on mobile devices.
– Responsive Breakpoint, width to go to the mobile menu.
– Toggle Bar Background, background color of the mobile menu open button.
– Disable Mobile Toggle, you can turn off the menu switch.
– Toggle Bar Height, the height of the mobile menu switch.
– Mega Menu Columns, how many columns are in the dropdown menu on the mobile site.
– Menu Background, mobile menu background color.
– Menu Item Height, the height of the menu item.
Custom styling... Here you can add your own CSS styles for the menu.
– Save your changes.
Menu Locations .
- here you can create menu areas where you can add menus later. To create an area for the menu, click on the button - Add another menu location.

Menu area you can add to the site using a shortcode or php code.

On the page: Appearance - Menu - Area management, you will be able to add a menu for the area.

Tools .
– Cache, here you can clear the CSS cache, not necessary, the cache is automatically cleared every time the menu is saved.
– Plugin Data, delete all plugin data stored in the WordPress database. Only if the plugin is removed!
– Export Theme, you can export mega menu theme in JSON or PHP format.
– Import Theme, you can import mega menu theme.
– Enable, check the box here to enable the mega menu.
– Event, here you can choose how the drop-down menu will open.
– Effect, you can select an effect for the dropdown menu.
– Theme, default menu theme.
After turning on the mega menu, in each widget of the page, on hover, a button will appear - Mega Menu. Click on this button to configure the dropdown menu for this menu item.

Further, a window will open. At the top right, click on the wide field to select a widget and add it to the menu. At the top right, you can choose how many columns there will be in the drop-down menu. Widgets can be distributed on the drop-down panel, you can specify which part of the widget will take up, for example 1/2 or 1/3. Click on the left and right arrows to indicate how much of the widget will take up.

To open and customize the widget, add some content to it, etc., on the right side of the widget, click on the key icon. Customize the widget and save it.

– Hide Text, hide text from menu item.
– Hide Arrow, hide the arrow.
– Hide item on Mobile, hide menu item on mobile devices.
– Hide item on Desktop, hide menu item on computers.
– Menu item Align, the location of the menu item.
– Sub Menu Align, location of the second level menu.
– Hide sub menu on Mobile, hide the second level menu on mobile devices.
– Save changes.


All is ready! Save the menu, go to the site and enjoy the result!
Attention! After enabling the mega menu, your default menu style will be completely changed. You will need to customize the menu style in the settings, in the tab "Menu Themes".
Still have questions? Write a comment! Good luck!
The menus on the site make it easier for visitors to move around the site. Websites with a lot of content cannot work with just regular menus. Most of the content on a website like this is unlikely to fit into them. In this case, the mega menu comes into play. The look and feel of the menu depends a lot on the technology you are using. Many WordPress mega menu plugins promise you so many features that it's hard to find the best in this list.
Out of this large number of mega menu plugins, there is one that suits most users. This is WP Mega Menu plugin. It offers all the basic functions and functionality and it's free.
In this article, we will look at the main functionality of the WP Mega Menu plugin, how to install and configure it.
WP Mega Menu Features
WP Mega Menu's wide range of features includes:
- Drag and drop menu.
- Visual construction of the menu.
- Widgets in menu items.
- Variant of several themes.
- Export / import menu themes.
- Branding with logo and social icons.
- Menu labeling / icons.
- Icon support.
- The stretched menu and the picture in the background of the menu.
- Responsive and mobile menu.
- Unlimited Google Font Colors and Options.
Let's take a closer look at some of the powerful features.
Drag and drop menu building functionality
Once you have the WP Mega Menu plugin installed on your site, you can create a menu using drag and drop functionality. Add rows and then drag widgets to the columns of those rows. This WordPress plugin automatically saves changes when editing menu layouts. You don't need to write any code or program anything. WP Mega Menu's powerful drag and drop system gives you the ability to create better menus with minimal effort.
Fully responsive and mobile menu

Menus created with WP Mega Menu will be 100% responsive and mobile. Regardless of the size of the devices your site is running on, it won't have display issues. You can control the screen resolution to automatically switch between desktop and mobile versions... Your website menu will work great on all OSes.
Integration with WooCommerce

If you have items to show and sell on your site, WP Mega Menu gives you a fantastic way to direct access visitors to product details right from the menu. You have a system for displaying eCommerce products in menu items. Turn your site into a highly organized eCommerce navigation site with the Mega Menu.
Multilevel dropdown menus

Create as many menu items as you like. You can design layered dropdown menus and they will look equally beautiful. Enrich your main menu items with a dropdown submenu. This will give you even more navigation options. Building such layered dropdown menus is much easier with this editor plugin.
Advanced functions

Use any shortcode in the menu. Along with this, you have the option of using two pre-installed advanced widgets: adding photos, titles and small details that will be displayed while hovering over them.
Social icons and menu search option
![]()
You have the default WordPress search engine right in your menu. With the WP Mega Menu plugin, you can do this in just a few clicks.
Completeness of settings

WP Mega Menu allows you to fully customize your menus. Setting up this menu and making the necessary changes is pretty straightforward. Set indents and margins for any item in the menu. Control menu visibility according to the devices your menus will run on. You can also apply effects to menu items. Use a variety of elements such as icons, background options when customizing the menu.
Multilingual: WPML Compliant

No matter what language your site will be running in, WP Mega Menu will have no problem with any languages. It is fully WPML compliant. Make your menu content in any language and the menu will work.
How to Build a Mega Menu on Your WordPress Site
1. Install WP Mega Menu Plugin
Like any other WordPress plugin, you can install it on your site in two different ways... First go to Personal Area-> Plugins -> Add new. Search for "WP Mega Menu" and click "Install Now". Then activate the plugin when the Activate button appears.

You can also download WP Mega Menu plugin from the WordPress directory. Then open your WordPress dashboard. Go to Plugins -> Add New -> Upload Plugin. Download the zip file with the plugin and click Install Now.
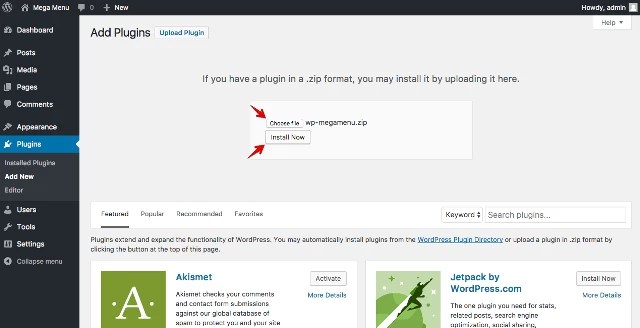
Activate the plugin after the message about successful installation. In fact, the system itself will ask you to activate it.
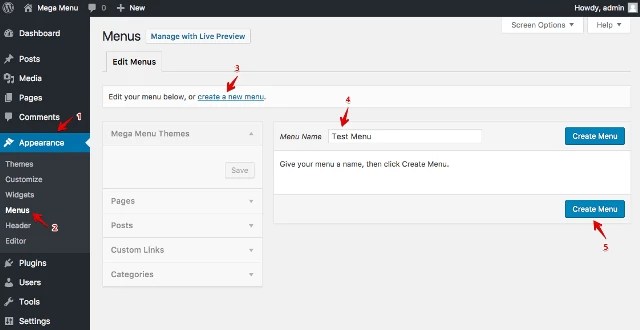
2. Create a menu
First of all, create a menu by going to your WordPress dashboard -> Appearance -> Menu. Then create a new menu. This is how WordPress allows you to create default menus.
3. WP Mega Menu Global Settings
Find the WP Mega Menu tab on the left sidebar and click on it.

4. Create a theme for the menu
Menu themes define the styles and behavior of navigation bars in menus. To create a menu theme, open WP Mega Menu -> Themes. You can either create new topic, or import it. Click the Import Theme or Create New Theme button to complete the action.

5. Settings for Mega Menu items
Visit WordPress Dashboard -> Appearance -> Menu. The WP Mega Menu option will appear when you hover your mouse over the menu items.

Click on it to make settings. Set the Mega Menu to Yes and click Add Row to select rows and columns. Also select the menu theme on the left side.

Shop in the mega menu
On the left, you will see useful widgets with which you can add advanced features. Drag the WPMM Grid WooCommerce widget and drop it into a column.

Edit the WPMM Grid WooCommerce widget. Display your products with images and information the way you want customers to see them. You can specify a name and select a specific category or all categories to display products from all categories.

You have finished creating your first mega menu for your WordPress site. There is a lot you can do with this revolutionary WordPress menu designer. To find out what else he can do, and how to do it, read the detailed documentation to the plugin.
 Architecture of a distributed control system based on a reconfigurable multi-pipeline computing environment L-Net "transparent" distributed file systems
 Email sending page Fill relay_recipients file with addresses from Active Directory
 Missing language bar in Windows - what to do?