How to use the pro recorder program. Professional video filming on a smartphone. Truth or lie? Application overview. Customizing the mouse cursor
03.02.2017 01:49:00
In one of the articles, we considered recording telephone conversations on an android.
For several years now, one of the most popular genres among video bloggers has been the review of smartphones, their functions and applications. A camera, web or video camera is used, which is fixed on a tripod. Often, the quality of such videos is frankly lame due to the fact that the author of the video uses a weak technique with an unimportant recording quality. It is much more convenient to record video directly from the smartphone screen. It will also prove useful for gamers who are recording walkthroughs. mobile games, the so-called "letsplay".
A large number of applications have been developed to record video from a smartphone screen. We will consider the most popular and convenient utilities that can be downloaded from Google play, moreover, they do not require root user rights.
AZ Screen Recorder
Download
One of the most popular screen recorder apps for Android. The application is free, but it is not packed with ads, it has a very convenient menu and simple settings. After installation, in addition to the icon on the desktop, there is also a widget with drop-down buttons: settings, screenshot, video recording and gallery. By default, the application has an advanced encoder that allows you not only to record video, but also to pause recording. The user has access to 4 video recording resolutions, up to HD, and it is also possible to set your own sizes. The maximum frame rate can be twisted up to 60 fps.
The application can record video from both main and front camera smartphone, add text or a logo to the entry that the user can download. For more convenience, you can add a timer, including a countdown to the start of recording.
The app does not support full video call recording. That is, it will turn out to record only video, but without sound.
Mobizen Screen Recorder
OS version: Android 4.4 or later
Download
The Android application allows you not only to record video from the smartphone screen, but also has a built-in editor, with which you can add background music, video intro, crop and divide the recording and extract the frames you want. In the settings of the utility, you can set the maximum resolution to FullHD, increase the quality to 12 Mbps, set the number of frames to 60 fps. By downloading the "Booster Mode" add-on, the user can display the recorded video on the PC screen via a USB cable. The application can be a little annoying with offers to download a game or program, as well as buy goods on AliExpress.
DU Recorder
OS version: Android 5.0 or later
Download
A convenient application for Android that allows you to record video from the smartphone screen in FullHD quality, adjust the recording quality and the number of frames per second. An easy-to-learn editor allows you to crop video, edit multiple recordings into one, crop and combine images, and transfer videos and screenshots via WI-FI to your computer.
Videos and photos can be sent to Instagram, saved to GoogleDisc, or sent by mail. You can turn on the front camera with just one tap in the app. Then a window with the author of the video will be added to the recording, who will comment on everything that happens on the screen. You can enable application watermarks. True, you will have to limit yourself to only this. Adding your own logos and texts in the application is not provided.
Other Fly smartphones
On our website you can find a catalog with the rest of Fly smartphones on Android.
Game screen recorder
OS version: Android 5.0 or later
Download
A lightweight application for Android, both in weight (just over 2 megabytes) and in use. There are no additional editors provided here - only the record button and the settings menu, where you can set the video quality from the screen, up to FullHD, frame rate, bit rate, change the codec, turn on the timer. The resulting video can be opened in your own player, as well as in a third-party video application. The utility will be useful for inveterate gamers who love to share the recordings of their games, since you don't have to dig into the program too much: you start the game, clicked on the record, and the rest of the application will do it itself.
One shot screen recorder
OS version: Android 5.0 or later
Download
In order to record video from the screen, you need to follow only 4 simple steps:
- Download utility
- Start video recording by pressing the red button on the screen
- Stop recording
- Remove button from screen
In the application settings, you can set the maximum bitrate to 50 Mbps, overclock the frame rate to 60 fps, and the resolution to 720 pixels. The set of settings is minimal and easy to learn. The application has two significant drawbacks: the lack of Russification and pop-up ads that can be disabled by upgrading the application to the paid version.
Telecine
OS version: Android 5.0 or later
Download
The easiest-to-use application for recording video from your smartphone screen. The whole interface is a launch button and five settings: Video size (measured as a percentage), 3-second countdown timer, notification for recent apps list, screen recording notification and click display function. The application does not clog the screen with unnecessary notifications and ads, and is also based on open source code, which is constantly updated and improved by developers and interested programmers.
Unlimited Screen Recorder
OS version: Android 5.0 or later
Download
 |
 |
 |
Absolutely free app, which can be downloaded without bothering about pumping the pro version, while allowing one button to record as much video from the screen as the smartphone's memory will last. We can say a kind of "thank you" to the developers, we will send them a donation from 53 to 157 rubles. In the settings, you can set the maximum bitrate up to 20 Mbps, assign a video codec, set the maximum number of frames up to 60 fps, adjust the resolution and screen orientation. Recorded videos are stored on the memory card by default. A video editor is not provided here. For lovers of the native language, the application may be alienated by the lack of Russification. The utility is designed in an aggressive red color.
Ilos screen recorder
OS version: Android 5.0 or later
Download
A handy application for those who want to quickly record video from a smartphone screen, and at the same time do not like to adjust the recording quality for a long time. A list of presets of three items is already available in the menu, which combine video resolution, frames per second and bit rate. The maximum available quality is FullHD, 30 fps and 4 Mbps. You can control the recording from the notification window. The user can send the resulting video to social networks, upload to YouTube or to the official website of the application developer (for this, you need to create an account).
Good day to all friends and readers of the Rumman.ru blog. Today we will talk about how to record a Skype conversation?
I already brought up this topic, recently in the article: How to record a Skype conversation using MP3 Skype Recoder? However, I would like to supplement it, and add to the list free ways Skype call recording, iFree Skype Recorder. ?
As I mentioned earlier, unfortunately, the ability to record conversations was not included in the Skype functionality. Therefore, in such situations it is necessary to resort to third-party programs and additions.
Of course, there are paid programs, which I will not consider, but let us turn our attention free programs that will be able to provide high-quality recording of Skype conversations. These programs include MP3 Skype Recorder, which I already wrote about. And today we will supplement the list with one more convenient program in this area iFree Skype Recorder.
What's with iFree Skype Recorder?
iFree Skype Recorder is a program that allows you to record all Skype conversations. The program can carry out both one-way recording and complete recording of a conversation and save it in MP3 format. The program itself on English language, but the simplicity of this program allows you to work with it without even paying attention to the language. The program is distributed on the basis of a free license, but the main thing is that despite this, it does a good job.
How to install iFree Skype Recorder?
Let's consider this program for recording a conversation in Skype in more detail. To do this, follow the link to the official website of the developer and download the program: ifree-recorder.com/download.htm.

Download and install it on your computer. There is nothing complicated during the installation process, after installation a shortcut of the program will appear on the desktop, launch it.
Now, pay attention to the inscription at the bottom of the program when you first start it. Which means that the program cannot access Skype.

Therefore, after iFree Skype Recorder, we launch Skype, and we see that a notification has popped up in Skype to allow access, click "Give access".

If the situation is correct, the message at the bottom of the program will change from "Watting to access Skype" to "Ready for Recording", which means "Ready to record."

To get started, you must register in the Skype service, download and install Skype program... If you don’t know how to do it, go here.
You can record a conversation using iFree Skype Recorder in two modes.
First: Automatic call recording. That is, the program will start automatic recording at the beginning of the conversation and end it after the end of the conversation. This mode is set in the program's default settings. So you just need to run the program to automatically record conversations.
Second: Manual recording. That is, in this mode, the user himself controls the beginning and end, as well as the suspension of the recording.
In order to configure some parameters of the iFree Skype Recorder, including the recording mode. You need to click on the "Options" button, which will open the program settings window.
Let's quickly go through the settings, the first tab is "General". In this settings tab, you are prompted to put a tick in the first line, which means to configure automatic start programs at Windows startup. And the last line, which means minimize the program to the system tray after launch. Leave the rest of the lines by default.

In the "Call Recording" tab, you can say the basic setting. The first two lines, in which automatic and manual recording of conversations are set.

In the "Mp3 Quality" tab, you can adjust the quality.
The first line, the choice of "Mono" or "Stereo" recording, I recommend choosing the first item so that the sound is in both speakers.
The second line, setting the recording quality. Here you need to take into account that the higher you set the bit rate, the better the quality of the recorded file will be. However, do not forget that the recording file itself will also be much larger.

As you can see, it is not difficult to understand the program settings.
Actually, this is what the functionality of the iFree Skype Recorder program is limited to. Now you know how to record a Skype conversation. In the next article, we will look at a program for recording videos from Skype. Well, and lastly, I want to recommend reading the article on registering ICQ and installing it on a computer.
The site lab continues to tell its readers about applications for capturing video from smartphones and tablets based on Android.
advertising
Recall that if earlier for full-fledged recording, almost everyone used hardware solutions that were not available to everyone, now a middle-class smartphone is enough to record the gameplay of a shooter or a race. But with which program to record video? Last time, to get acquainted with the topic, three most popular applications were selected that do not require Root rights to work.
The next trinity was made up of three unusual utilities: the first focuses on recording the gameplay, the second is designed for novice users, the third will allow the best quality transfer of the picture from the screen of a mobile gadget. This is DU Recorder, Rec. and Game Screen Recorder, and you will find out which application is intended for what purposes during the review.
The following devices were used as test equipment:
- Xiaomi smartphone Redmi note 3 Pro (OC Android 6.0.1, MIUI 8, 64-bit Snapdragon 650 processor, 6 x 1800 MHz, Adreno 510 video processor, 2 GB of RAM);
- Jinga Basco M500 3G smartphone (OS Android 5.1, MediaTek MT6580 processor, 4 x 1300 MHz, Mali-400 MP2 video processor, 1 GB of RAM);
- Samsung Tablet Galaxy Tab 2 7.0 (CM 13 based on OS Android 6.0.1, TI OMAP 4430 processor, 2 x 1200 MHz, PowerVR 540 video processor, 384 MHz, 1 GB RAM).
advertising
DU Recorder

Acquaintance
We'll start by looking at an advanced and functional application that has a lot of options, features, and is fairly easy to use. However, we will not blindly trust the promises of the developers and will test the DU Recorder in full.
Key features of DU Recorder:
- Many options for resolution, frame rate and bit rate; HD video support;
- Pause / resume recording;
- Using the front camera;
- External sound recording;
- Controlling recording using a floating window or notification bar; the ability to hide the floating window for full screen shooting;
- Displaying click operations in a record;
- FaceCam.
Capabilities for creating screenshots and editing images:
- Notification panel or floating window allows you to take screenshots with one click;
- Combining several images into one;
- Blurring the image - pixelate areas of the picture that you do not want to show;
- Cropping the image to get the perfect shot.
Video viewing and publishing options:
- Easy viewing of videos using the floating window and notification bar;
- Publishing video to social networks, share the video with your friends;
- Change video titles or local video pages for easy management.
Beginning of work


The very first time you click on the DU Recorder application icon, a floating widget will appear on the device screen, allowing you to record a video, take a screenshot, activate FaceCam or go to the menu.
The floating button is attracted to the edges of the screen, and with a long hold and transfer to the "basket" instantly disappears. In general, everything is like all similar applications: no imagination, but nice and convenient.


The DU Recorder menu is divided into four screens, and so far only the first two are of interest. These are galleries for photos and videos.

advertising
Now let's talk about additional functions and features of DU Recorder. Fortunately, they are all collected on the third screen of the application and we do not have to dig into it to find the desired option.


The first line is the video-related functions "Video Trimming" and "Combine Video". Everything here is as simple and clear as possible, there are two typical elements: cut and glue. Nothing more. There are not even parameters for the transition from one video to another.
Further there are interesting settings regarding the photo. In one way or another, we will be able to crop screenshots, combine them into one picture (or rather a long screenshot) and blur the image according to a previously prepared brush template.


advertising
As you might have guessed, low-level photo and video processing is possible in DU Recorder.
And the next item completes the list of options - "Wi-Fi transmission". And if you read our previous review, you will immediately understand what will be discussed.

It is a local web service that allows you to quickly download photos and videos from your smartphone to your PC. Very comfortably. We entered the https address and got access to the files created through this application.
advertising
Let's separately mention the FaceCam function. It is absent from the main menu of the program, but it can be activated via a pop-up widget on the desktop. This function implies displaying video from the front camera directly over what is being recorded on the screen. Very convenient, especially considering the ability to move and scale the camera window.Settings


There are not so many settings in the DU Recorder application. Before recording a video, we can set its resolution, quality and number of frames. But all the parameters do not end there, these are, so to speak, "classic" functions. Next, we have the management of recordings through the panel with notifications, "shaking" the gadget to stop recording, sound, displaying touches, overlaying a watermark, timer and video location on the device.
advertising
As you can see, there are quite enough options, however, there is one caveat - they are all of a nominal level. For example, we cannot set the type of sound to be recorded, that is, on some devices it will be stereo, on others mono, and on the third the program does not recognize microphones at all. Or watermarking is a cool option, but who would have thought that DU Recorder only offers to overlay its own logo. Third party decals and images are not supported. There are similar mistakes in other elements.The only thing that I did not find in the settings is the setting of a certain orientation for the video. This is sometimes necessary.
Testing
When testing DU Recorder and running it repeatedly with different video capture quality settings, I came to the same conclusion - the application works best with automatic settings. In my opinion, you shouldn't experiment with bitrate and frames per second.
advertising
So, my test configuration is in the form Xiaomi Redmi The Note 3 Pro on SoC Snapdragon 650 captured videos well in original resolution (Full HD) with 5 Mbps at 30 FPS. But a "good" result will not suit us - it is necessary best program to record videos from android devices. And after setting the settings to "Auto" we get the ideal option: a beautiful, smooth picture in high resolution.By the way, with the above parameters, the device worked quite stably: the GPU was loaded by about 50%, and the average frequency of all cores did not rise above 1 GHz. RAM consumption was at 100 MB.
The finished video is MPEG-4 encoded and includes single-channel ACC audio. There are no other options for encoding video and audio in DU Recorder.
conclusions
advertising
DU Recorder - good decision for video capture from android devices. It cannot be called innovative or cutting-edge, but it fulfills its goals perfectly and contains all the necessary tools.To begin with, the application perfectly captures video in automatic mode, removing the user from various testing of the capabilities of his device. Agree, this is important for beginners. In addition, it can do everything: take screenshots, record video on a timer, process video, carry out basic photo processing, and more. True, not all features meet our expectations, as, for example, the "Watermarks" option, but still.
It only remains to add that the DU Recorder application is absolutely free and does without paid versions but occasionally pop-up banner ads can spoil the mood of users.
If you are looking for a quality screenshot software, then Free Screen Video Recorder is exactly what you need. This utility is quite convenient, very functional, has high performance, is understandable for all users and is compact.
This multifunctional application is free and simple. With it, you can capture video and take screenshots from the screen of your personal computer... Dignity this instrument is that, despite the variety of functions, working window miniature.
Screenshot images
You can capture any part of your desktop or the entire screen using this utility. Finished frames will be automatically saved to your computer in a folder called "Images".

Capturing Rollers
The principle of working with videos does not differ from screenshots of images. You just select the required area that you want to capture, and then the utility starts to shoot the video. The finished clip will be automatically saved to the folder "Video".

Selecting folders for saving data
With standard settings, all finished files are saved in folders "Images" or "Video"... But if you need to, you can customize the directory like this:

Customizing the mouse cursor
If you want to make any instruction, then you need to display the mouse cursor. You can change the display of the arrow at any time, for this, follow these steps:

Sound and video quality
You can set the required qualities for the material in the program settings. To do this, follow these steps:

Setting the image format
If you are not satisfied with the automatic format for saving photos "PNG", then you can change it to JPG, PDF, BMP or TIF. To do this, you need to do the following:

Pause before screenshot
The program provides the function of setting a timer before capturing. After you press a certain button, it will take some time before the picture is taken. To enable this function, do the following:

Recording sound in a video
To configure how audio is recorded from system sounds or from a microphone, at the same time or completely mute, do the following:

Automatically open the editor
If you want the editor to start immediately after the screenshot is taken, then you need to do the following:

Benefits of the program:
- Affordable and small utility window interface;
- Simple controls;
- Free operation of the program.
Cons of the utility:
- There is no way to disable the work on top of all windows function;
- During the installation of the program, if not fixed in time, additional advertising products will be installed.
To make it convenient for you to capture video and take screenshots, the developers of the program have simplified the interface as much as possible. This led to the fact that all users can freely use the utility without any problems.
Is an excellent choice for those who are going to record sound, listen to video from the screen or take screenshots in one swipe. Despite the fact that the program has simple interface, many users have questions about its operation. We will try to understand the functionality and settings in as much detail as possible.
How to use Icecream screen recorder?
First of all, you need to download the program, install and activate the PRO version. All this is very easy, just follow the step-by-step instructions below.
- Download Icecream screen recorder to your PC from our internet resource.
- Run the setup file. Be attentive to what the installation wizard offers you. No, you don't have to reread the license agreement. But right after it, he will recommend that you install extra software, just uncheck the boxes.
- Open the app and check if it works.
- If you do not want to purchase the Pro version for 2000 rubles, use the crack. With the help of the activator, you will receive all the functions of the professional version of the program for free. To do this, download the activator of the corresponding version from our website, run it, select the program to activate and run it with the application closed.
- Open Icecream screen recorder again, check which version of the program you have installed. The window should look like this.

Now let's talk about the customization options for Icecream screen recorder.
The program has a lot of settings, but the developers have created a truly amazing interface. Everything is convenient, close at hand, setup does not take much time. Let's list the possible parameters. Be careful! If you download other versions of the app, this information may be out of date.

On the first tab, you can select image formats (PNG and JPG are available). Available language settings, startup options (pleased with the unobtrusiveness of the program in this regard), auto-update, etc. Everything is clear from the screenshot.

On the second tab, you have the ability to configure the saving of recorded files. By default, they are handily saved to your desktop. You don't have to search for them in all folders. This is how developers save users time!

The third tab has a lot of video settings, thanks to them this program falls into the segment of professional software. Surprisingly, you can customize the display of the watermark immediately upon recording. You will be able to broadcast online and immediately protect your copyrights. The watermark itself is customizable too. Pay attention to the variety of video recording formats. Importantly, the necessary codecs are downloaded along with the program.

In audio, audio sources are configured. Note! Bitrate quality is not configured here. You can find this option here:

Hotkey settings require special attention. All combinations responsible for the main functions of the program are listed here. You can change them at your discretion by clicking on one of the windows.

Possible problems
Icecream screen recorder isn't perfect. Disruptions in its work are quite possible. This is especially true for pirated versions.
If Icecream screen recorder does not record sound, most likely you have configured the program incorrectly. Recheck all parameters. If everything is in order, look from which device in this moment recording is in progress. Select the one you want.

If this measure does not help, try disconnecting all extraneous sound recording and playback devices from the computer. Reboot your computer. Check the position of the sliders here. They should not be zero. Below is an example optimal setting for recording from a microphone and speakers in parallel.
Icecream screen recorder does not write video
A rare situation, but quite natural. First of all, make sure to use the PRO version, as Free recording is limited to 5 minutes. If you are trying to record video using hotkeys, check their settings. Check if the program was moved to the tray or closed completely. Hotkeys will only work in the first case. The problem may lie in the damage of some files. In this case, reinstall it and restart your computer.
How to record games in Icecream screen recorder?
Everything is very simple. You have two options.
- Run the program, enable recording of a specific area or entire screen. Then start the game. While you are in the game, the recording will take place.
- Turn on the game and then use hotkeys to start recording.
This is a really solid professional recording software that is easy to use. Download from our website and see for yourself!
 Wireless Charging Smartphones A5 Supports Wireless Charging
 Why do not MTS sms come to the phone?
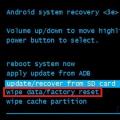 Why do you need a full factory reset on Android or how to return Android to factory settings