What can be done from CDs. We spend time with the little ones interesting and fun: making a tiger cub. Extravagant use of discs
From year to year, new equipment appears, methods of recording information, computers are being improved. CDs are hopelessly outdated, replaced by flash drives and fast internet. You can try to sell old blanks, or just throw them away. But why? We offer you options for what you can make of disks.
 Of course, the alteration of any unnecessary things is a great reason to take a creative look at the surrounding reality.
For example, you can make a wonderful vase from old discs that will emphasize your individuality and creativity. It is quite simple to bring this to life with the help of scissors (we cut the blanks with them), a base vase and glue with which we attach the fragments. And the result is impressive.
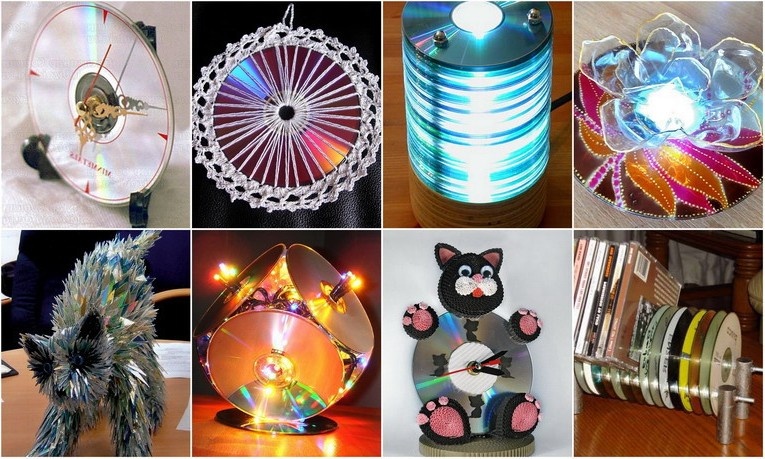
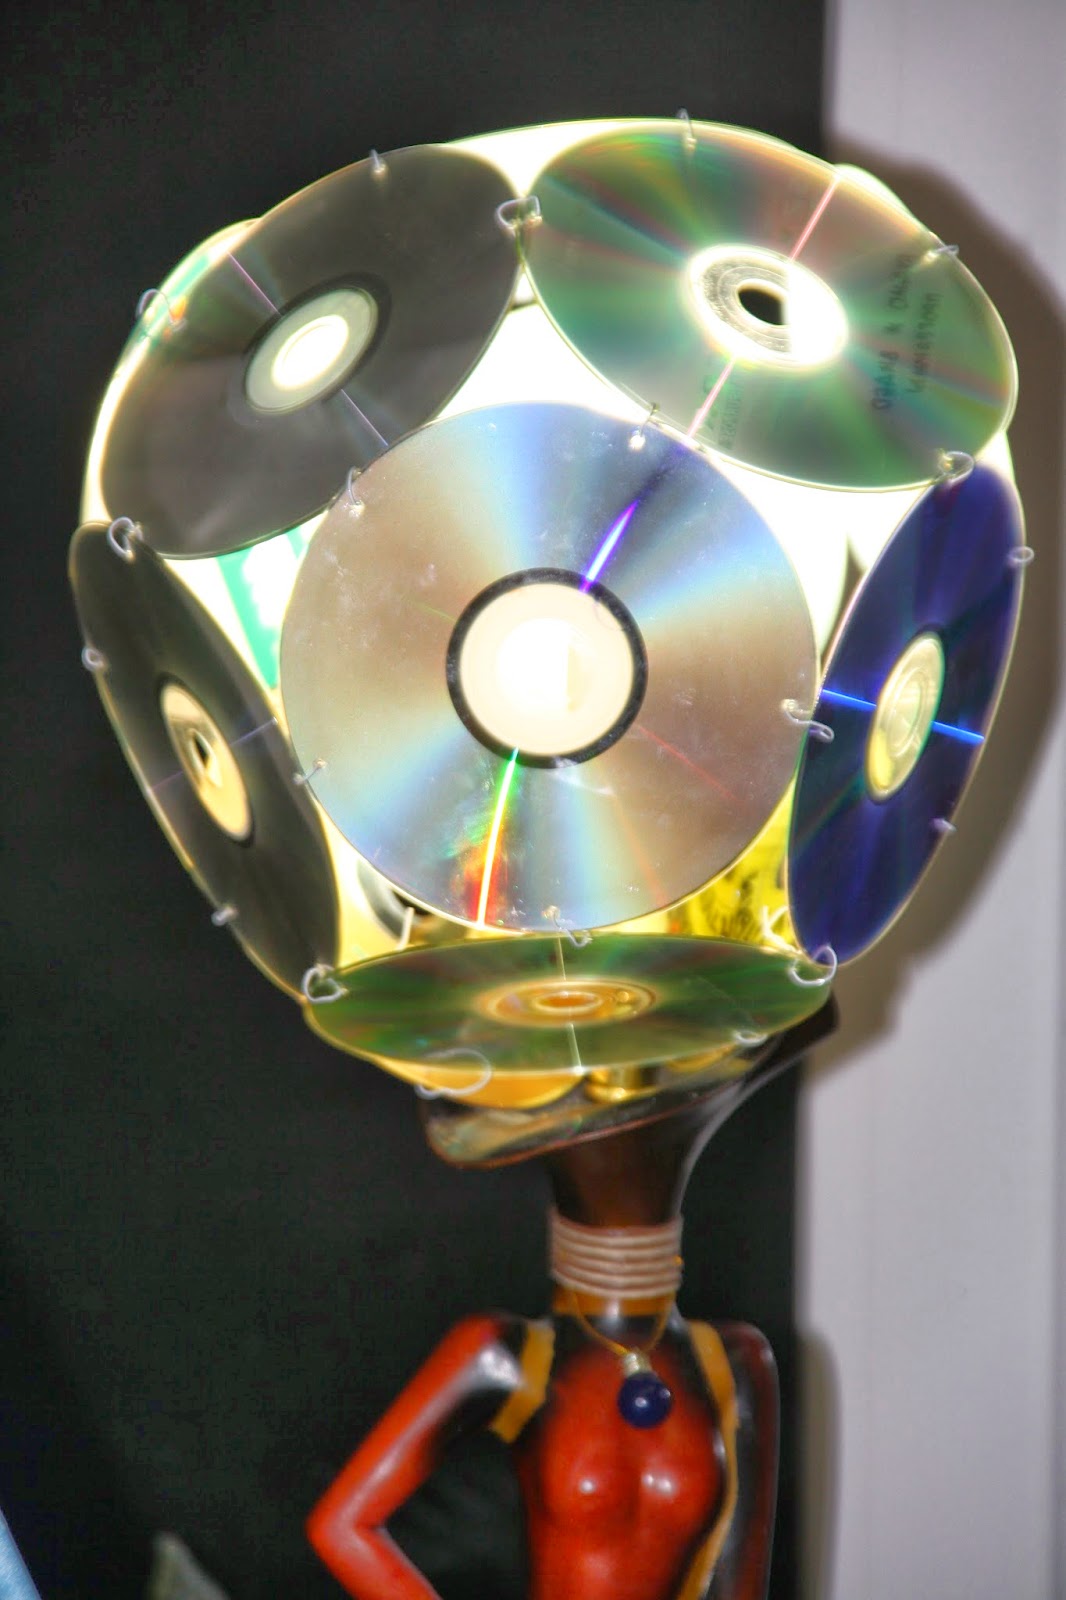
 Unusually interesting lamps of different types can be both a starting point for creating an interior, and just a wonderful addition to it.
Looks especially original table lamp with a fluorescent lamp inside. You can also make an ordinary photo frame or mirror, a photo frame with a magnet, and a whole album for photos with your own hands.
Albums for photos
It's a good idea to make several of these albums, each of which will correspond to one year in your life or correspond to a specific theme (wedding, motherhood, pets, travel abroad).
The young princess will love the little mirror that catches the sunbeams and adds a fabulous atmosphere.
For this we need:
- a mirror for powder or cosmetic bags;
- braid;
- lace braid;
- white outline;
- satin or durable nylon ribbon;
- two old laser CDs;
- glue or glue gun.
First of all, glue the mirror to the center of the CD, then glue the tape of the first type around the mirror.
With a white outline, we put dots along the edge of the laser disk and in the bends of the braid. After the contour points have dried, turn the blank over and glue the lace braid along the edge.
We glue a loop from a nylon or satin ribbon - this will be the top of the mirror. On the reverse side, glue the second disc (you can replace it with a cardboard circle to fit the disc) to close the glued part of the lace tape
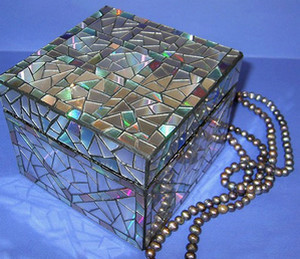
Small box
A cute box for jewelry or any little things will become an irreplaceable assistant. To create it you will need:
- thick paper or cardboard;
- colored paper;
- PVA glue;
- decor for the cover.
The creation process is as follows:
You can put your “memories” into such a cute box (tickets from the cinema, theater, reminders of a pleasant time and love notes).
Watch
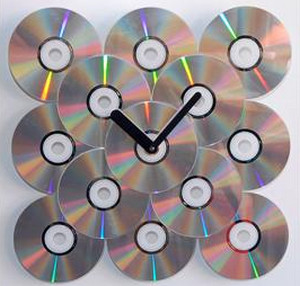 Do you like watches? Do you already have a CD watch? You just need to insert the clock mechanism into the central hole of the disc and fix it, for example, with a strip of cardboard on the back of the watch.
If you put the disc in the microwave for 15 seconds, you can achieve artistic cracking of the disc. Or just print the image to fit a compact and stick on top.
You can easily change the look of the clock every day!
Large-scale creations
You can approach the issue globally and create a curtain from old CDs or a mesmerizing coffee table with your own hands. And the French-style door will shock your guests.
Is there too much CD? No question, make a wallpaper! They visually expand the space of the room. The mosaic bird drinker will become not only a useful attribute, but also a decoration for the garden.
Useful little things
The easiest way is to make coasters for cups from the discs with your own hands. They can be performed using a variety of techniques.
They can be made using decoupage technique. Such masterpieces are created using a disc, beautiful napkins, glue and varnish. And funny ladybugs will settle in your home if you use felt instead of napkins.
Making stands with your own hands is not difficult at all, for you need:
- old disks,
- coffee beans,
- glue,
- some inspiration.
 And if you attach magnets to the stands on the back side, you get unique gifts for your friends.
On the principle of a box without a lid, you can make a stand for stationery. The CD can also be used to upgrade the napkin holder.
Ladies usually do not have enough space to store jewelry, earrings in caskets get confused. With the help of CDs and a reel, it is not difficult for them to make a decent earring stand with your own hands.
Are reflectors on your bike too expensive? No problem. You don't need anything other than a blank and a rope.
The disc box can be used in place of the snack box and is the buzzword for lunch box.
Winter always comes unexpectedly. Even the icy glass scraper can be replaced with old CDs.
Pin cushion
Such a thing is very necessary in the household. You will need:
- compact disc;
- thick fabric or felt;
- threads in color;
- synthetic winterizer;
- scissors;
- a large yoghurt carton or something similar in size.
To make a needle bar:

Extravagant use of discs
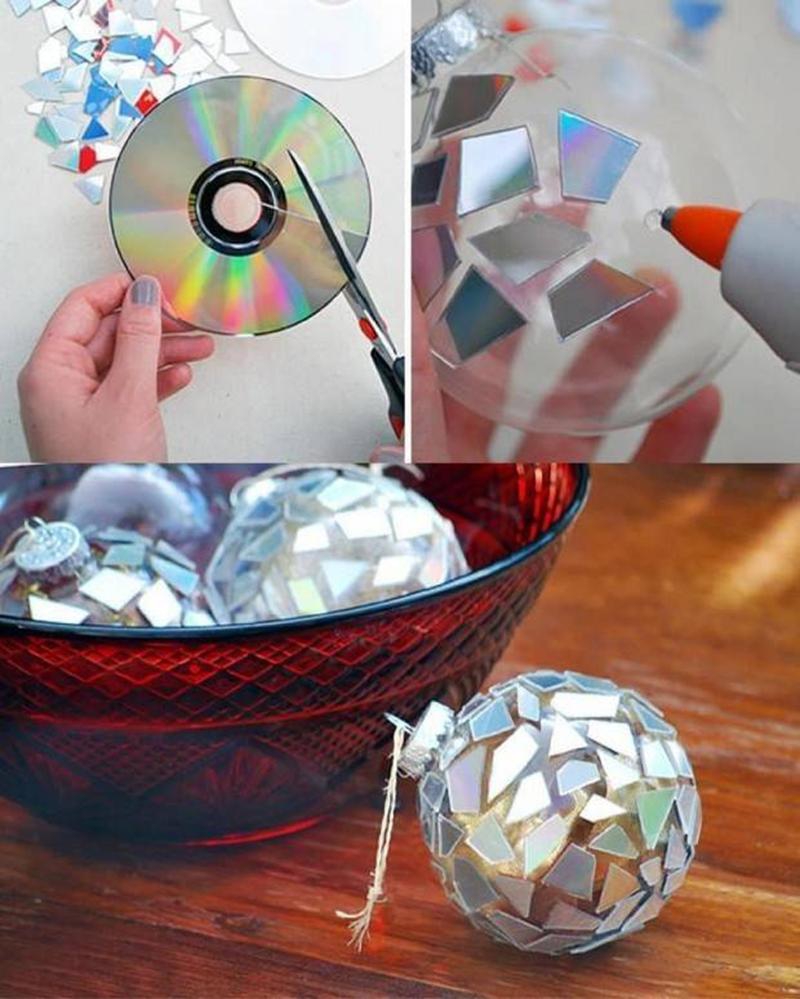
 Is there always a holiday in your soul? Can't stand still at the sound of music? Especially for you, a disco ball with your own hands! And don't let the parties end at your home. Here the basis was a paper lamp of this type.
Do you like to attract the attention of others? You can paste over discs, for example, a motorcycle helmet, in which you will not go unnoticed. If there are too many CDs and energy, create a real art object with your own hands.
Creative inspiration and creativity! Do not be afraid to turn your fantasies into reality with your own hands.
Today, good repairs in the country and a landscaped garden are no surprise to anyone. And more and more people, to make their site unique, prefer to create a variety of handicrafts from improvised things. After all, a summer cottage is a large space for creativity, where every centimeter can be decorated beautifully and non-standard.
In magazines and on the Internet there are many photographs of summer cottages, with various examples of their decoration. But especially interesting idea, is the creation of crafts from computer disks. A large number of original crafts can be created from them. Moreover, it is not necessary to have an art education. It all depends only on your imagination and, of course, your desire.
Crafts from disks for summer cottages can be used as coasters for something, as well as decorate flower beds with them and make unusual fences. They will look beautiful enough both in the daytime and in the evening.

Probing the suburban area
Among the owners of plots, one can rarely find those who probe their territory. Although doing this is extremely necessary in order to have, for example, a comfortable path to the plants. And if you want to make this track even more beautiful, then crafts from disks will help you with this. Of course, it must first be asphalted.
For work you will need:

1. Instant, transparent adhesive.
2. Computer disks.
It is necessary to take the discs and, in any order, glue them with the top side to the track. And in order for such art to last as long as possible, the disks must be glued exactly. The result is a bright, attractive and unusual track.
To decorate flower beds with discs or highlight garden trees, you can take any multi-colored beads and glue them to each disc. Then, around the flower beds, all the discs need to be stuck into the ground thoroughly and beautifully. The result is gorgeous and unusually decorated fences.
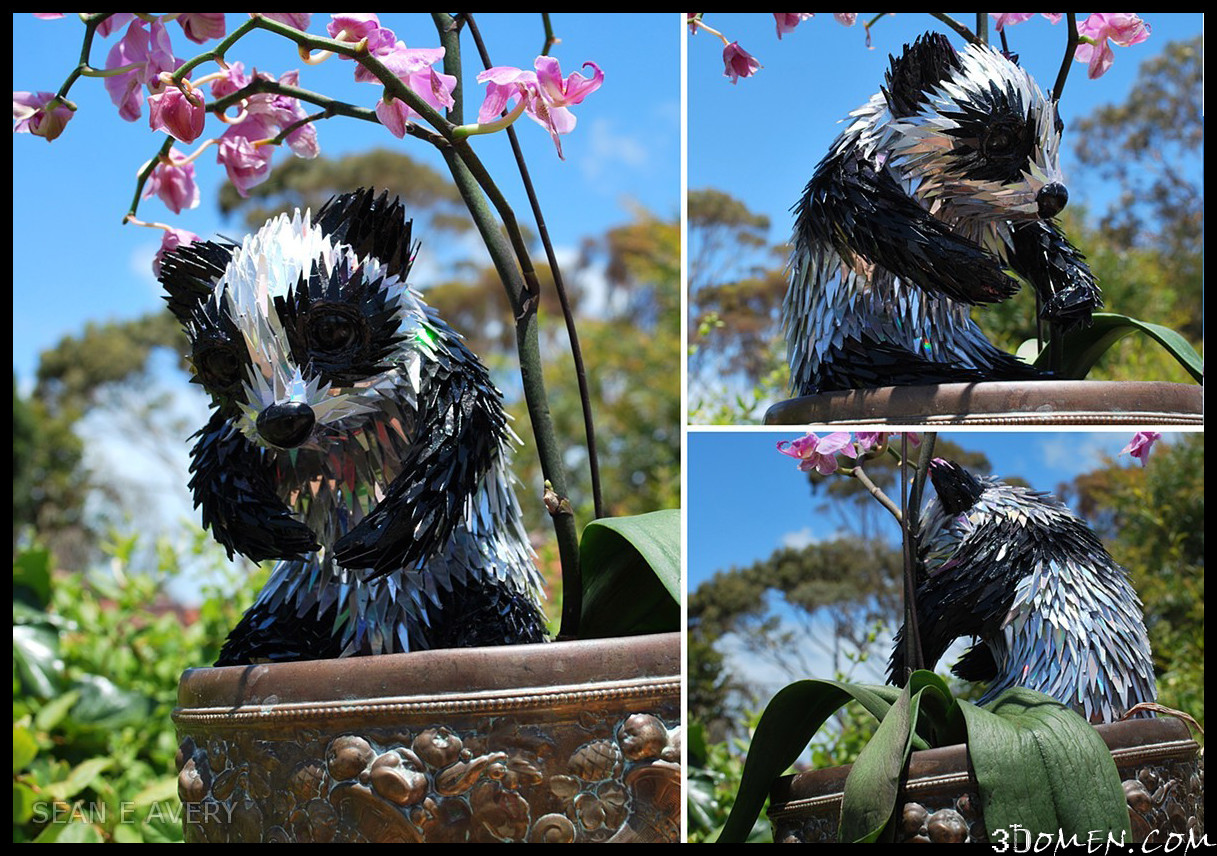
DIY animals from disks
Crafts from disks for summer cottages can be made not only in the form of fences and flower beds, but also in the form of stunningly beautiful animals.
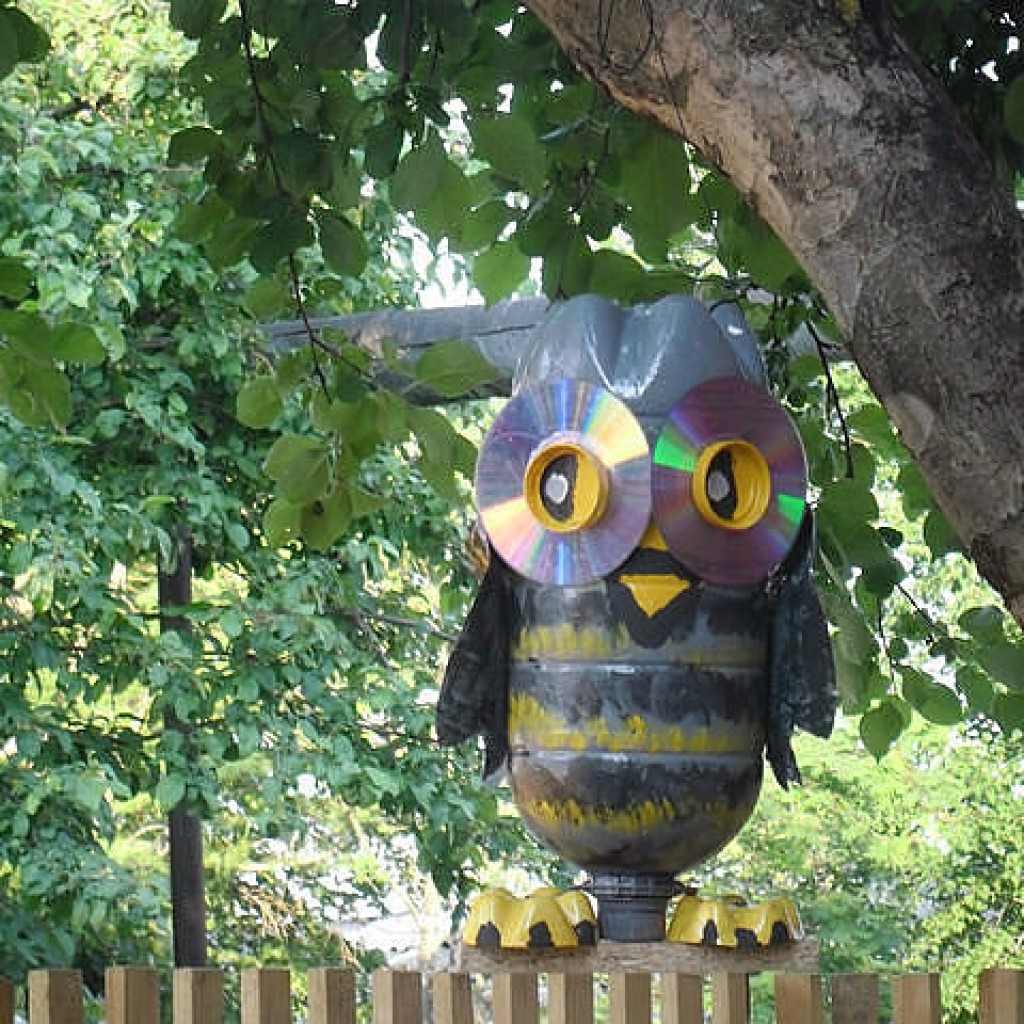
So, an owl made of disks, which can be made with children, will become an excellent decoration for a tree.
Manufacturing scheme
To complete it, you need the following details:
1. Disks of different sizes.
2. Instant adhesive.
3. Colored cardboard.
4. Acrylic paint with scissors.

Take 2 small disks and draw pupils in the center in green on them. Next, paint one large disc black, and another 5 of the same - in half in black and brown. The torso will consist of these disks, and the head will consist of black discs. The next step is to take cardboard. Cut a beak from red, and claws and ears from white. Glue the body of an owl onto black cardboard. Attach eyes and other details to the head. A layer of varnish can be applied to the created craft to protect it from the effects of bad weather.

The resulting decoration in the shape of an owl will always look unique and interesting in your garden.
Another craft, a peacock, is a little more difficult to make, since in addition to disks, other materials are used in this work.
Namely:
1. About two dozen large disks.
2. Yellow, white and blue paint.
3. Thick wire and glue.
4. Garden mesh for work.
5. Five-liter plastic bottles.
It is necessary to cut out the torso and neck from a plastic bottle, and also make a head. To make paws, you need a wire of the same length. They should be painted with yellow paint. Next, take a mesh and cut it out in the shape of a triangle. This will be the peacock's tail, on which the discs should be glued with the shiny side up. The body can be painted blue, and the eyes can be painted on the head. After that, assemble the entire structure into a single whole. Glue the paws to the body, and secure the tail. And on the head, like a tuft, place a small disc. After completing the work, you will definitely get a delightful and unique craft - a peacock, which will delight you for more than one year.
The same peacock can be made from an old tire, which will be used as a torso. But in this case, you will need male help and the presence of a grinder.
![]()
Thus, from the discs you can create a wide variety of animals and not only them. And then, all the possible decorations invented by you will certainly make your summer cottage not only beautiful, but also unique.
Video
Making crafts from old CDs
Every PC user has a couple of unnecessary disks at home. Do not rush to throw them away, because in the hands of a master, even the most unnecessary thing can turn into a necessary one. We offer you several master classes on how to make a CD and DVD discs original crafts for the home with your own hands.
Materials:
- 3 discs;
- glue gun;
- beads;
- scissors.
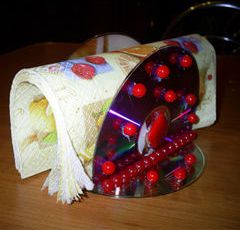
1. One of the discs will act as the base and the other two will form the napkin holder.
2. At a distance of less than half, measure a straight line on 2 discs and cut carefully with scissors.
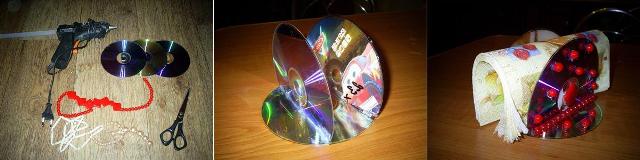
3. Using a glue gun, glue the cut discs onto the third backing disc. You can adjust the distance yourself, it all depends on the number of napkins that the napkin holder will hold.
4. After the glue dries a little, start decorating the napkin holder. For this you can use beads, beads or ribbons. You can glue them in any order.
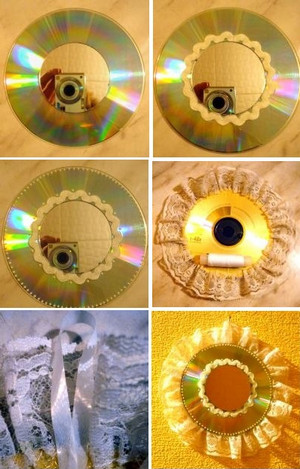
The interior, decorated with exclusive things, has become more and more popular in recent years, so we suggest making a creative frame for a photo.
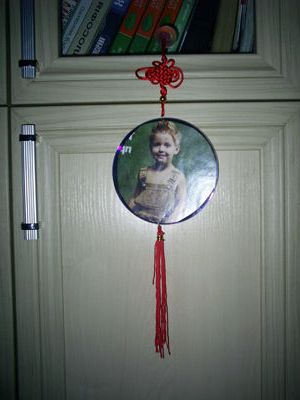
Materials:
- beads and beads;
- disk;
- drill or thick needle;
- threads;
- suction cup;
- Photo.
1. Drill a hole in the disc or punch holes at the top and bottom of the disc.
2. Now, from threads and beads, make an ornament to which you attach a suction cup. Another decoration can be made from threads folded several times.
3. Attach jewelry to the disc.
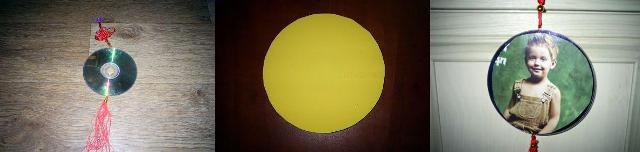
4. Match your photo to fit the round frame. Cut it out to fit the disc.
5. You can glue the photo with glue or double-sided tape. In the latter case, the photo can be changed over time. Instead of a photo, you can use beautiful picture, and thread decoration can be replaced with ribbons. It all depends on your imagination.

Materials:
- compact disc;
- shells;
- glue;
- candle.
1. Select suitable pebbles and shells for the candlestick. Glue them to the shiny side of the disc. For gluing, you can use a glue gun or Moment glue.

2. In the center it is necessary to leave free place for a candle.
3. You can paint stones and shells with acrylic paints or open with varnish.
The original candlestick will allow you to create a romantic atmosphere in the room and will give a second life to unnecessary items.
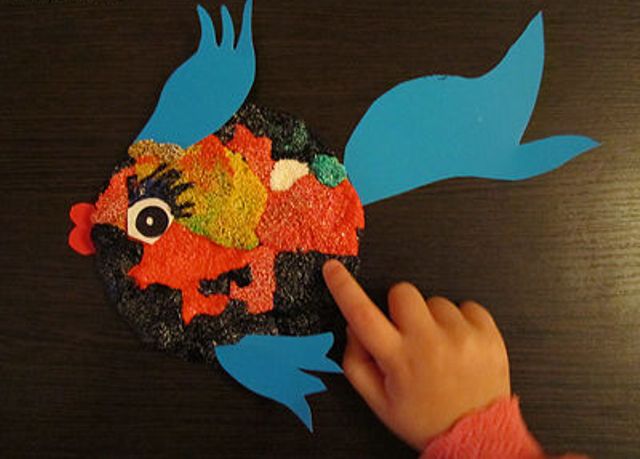
Ideas for children's crafts will come in handy for teachers in child care institutions, as well as for parents. Craft fish from CDs will help to decorate the interior in an original way, and it can also be used as a postcard. With the help of simple materials, you can make a fish from discs, even with a 3-year-old child.
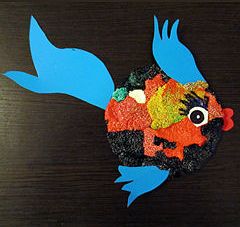
Materials:
- disk;
- glue;
- colored cardboard;
- scissors;
- plasticine;
- markers.
1. Draw the fins, tail and mouth of the fish on a piece of cardboard.
2. Carefully cut out all parts. If the child is small, it is better for the mother to cut out the details.
3.Use PVA to glue the fish pieces onto the disc.
![]()
4. Now the surface of the disc needs to be covered with plasticine using the indentation method.
5. Cut out the eyes of the fish from the cardboard and secure them.
6. Make plasticine eyelashes.
The fish is ready. If you want to present it as a gift, you can write wishes on the tail or fins.
A hot stand is an indispensable item in the kitchen, while making it with your own hands is quite simple from ordinary materials.
You will need:
- disk;
- synthetic winterizer;
- double-sided scooter;
- the cloth;
- scissors.
1. It is necessary to cut a circle from a padding polyester to fit the disc.
2. A circle with a larger diameter than the disc must be cut out of the fabric.

3. Place double-sided tape around the edge of the fabric. Wrap the disc and it with a cloth and padding polyester.
A beautiful stand is ready, now you can put a cup of tea or coffee on it.
Original cup holder
A cute cup holder will become a real decoration and an original gift.
Stand materials:
- disk;
- scissors;
- napkin for decoupage;
- varnish;
- PVA glue;
- flexics.
1. Separate the top layer from the napkin so that only the drawing remains in your hands.
2. Apply PVA to the surface of the disc and carefully glue a napkin on top so that there are no folds. You can smooth the napkin with a cotton pad or pieces of napkin dipped in PVA.
3. Cut out a circle of CD diameter from the flexica sheet.

4. Glue the flexic to the side of the disc where there is no napkin. Thanks to flexics, your stand will not slide on the table.
5. Cover the craft with varnish to give it a pleasant shine and extra durability.
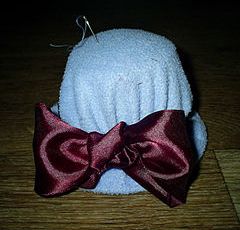
Materials:
- disk;
- a glass of sour cream or yogurt;
- threads;
- a needle;
- synthetic winterizer;
- the cloth;
- ribbon.
1. Cut a circle out of the fabric that is slightly larger than the diameter of the disc. Sew it along the edge with a basting stitch.
2. Fill the fabric with padding polyester, insert the disc and tighten slightly.
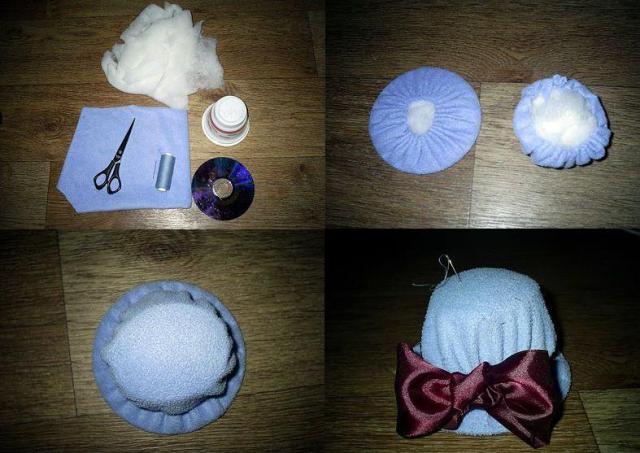
3. Cut off the bottom of the sour cream cup. Cut a circle out of the fabric so that it covers the cup. Fill the glass with padding polyester.
4. Proceed to stitching the parts so that you get a head.
5. Decorate the seam with tape or tape.
The pincushion in the form of a hat is ready.
The image of smeshariki from the cartoon of the same name is reflected in different types of needlework. Today you will learn how to make smeshariki from CDs.
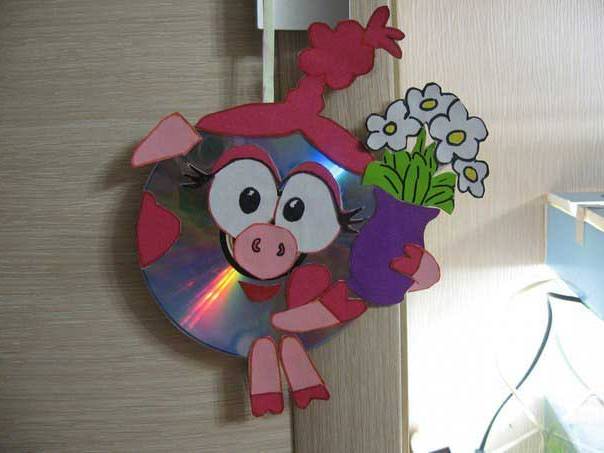
Materials:
- old disks;
- glue;
- colored cardboard;
- colored paper;
- scissors.

In order to make any cartoon character, be it Nyusha, Krosh or Sovunya, you need to cut out eyes, ears, arms, legs from colored paper or cardboard.
Ideas can be taken from regular coloring pages and used as a template. To make the facial features of the Smeshariki more clear, outline the contours with felt-tip pens.
All elements can be easily glued with PVA or double-sided tape.
Find out which original and useful things can be made from CDs.
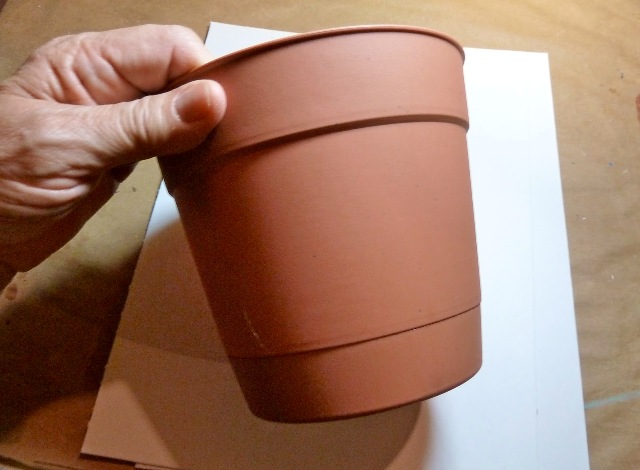
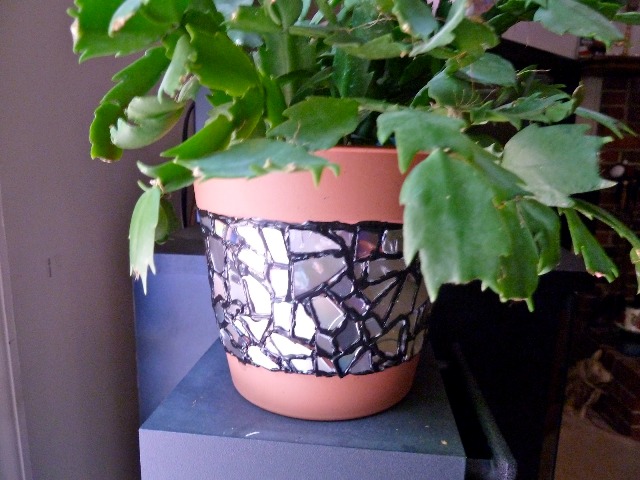
What to make of disks with your own hands. Flower pot mosaic.
You will need:
CDs (3 or more)
Scissors
PVA glue (or superglue)
Plastic pot
Acrylic paint (or regular)
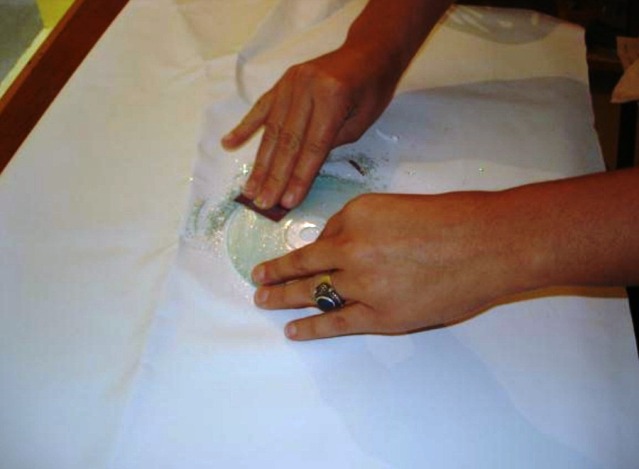
* Before starting to cut the disc, it is worth wearing protective goggles - this will help you to avoid injury if parts of the discs "fly up" during cutting.
1. Cut the discs into pieces of different sizes and shapes.


2. Gradually apply the glue to the flower pot and start glueing the pieces of the discs.
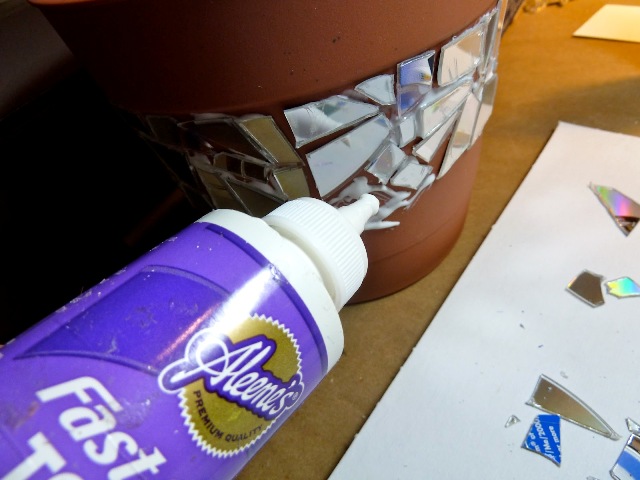

* Remember to leave some space between parts.
3. Continue glueing until you have covered the intended part of the pot and let the glue dry.

4. Prepare the paint and start applying it in the gaps between the disc pieces. Try to keep all the lines neat. When you've filled all the gaps with paint, leave it to dry.

* When the light hits the pot, it will "glow" where the sun's rays are reflected.
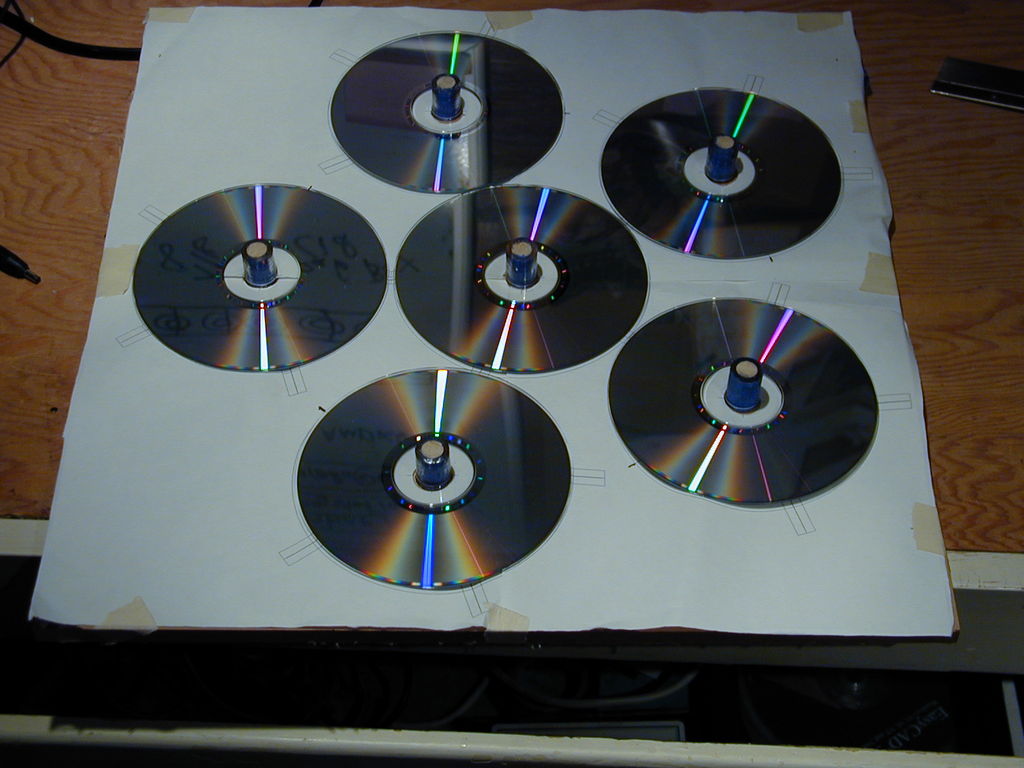
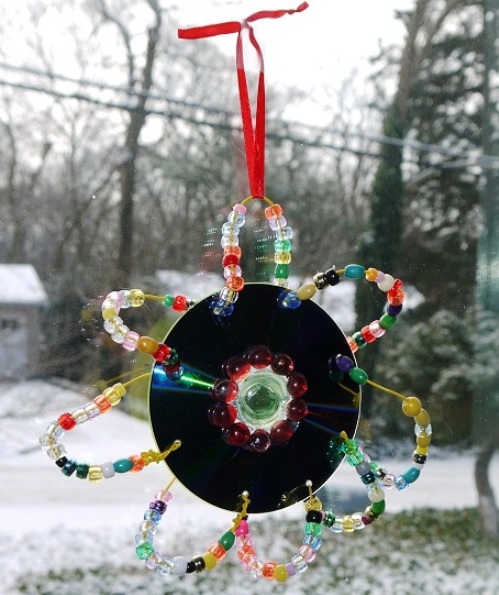
Crafts from CDs. Spring Flower.

You will need:
1 CD
Thin wire
Nippers or scissors
Dremel or electric drill

1. Drill small holes in the disc - you should get about 8 holes.
2. Pass the wire through the holes, securing it at the first hole and then threading it into the next.
3. Alternately, after each threading the wire into the hole, string the beads. Add as many beads to cover the wire arch (see picture).

* If you run out of wire, get more (at the office supply store) and simply insert into the last hole and continue to weave.
4. You can decorate the hole in the middle of the disc with beads or other decorations - feel free to fantasize.
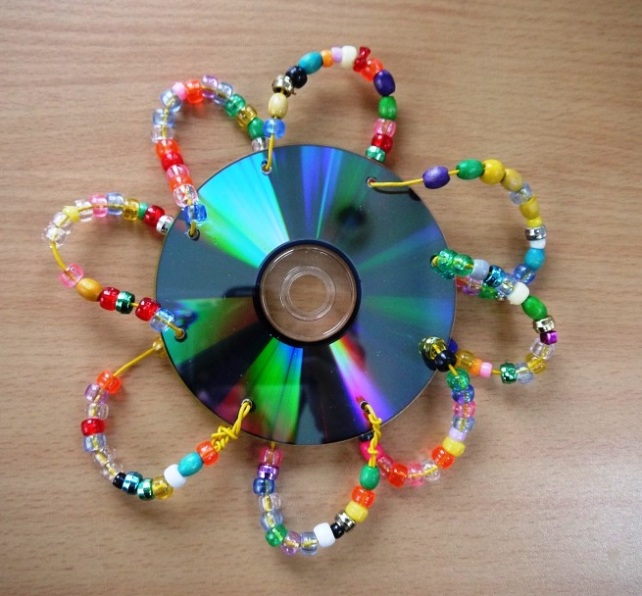
* This flower can be hung on the window - just tie a ribbon or thread.
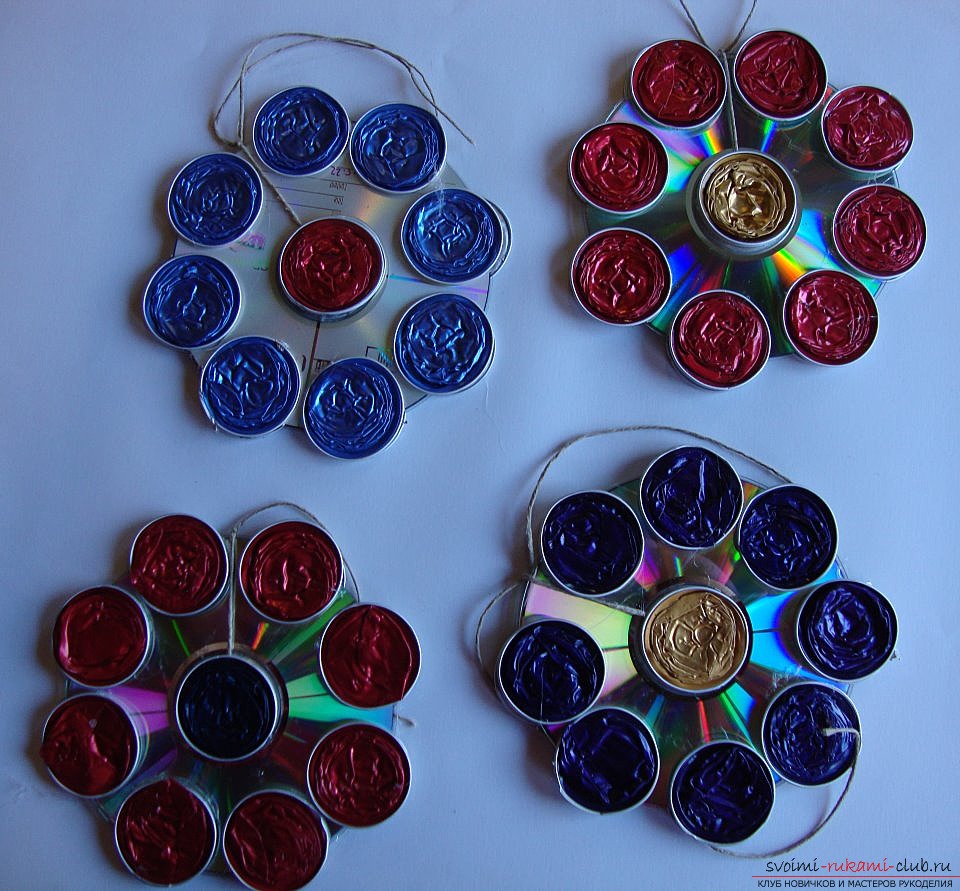
Crafts from CDs. Hot coasters.
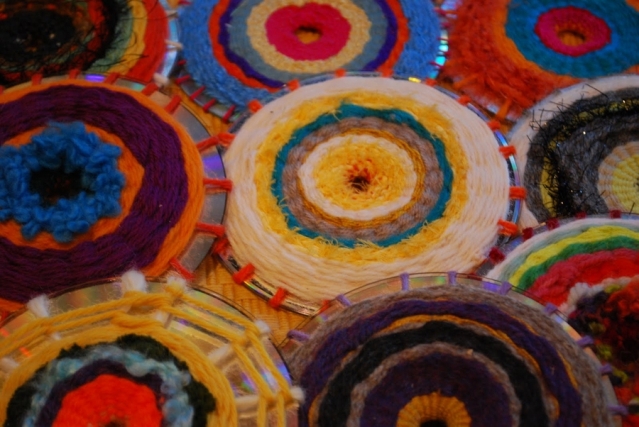
This craft is perfect for home, to put a hot kettle, pot or mug on it.
In the pictures - clear instructions how to make a stand.
You will need:
CDs
Thread of different colors
Colored paper
Scissors


![]()
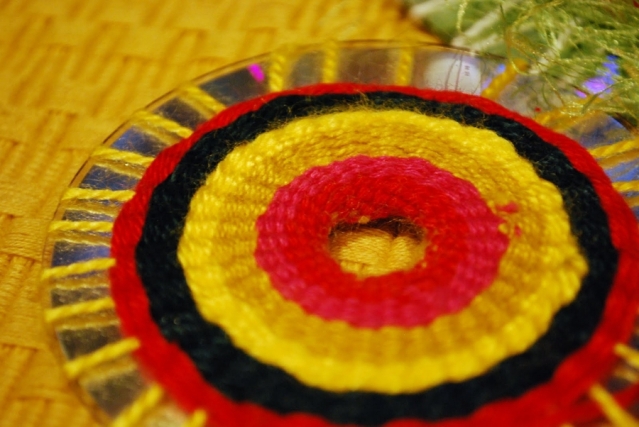
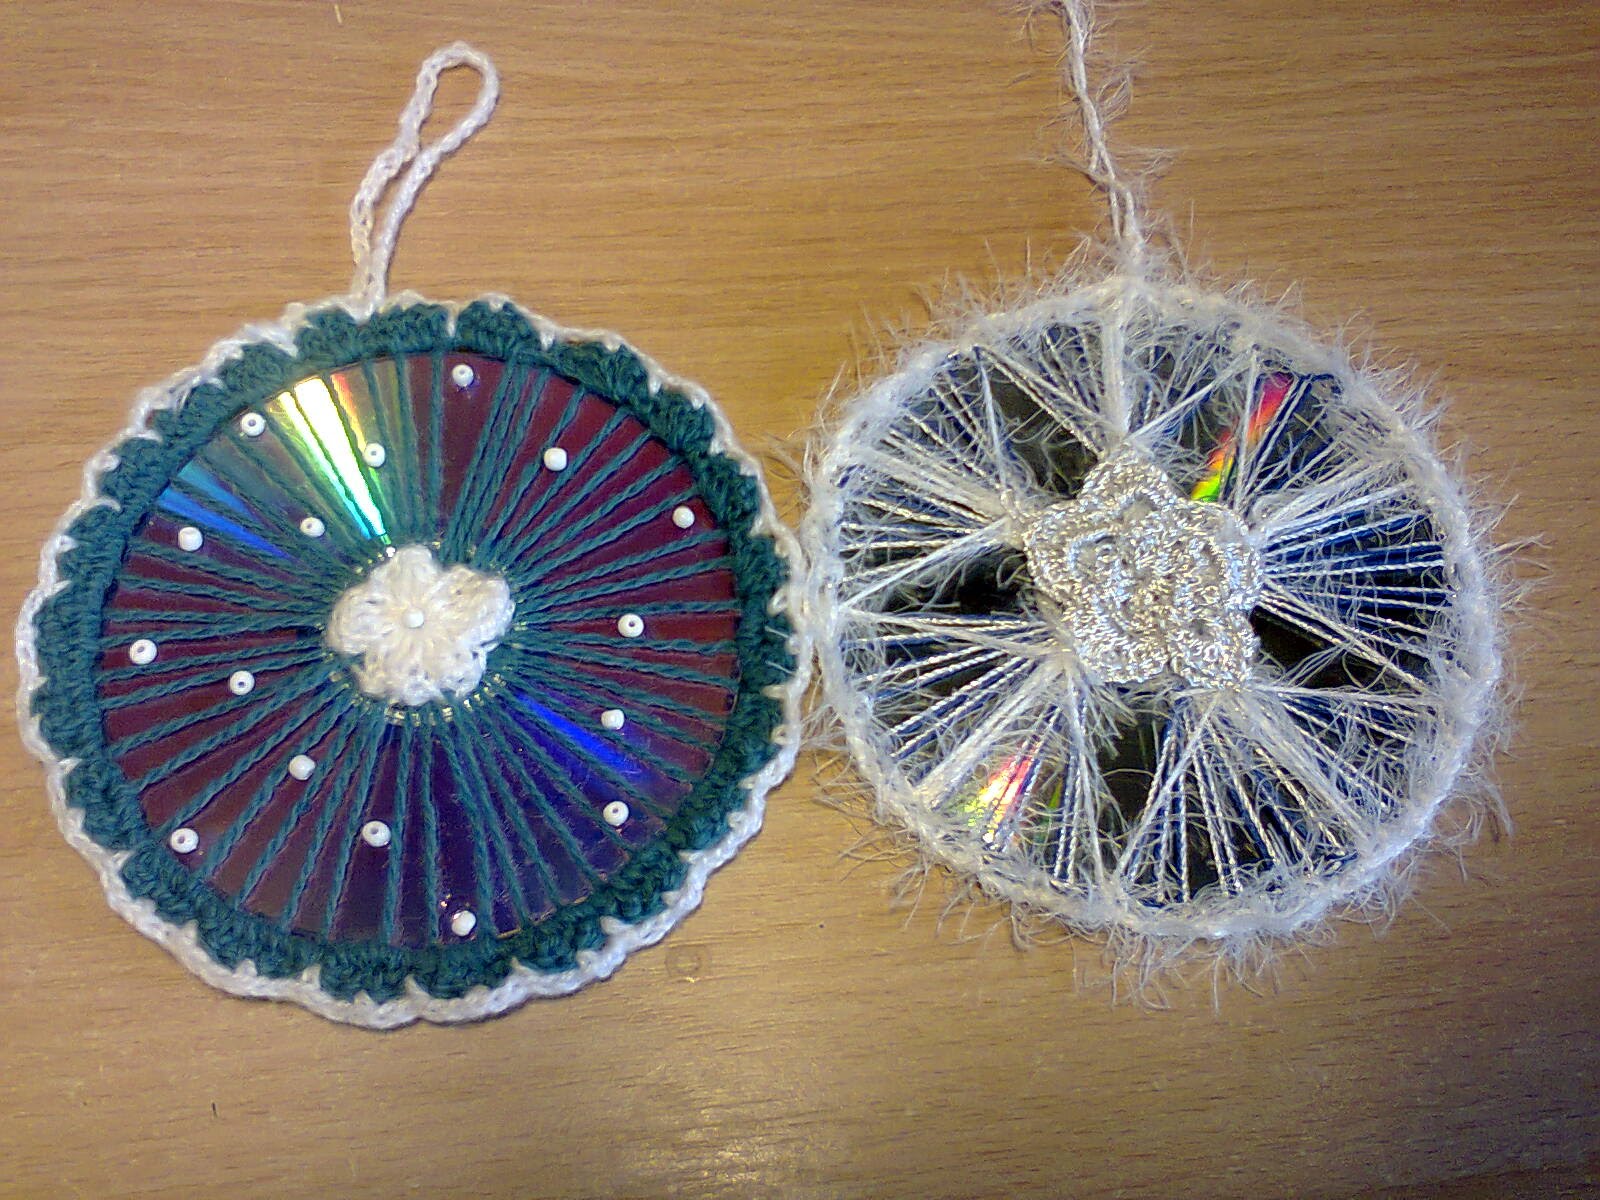
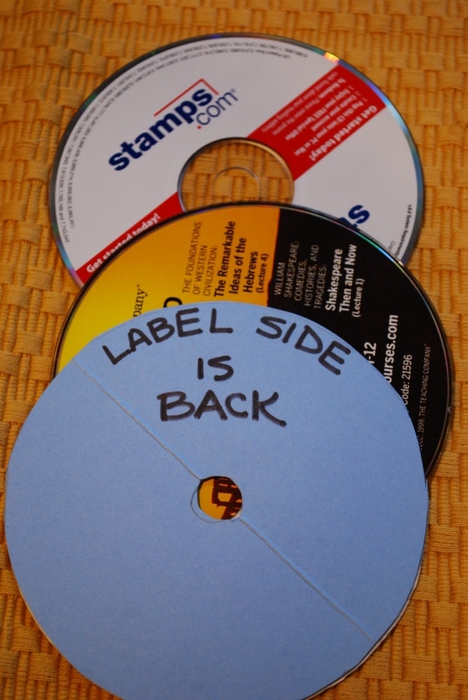
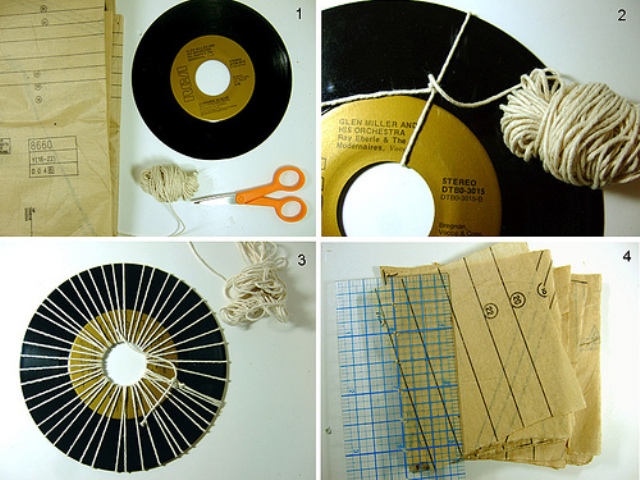
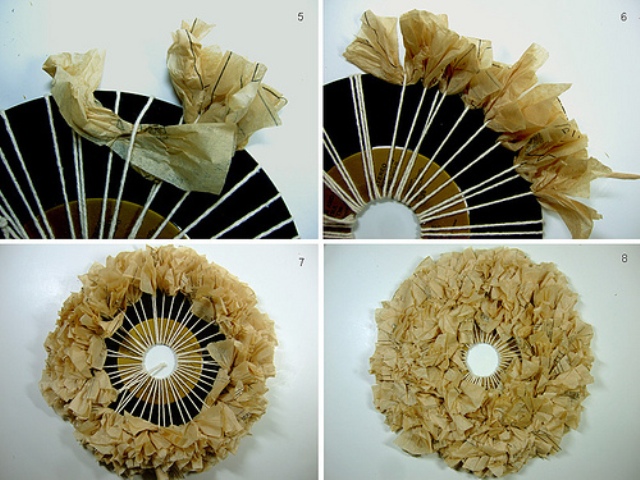
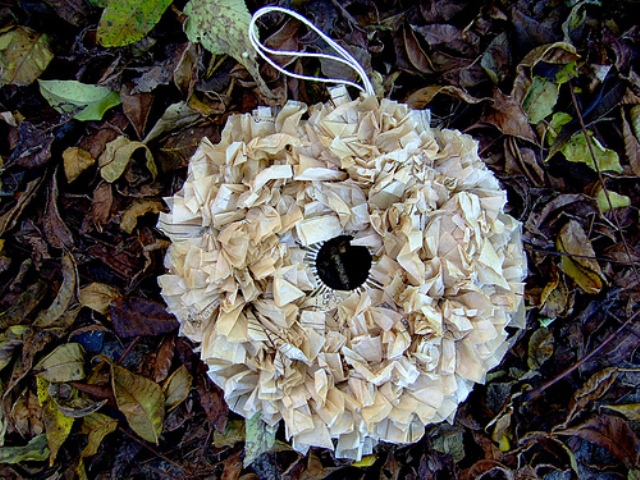
Crafts from old disks. Bright wreath for interior decoration.

This wreath can be used to decorate a room, porch or front door. It's very simple to do - follow the instructions in the pictures.
You will need:
CDs or LPs
Thread of different colors
Colored paper
Scissors
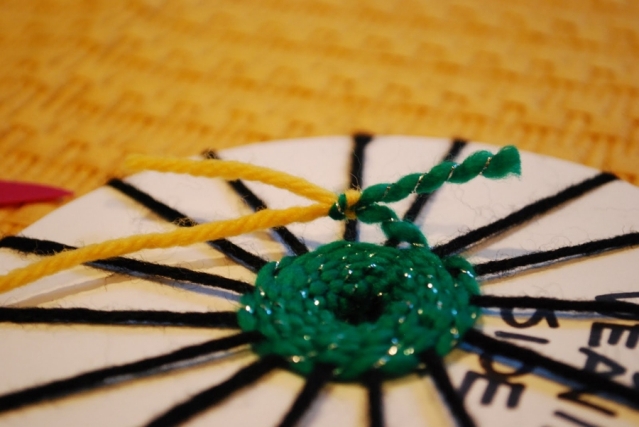
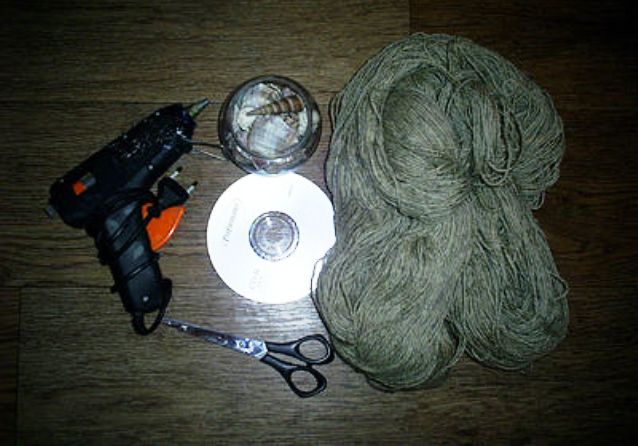
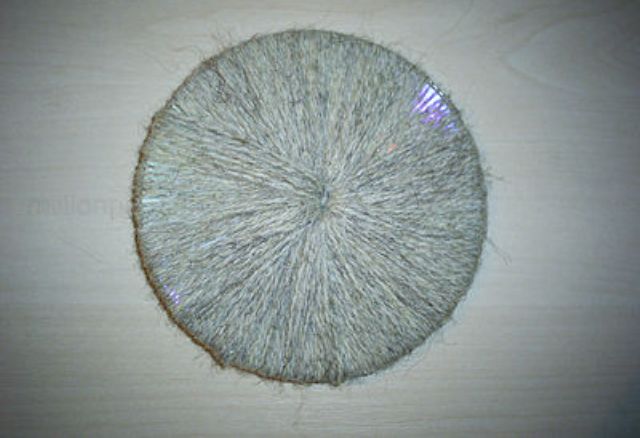
Crafts from disks (master class). Panel with shells.
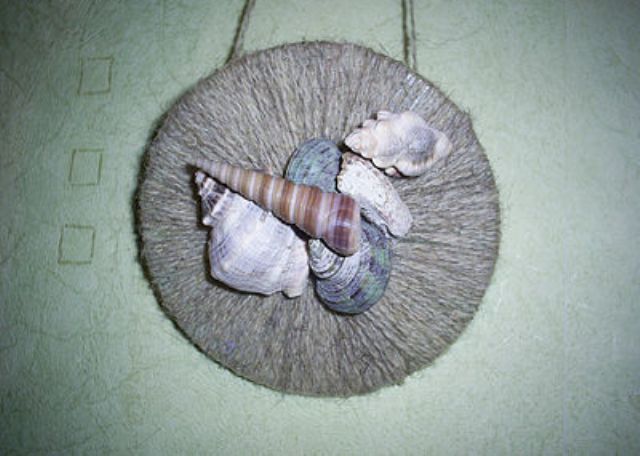
You will need:
1 CD
Woolen thread of one or different colors
Seashells
Glue (hot glue gun)
Scissors
1. Wrap the thread around the disc.

2. You can fasten the ends of the thread with glue, having previously tied it in a knot.
* To make it easier to wind the thread, you can use several short lengths.
3. It remains to glue the shells using a hot glue gun. If not, you can use superglue.
* You can attach a string or ribbon to the back to hang the craft on the wall.
Children's crafts from disks. Fish.
This craft can be done with little children. The fish from the disc can be used to decorate a room or as a colorful postcard.
You will need:
1 CD
Colored cardboard
Ball plasticine
PVA glue
Scissors
Markers

1. Prepare colored cardboard and cut out the fins, tail and mouth of the fish.

2. Take a few different colored pieces of ball plasticine and cover the entire surface of the disc with them.

3. It remains to glue the cut out details of the fish, add plasticine eyelashes and you're done.

What to make of disks. New Year's candlestick.
Old discs can also be used to make Christmas crafts, such as a candlestick.

You will need:
1 CD
Superglue (glue "Moment")
Silver or glitter nail polish
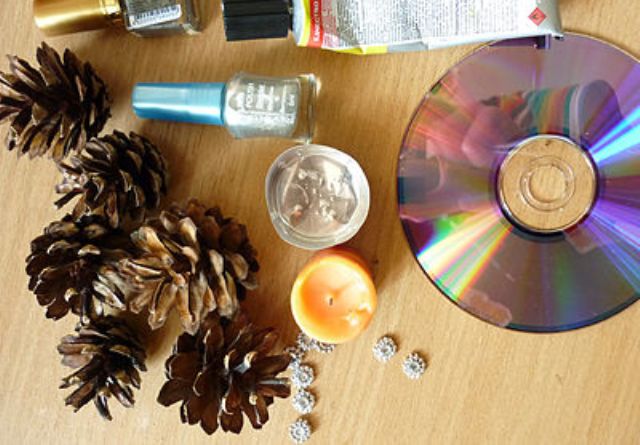
1. Glue the bumps to the disc using superglue. When doing this, leave room for the candle.
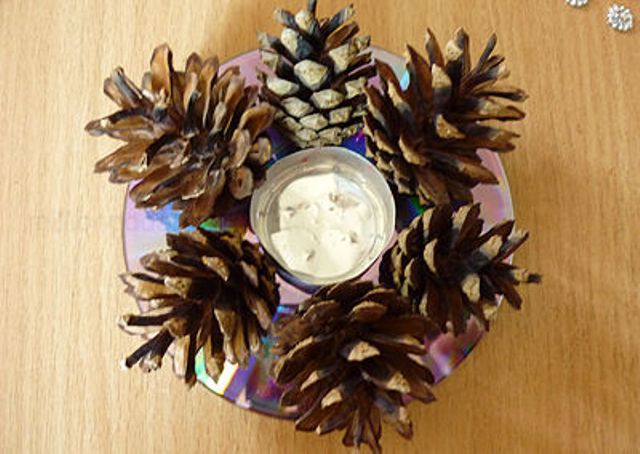
2. Varnish the buds and let the varnish dry.
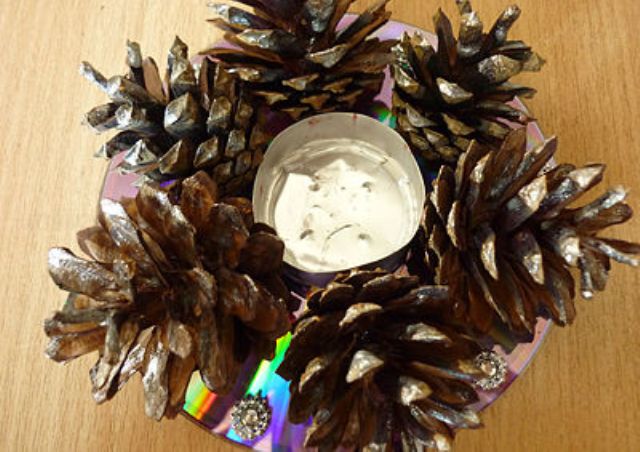
3. You can glue rhinestones between the cones and leave to dry.
4. Now you can insert a candle in the middle of the composition.
What can be done from disks. We decorate the chair with mosaics.
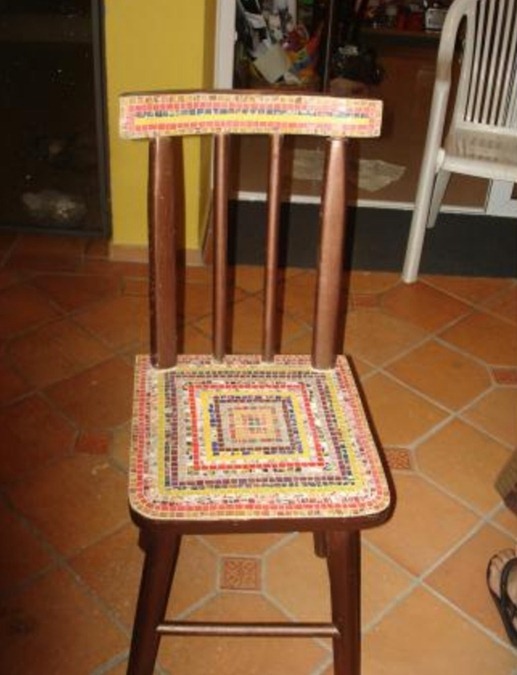
You will need:
About 50 CDs
Sandpaper
PVA glue
Unnecessary glossy magazines
Scissors
Damp rag
Construction putty
1. A mirror surface is not needed, which means that the mirror part of the discs needs to be sanded. After that, each disc must be rinsed with running water.
 Architecture of a distributed control system based on a reconfigurable multi-pipeline computing environment L-Net "transparent" distributed file systems
 Email sending page Fill relay_recipients file with addresses from Active Directory
 Missing language bar in Windows - what to do?