The phone does not translate the language. Switching keyboard in Android and installing an alternative
For some users, the standard Android keyboard ceases to suit them for some reason. Moreover, we are not talking about the quality or inefficiency of the built-in keyboard, just taste and color, as you know, all markers are different. One of the most popular keyboards for Android is the Go Keyboard. Let's see how to connect it using Android 4.1 as an example. As a test device, we will have the Galaxy Nexus.
When we have a text field, we can choose which input method to use. Our device had an English and Russian QWERTY keyboard, in addition, there was an opportunity voice input... In order to select one or another input method, press and hold your finger on the input field. A window like this should appear:
these are standard keyboards. We need to put third party application Go Keyboard. To do this, we need to download this application, which we will do:
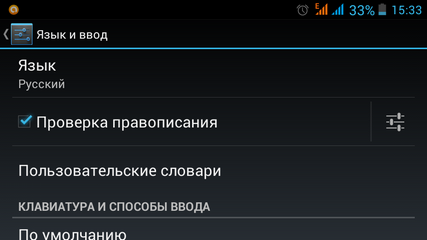
After we have downloaded and installed the keyboard, it is necessary activate... To do this, go to settings, "Language and keyboard" and select Go Keyboard. We put a tick in the right place:
and then select our new keyboard as the main one:
I hope our readers understand that when the following dialog appears, you must click OK: the Go Keyboard app is completely safe:
As a result, when entering text, we will be shown the "native" keyboard, and the Go Keyboard installed by us. All this beauty will look like this:
You can also use multiple keyboards. This is especially convenient when you often have to enter a lot of information: for one dialog boxes it is better to use a keyboard "sharpened" for the Latin alphabet, for others - a keyboard that is convenient for typing characters. To be able to switch keyboards, the required keyboards must be activated by ticks in the corresponding menu (Menu - "Language and keyboard").
When you need to start entering information, press and hold the palette on the input field. A window will appear where we select our keyboard as the "input method".
I hope you succeed. Changing the keyboard is not the most difficult task. At any time, you can remove the keyboard that does not suit your needs, as well as install a new keyboard (this can be useful if the phone's firmware language does not match the language you have to constantly work with).
The issues of upgrading the operating system of a smartphone are of concern not only for beginners, but also experienced users Android trying to customize the device for themselves. It includes flashing, and installing side applications, and much more. Everyone pays attention only to visual changes, ignoring the built-in keyboard.
You don't have to study appearance the main menu, performance and various effects of the phone, but "keyboard" is needed by any user. With its help, you can communicate, search for important information on the Internet and create the necessary notes in a notebook, which greatly simplifies life.
This article will show you how to change the keyboard and customize it in your own way.
How to change the "native" settings for yourself
You may not need to install a new application if you are only interested in the nuances of its operation. Some, for example, are very annoyed by the automatic correction of words (function "T9"). To fix this minor issue, you don't need to run to Google play for a new application. You can rummage through the settings of the old one.
First, go to your phone settings. Next, find the item called "Language" and click on the gear symbol next to the selected option. An extensive list of all sorts of options will open that will allow you to customize everything as much as possible for yourself and change the application parameters.
- Change input language and type. Depending on the firmware, 300 languages may be available or only 3. The most common options are English and Russian with QWERTY layout (computer view).
- Prediction of words. At this point, you can set automatic correction and prediction, which will greatly simplify the use of the application.
- Automatic punctuation. Set this item in the event that you forget about the periods at the end of the sentence: just put two spaces in a row.
- Touch responses. In this menu, you can set the sound effects and vibration when you press the keys. On by default, but here it is as you like.
If the setting did not help, start looking for the application.
Popular free installation options
- To get started, you need Internet access. It is recommended to connect to the closest Wi-Fi for the app to load faster.
- Start Google Play ( Play Market- in older Android models) installed by default on any version of the operating system.
- To access, get a new account or enter an existing one. Do not be alarmed by lengthy operations: registration in the system takes no more than 5 minutes.
- Go to the search box at the very top of the screen and enter your keyword there.
- Choose the option you like the most from the proposed ones. It is recommended that you download one of the very first applications on the list.
Now that everything is installed, you need to make sure that it will function by default. To do this, go to the same settings. The list of loaded keyboards will show off just now installed application, check the box next to it. In this case, you can also change the settings according to the instructions in the previous section.
Best Android App: How to Make Practical Choices
If you do not want to choose a random application from the list, check out the special charts of keyboards for Android, compiled by the users themselves. The top five include the following:
- GO Keyboard.
- Ginger.
- Slide IT.
- TouchPal.
- Fleksy.
There is a huge assortment of all kinds of applications on the Internet, customized to suit any user needs. The above guide will help you choose and install the best option that will make you feel comfortable typing even on the smallest screen. Good luck with your work, experiment with pleasure!
Today I will start a series of articles on the topic of "Learning Android". The articles will be intended for novice users, for whom Android is still a wonder. Therefore, I ask advanced gurus not to be ironic in the comments, but, on the contrary, to share their experience. And I will ask novice users to unsubscribe in the comments if articles of this type are needed on the site.
So, let's begin. Today, as you already understood, we will focus on the keyboard in Android. For some users, the stock keyboard very quickly ceases to suit, especially since in the market you can find a keyboard for almost every taste. And so we downloaded the keyboard, it was installed on a phone or tablet, but the next time we enter text, we again see the old keyboard.
What to do? Everything is very simple. First, go to the settings menu, and find the "Language and keyboard" item there. Having opened it, we can see a list of keyboards installed on our device. Yes, there can be several - two, three or more. Make sure the keyboards we need are selected. If not, mark them with a tick. If necessary, go to the settings of our new keyboard and set the parameters we need.
Now we need to switch to the keyboard we need. It’s very simple. In the text input field ( address bar browser or message text Email), press the screen and hold your finger (the so-called "long tap"). A drop-down menu will appear on the screen. We select the "Input Method" in it, and then in the list that appears, mark the desired keyboard.
Everything. In the future, all text will be entered using the new keyboard.
It's simple enough, isn't it? Now let's look at this situation: you connected an external USB keyboard, and it worked with your tablet, but the joy was short-lived - you cannot switch to another language other than the default language.
What's the matter? Again, everything is simple. There are two options here.
First - android keyboard or the other on-screen keyboard you installed does not support external keyboards... Therefore, you need to install a keyboard that supports the hardware keyboard. For example Smart KeyboardPro or Russian Keyboard, which you can download from the Market.
The second is in the settings of your on-screen keyboard you just need to find and enable the ability to work with a hardware keyboard. There you can also find a key combination that switches input languages. For example, for Smart KeyboardPro it is Shift + Space.
That's it, now you can enjoy working on a "real" external keyboard.
Each smartphone manufacturer tries to integrate its own into its creation virtual keyboard... But it does not always meet user requirements. In this case operating system Android allows you to replace the keyboard by downloading any other. But not all smartphone owners understand how to change the keyboard to Android. If you are also asking this question, then today's material was written just for you!
How are keyboards distributed?
Any virtual keyboard for a tablet or smartphone is a regular application. If the manufacturer has installed its own keyboard, then it is impossible to remove it without special tweaks. But that doesn't mean you can't change the keyboard that appears by default every time you type.
Third-party keyboards are distributed through the well-known online store Google Play. They can differ from each other in the arrangement of the keys (layout), the ability to stick to the edges of the screen, a set of stickers and emoticons, support for themes and many other properties. You can read more about this in our selection.
When installing a new keyboard to activate it, most often you do not need to go to " Settings"Following our instructions. It is enough at the first start to agree with the proposal by answering it by pressing the button " Yes". Or the utility itself will transfer you to the desired settings window, where you only need to activate the switch for the installed keyboard.
Changing the virtual keyboard
You can easily choose another keyboard on your phone. To do this, follow the steps described below:
Step 1. Proceed to the section " Settings».
Step 2. Select the item " Language and input».
Step 3. Here you should select the item " Current keyboard". It can be located in a subsection or tab “ Keyboard and input methods».
Step 4. Here put a circle next to the item “ Russian", Then click on the button" Select layout».
Step 5. You will be taken to the section described above. Here you need to activate the virtual keyboard that you want to use. Here you can enable voice and some other unusual input methods.
Step 6. Activate the keyboard for the English-language layout in the same way.
That's all. Installing the keyboard on Android is very simple - just download it from Google Play. There is nothing difficult in activating it - now you know how it can be done.
 Examples of jQuery function setTimeout () Javascript prevent multiple timers from running setinterval at the same time
 DIY amateur radio circuits and homemade products
 Crop one- or multi-line text in height with the addition of ellipses Adding a gradient to the text