Nexus mod manager does not see skyrim. Nexus Mod Manager - automatic installation and management of mods v0.71.1. How to use Nexus Mod Manager
× Close

Nexus Mod Manager is a game mod manager for such series as Dark Souls, World of Tanks, War Thunder, Witcher, Dragon Age, Fallout, as well as some products from The Elder Scrolls line. The program is distributed free of charge under the GPL license, giving users the opportunity to use open source code in their own projects.
As it should be, the Nexus Mod manager has all the necessary tools to work with files of a certain type. Basic options allow the user to add, update and merge mods into categories, back up installers and game profiles.
The program interface is made in the corporate style with the use of large icons and tabs mechanism. The main work area displays a list of game add-ons with detailed information about them. Thanks to the tabular view of this list, all mods added to the manager can be sorted by one or another criterion, for example, by name, version or date of addition.
Additional areas of the Nexus Mod Manager - download manager and mod activation queue - are floating and by default open on mouseover and hide automatically when inactive.
The program supports add-on files with the FOMOD, ZIP, RAR and 7Z extensions.
Nexus Mod Manager Benefits
- Free and open source distribution of the product.
- Built-in download manager.
- The ability to update mods.
- The ability to expand functionality through the use of plugins.
- The ability to organize the list of mods.
Disadvantages of Nexus Mod Manager
- Lack of support for Russian and Ukrainian languages.
- The need to create a user account.
Conclusion
The program works correctly, but its interface is hardly intuitive.
Installing Nexus Mod Manager
The installation of the program is quite fast and should not cause problems for the user. At the first stage, accept the terms of the license agreement by marking the appropriate item with a dotted marker, and then click Next... Next, read the installer's notice and click again Next... To change the path where the program is located on your PC hard drive, click Browse... Otherwise, skip straight to the next step. Enter the name of the directory or select it from the list of available ones to locate links to the Nexus Mod Manager components in the Start menu. Click Next... If necessary, create shortcuts for the program on the desktop and in the quick launch menu, and also check the boxes opposite the file types with which the Nexus Mod Manager will be associated. To proceed directly with the installation of the program, click Next and Install... To close the installer at the end of the process, click Next and Finish.

Nexus Mod Manager is a free manager program used to manage game mods, download game application updates, control and manage game functions. Nexus Mod Manager can be downloaded for free by users who use gaming applications such as Skyrim, Fallout 3, Oblivion, State of Decay, World of Tanks and other games for Windows.
After users decided to download and install Nexus Mod Manager on their computer, they have free access to all mods for game applications. In order to update applications and download a game mod, the user himself chooses the name of the mod, loads it into the desired folder, installs it into the game application. Using the mod manager, the user can independently organize mods for games by installing or deactivating their function in the game. The program automatically searches for new updates and mods, installs updated versions and removes outdated mods.
To start using the capabilities of the mod library, you need to download and install the program on Windows. The manager is compatible with all Windows systems. After installation, the user needs to launch the program and select the game for which the mod or update needs to be installed. The library automatically finds games that are installed on the computer. The program invites the user to register for free access to the mods of the multimedia application. To register, the user must enter a username, password and mail through which authorization will be carried out.
Despite the fact that users do not have the opportunity to download Nexus Mod Manager in Russian, there is no need to search and use a crack, the process of installing and using the mod is easy and straightforward. The rules on how to use the program have a clear algorithm of actions when activating and deactivating a mod.
Algorithm for installing the mod from the Nexus Mod Manager program:
- open the program;
- select the Mods tab;
- select the Add Mod from file function;
- the mod is copied to the library list;
- select the required mod;
- activate it by double clicking the mouse;
- close the folder.
Nexus Mod Manager - Disassemble in order
This program is designed to automatically install mods in TES-V: Skyrim, conveniently store them, disable unnecessary ones, etc. The program is in English, but everything is clear.
Important!!!
When starting the NMM manager, if you get a window with errors, then look at the first lines in the window, you will be shown the incorrectly set esp mod names. in the launcher, arrange everything as they write to you and start NMM again, if there is a window with errors again, then continue to arrange the mods that are written in the window)
Updated 0.71.1:
- fixed bugs that led to crashes
- improved work with archives
Updated 0.70.11
- fixed a bug with importing load order that did not handle .esl files
- optimized code for faster loading of plugins
- fixed enabling official unmanaged plugins showing as disabled
Updated 0.70.9:
- fixed bug with category filter reset
- fixed installation of .PDB files
- removed an unused tool in the game Enderal
- fixed bug of spaces in archives
- improved display of logs
Update: 0.70.5
- Known bugs fixed
- Added support for the latest Windows 10 update
Update: 0.54.10 (for Windows 7,8, Vista), 0.52.3 (for Windows XP)
- For Windows 7.8, Vista
1. Bugfix: Fixed problem with mod loading order caused by empty Plugins.txt files (broken plugins will be ignored)
2. Bugfix: Fixed boot order / plugins with backup not being able to get path to AppData on some systems
3. Bugfix: The problem caused by invalid files in userlist.yaml has been fixed.
- For Windows XP, the version has not been updated
Changelog:
All changes and updates of all versions can be read in the readme in the archive
Features of the program:
- choose and install downloaded mods
- manual sorting of installed mods
- correct removal of installed mods (no need to look for files to delete in the game folders, the program itself will clean everything up)
- Archive Invalidation support
- start the game.
Installation:
1. There are 2 options in the archive, for Windows Vista, 7.8 and for Windows XP, select the option you want, run the exe. programs
2. Install
3. Launch Nexus Mod Manager
4. Choose the game you are using (there will be several games, tick Skyrim)
5. Select the folder with the game (the program should automatically detect the folder with the game and find it)
6. Optional!!! Register here: Nexus and enter your login and password information. That's all.
7. To register, you must have a mailbox account on Google.com and it should look like this [email protected]
Other mailboxes like mail.ru and yandex.ru Nexus will not register!
8. Registration on the Nexus is OPTIONAL
Many of the avid computer game lovers know how a high-quality game mod transforms the game. The detail of textures improves, the game AI grows, new characters appear, the fun of the gameplay increases. At the same time, the installation of a new mod can be associated with the whole destruction of minor problems that could potentially nullify all the advantages of this mod. This is where special programs for installing mods come to our aid, and I will focus on one of them, called "Nexus Mod Manager" in this material. In which I will tell you what Nexus Mod Manager is, how to install it, and how to use this program on your PC.
What is Nexus Mod Manager
Nexus Mod Manager (NMM) is a free and open source software that allows you to download, install and update mods for a line of popular games.
The functionality of NMM is fully automated, all processes are performed in a couple of clicks, saving the user from various installation routine. Disabling (uninstalling) a previously installed mod is carried out no less quickly, allowing you to avoid wasting time searching and deleting the corresponding files in the body of the game.
To install the desired mod, you just need to select it, then the Nexus Mod Manager will download and install this mod in the desired game directory on your PC.

Among the games supported by NMM is the popular action / RPG "Fallout 4"
How to download Nexus Mod Manager
- In order to start using the Nexus Mod Manager, you will need to download this program from the Nexusmods.com website.
- Go to this site, click at the top on the inscription "not logged in", in the window that opens, select "create an account".
- On the page that opens, click on the "Register" button on the right (nexus mod manager registration), scroll down the page that opens and click on the "Create Account" button.

Click on "Create Account" to create an account
- In the registration window, enter your name or nickname (Username), e-mail, password to your account (Password), again the same password (Confirm Password), enter your gender (Gender).
- Then you will need to answer in English a question from a program that wants to make sure you are not a bot.
- If you do not know English at the proper level, then I recommend using translation programs that will help you give the English version of the correct answer to this question.
- Then enter the captcha in the appropriate row, put a tick in front of “I’ve read and agree to the Terms of Use”, and click on the “Create Account” button.
- An email will be sent to your e-mail with confirmation of registration, and after clicking on the appropriate link in it, you will be able to enter the site under the previously selected username and password.

Now download Nexus Mod Manager by choosing the appropriate version for your operating system and install this program on your PC.
How to use Nexus Mod Manager
When NMM is launched for the first time, it will automatically search the PC for supported games. If necessary, you can interrupt the process by yourself setting or unchecking the necessary games. If the Nexus Mod Manager application does not find at least one of the supported games, it will terminate early. You can directly tell the program the path to the game, without having to wait until NMM finds the game on your computer (click on the button with three dots next to the name of the game you want).
Then you will need to select one of the installed (and found by NMM on your computer) games, with the mods for which you want to work.

If you want to change the game you are currently working with, then click on the button in the upper right corner (Default game). You can also scan your computer again for NMM-supported games by clicking on "Rescan Installed Games".
There are two main tabs on the main screen - "Mods" (Mods) and Plugins (plugins for mods).

To install the mod, you will need to find it on one of the Internet resources. For example, you can use the already mentioned site Nexusmods.com, which contains a huge number of mods for games supported by NMM (for example, mods for the game Fallout 4).
- Go to Nexusmods.com, click on the "Files" tab, click on "Browse files".
- Select the desired mod, in the opened mod description window, go to the "Files" tab.
- Here you click on the button "Download with manager", select the download using the auxiliary tool "Nexus Mod Manager", and click on "Open link".
- The selected mod will be uploaded to the PC using NMM and will appear in the program's mod list. To activate it, click on it, and then click on the button with a large green checkmark on the left.
- To manually add a mod that is already available on our computer, just click on the green plus sign in the main NMM window, and show the program the path to the desired mod on the hard disk.
- After downloading it, and appearing in the list of available mods, it must also be activated by clicking on the green checkmark.
- To start the game with the mod we have chosen, click on the large button on the top left "Launch (game name)".
- If you need to disable a previously installed mod, then click on the desired mod and on the left select "Diactivates the selected mod" or double-click on the line with this mod.
Video on installing and using Nexus Mod Manager:
Conclusion
To use the Nexus Mod Manager, you need to register on the Nexusmods.com website, and then download and install NMM on your PC. It is quite easy to use the program, the interface is simple and straightforward, the control of the program will not cause any special problems for the user. Use NMM to work with mods, this will make it much easier to work with them, and the gameplay thanks to the installed mods will shine with new, bright colors.
First, I'll tell you what Nexus Mod Manager is. It is a utility that helps you install mods for your favorite games. It simplifies the installation of mods up to a couple of mouse clicks, which in turn saves you valuable time.This tutorial will answer three questions:
- Installing and configuring Nexus Mod Manager.
- Enabling mod support in Fallout 4 and more.
- Installing the mod.
- XCOM 2
- Fallout 4
- TES V: Skyrim
- TES V: Skyrim Special Edition
- Fallout: New Vegas
- Fallout 3
- State of decay
- TES IV: Oblivion
- TES III: Morrowind
- Dark souls
- Dragon age 2
- Starbound
- War thunder
- World of tanks
- Dark souls 2
- Dragon 's Dogma
- The Witcher 2
- Dragon age origins
- Legend of Grimrock
- TES: Online
- The Witcher 3: Wild Hunt
- X Rebirth
Today there are two ways to install mods in Fallout 4: this is installation using the Nexus Mod Manager utility or manually. The first method is convenient and simple, although it requires installing the utility, but the second is inconvenient in that you need to copy files by hand, and for some mods there is more and its own installation features.
The great advantage of the NMM program is that you do not have to download each mod for Fallout 4 separately, and then manually copy the files to the game directory, adjusting the configuration files. This not only can replace the necessary files and the game will stop running, but it is also inconvenient and often incomprehensible.
Registration on Nexusmods.
To download NMM (Nexus Mod Manager), you need to register on the off site.
Registration:
Registration on the Nexusmods website is needed both for downloading add-ons and for the Nexus Mod Manager utility to work. A short description on how to register.
How to download?
Nexus Mod Manager is no longer supported. You can download the latest version from GitHub. You need to download the file Nexus.Mod.Manager-0.65.11.exe
To download NMM, go to your Nexusmods account and click Instal NMM:
In the page that opens, we see the following:
Click:
- Download (Vista, Win7,8,10) - For Windows Vista, 7,8,10.
- Download Legacy (Win XP) - For Windows XP.
How to install?
For the utility to work correctly, you need NET Framework 4.6.1
After downloading, run the file:
Installation process:
Step 1
After launching, we see the following:
Push Next>
Step 2
We agree with the license agreement. Check the box next to "I accept the agreement" and press Next>
Step 3
Push Next>(read if you like)
Step 4
Select the directory where we want to install NMM.
Step 5
Create a folder in the Start menu. Push Next> If you do not want to create a folder in the Start menu, then put a check mark next to - "Don" t create a Start Menu folder "
Step 6
Enabling mod support in Fallout 4
- Open the file Fallout4Prefs.ini and find the category in it
.
Add the following line below this line:
bEnableFileSelection = 1
- Save your changes and close the file.
- If you are playing on a version of the game below 1.2, open the file Fallout4.ini and find the following text in it:
sResourceDataDirsFinal = STRINGS \
- Replace it with this:
sResourceDataDirsFinal = STRINGS \, TEXTURES \, MUSIC \, SOUND \, INTERFACE \, MESHES \, PROGRAMS \, MATERIALS \, LODSETTINGS \, VIS \, MISC \, SCRIPTS \, SHADERSFX \
- Save changes and close the file.
- If you are playing on a version of the game below 1.2, open the file Fallout4.ini and find the following text in it:
- If you have patch 1.2 or higher installed, then make changes to Fallout4.ini not necessary but needs to be changed Fallout4Custom.ini(If there is no such file, then create it).
- Open up Fallout4Custom.ini and add lines like this to it:
bInvalidateOlderFiles = 1
sResourceDataDirsFinal = - That's it, now the game is completely ready to install mods. Despite the seeming complexity, it's simple, and you only have to do it once. But mods can now be installed in a couple of clicks.
First start.
- After the first launch, we see the following:
The program looks for games on your computer that support mods. In order not to wait, we press the button Stop searching, as the utility will quickly find all installed games that support mods.
- Then we click on the green checkboxes for those games for which you will install the mods. (For example Fallout 4) If you do not want to install mods on the found games (for example Fallout 3), click on the red cross 2 times. (In some cases, 1 time)
- After choosing which games to bet on and which ones not to, press ok. And we get the following result:
Click on the red figure in the lower left corner and enter the login and password with which you registered on the Nexusmods website in the window that appears.
Given the somewhat technical boringness of this article, I'll tell you about the installation using the example of a modification that emphasizes the femininity of the main character of the game, dressing her in rather attractive clothes. Also, these clothes can be worn by a partner or any settler. Here's a link:
On the page with the mod, we are only interested in the three left tabs of the menu:
- DESC
- FILES
- IMAGES
As you might guess, the first item contains a description of the mod, the second files for downloading, and in the third you can see screenshots.
On the FILES tab, press the green button "DOWNLOAD WITH MANAGER" to download the mod. Usually there are several versions of the modification on the download page, but you need to select the most recent one (just look at the release date). Or select “download manually” to download the mod manually. Then you should definitely look at the "DESC" tab to learn how to install it.
During pressing "DOWNLOAD WITH MANAGER" the manager program must be open. Nexus Mod Manager will start downloading files, after which you will see this mod in the program interface.
Activate the downloaded mod by clicking on the green checkmark in the manager window. If the mod has an ESM or ESP file (these files determine the order of loading), then open the "Plugins" tab and activate everything that is there by checking the boxes.
That's it, the mod works! All that remains is to launch the game and enjoy the new features.
 Wireless Charging Smartphones A5 Supports Wireless Charging
 Why do not MTS sms come to the phone?
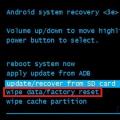 Why do you need a full reset on Android or how to return Android to factory settings