An extra sheet in the Word is not deleted. How to delete a blank page in Word - instructions with animation. N-th sheet in a bulky document
When editing text documents in the Word editor, there are situations when a blank page comes across between the text, which refuses to be deleted. In this article, we will show you how to remove a blank page in the middle or at the end of a Word 2003, 2007, 2010, 2013 or 2016 document.
Usually, there is nothing difficult about removing blank pages. It is enough to put the cursor at the end of the page and erase all the text, or select all the text and delete it by pressing the Delete key. But, there are situations when such a plan does not work and it is impossible to delete a blank page. Despite all the efforts of the user, a blank page may remain in the middle or at the end of a Word document.
As a rule, such problems arise due to non-printable characters that remain on the page and, being invisible, do not allow themselves to be deleted. In order to get rid of such characters and delete a blank page in the Word, you need to perform just a few steps.
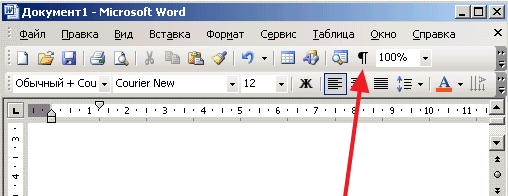
First you need to enable the display of non-printable characters. If you have Word 2007, 2010, 2013 or 2016, then you need to go to the "Home" tab and find the button " Show all symbols". After clicking this button text editor The word will start displaying all the characters, and you can remove all unnecessary from the page, after which you can delete the empty page itself. Also, in modern versions of the Word editor, the CTRL + SHIFT + 8 key combination works with which you can quickly turn on and off the display of hidden characters on the page.
If you have Word 2003, then it also has such a button. Explore all the buttons on the toolbar and you will definitely find it.
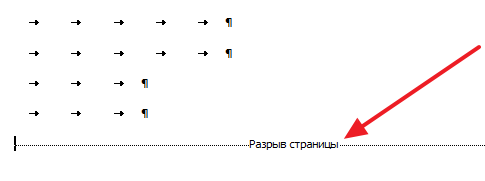
After you have turned on non-printable characters, you can start deleting the blank page in the middle or at the end of your Word document. To do this, go to this page, select with the mouse everything that is there, and press the Delete key on your keyboard. This way you can remove line breaks, tabs, page breaks and section breaks that previously prevented page deletion. If page or section breaks do not work, then try positioning the cursor in front of such a break and press the Delete key again.
If, after deleting a blank page, you need to restore section breaks, you can do this using the "Breaks" button located on the " Page layout».
May the Word gurus and its creators forgive me .. If you have a more rational solution to the problem with the last section and the last page, please let me know in the comments.
The abundance of questions “how to delete the last page in Word” and “How to preserve formatting in Word after deleting a page” (more precisely, the question sounds more like this: why, when I delete a page in Word, everything creeps in), were the reason for writing this note. I do not consider myself to be an expert on WORD, so I do not exclude that there is a more correct (correct, convenient ...) solution.
Quite often, when editing WORD documents, you can encounter a situation when the last page turns out to be empty (the plate is over, and behind it is another sheet). What to do?
How to delete the last page in Word?
First of all, go to the last page and see what is there? If there are a lot of characters (paragraphs or spaces) - just put the cursor at the beginning of the page and press DEL (ete) until everything is deleted. If there is only one paragraph character left and he does not want to be deleted - press BackSpace once - it is possible
Most likely, the reason is that the very last character in the document simply did not fit on the penultimate page. Most often, it helps to position the cursor on the last page and reduce the font size of the last paragraph (say, make it equal to 1 or 2 - you can not only choose from the drop-down list, but also write with "pens"). You can also reduce the vertical indents of the same paragraph .. in general, make the last paragraph "fit" into the remaining free space.
Often a formatting issue occurs when deleting the last page. More specifically, when the last section is deleted, its formatting is applied to the previous (penultimate) section. I did not find how to delete a section without formatting "failure" (if anyone knows - share in the comments), but a little trick that allows you to delete the last sheet while preserving Word formatting.
How to delete the last section in Word
First of all, go to the section with the required formatting (penultimate), and go to the Page Settings window ( double click on the ruler or the File-Page Setup menu). We write down all the values for the fields (you can just erase the centimeters .. The fact is that they are already set .. but if you do not touch them, then when you select “apply to the entire document”, all the values will become empty), select the paper orientation, go to tab Paper source and select start section “On current page”.
Perhaps (if the formatting of the last deleted section differs from the previous one), additional changes will be required, but in my case (there was a “horizontal” plate on the last sheet that needed to be deleted) the described changes were enough.
After setting all the properties in the lower drop-down list, select “Apply to the entire document” and click “OK”. After that, boldly go to the penultimate page and transfer the section break to it - delete the characters before the break, but not the page break itself. To reduce the required space for the last paragraph, you can reduce the font and vertical indents (as in the first part of this article)
PC users, when working with, are faced with the fact that a blank sheet accidentally appears in the document itself. And here, if it is planned to output it to double-sided printing, the user is faced with a problem, since it is a blank sheet that can ruin everything. The question arises how to delete a sheet in the Word.
To work, you need the software of the used Word.
How to remove a blank sheet in a Word?
To understand the reason for the appearance of white space and to answer the question of how to delete a page in word, you need to look at those characters that do not print. This is done as follows: on the toolbar, click the button located near the buttons of the drawing panel and the document scheme. It happens that this panel is not displayed in the editor window, in this case, you need to click the "View" menu and put a tick on the "Standard" item in the toolbar.
After the button has been pressed, a plurality of different characters, which were not visible before, dots and other signs. This way, unnecessary spaces can be removed. You want to view the entire document, which will reduce it by a few lines. If it is large enough, then the volume can be reduced even by a whole paragraph.
It is necessary to look very carefully through all the pages in the Word until you find a lot of dots. It is required to remove such an element, since there is a high probability that it was he who caused the empty characters to be transferred to another page.
If you cannot remove this element, to answer the question of how to delete a blank page in a Word, you can try another option: try all the deletions of this value. In addition, deletion can be performed not only using the Delete button, but also Ctrl + X or Ctrl + Backspace. The latter is usually used to remove a word from the text.
It also happens that the method with non-printable characters does not help, then you should try using editing. How to make editing in a Word? To do this, use the "Web Document" mode, which can be selected in the "View" menu by clicking the appropriate tab. After editing is complete, you need to remember to change the view mode back.
If the question arises of how to delete not one page, but several at once, then you need to put the cursor in front of the sheet that you plan to delete initially, and scroll to the document that you want to get rid of last. As a result of such manipulations, all unnecessary should be selected. It remains only to press the Delete or Backspace button.
Instructions on how to delete a blank page in Word
These blank pages can appear for a variety of reasons. But they appear especially often when the user adds tables or pictures to the document. With the latest Word still does not know how to work normally. Of course, it is not pleasant enough when your document takes the form of some kind of monster. Fortunately, you can easily fix this. There are several ways to remove a blank sheet in a Microsoft Word document. And they are not particularly difficult.
Removing an extra page without text
Read also: How to flip text in Word: The easiest ways for Word 2003-2016
You can't do it just like that. You can lose all the written text. But in the Vord there is a very interesting tool that will make this process more convenient. It is available in almost any version. Microsoft Office... Even in 2003.
It is worth noting that many users are not even aware of the existence of this tool. But it is very useful and can help you quickly fix the formatting of the text. However, let's get down to solving the problem.
You need to do the following:
Launch Microsoft Word and open the document containing the page to be deleted.


After that, the document will immediately bounce back, and the blank page will disappear.
Now you can turn off the display of a hidden element and render the document in a more familiar form
However, in some (especially severe) cases, this option does not work. But there is alternative ways solving the problem. And we'll talk about them in the next chapter. Moreover, they are just as simple.
VIDEO: How to remove or remove an extra empty unnecessary page in Word 2016
How to remove or remove an extra blank unnecessary page in Word 2016: in the middle, at the end of the document
Remove page break
Read also: How to recover unsaved, damaged or deleted Word document (Word)? Methods for all versions 2003-2016
Page break is set in MS Word document by default. In theory, it should properly format the page of the document for subsequent printing. But in reality, the entire document is sometimes scattered across different pages. And this is not very good.
Due to page break, sometimes blank pages appear in the document as well. Therefore, you need to know how to remove it correctly. This component is hidden from users' eyes. Therefore, you have to work a little.
Here is the instruction:
Open Microsoft Word and load the required component. In the tab "Home" looking for a button "Replace" and click on it.

In the window that appears, click on the button "More".
Now at the very bottom of the window, click on the button "Special" and in the menu that appears, click on the item "Page break".

Sometimes, when typing or editing it, situations happen that you need to delete an extra page with text or even a blank one, which will interfere with you in the future when printing or saving a document. Let's try to understand this process.
Delete blank page in Word
There are several ways to remove a blank page. The simplest of them is the use of the "Backspace" or "Delete" keys. To delete a blank page following the page with text, you need to put the cursor at the end of the previous page and press "Delete" on the keyboard. And if you need to delete, on the contrary, the previous blank page, then you need to put the cursor at the beginning of the next and press the "Backspace" button.
There is another method, deleting a blank page, it can be deleted using the non-printable characters icon.


Delete a filled page in Word
After we figured out how to delete blank pages, let's further figure out how to delete a filled page in Word with text, images or other information. This process does not take much time and does not require special knowledge from you. What is needed for this:

That's the whole procedure - the page in Word has been removed. Congratulations, you have learned several methods on how to delete a page in Word 2007 or Word 2010.
 Why does the blue screen turn on on the iPhone Blue screen on the iPhone 5s what to do
 Everything you need to know about Apple Music
 How To Set Up An iPhone Like New From Zero - Detailed Instructions