How to distribute your internet. How to distribute the Internet from a Yota usb modem over a local network in Windows
Hello friends! Today I needed to connect the usual stationary computer to the Internet in order to update the antivirus on it. It doesn't have Wi-Fi, and it's very difficult to connect a network cable directly to the router, it's just that the router is not installed in a very convenient place. And my laptop is connected to the Internet via Wi-Fi and I decided to try to connect a stationary computer to a laptop using network cable and using a network bridge to distribute the Internet to a computer through a laptop.
Everything is somehow confused :). But now everything will become clear. I thought that perhaps not only I may have such a situation and my advice may be useful to someone else.
This means that I had Internet on my laptop, which I received via Wi-Fi. The task was as follows: to connect a stationary computer with a laptop via a network cable and make it so that the computer and laptop had access to the Internet, and not just a network.
Setting up a network bridge
The laptop has the Internet. We connect a computer to a laptop using a network cable (how to crimp the network cable, see the article)... On the computer, the Internet connection status will be a network without Internet access. We need to make sure that there is access to the Internet.
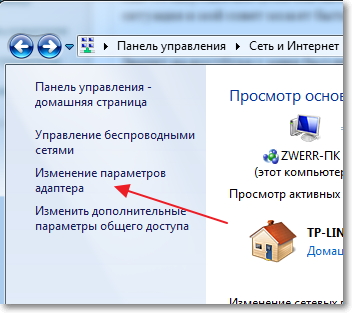
To do this, go to Control Panel – Network and Internet – Network and Sharing Center (or press right click on the status of the Internet connection in the tray and select "Network and Sharing Center")... Then, on the right, select.
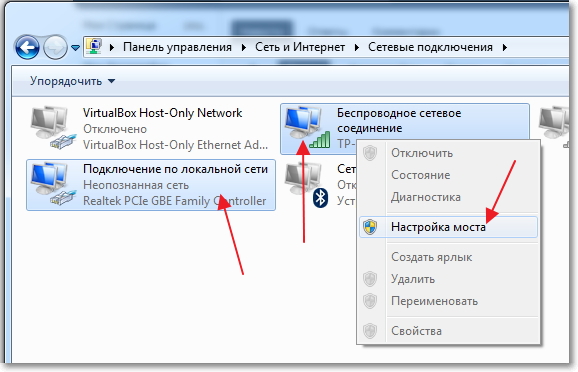
Hold the key Ctrl and select two connections. I have it Wireless network connection (through which the laptop is connected to the Internet) and Connection by local network (this connection is used to connect the computer to the laptop via a cable).
Select these two connections and right-click on one of them. We choose.
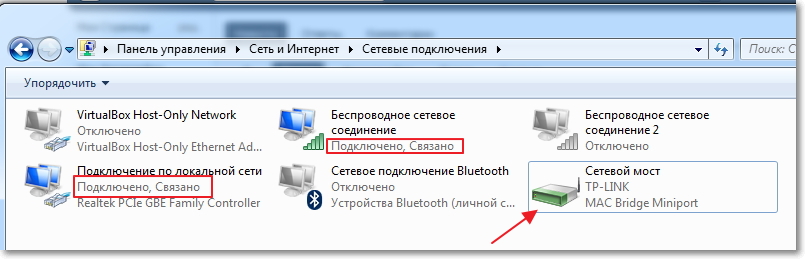
We wait a little while the bridge settings are created and we have a new connection “Network bridge” ... And two connections, wireless and LAN connection should get status "Connected, Connected".
If, during the creation of the Network Bridge, a message appears that it is impossible to continue because one of the connections is configured to share the Internet, then do this:
Right click on one of the two connections and select "Properties"... Then go to the tab "Access" and see that there is no check mark next to "Allow other network users to connect to the Internet ..." If this checkbox is checked, then uncheck it. Also check another connection.
On a computer that is connected to a laptop via a network cable, the Internet should appear, by at least, it all worked for me. I updated the antivirus on my computer and I no longer need the Network Bridge. If you also want to delete the Network Bridge, then just right-click on it and select "Delete".

If you encounter problems during setup and connection, try disabling your antivirus. Very often they block all kinds of connections.
That's all I wanted to tell you in this article. Perhaps my advice is useful to you.
Hi, if you have a Yota usb modem and several computers, then for sure, sooner or later you will want to make sure that the rest of the computers use the Internet connection that comes to the computer where the modem is connected. Below I will show you how you can share the Internet from USB modem Yota.
I'll make a reservation right away that this is essentially a repetition of the article, but with a description of actions for a specific case. In general, it is better to share the Internet through general access to the Internet, but for some reason this does not work with iota.
In order to implement your plan, you must have your own modem itself, and network interface, to which other devices will connect (by the way, it is not necessary that they be connected directly, it is possible through a switch or router, for the latter it will be necessary to disable nat, and specify the main gateway in the settings - the gateway that is registered on your computer).
We go to the Network and Sharing Center (you can click on the network icon next to the clock, right-click and select the appropriate item, or go through the control panel). Here we go to change the adapter parameters.
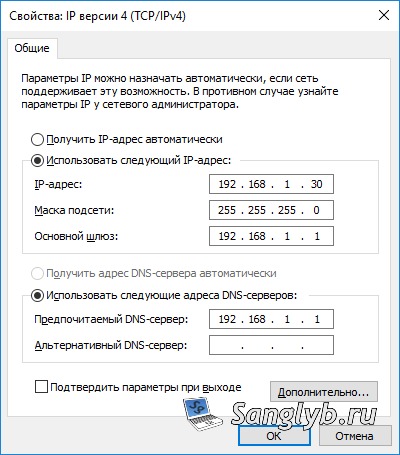
Unfortunately, I don't have a modem at hand now, so here you will have a different adapter to which the Internet comes, namely the NDIS adapter, but this does not play a special role, go to its properties, go to IP version 4, and click again properties. Remember or write down the information that you see (ip address, mask, gateway, dns servers).
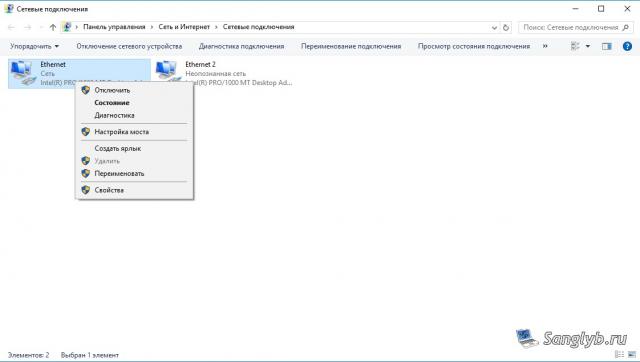
Then close the properties windows, select both of your interfaces (if you have more of them, and you want to distribute the Internet to all interfaces, select all), right-click and select the bridge setting.
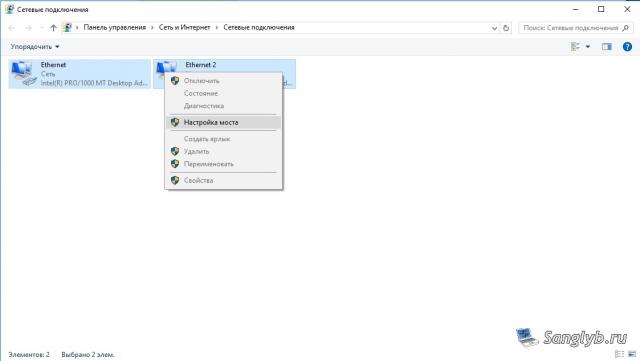
You will have a new device - a network bridge.
![]()
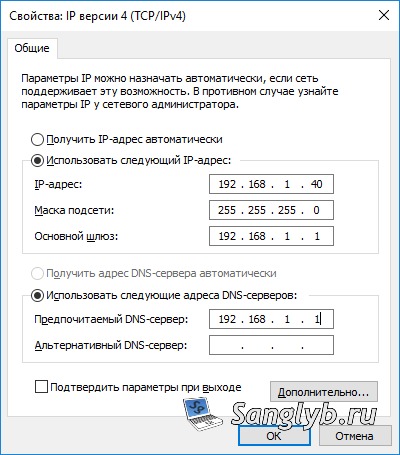
Now you need to go to its properties, go to the properties of IP version 4, and drive in the information about the network that you remembered before.
Actually, this is the end of the setup, you can configure other computers, for this you also need to go to network connections, in properties network adapter and drive network settings... It is necessary that the address be in the same subnet as the computer with the modem, that is, for example, if you have the address on the main computer - 10.0.0.10, mask 255.255.255.0, gateway 10.0.0.1, dns server 10.0.0.1, then and on the second computer there should be all the same settings, except for the address, the address must be different, i.e. for the computer, you can set the address, 10.0.0.11 or 10.0.0.20, etc. Please note that we set the gateway the same as on the computer with the modem, and not the address of this computer.
Often the computer is connected to the Internet using a cable. But what if you need to connect multiple devices. To do this, you need to create home wifi network with Internet access. This raises the question of how to share the Internet via WiFi on a computer with Windows 7?
The Internet is something that almost no person can do without today.
It opens up a lot of new possibilities, and also greatly simplifies life. He helps with study, work, entertainment, finding the information you need and much more. Thanks to the Internet, we can find out the answer to any question. However, it is not always available for all devices.
It is worth noting that in order to share the Internet via WiFi in Windows 7 for other devices, you need to create home group, into which it will be possible to combine required computers, laptops, tablets, smartphones and so on. In this case, the Internet will be available only to network members.
How to do it?
Nowadays, there are several ways to organize the distribution of the Internet via WiFi:
- Share via built-in Windows 7 tools.
- Install a third-party program.
It should be noted that share the Internet via WiFi using standard Windows tools 7 can be done in two ways:
- Through settings wireless connection computer-computer.
- Using the command line.
So, let's take a closer look at how to share the Internet via WiFi in Windows system 7.
Sharing the Internet via WiFi in Windows 7: Video
Organization of Internet distribution via WiFi using the command line
Moreover, the second method is more stable and simple. You only need to know a few specific commands. This method of distributing the Internet via WiFi is only suitable if the adapter driver wireless supports Virtual FiWi function. But it is worth noting that any modern laptop has such a function, and in case of problems, you just need to install or update the driver for the WiFi adapter.
The first step is to go to Task Manager and update the wireless adapter driver. After that, you can start organizing home network... To do this, hold down the "Windows" key on the keyboard and, while holding it, press the R button. In the window that appears, you need to register cmd. This will invoke the command line.
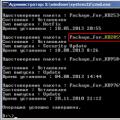
Here you need to register the following: netsh wlan set hostednetwork mode = allow ssid = My_virtual_WiFi key = 12345678 keyUsage = persistent. This is a command that creates a virtual home network to which other devices will connect in the future. SSID = MyvirtualWiFi is the name of the group. Instead of MyvirtualWiFi, you can write any other name. Key = 12345678 is the password to connect to the group. The required password is also indicated here. After you have registered the command, you must press Enter on the keyboard. It should look like the picture.
If everything is done correctly, then a new hardware will appear in the task manager - “Microsoft virtual WiFi mini-port adapter”. In addition, a new wireless network connection will appear in the Network and Sharing Center. 2. This means that everything is done correctly.
Now you need to share the Internet for the created group. To do this, in the Network and Sharing Center, go to “Change adapter settings”. In the window that appears, you need to find the connection through which the computer receives the Internet. We need to go to the properties of this connection by right-clicking on the shortcut.
Here you need to go to the “Access” tab and in the “Home network connection” item select the created connection, which is called “Wireless network connection 2”. You also need to check the boxes for "allow other network users to use the Internet connection this computer... Click "OK" and close all windows.
Related Articles
This completes the setup of the distribution of the Internet. It remains only to start the created network. The following commands are used to start and stop the created network:
- Start virtual group - netsh wlan start hostednetwork
- Stop virtual group - netsh wlan stop hostednetwork.
How to Create a WiFi Hotspot Using the Command Line: Video
Distribution of the Internet using special software
There are a lot of such programs, and each of them has its own advantages and disadvantages. However, they all work according to the same principle, so their settings are reduced to setting three main parameters:
- The name of the group.
- Password to connect.
- Select the connection through which the computer gains access to the Internet.
Since all programs have almost the same settings, let's look at how to share the Internet via WiFi in Windows 7 using the Conectify Hotspot program. This is the most widely used free software.
So, download and install the program. During installation, it will ask you to restart your computer. This is required to install the driver. After that, we launch it. In the window that appears, you need to fill in all the lines. We do it as follows:
- Hotspot Name is the name of the virtual group to be created (SSID). It can be anything you want.
- Password is the password you will need to enter to connect to the group. You have to come up with it yourself.
- Internetto Share is an adapter through which your computer is connected to the Internet.
- Share Over is a wireless adapter that is required to share the Internet.
- Sharing Mode is a type the network being created... It can be open, Wep, WPA-2. It should be noted that the last option is the safest.
After setting all the settings, click “Start Hotspot”. That's it, this completes the setup.
How to easily share Wi-Fi in Windows 7 with Conectify Hotspot: Video
It should be noted that the first method allows you to use WiFi to receive and share the Internet at the same time. In the second case, this is impossible. Therefore, the Connectify Hotspot program allows you to share the Internet if your PC is connected to the Internet using a cable.
 Customizable software
 Windows 8 will return the start button
 Installing Skype on a computer (step by step instructions)