Computer power connector. Pinout of the computer power supply. Modern power supplies
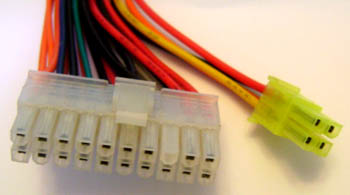
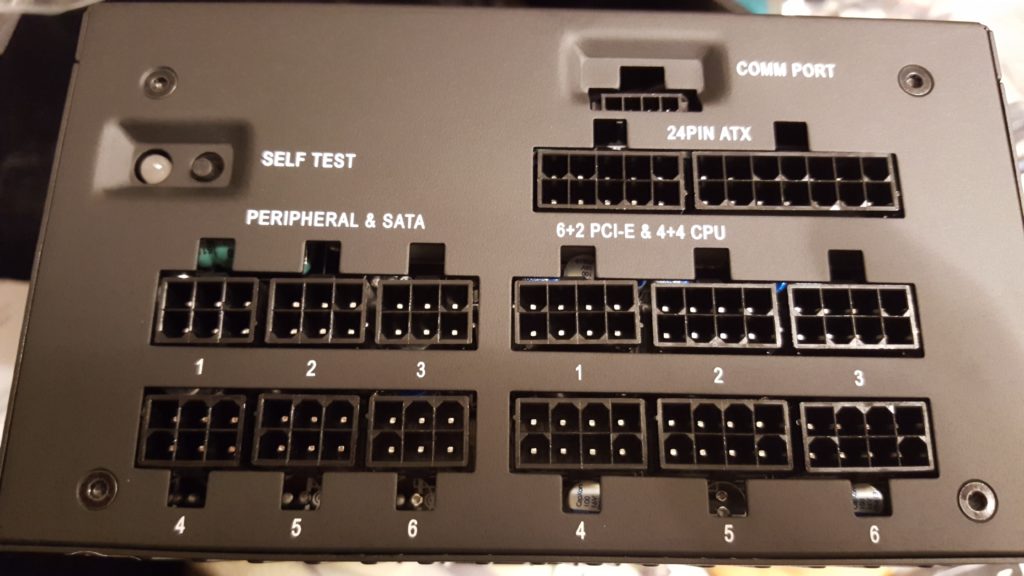
Modular power supply
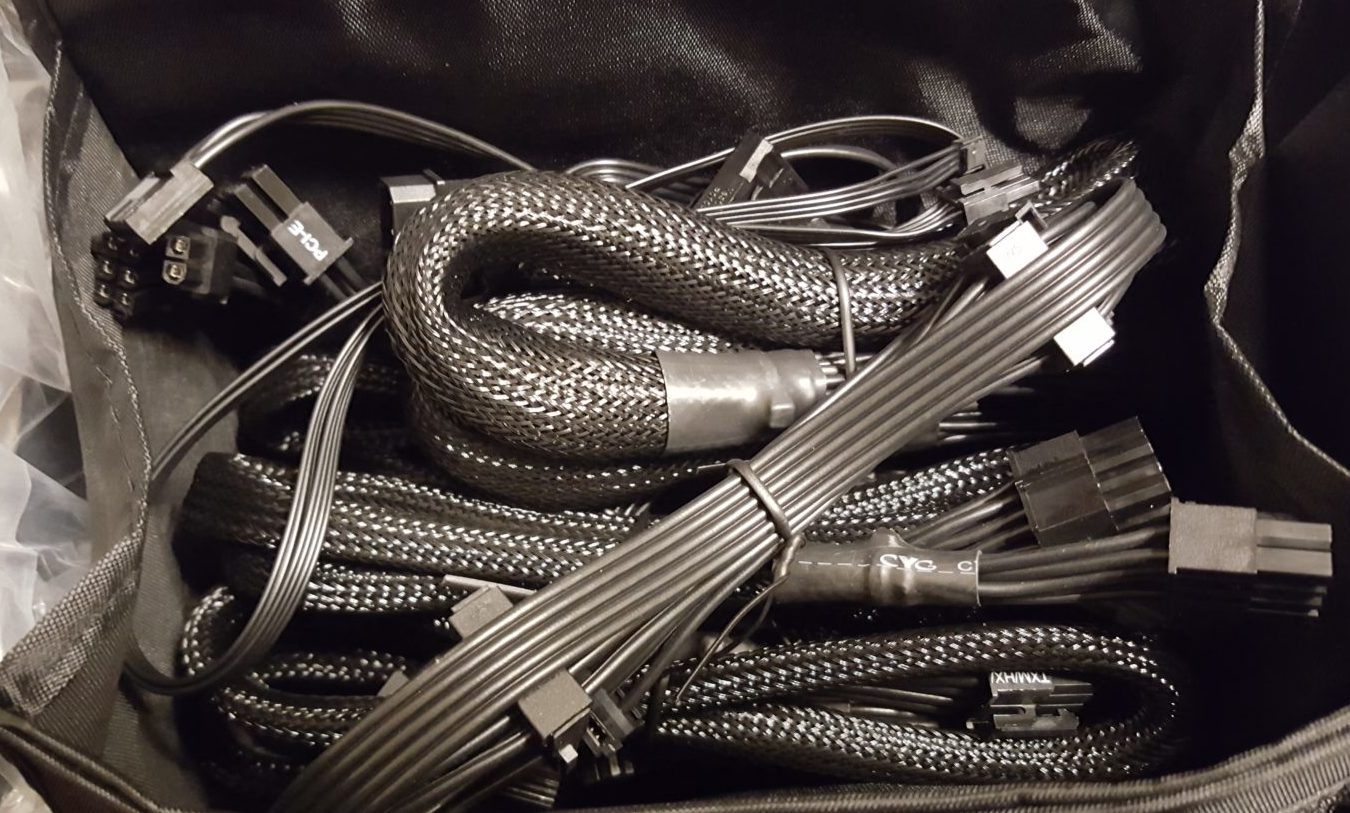
Before looking at the main connectors, it is necessary to mention simple PSUs and power supplies with modular cables. Cheap power supplies have all cables pre-installed. And therefore, unused cables will dangle inside the case, impairing air circulation and possibly aesthetics if your case is system unit transparent.
If you need good air exchange inside the case and a beautiful appearance is worth purchasing a modular power supply. In such a power supply, the most important cables are already connected, and the rest can be connected via modular connectors. It is clear that reducing the wires improves air exchange, and protruding wires will not spoil the appearance.
In general, the answer is that it is better to have more fans at low speed than fewer fans at high speed. What's more, each fan added usually adds less noise than the last. On the other hand, a doubling of the airflow moving a fan usually means a significant increase in its speed and noise, usually more than doubling.
Therefore, in view of the above, it is worse to place one fan moving a certain amount of air than two movements along each half. The noise of the two fans together will be much lower than the noise of the other alone, moving the same amount of air in both situations. Of course, you need to find a balance between the number of fans and their speed, as adding fans increases the buzz.
Modular power supplies
Power supply connectors
When choosing a power supply, the first step is to pay attention to the interface standard (). The power supply standard must match the motherboard standard.
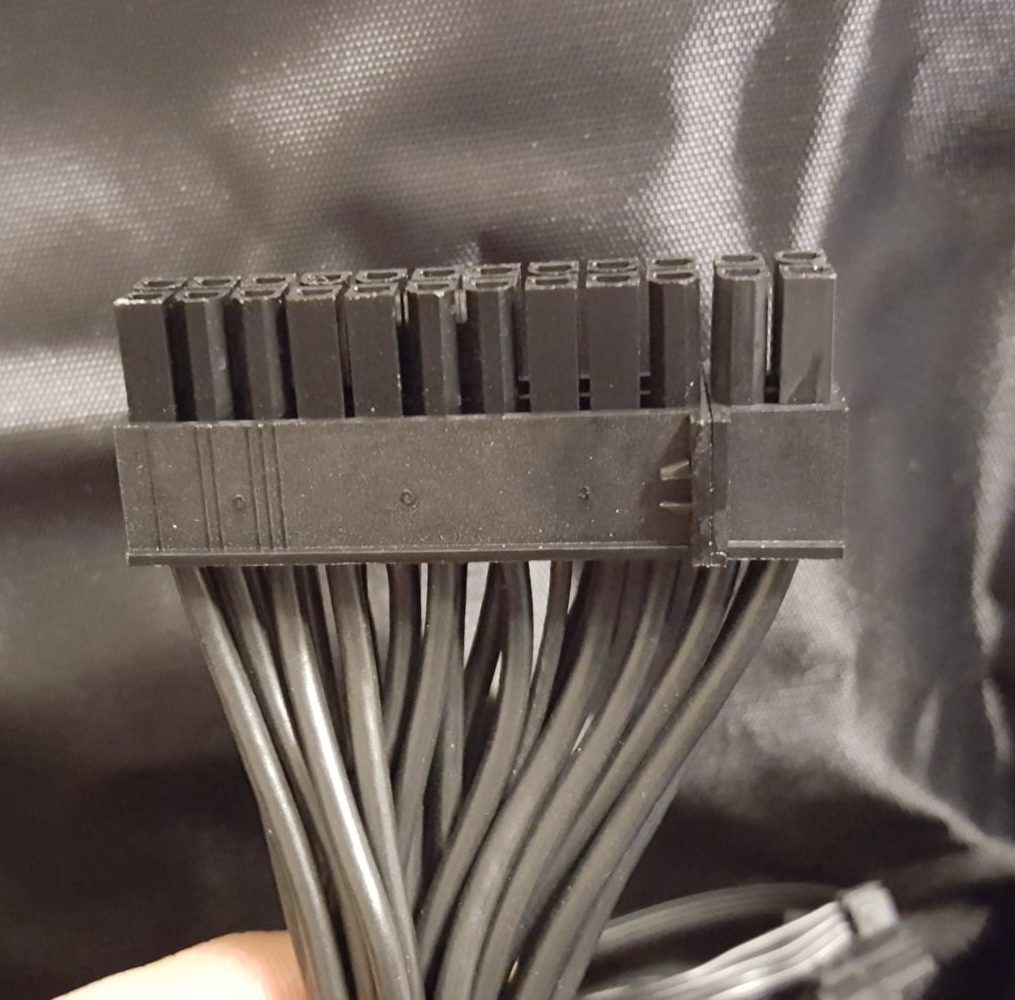
In 2003, the main power connector for the motherboard was expanded by 4 pins: from 20pin to 24pin. This was necessary to support PCIe graphics cards that draw up to 75 W from the motherboard.
But it is important that practice confirms what we talked about in the previous analysis, and that two fans make less noise than one, assuming that the same amount of air is moving in both situations. A power supply is a component that is often overlooked when setting up or repairing a computer, but is critical to it. correct work... The power supply must provide sufficient power to power all installed components. Installing and wiring a power supply may seem like a daunting task, but as long as you make sure everything is connected correctly and that the power is sufficient, you shouldn't have too many problems.
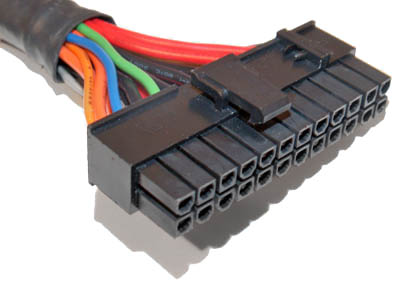
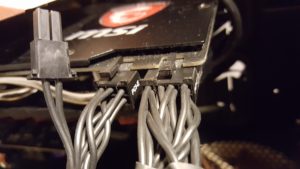
 Main 24-pin power connector and 20 + 4 pin power connector
If the video cards do not have enough power received through the connector, then use an additional 6-pin cable from the power supply.
Connector additional food PCI-Express video cards are similar to the additional power connector for the processor.
Wire marking and designation, connectors
Never open or insert metal objects on the sides of the device as this may result in electric shock.
- If not, try moving the font around them.
- Grasp the power supply when removing the set screws.
- After removing a screw, it may sag, making it difficult to remove others.
- Check carefully before cutting any clip.
- You don't want to cut the cable accidentally!
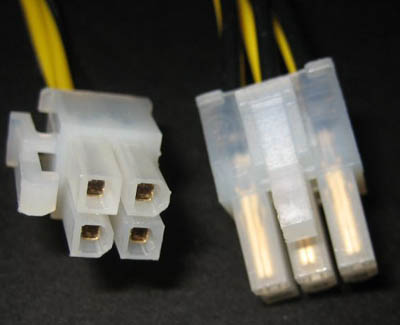 4-pin connector for processor power and 6-pin connector for additional power for PCIe graphics cards
Connector type Molex designed to provide food hard drives standard and other devices (CD-, DVD-drives). But due to the growing popularity of standard hard drives, the number of Molex connectors in power supplies has decreased.
Burning the part can be avoided by using good line filters or surge protectors, but after this event we have to change it. ABOUT US This is a dangerous procedure that, if not followed, can cause permanent damage to your computer or you.
Turn off the computer by plugging in the ac power outlet. Never tamper with the power supply. The risk of electric shock is imminent. Simply unscrew the two screws located on the right rear side of the case and slide the cover back as shown below. Disconnect all cables from the old power source. In some cases, the source will also be connected to a floppy drive and video card. The cables need to be strong and you need to use a little force to pull them out.
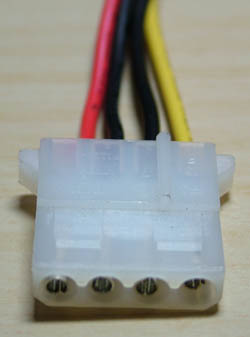 Connectors Molex power supply for hard drives such as ATA and CD-, DVD-drives.
Today, it is not uncommon to see people throwing away computer power supplies. Well, or PSUs are just lying around, collecting dust.
Do not touch the hardware circuit. Static energy stored in your body can burn parts. Two connectors connected to motherboard, have a latch. You need to press down on the pin and then pull the connector upward as shown below.
At the back of the case, remove the four screws that secure the power supply. Then slide the power supply forward and release it away from the chassis. Let's install a new power supply. To do this, cancel the step. Place the new source inside the case and slide it back. Then secure it with four screws.
But they can be used on the farm! In this article I will tell you what voltages can be obtained at the output of a conventional computer unit nutrition.
A small educational program about the voltages and currents of a computer power supply
First, safety precautions should not be neglected.
If at the output of the power supply we are dealing with voltages that are safe for health, then at the input and inside it there are 220 and 110 Volts! Therefore, observe safety precautions. And make sure no one else gets hurt by the experiments!
Connect all source cables to where the old cables were. It is important to remember that all connectors have the correct fit. If you cannot connect them, then the opportunity to try the wrong path is great. Rotate the connector 180º and try again. Never force it.
Some cables will be left behind, and this is completely normal. Just arrange them so that the ventilation inside the computer is not damaged. Just place the cover on the side and slide it forward; reverse step. If the power supply has a voltage selector, make sure the value matches your power supply. If you try to connect the computer to a 220 V power supply with 110 V power, it may burn.
Secondly, we need a Voltmeter or multimeter. With it, you can measure voltages and determine the polarity of the voltage (find plus and minus).
Thirdly, you can find a sticker on the power supply unit, which will indicate the maximum current for which the power supply unit is designed for each voltage.
Subtract 10% from the written number just in case. This will give you the most accurate value (manufacturers often lie).
One of the most important components of a computer is the power supply. If you have already opened your computer, you will likely find a large drawer located in one of the corners of the cabinet. From there come several cables with different connectors, each with a specific function of bringing that DC current into a new part. Can you identify what each connector is for?
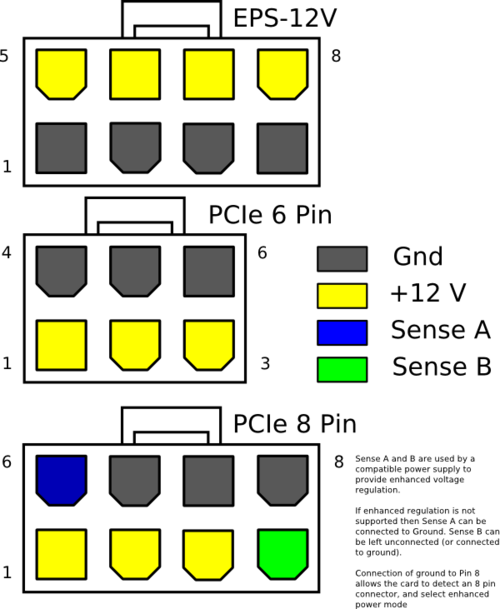
He is responsible for connecting power to the motherboard. In most cases, the 8 pins are split into two connectors to maintain compatibility with previous versions... 6-pin connectors double that capacity. Some graphics cards require two of these for best performance.
Fourthly, the ATX type PC power supply is designed to generate constant supply voltages + 3.3V, + 5V, + 12V, -5V, -12V. Therefore, do not try to get an alternating voltage at the output, but we will expand the set of voltages by combining the nominal ones.
Since the two auxiliary contacts are separate, it can also be used on older models. This connector is responsible for supplying power to HDD... They can carry 3, 3, 5 or 12V to their devices. If the orange wire is missing or not working, you will be limited.
What is a power supply?
But the importance of this is important because it is based on the stability of the system. A desktop computer has several components that can be purchased separately. When you purchase a pre-assembled desktop computer, there is space to plug in the power cord. This is the component we are talking about. Of course, it also exists in a laptop, it is a "transformer" that we connect to the network.
Well, have you learned? Then let's continue. It's time to decide on the connectors and voltages on their contacts.
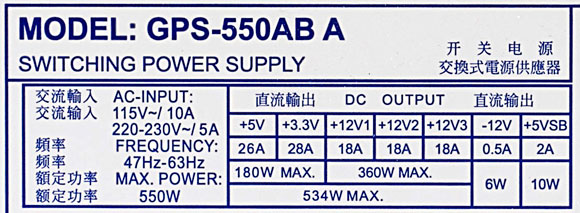
Connectors and voltages of the computer power supply
Color coding of computer power supply voltages
As you may have noticed, the wires coming out of the power supply have a different color. It’s not just that. Each color represents tension. Most manufacturers try to adhere to one standard, but there are completely Chinese power supplies and the color may not match (which is why a multimeter will help).
Many instability issues come from this component. This means that the motherboard, memory, processor, and eventual graphics card should be as good as the applications require, but the box and PSU can significantly exceed the average lifespan of these components as they can be retained in future updates. And these updates were about wanting better, not rejection. All other components were either reused or sold as long as they had a useful life and did not break.
In normal power supplies, the wire color marking is as follows:
- Black - common wire, "ground", GND
- White - minus 5V
- Blue - minus 12V
- Yellow - plus 12V
- Red - plus 5V
- Orange - plus 3.3V
- Green - power on (PS-ON)
- Gray - POWER-OK (POWERGOOD)
- Purple - 5VSB (power on duty).
AT and ATX power supply connector pinout
For your convenience, I have selected a number of pictures with pinouts of all types of power supply connectors for today.
And this is where today's story begins: my excellent 720W power supply failed to handle the system, causing instability and sudden voltage drops, resulting in an unplanned machine shutdown, as well as the motherboard shutting down with the intention of protecting the system from power surges. This happened in situations more load to the system.
His real power was deliberately overstated. The faulty source had about 8 years of electrical abuse with a high-performance, overclocked system that ran for hours every day. 
However, there are other cardboard designs as well. They require compatible fonts that are more difficult to organize and choose. Some require an external transformer and have a small transformer board attached to the inside of the box.
First, let's study types and types of connectors(connectors) of a standard power supply.
The motherboard is powered by a 24-pin ATX connector or a 20-pin AT connector. It is also used to turn on the power supply.

MOLEX is used for hard drives, sidiroms, card readers and other things.
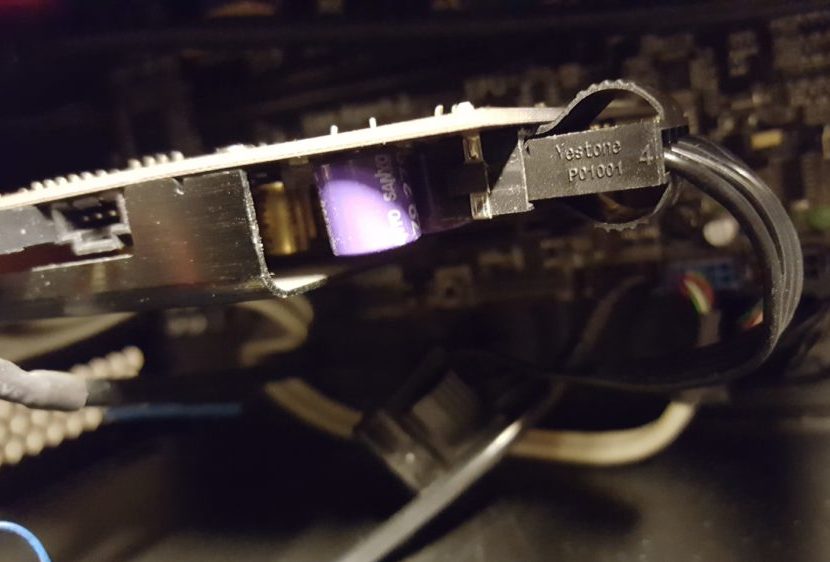
Usually the motherboard has two places for connecting to the power supply. This connection provides the full range of voltages used by the system. It is usually located on the periphery of the motherboard, most often on the right side of the processor.
Fans and other peripherals
This connector comes in two formats, but fonts are usually shaped to adapt to each. 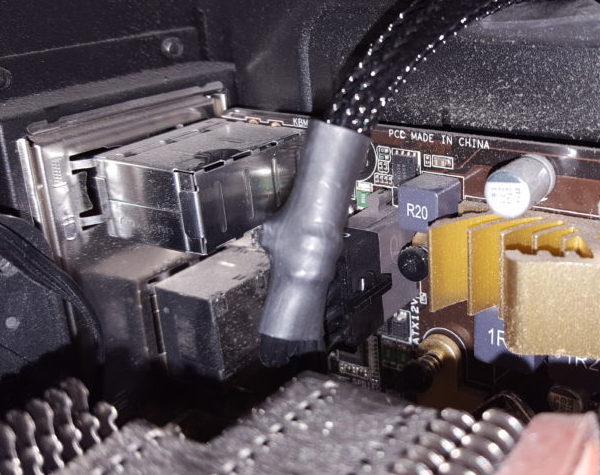
Older drives use 4-pin connectors. They are usually located at the back. 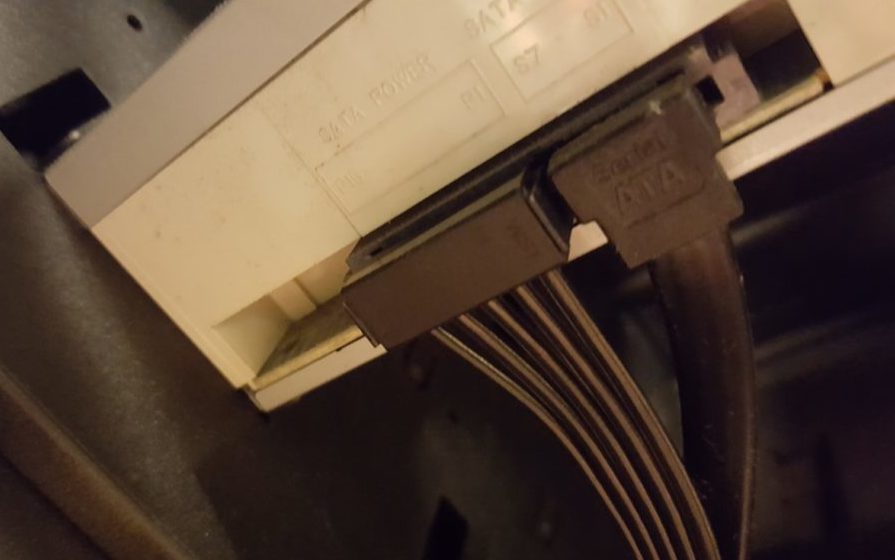
Very old devices may have 4-pin connectors. When these items are not connected to the motherboard or when the controller is external to the motherboard, typical compounds are 4 pin connectors.
A rarity today is a connector for flopy drives. But on old PSUs you can find.
A 4-pin CPU connector is used to power the processor. There are two of them or even double, that is, 8-pin, for powerful processors.
SATA connector - replaced the MOLEX connector. Used for the same purposes as MOLEX, but on newer devices.
Food options
The printer can have all cables, either integral or modular. Modular fonts tend to be more expensive and more prone to failure as there are more components to fail. Inside the same brand usually pays more to buy the non-modular option. Good modular fonts tend to be very expensive.
Non-peak powers typically broadcast in sources Low quality... We are talking about the constant delivery of energy to the logo of the time with this maximum value without voltage fluctuations. There are many brands out there that make quality fonts. And the quality is not the same across all sources of the same brand. It is difficult to call “good” brands because they are always skewed. In my case, they would be the brands I had, loved, or wanted to have. It is interesting to look at the guarantees, which are also a guarantee of the brand's trust in your product.
PCI slots, most often serve to supply additional power to various kinds PCI express devices (most common for video cards).
Let's go directly to the pinout and labeling. Where are our cherished tensions? And here they are!
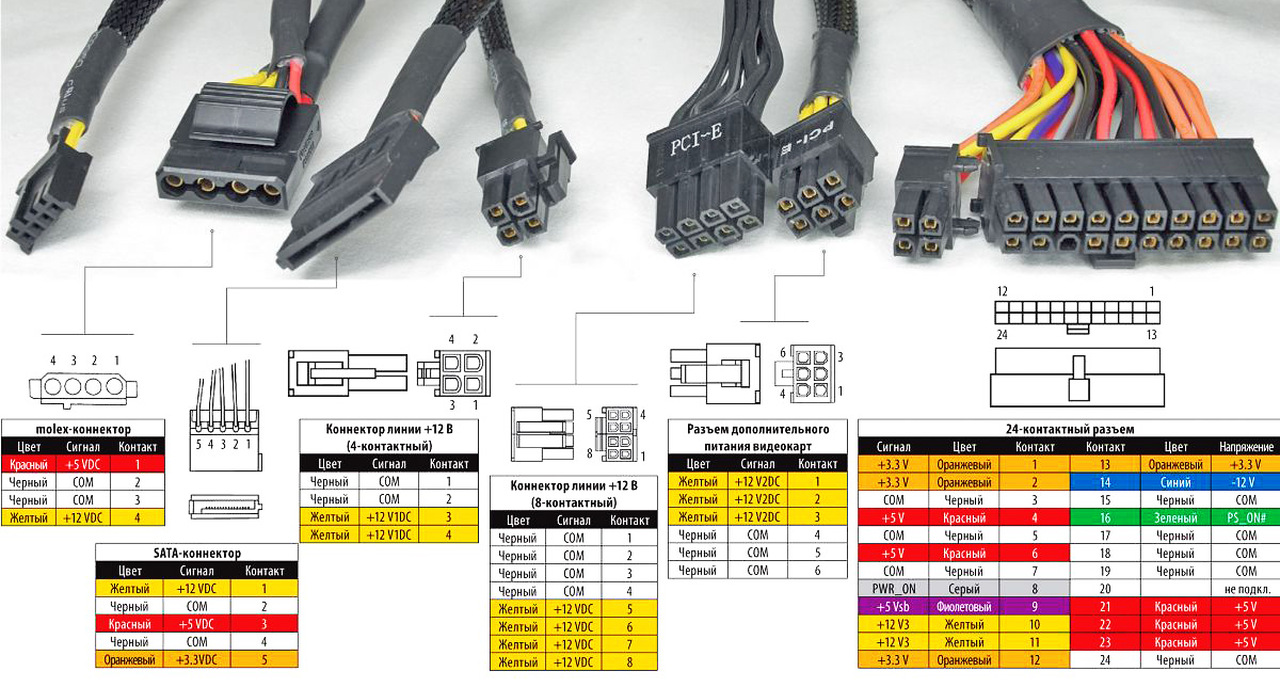
Another picture with pinout and color coding of voltages on the power supply connectors.
 Below is the pinout of the AT type power supply.
 Well. We figured out the pinout of computer power supplies! It's time to move on to how to get the required voltages from the power supply.
Receiving voltages from connectors of a computer power supply
Now that we know where to get the voltages, let's use the table I gave below. It should be used as follows: positive voltage + zero = total.
| positive | zero | total (difference) |
| + 12V | 0V | + 12V |
| + 5V | -5V | + 10V |
| + 12V | + 3.3V | + 8.7V |
| + 3.3V | -5V | + 8.3V |
| + 12V | + 5V | + 7V |
| + 5V | 0V | + 5V |
| + 3.3V | 0V | + 3.3V |
| + 5V | + 3.3V | + 1.7V |
| 0V | 0V | 0V |
It is important to remember that the current of the final voltage will be determined by the minimum value according to the ratings used to obtain it.
Also, do not forget that for high currents it is advisable to use a thick wire.
The most important thing!!! The power supply is started by shorting the wires GND and PWR SW... Works as long as these circuits are closed!
REMEMBER! Any experiments with electricity must be carried out in strict observance of electrical safety rules !!!
Supplement on connectors. Clarification of the pinout of PCIe and EPS connectors.
 How to deactivate the "You've received a call" service from MTS?
 Factory reset and hard reset Apple iPhone
 Factory reset and hard reset Apple iPhone