How to download android version 6.0. Support for new standards and technologies. Battery usage and battery saving
Android is the most popular operating system in the world with billions of devices installed around the world, so it's no surprise that many mobile device users are waiting for the latest version of Android 6.0 Marshmallow.
Android 6.0 Marshmallow has a number of improvements and new features. Although the system will initially be available only for Nexus devices, most Android phones will soon be able to update completely free of charge.
Typically, smartphone manufacturers are in the process of updating the operating system, and it may take several months for the manufacturer to test the new software and make sure it is compatible with mobile devices.
If you don't want to wait that long, here's how to download and install Android 6.0 Marshmallow right now.
1. Check the phone for compatibility

At the moment, a preview of Android 6.0 Marshmallow has been released for the Nexus 5, Nexus 6, Nexus 9 and Nexus Nexus Player. You can try to update your Android smartphone, however we strongly recommend not to do this, as most likely, you simply will not succeed, and in the worst case, you will get a broken phone. So, you have been warned, and we continue!
2. Back up your device

Before you start updating your Android device to Android 6.0 Marshmallow, you must back up your phone. Upgrading to a newer version of the operating system always carries a risk.
Backing up your smartphone means that if something goes wrong, you can quickly and easily restore your photos, videos and other data.
The fastest way to copy your photos is to connect your Android device to your PC via USB, and copy them to your computer.
You can also set up automatic backups of your photos. To do this, you need to go to the Photos app, tap on Settings> Backup & sync, and then make sure that backup is enabled and connected to your Google account.
Also make sure to enable the backup of your data. To do this, go to Settings> Backup & Reset, then make sure Data Backup and Automatic Restore are enabled.
3. Enable USB debugging

Now you need to enable USB debugging. To do this, you need to go to Android developer mode, namely Settings and scroll down to "About phone". Press this button seven times and it will inform you that developer mode is enabled - now you will see this mode on the settings page. Click it and then enable USB debugging.

After that, you need to enable OEM unlocking - but keep in mind that after this step, all files on your device will be deleted.
4. Download 15 seconds ADB Installer

You will need an additional Windows tool to install Android 6.0 Marshmallow on your smartphone. The program is called 15 seconds ADB Installer. You can download it from this link.
A window will appear to confirm the installation of ADB and Fastboot. Enter Y from the keyboard to confirm. Press Y again when asked to confirm the installation of ADB on the whole system and if you want to install the drivers. Then a new window will open for installing drivers. Confirm the installation again, and then click the Restart Now button to restart your computer.
The program will be installed at C: \ adb (if C: \ is the default hard drive).
5. Download Android 6.0 Marshmallow

Head over to Google's Android Developers site, which lists the Android 6.0 Marshmallow system hardware images.
Each hardware system image is for a separate Nexus device, so make sure you download exactly the image you intend to install Android 6.0 Marshmallow on.
After downloading a compressed file in a.tgz format, you will need to extract files and folders using programs such as WinRAR. Find the file you downloaded, right click and select "Extract files ..." and extract the files to the ADB folder we created in the previous step (for example, C: \ adb).
6. Install Android 6.0 Marshmallow

You can now install Android 6.0 Marshmallow on your device. Turn off your cell phone and connect it to your computer. Now you need to start your device in fastboot mode. If you have a Nexus 6, then press and hold the volume down and power buttons. For Nexus 5 - Press and hold the volume up button and the volume down button, and then press and hold the power button.
For Nexus 9 - press and hold the volume down button, then press and hold the power button and for the Nexus Player just press and hold the power button.
In the spring at Google I / O 2015, a new version of Android was announced, and since October 5, the stable version of Android 6.0 Marshmallow has become available for the first devices, including the Nexus 5, Nexus 6, Nexus 7 2013, Nexus 9 and Nexus Player. Today we will tell you in detail about the new operating system using the example of the Google Nexus 5 smartphone.
Interface
After updating the operating system, the first thing that catches your eye is the new boot animation of the smartphone using the updated Google logo.
The initial setup of the smartphone has not undergone any changes. Everything is the same as on Lollipop.


Before getting to know the interface, one thing should be clarified. Google Start is used as a shell. Yes, this is the same application that we remember from previous versions of Android. Therefore, many will have a healthy question, why should I wait (want) an update to 6.0, if I have the same interface on my old Nexus 4 as on new devices. It just so happened that most of the changes are hidden inside and at first glance they are not noticeable. We will talk about this in the article.


Let's start with the changes in unlocking the device. Now the lower left icon is responsible for launching Google Now, and not "dialers" as in the previous version of the operating system. Yes, and now you need to pull the icons literally from the corner, it's not as convenient as before. The font of the clock widget has changed, but if you don't look closely, the changes are almost invisible.


The desktop remained unchanged at all. The new Google logo and color microphone have been brought along with the new version of Google Start. The only innovation is the ability to remove applications from the desktop, and not just a shortcut as before.


Changing the scroll orientation in the Apps menu also applies to Google Start. If earlier we leafed through the application tables from right to left, now from bottom to top. At the top, there will always be an application search bar, under which there will be four most frequently launched applications. The order of the application is simple - first those applications that begin with numbers, and then everything alphabetically. The first language will be system, and then English. If you click on the scroll bar located at the left edge, the letters and the first applications for each of them will be highlighted.
By the way, vertical scrolling in the application menu was shown to us by Google in the days of Android 1.X - 2.X. But there is nothing to do with the current version.
Finding apps is literally lightning fast. This is suitable for those who have a lot of programs and games stored in their device. Now you do not need to scroll and carefully search for the application, but just enter the first letters, and it has already been found.
There have been changes in the animation as well. Now, after clicking on the screen, the application opens as if from her. When you hide an application, it goes down. When you go to an application from the Task Manager, it opens up. All animations are very smooth even on Nexus 5.


Separate volume for multimedia, alarm clock and ringtone has returned, as well as the normal "Do not disturb" mode.


Slightly redesigned the "copy and paste" function. It contains a translator that can replace the text with the translated one, of course, if Google Translate is installed. Now, when the cursor moves to the right, the words are selected entirely, and if you need to select a part of the word, then for this you need to move the cursor to the left. This makes it easier and more convenient to select text.
Google Now on Tap
Google Now on Tap makes it possible to search within a specific application. In practice, this is a very useful thing.


Now you can search for information directly on the web page, in the music player, twitter, messages, mail and many other applications. To do this, you need to hold down the home key for a few seconds and Google Now on Tap will analyze the screen content. It is important to remember that only the information that is in the active area of the screen is analyzed. The analysis itself is very fast, although it depends on the speed of the Internet connection.


Let's take an example of Google Now on Tap search while listening to music in a smartphone player. In the summary, we will receive a link to the song on YouTube, Google search, pictures, as well as links to the artist on YouTube and popular social networks. As a result, this is a very handy feature. Its inaccessibility will be a fly in the ointment if the Russian language is selected in the phone. But with the English language everything works great, even the Cyrillic alphabet perfectly recognizes. We hope there will be support for other languages in the near future.
Settings
The standard Android interface had only the most necessary settings. Now the situation has changed a bit. We will describe the new settings below.


If you click on the gear in the “Applications” settings item, then we will get to the “Configure applications” menu. Here we will find a lot of interesting things. The most interesting items are “App permissions” and “In-app links”.


Let's start with the "Application Permissions" item. At this point, we determine which application to give access to SMS, calendar, camera, contacts, location, microphone, body sensors, memory, phone and other functions. Now, when installing an application from Google Play, you do not need to agree to all the conditions in one fell swoop. Everything will happen gradually. At the first attempt to access data on the device, a request will be made and then you can either allow or deny it.


If we return to the main table of settings, then another interesting item has appeared - "Storage and USB-drive". At this point, you can see the use of internal and external drives, whether it is a microSD memory card or a USB flash drive connected via OTG. Finally, Google has added a built-in file manager, but it can only move, delete and share files, but this is at least something.


In the item "Battery" there have also been changes.
In the statistics of use, from the moment of full charge, not only the operating time is displayed, but also the estimated consumption in mAh.
Now you can customize applications so that they save power. The so-called Doze mode. At the moment, by default, almost all applications are configured for saving, except for Google Play services, it is impossible to force them to save power. Doze mode is required to extend the battery life of the phone in sleep mode. This is what many people lack, because it often happens that up to 20% of the charge goes away overnight. Now the Nexus 5 can easily manage 1-2% of the discharge per night. In this case, you do not need to turn off Wi-Fi or turn on airplane mode at all. Magic, and nothing more.


RAM has now received its own menu item - "Memory". It features an estimate of available memory, total memory, average usage (in percent), free memory, and an analysis of application memory usage.
Usage analysis is displayed for the last 3 hours, 6 hours, 12 hours, and 1 day. Applications are sorted by the average amount of used memory. When switching to the application, we receive additional information about the frequency of application use, the maximum amount of used RAM, as well as about the system processes behind which the application is hidden.


There are also hidden settings - "System UI Tuner". To activate them, you need to hold the gear in the shutter for a couple of seconds. As the welcome says, “System UI Tuner lets you customize Android devices to your liking. In the future, this experimental feature may change, stop working, or disappear. " Well, interesting. The first menu item is called "Quick Settings". It changes the location of the shortcuts in the curtain. In the next item "Status bar" you can activate or deactivate notifications from the shown applications. And, perhaps, one of the most necessary items is "Show the battery charge level as a percentage."


If we talk about hardware changes, now Android 6.0 Marshmallow supports USB 3.1 Type-C, the transfer speed of which can reach 10 Gb / s, as well as a fingerprint scanner. But the new camera interface is only available on the Nexus 5X and Nexus 6P so far.
conclusions
Android 6.0 Marshmallow is a real bug fix. Despite the fact that outwardly practically nothing has changed, everything has become much better. The smoothness of the interface has become simply unsurpassed, the same Nexus 5 on Lollipop and Marshmallow feels like two different phones. Autonomy has also increased, especially in sleep mode. There are goodies in the form of Google Now on Tap, which you get used to very quickly, as well as statistics on memory usage and the ability to customize application permissions. Yes, it was not without a fly in the ointment. This time it was the battery-guzzling Wi-Fi. But, despite this, even the old Nexus 5 can work quietly for a day with 4 hours of active screen, and this is a significant increase in autonomy. So it turned out that there are a minimum of external differences, but in fact, the new operating system is simply "must have".
It took place in October 2015, but it is now installed on just over 2% of devices on this platform. As you know, updates here are not distinguished by excessive efficiency.
Whether you have this system or not, you can learn something new about it from the tips below. Read them and teach your smartphone or tablet new skills. Note that the description refers to a clean version of the system, without shells from third-party companies, where the location of the settings may be different.
1. Make the most of Now on Tap
One of the most touted new features of the system is something called Now on Tap. This is a kind of Google virtual assistant that gives contextual information about what is currently displayed on the screen. Press and hold the Home button to use.Now on Tap can be very beneficial, and its capabilities are constantly increasing after its release. When activated at the moment the flight number is displayed on the screen (for example, in correspondence), Now on Tap will allow you to see the flight status without having to open another application. When activated, at the time of displaying the item number when buying in the online store, a description of the delivery process will be given.
Now on Tap can be used to get driving directions, business addresses and street lookups, restaurant data, movie screenings. It is only necessary that the required theme be launched on the screen of the device.
2. Disable Tap
Despite the full potential of Now on Tap, its usefulness is still limited. For some, it is not diverse enough to take up space in the Home button, especially since in previous versions of Android, clicking on it opened Google Now.Fortunately, Now on Tap is disabled. After that, clicking on Home will open Google Now. Open your operating system settings, Google Settings -> Search & Tips -> Now on Tap and toggle the slider. Then, if necessary, you can immediately turn the function back on.
3. Change the quick settings panel
It is possible to change the icons displayed in the quick access panel - where Wi-Fi, Bluetooth, flashlight, flight mode, etc. are shown. This is done in the System UI Tuner tool. Swipe from the top of the screen twice. Press and hold the gear icon at the top right, it will rotate, after which a message will appear about the availability of the System UI Tuner.
Open the settings and at the very bottom of the list. There the System UI Tuner option appeared.
4. We continue tuning the system
If you are determined to continue making changes to the system, use the third-party Custom Quick Settings application. It goes even deeper than Tuner, penetrates deep into the system and allows you to add various shortcuts to the settings panel.However, be warned that this program does not have a very user-friendly interface. Work with her only if you are confident in your strengths and knowledge.
5. Turn up the volume
The volume in Android 5.0 was inconvenient to adjust, but in Marshmallow there are no problems with this. You can open all elements of the system for sound control - for an alarm clock and notifications, music, calls. They are available from anywhere in the system.
When you press the volume button up or down, the system opens the sound setting for the activity that is in progress. If audio is playing, the audio setting for it opens. If you want to change the sound somewhere else, use the down arrow to the right of the volume slider. More sliders will appear, allowing you to change the sound in other places.
6. Setting the silence
Part of the redesigned volume control is the new Do Not Disturb mode. When you need complete silence, click on this option in quick settings. All sounds and vibrations will be turned off either permanently or temporarily. You can mute everything, leaving the alarm clock or notifications from applications with priority.7. Simple maintenance of silence
If you have no time to think about options and need to quickly muffle the device, press the volume down button, an icon will appear that only vibration works. Then release the button and press again.This puts Android into silent mode, which only runs the alarm. Android Lollipop users will appreciate the simplicity of this solution.
8. Automatic activation of the silence mode
Save yourself one extra minute by keeping the machine silent beforehand when you know you will be busy.
Open the settings under Sounds & notifications and click Do not disturb. Here you can create different rules, indicating when the silence mode should be automatically turned on, depending on the day and time, or the presence of certain tasks in the calendar.
9. Setting priorities
Not everyone wants to be distracted by every squeak made by a smartphone, but at the same time, important notifications should not be missed. The Android 6.0 notification priority system comes into play.Before you can start using it, you need to make the settings. Open Do not disturb in Sounds & notifications again and tap the Important only option.
A list of notification types is available here, you can set them a high priority - reminders, events, certain calls and text messages. You can even allow calls from certain subscribers if they call a second time in 15 minutes.
Having configured everything as it should, activate the Only important mode, as it is said in tip # 6, and only events and people that are interesting to you will bother you.
10. Control over notifications
Another drawback of Android 5.0 is the intrusive display of a notification (heads-up or peek). Big card-based notifications were updated in Android 5.1, but this was only an interim fix.
In Marshmallow, you can take control of notifications and set which apps can display them on the screen, and which only in the status bar. Open Sounds and notifications -> App notifications in settings and select an app. A list of settings will appear where you can make notifications from this application important (they will be shown when the Do Not Disturb function is activated) or you can prevent them from showing notifications on the screen.
11. Further customization of applications
Continuing the theme of controlling apps, Android 6.0 makes them easy to browse and tabs out what they're doing. Open the Applications section in the settings and select the one you need.Here you can see how much space the application takes in memory and the types of data access permissions it received. Shows the use of RAM and battery, which will help to determine if the program is using resources too quickly (hint: keep an eye on Google Photos and Facebook).
12. Working with text
The text selection tool in the system has been simplified. It gives you access to third-party developer programs that offer new features.Attention! The first step is to back up all your data. Copy all photos, videos, documents and other information you need on your device to a safe place.
Manual update will inevitably lead to the complete removal of all user data from the device's memory, and with proper bad luck, it can turn your Nexus into a brick. All subsequent actions you perform at your own peril and risk!
Downloading the image
Manual Android installation comes from an image. You can find and download the desired image on the corresponding page of Google Developers. In our case, Android 6.0 is being installed on the Nexus 5, and therefore we find this device in the list.

Download and install the tool to download the image to the device
In order not to waste time and effort downloading and installing the entire Android SDK, it is recommended to turn to the ADB Installer utility available at XDA-Developers. Here is a direct download link from Google Drive. The utility weighs only 9 megabytes, its installation is extremely simple and takes less than a minute.
Don't be intimidated by the DOS-style interface. We confirm each request with the English "y" and pressing Enter.

Agree and install Google USB Driver.

Now, if you look at the root of the C drive of your computer, you will find a new folder there adb... It contains everything you need to manually install an Android image.
We return to our image, which has already been downloaded and stored on disk as a TGZ archive. It must be unpacked with any suitable archiver. For example, 7-Zip.

The TGZ archive hides another archive, this time in the TAR format. It also needs to be unpacked. As a result, you will have a folder with such content.

For convenience reasons, it is better to give this folder some short name (for example, I chose a60m). A little later, you will understand the meaning of the short name. Also, do not hide it in a dozen subfolders. It seemed to me optimal to place the folder with the unpacked image inside the adb folder. It turned out like this.

The preparation process is almost complete, and all that remains is to make the necessary settings on the mobile device itself.
First, enable USB debugging. To do this, go to "Settings" and scroll to the very bottom of the screen. Here you need to find the item "For developers".

If this item is not there, then go to "Settings", find "About phone", the last in the list is "Build number". We tap on it seven times.

After the message about receiving the developer status, go back to "Settings" → "For Developers", find the item "Debugging via USB" and enable it. A warning will appear - we confirm.

Turn off your mobile device and turn it back on. At the very beginning of the download, you see a black screen and a white Google sign. If on the same screen at the bottom of it there is an open lock, then you can skip the next step.

If there is no lock, then we have to unlock the bootloader.
We connect the mobile device to the computer via USB and enable debugging.

Run the Windows command line as administrator.

On the command line, write:
adb reboot bootloader

Such a menu will appear on the mobile screen.

Notice the LOCK STATE line. The bootloader is now locked.
Attention! Executing the following command, in fact, will reset to factory settings, all your data and applications will be deleted from the device!
To unlock the bootloader, write in the command line:
fastboot oem unlock

A warning will appear on the screen of the mobile device and asking you to confirm the operation. Use the volume buttons to select Yes and press the power button.

We are waiting for the OK message and the Finished message to appear in the command line interface.

The LOCK STATE setting on the bootloader screen has now changed to Unlocked and your Nexus is ready to accept the new Android.

The magic begins
Let's go back to our unpacked image. Inside, among other files, you can find a script flash-all... Our task is to run it through the command line. You can do this by being in the image folder. Changing the folder in the command line is carried out with the command cd.
If you did everything the same way as I did, then your folder with the image is also called a60m and is located in the adb folder in the root of the C drive. To get into this folder through the command line, run the command:

And here it is - the moment of truth. We write flash-all on the command line.

Installation begins. The process takes a fair amount of time.


Please be patient and wait for the command line interface to prompt you to press any key to exit the command line.

For safety's sake, it makes sense to close the bootloader again. To do this, we sequentially execute two commands in the command line with a mobile device connected to the computer, and then press the power button.
adb reboot bootloader
fastboot oem lock
Don't forget to turn off USB debugging in developer settings. You can also delete the folder with the unpacked image from your computer.
Ready!
Please accept my sincere congratulations. You can now manually install any supported version of Android on your Nexus.
Everyone knows that the Android operating system is developed by Google for smartphones and tablets. At the moment, this is the most popular platform for these devices. The official version of Android can only run on supported ARM devices. But since Android is an open source project, the community has created a port of Android for x86 computers that will work on almost any modern computer.
The official version of Android 6.0 from Google came out quite a long time ago, but only a few days ago the developers released a stable version of the Android x86 port for version 6.0. In this article, we will consider installing Android x86 6.0 on a computer or laptop. The platform may not be stable enough yet, but it can already be used and you will see for yourself.
System Requirements Android x86 6.0
Android x86 is quite demanding on the hardware. Ideally, it should work on any x86 computer. But in reality, not everything is so simple. The developers have tested the system on several devices, for example, laptops from ASUS, EeePC and Dell, for a complete list of supported devices and their level of support, you can find on the official website.
With regard to equipment and characteristics, the following parameters are recommended:
- CPU: Intel;
- RAM: 2048 MB;
- Free disk space: 10 GB;
- USB flash drive- to record the installer.
Preparing for installation
As with other operating systems, we first need to download the installation media. You can download the latest version of the system from the repository at SourceFoge or the official website. Images are available for both 32 and 64 bit architecture:
It takes up a little image, only 400+ megabytes, so it loads quickly.
Step 2. Burn to media
To install Android, you need to use either a USB flash drive or a rewritable disk. But still a USB stick is better. I do not recommend using various utilities to capture the image, do it with the following command:
dd if = ~ / android-x86-6.0.iso of = / dev / sdc bs = 5M
Here ~ / android-x86-6.0.iso is the image you just downloaded and / dev / sdc is your flash drive.
Step 3. BIOS setup
Everything is standard here. Restart your computer and during the BIOS splash screen press F2, F8, Shift + F2 or Del to enter the BIOS setup, then go to the Boot tab and select in 1st Boot Device your USB stick.

It remains to go to the tab Exit and press Exit & Save Changes.
Installing Android 6.0
Step 1. Beginning the installation
Immediately after restarting your computer, you will see such a bootloader window. Here you can either boot into the Live system, or go to its installation. We will be interested in the last point, installation:
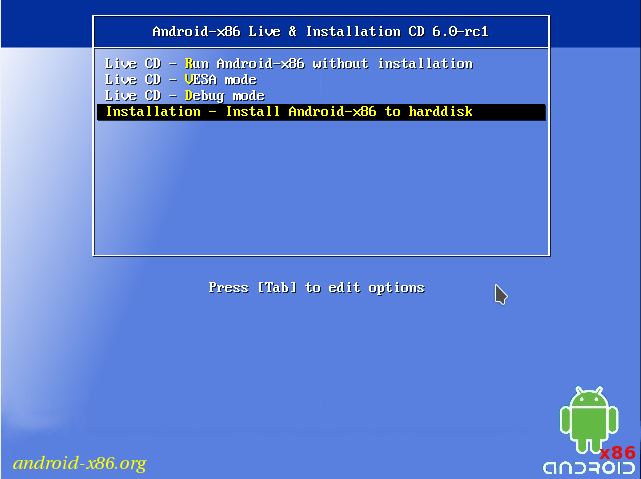
The installer will start very quickly:

Step 3. Selecting a disk
At the first step, you have to select the drive on which you will perform the installation:

Step 4. Partition table
Further, if this disk has not yet been partitioned, you must select the partition table. You can use GPT, but I do not recommend doing this as it is more likely that the installation will simply hang. Therefore, at this step, select No. In this case, MBR will be used:

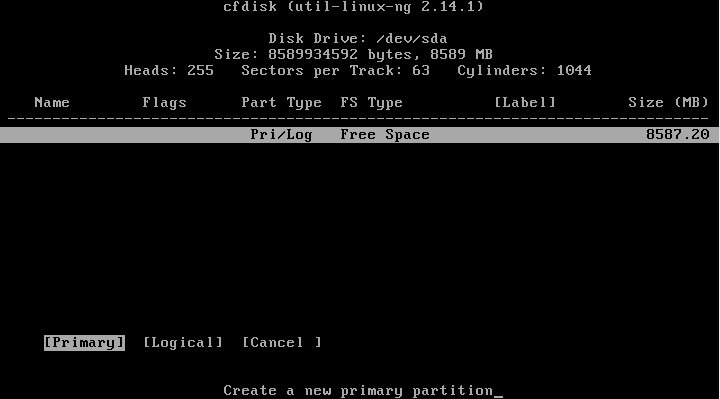
Step 5. Create a partition
Installing Android x86 6.0 is done on one partition only. And at this step we have to create it. The cfdisk utility will be used for this. First click New to create a new section. You can navigate through the buttons with the left / right arrows, and press with Enter:

Select type primary, primary:

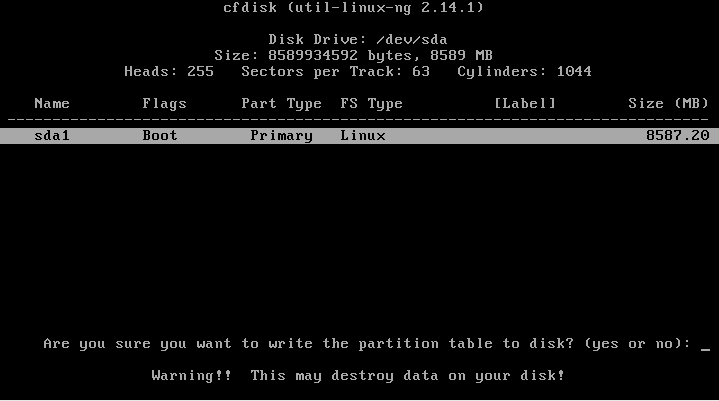
Find the Bootable button and press Enter to make this partition bootable:

Find and click the Write button to write the changes to disk. Type yes to confirm:
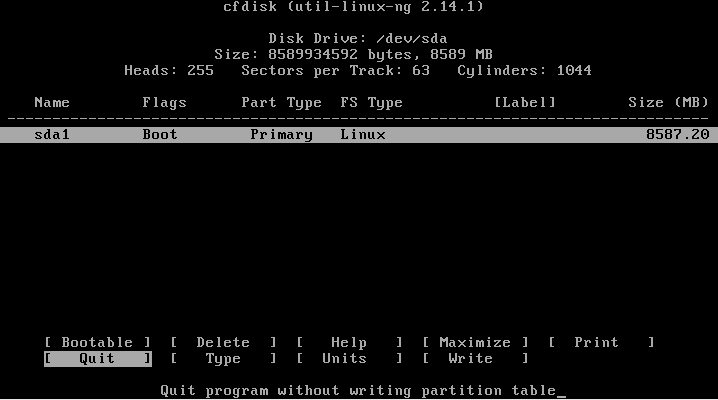
It remains to press the quit button to exit the program:
Step 6. Selecting a section
After completing the markup, you need to select the section you just created:

Step 7. File system
Choose a filesystem like ext4

Step 8. Formatting
Since we want a clean section, we agree that it will be formatted:

Step 9. Bootloader
We'll need a bootloader, so select Yes:

Step 10. EFI Boot Loader
But we do not need an EFI bootloader, given that we used MBR. Please select Skip:

Step 11. Access mode
In this window, you need to choose whether you want to mount the system partition / system in read and write mode. This will be useful for installing new programs, so select Yes:

Step 12. Completing the installation
Wait until all files are unpacked:

When the installation of Android on your computer is complete, select Reboot to restart your computer and enter the new system:

Step 14. Bootloader
Select the first bootloader item:
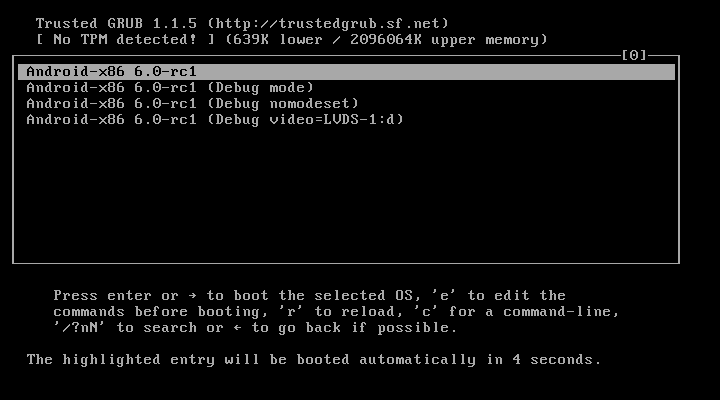
Step 15. Starting the system
Wait for the system to boot up.
Step 16. Finish
That's it, the installation of Android x86 on your computer is complete. You can now use Android right on your computer. You can install and run Android applications, play games:

conclusions
As you can see, installing android x86 on a pc is not that different from other operating systems. If you are lucky and the system will fully support your hardware, then you can very easily get a full Android system on your computer. If you have any questions, write in the comments!
To complete the video with the Android installation process from the American video blogger:
 Architecture of a distributed control system based on a reconfigurable multi-pipeline computing environment L-Net "transparent" distributed file systems
 Email sending page Fill relay_recipients file with addresses from Active Directory
 Missing language bar in Windows - what to do?