How to clean a laptop at home video. How to determine what a laptop needs. Excess weight is hazardous to health!
If your laptop starts to “roar” like a jet plane during operation, and its body resembles a heating device when touched, then it's time to do preventive cleaning. Also, the fact that cleaning the laptop is necessary may indicate it spontaneous shutdown during work. You should not neglect caring for a laptop, because dust, getting into the radiators, prevents the processor from cooling and, overheating, it can simply burn out. To avoid damage, the laptop should be cleaned about once every six months.
How to clean a new laptop under warranty
Most services for servicing warranty equipment break the contract and refuse service if you tried to get inside the device yourself. Therefore, you should not unscrew and remove the lid of a new laptop if the warranty period has not yet expired. There is an easier way to remove dust from your laptop. Usually, new laptop I have not yet had time to get very dusty from the inside, and you can "blow off" dust and small debris (hairs, crumbs, etc.) by acting on it from the outside. This requires a vacuum cleaner with air blowing function. Think about where the air is coming from when your laptop is running, find that hole (most modern laptops have it on the left), switch the vacuum to blow mode, and place the tube against the computer's air vent. A few minutes will be enough for dust and fine debris to be “blown out” of the laptop. A powerful hairdryer is also suitable for such preventive cleaning.
How to clean an old laptop
If the laptop is old and the warranty period for it has long expired, then you can arrange for it a global cleaning from the inside. To do this, you need to arm yourself with a small Phillips screwdriver, a clean brush, a vacuum cleaner, a hairdryer and a damp cloth.
First you need to turn off the power and remove the laptop cover by unscrewing all the bolts with a screwdriver, otherwise how to clean the laptop from dust? It is better to prepare a small box in advance and put them in it so as not to lose or accidentally brush them off the table. Pay attention to the motherboard first. If there is a layer of dust on it, gently blow it off with a hair dryer, but in no case wipe it with a napkin, cotton swabs, or even touch it with a brush. Any microscopic lint from the napkins remaining on the metrin can damage the tracks or even provoke a short circuit.
Especially a lot of dust and dirt is attracted to the radiator and fans. The latter must be carefully detached and wiped with a damp cloth. The radiator (the most polluted place in the laptop) will have to be cleaned with a hair dryer, brush, damp cloth, and in difficult cases you may need a toothpick to help pick out the adhering crumpled dust.
To complete this step, apply a couple of drops of machine oil to the fan shaft and reinstall it. Blow out the surface and ventilation openings with a hairdryer.
Replace the laptop cover carefully and tighten the screws one at a time using a screwdriver. Turn on the laptop and listen, if it began to work quieter, it means that you followed all the points of the instructions correctly and now you know exactly how to clean the laptop from dust at home.
Hello.
No matter how clean your house is, all the same, over time, a large amount of dust accumulates in the computer case (including a laptop). From time to time, at least once a year, it must be cleaned. It is especially worth paying attention to this if the laptop begins to warm up, turn off, "slow down" and freeze, etc. Many manuals recommend starting the recovery of the laptop by cleaning it.
The service will charge a tidy sum for such a service. In most cases, you don't need to be a great professional to clean a laptop from dust, it will be enough just to blow well and brush off fine dust from the surface with a brush. This is the question I wanted to consider in more detail today.
1. What do you need for cleaning?
First, I want to warn you. If your laptop is under warranty, don't do it. The fact is that opening the laptop case voids the warranty.
Secondly, although the cleaning operation itself is not complicated, it must be done carefully and slowly. Do not clean your laptop on a carpet, sofa, floor, etc. - place everything on the table! In addition, I definitely recommend (if you are doing it for the first time) - where and what bolts were screwed in - to photograph or shoot with a camera. Many people, having disassembled and cleaned a laptop, do not know how to assemble it.
1) A vacuum cleaner with a reverse (this is when it blows out air) or a can with compressed air (approximately 300-400 rubles). Personally, I use a regular vacuum cleaner at home, it blows out dust quite well.
2) Brush. Any one will do, the main thing is that it does not leave behind a lint and that the dust brushes off well.
3) A set of screwdrivers. Which ones will be needed depends on your laptop model.
4) Glue. Optional, but may be necessary if your laptop has rubber feet that cover the mounting bolts. Some do not put them back after cleaning, but in vain - they provide a gap between the surface on which the device stands and the device itself.
2. Cleaning the laptop from dust: step by step
1) The first thing we do is be sure to disconnect the laptop from the network, turn it over and disconnect the battery.

2) We need to remove back cover, sometimes, by the way, it is enough to remove not the entire cover, but only the part where the cooling system is located - the cooler. Which bolts to unscrew depends on the model of your laptop. By the way, pay attention to the stickers - a mount is often hidden under them. Also pay attention to the rubber feet, etc.
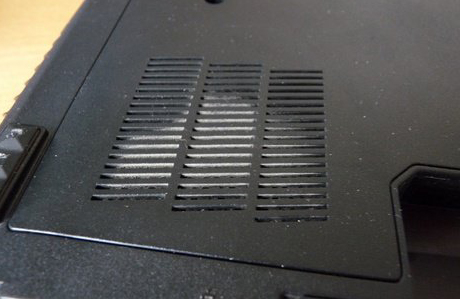
By the way, if you look closely, you can immediately notice where the cooler is - you can see the dust there with the naked eye!
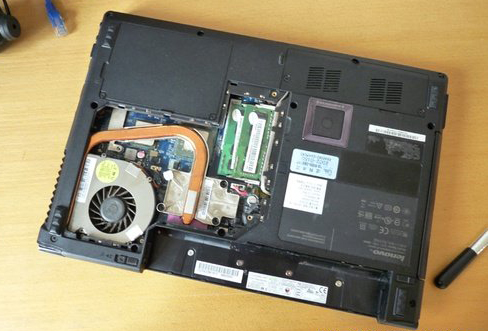
A laptop with an open back cover.
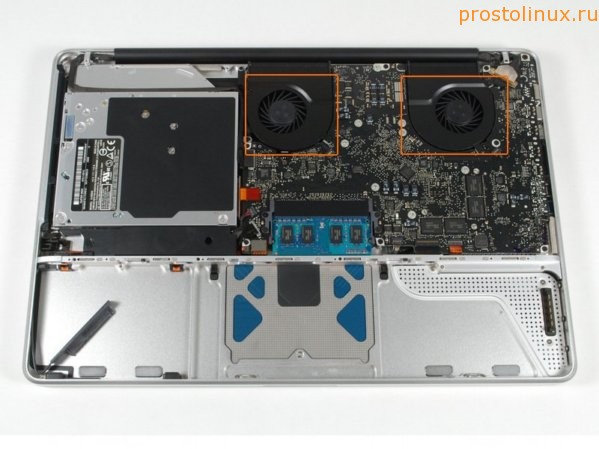
3) A fan should appear before us (see the screenshot above). We need to carefully remove it, while first disconnecting its power cable.

Disconnecting the power loop from the fan (cooler).

Laptop with the cooler removed.
4) Now turn on the vacuum cleaner and blow out the laptop case, especially where there is a radiator (a yellow piece of iron with many slots - see the screenshot above), and the cooler itself. Instead of a vacuum cleaner, you can use a can of compressed air. After that brush off the leftovers with a brush. fine dust especially with fan and radiator blades.
5) Assemble everything in the reverse order: put the cooler in place, screw on the mount, cover, glue stickers and legs, if necessary.
Yes, and most importantly, do not forget to connect the cooler power cable - otherwise it will not work!
How to remove dust from a laptop screen?
Well, in addition, since we are talking about cleaning, I will tell you how you can clean the screen from dust.
1) The simplest thing is to use special napkins, they cost about 100-200 rubles, enough for half a year - a year.
2) I sometimes use another method: I slightly soak an ordinary clean sponge with water and wipe the screen (by the way, the device must be turned off). Then you can take a regular napkin or dry towel and lightly (without pressing) wipe the damp surface of the screen.
As a result: the surface of the laptop screen becomes perfectly clean (better than from special napkins for cleaning screens, by the way).
That's all, all successful cleaning.
Social buttons.
Overheat Is one of the three most common "common" problems in all laptops. It happens due to the fact that the laptop cooling system becomes clogged with dust over time, preventing hot air from escaping from the case.
If your laptop, after some time after turning it on, starts to get very hot, make noise, slow down, or even turn off abruptly - all these are heralds that you urgently need to clean your dustproof laptop and change thermal grease.
You can contact a computer service, or you can try to do prevention on one's own.
All that is needed for this is a couple of simple, accessible tools, and a certain amount of accuracy and care. Well, some kind of algorithm for disassembling a laptop, which I will explain for you in this article on my computer blog.
Overheating begins to appear after 1-5 years of using the laptop, depending on the model and conditions of use. But, sooner or later, it will come, because over time, a layer of cosmic dust slowly but surely accumulates on the laptop fan.
I'll try to make my own subjective TOP of the hottest laptop models:
- HP, especially models, Dv6, G7
- LENOVO
- SAMSUNG
- TOSHIBA
I already wrote an article on how, and how fast and free.
We will assume that you already diagnosed an overheating problem. That is, they did a temperature test, and found out that under load, the temperature of the processor and video card of your laptop rises to 90 degrees or more.
But it was all theory and diagnostics. Now we are going to practice and directly repair - disassembling and cleaning the laptop from dust with your own hands.
Disassembling a laptop- not such an easy task as it might seem at first glance to a person who has never "opened" his laptop.
If in most system units, to access the "insides" you need to unscrew 2 screws and move the cover, then in laptops everything is much more complicated.
There are many laptop manufacturers, each with hundreds of different models, and they all disassemble in different ways. Somewhere you just need to remove the bottom cover. For example, this is exactly the case for. And somewhere, in order to get to the motherboard and remove the cooling system for cleaning and replacing thermal paste, you need to completely disassemble the laptop case, "to the bolt."
But the general algorithm for disassembling a laptop is usually always the same. In short, you need to unscrew all the screws, disconnect all cables, connectors, and open all the latches.
How to independently disassemble any laptop and clean it from dust - a universal instruction.
Below I drew a laptop device with the designations of all the details, so that it would be easier for you to navigate when reading this article.
1. Disconnect the battery
The first step is to always disconnect the battery. Disassembling a laptop under voltage can ruin your laptop by accidentally dropping a bolt on the motherboard. Therefore, the first thing we do is take it out.

On some laptops, the battery is inside the case, for example. Before turning it off, be careful not to short-circuit anything.
2. Remove all visible bottom bolts.
Pay attention to their length and thickness. If they are the same, you don't have to bathe. If some come across longer / shorter - remember / sketch where they were twisted.

3. Remove all the caps on the bottom, and unscrew all the bolts under them
We remove all the small covers on the bottom of the laptop ( random access memory, hard disk), unscrew all the screws, put them in the next pile. Disconnect all connectors, if any.
You may not have such covers, the bottom of the case may be solid. Don't be alarmed - go to step 5.
4. Disable Wi-Fi module, hard disk, RAM, DVD.
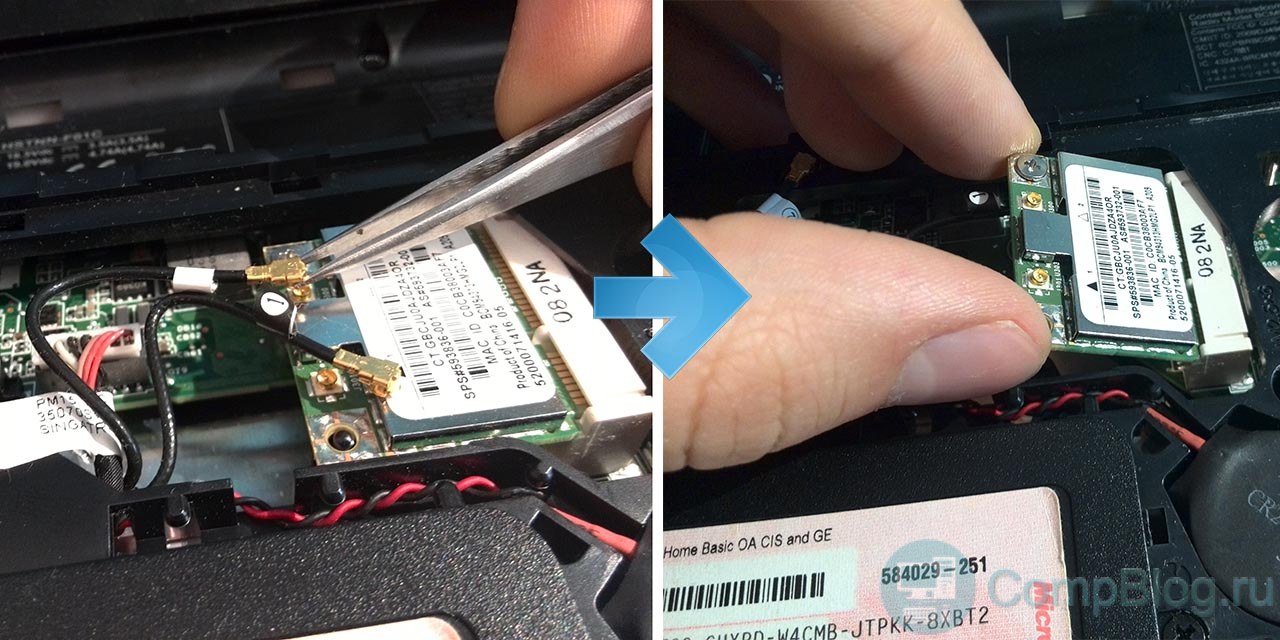
To turn off the Wi-Fi module, first remove 2 antennas from it by pulling them perpendicular to the module. Remember where which one was. Then unscrew the screw that secures it and pull the module out of the slot.
Unscrewing HDD, see how it is connected. You can remove it either by sliding it away from the connector, or by disconnecting the flexible wiring by pulling on it.

As a rule, it is not necessary to remove the RAM. But you can remove and clean its contacts with an eraser.
At this stage, you can usually take out the DVD-ROM by pulling slowly on it.

The detachable keyboard is easy to distinguish - it seems to be "blocky", i.e. does not form one whole with the rest of the body.

If you made sure that your keyboard is sewn into the upper part of the laptop case (Sony, ASUS 500 series) - go to step 8.
6. If the keyboard is removed, remove it.
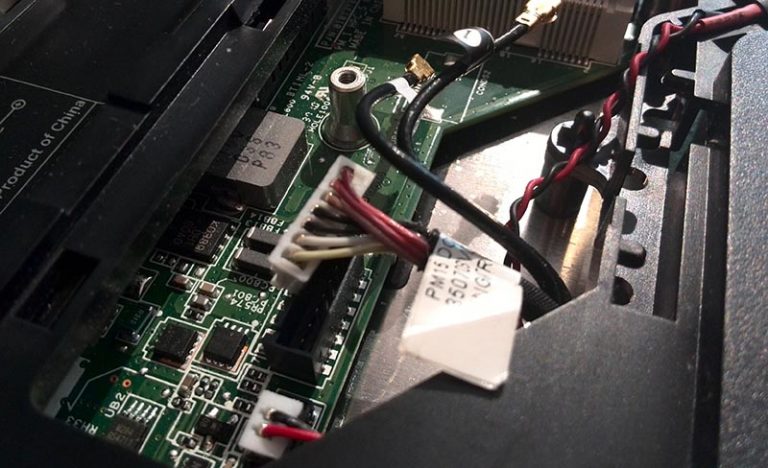
Don't forget that from keyboard to motherboard laptop goes plume, so after removing it, do not rush to pull it, but first lift and disconnect this loop.

Most often to remove the keyboard you need to carefully pry it with a pick or spatula, and open all the latches around the perimeter.

It happens that before this you need to first remove socket above or under the keyboard.

On some laptops, another unpleasant surprise may await you - an additional keyboard keeps on glue... In this case, we carefully pry it off with a ruler / spatula / screwdriver, and, gradually lifting it, peel it off.

7. Unscrew all visible bolts under the keyboard, remove all cables and connectors
There are several basic types of loops. They all unfasten in different ways. Some rise, some pry on, some stretch.
I will try to organize them in one of the following articles on the site.
Sometimes at this point you will need to pull out long cables from the wi-fi adapter through the case.
8. Carefully "open" the laptop from the side around the perimeter, and remove the top cover
For me, it is most convenient to use a guitar pick for this, preferably thicker - 0.8-1 mm.

Also, sometimes the scapula helps out:

After going around the perimeter with a pick and snapping off all the latches, we carefully try to lift the lid. If it does not give in, we check again if all the screws are unscrewed. If it still doesn't work, we check it again.
No need to use force! And a screw that has not been unscrewed often turns out to be imperceptibly recessed into the case, or hidden under a rubber stand at the bottom of the laptop.
The motherboard can be attached both to the bottom of the laptop case (most often) and to the top (this is what Sony Vaio do). Be careful and take your time.
9. Unscrew the remaining screws and disconnect the connectors, take out the motherboard
We look at which cables go to the motherboard, take them all out.

Sometimes, in order to remove the motherboard, you have to completely unscrew and remove the upper part of the laptop with the screen.
10. Remove the cooling system from the board
The screws on the radiator are usually marked with numbers - we unscrew and tighten in the order of these numbers, so as not to accidentally damage the chip by skewing.
We work very carefully here - a screwdriver can easily slip off and knock down some element on the motherboard.

Having unscrewed all the bolts, carefully pry on the cooling system, if it does not go - you can turn it a little in its plane. We try not to tear the thermowells, if any.
11. We disassemble and clean the laptop fan from dust
Actually, this is the most important stage. disassembling laptop... Right now, in fact, "cleaning the laptop from dust" will take place
Usually, to disassemble the cooling system, you need to unscrew a few small screws on it, and tear off a piece of cloth / tape, "turning" the fan out.
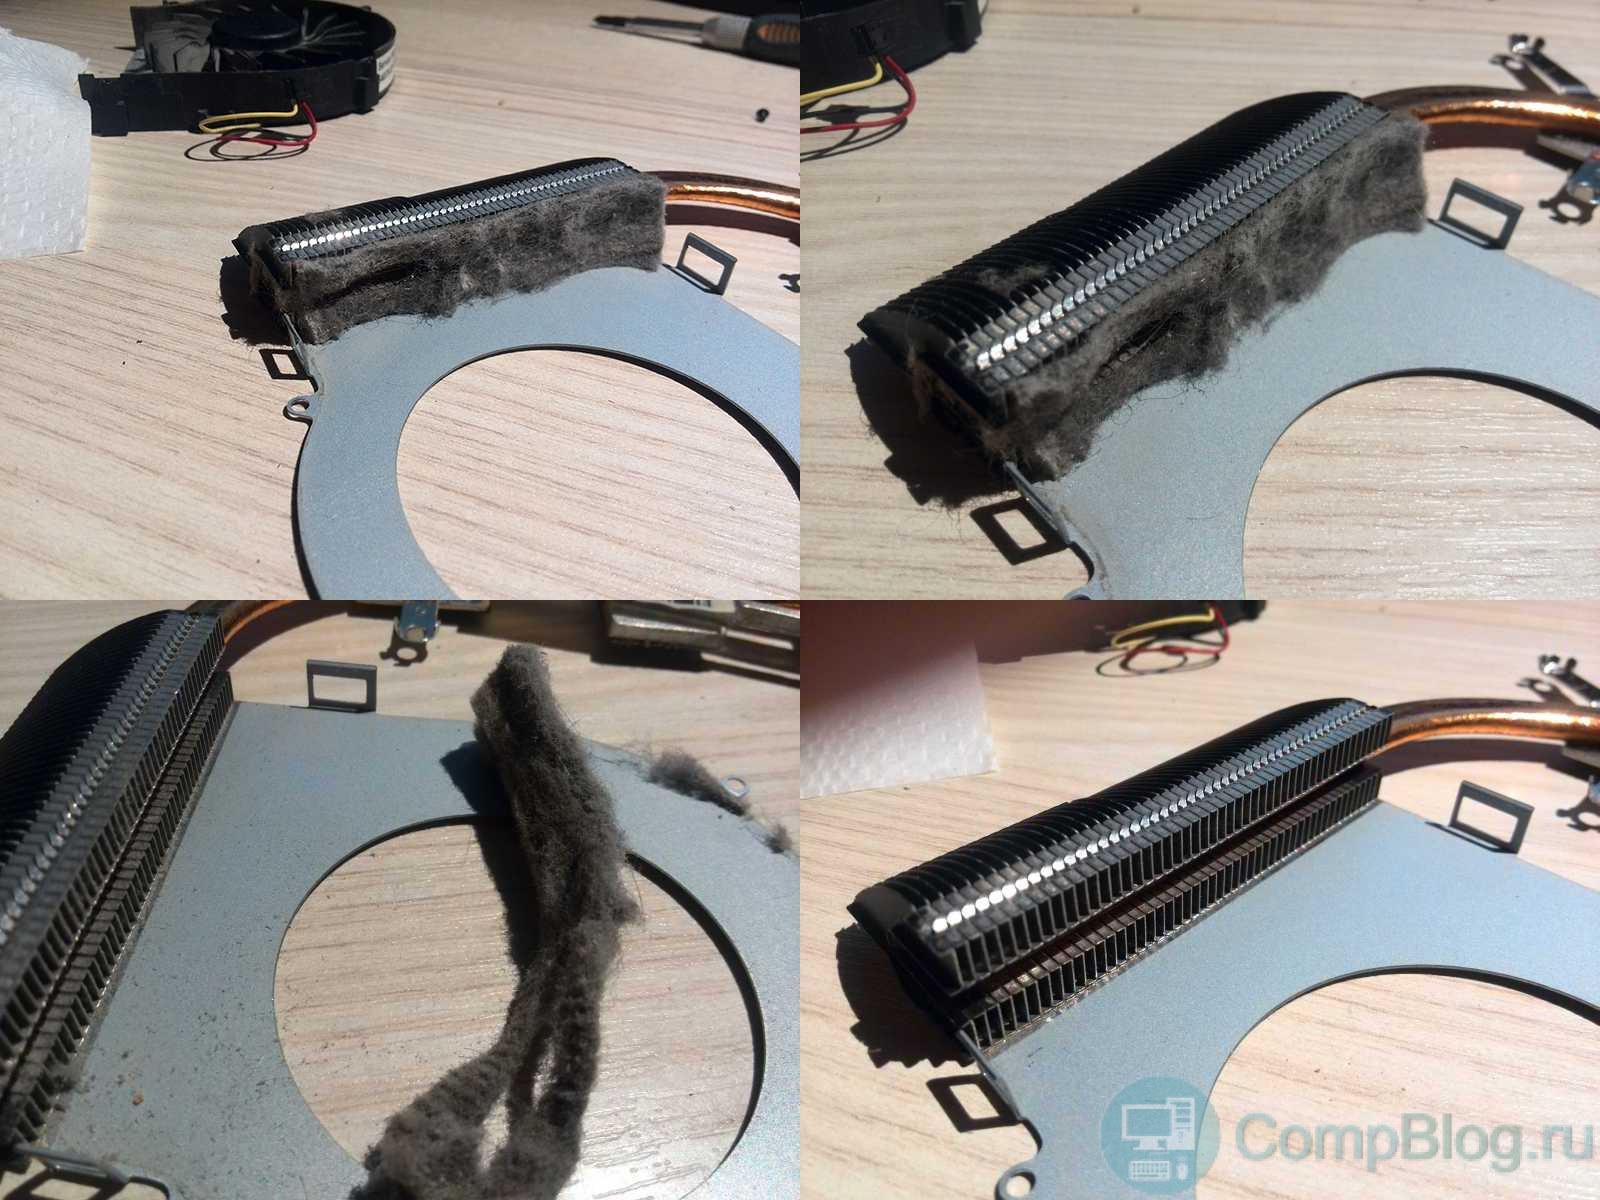
We see the dust accumulated on the radiator grill - remove it with a brush, blow it through. Congratulations! Laptop cleaned) But that's not all.
12. We remove the old, smear the new thermal grease
We remove the old thermal grease from where it was, on the chips on the motherboard, and on the cooling system. You can remove thermal paste with a dry cloth and cotton swabs. If there is, you can moisten them in alcohol, at the same time take it inside 🙂
Often, instead of thermal paste, thermal pads can be seen. It is highly desirable if they remain intact - it is quite difficult to find them on sale, only to order. If this gum is badly torn, most likely it is already "inoperative", you will have to look for it and change it. Or spread a layer of thermal paste. But I don't recommend doing that. Change! Usually thermal pads are placed on elements that do not have a temperature sensor and protection against overheating, and your laptop can suddenly "die", while showing a normal temperature on the processor and video card.
Spreading new thermal paste... How to smear? As thin layer as possible... Thermal paste is needed not to cover the entire surface of the chip, but to smooth out uneven surfaces.

I will write a short overview about various thermal pastes in one of the following articles on the site.
And in this video on my YouTube channel you can see how to apply thermal grease using the Pavillion G6 laptop as an example.
13. Putting it up in the reverse order.
We assemble - in the same way as we disassembled, carefully checking at each stage whether all the connectors are in their connectors. In theory, there should be no “superfluous, empty” (but they can be).
It is desirable that there are no extra bolts left, but if it remains, it’s not scary! 😉 The main thing is that the bolts in the hinge area are screwed in - otherwise the laptop will fall apart over time.
14. Doing a temperature test - rejoice! 🙂
Thermal paste needs some time to spread evenly under the pressure of the plate. So its maximum efficiency is achieved after a couple of days of using the laptop.
Tips, subtleties when disassembling a laptop on your own
- Collect the cogs from each stage of disassembly in separate piles - so you won't be mistaken which cog is from, and you won't have any extra ones left.
- Use the Internet - almost every, or similar, laptop model has detailed photos and video instructions for disassembly!
- Do not use force - if something "does not go", double-check 10 times, whether you have unscrewed everything, turned it off. If in doubt, go online.
- Be careful and careful, take your time.
Outcomes
So, from this article you learned how to disassemble and dust your laptop yourself.
The first time it may be difficult, but the second time, I assure you, it will be much easier! After all, the neural connections in your brain will already be established. 😉
Good luck to all! If you have any questions - ask! 😉
Have you checked it operating system for viruses, installed the most up-to-date components in your laptop, demolished Windows several times, but can't get rid of the “brakes” and freezes during work? Most likely, the problem lies exactly where you were not looking. Dust can accumulate inside the laptop, the presence of which in large quantities and causes overheating of the cooling system, which leads to lags. In this article, we will describe popular methods of dealing with such a problem. So, let's get started: how to clean a laptop from dust at home.
Self cleaning - how realistic is it?
Is it possible to clean a laptop from dust at home with your own hands so as not to break it? Can! It's enough just to have a few tools at hand and access to the vastness of the Internet.
There are two different ways laptop cleaning: superficial and deep. These words already speak for themselves. The first method does not imply assembly and disassembly of the device, and the second - exactly the opposite.
How often do you clean the dust?
Parting with this is not worth it. The frequency depends on various factors: environment, configuration, stability of work.
Consider a theoretical possible chart:
- If dust often accumulates around, it is worth “cleaning” the laptop every 6 months.
- The fan blades will attach dust particles to themselves even in the cleanest room, so it is recommended to clean the cooler at least once every 3 months.
- General cleaning is recommended to be done at least once every 3 years.
Important! When to start? If your laptop starts to run unnaturally slowly and heats up even when you are not overloading it, then you can put on rubber gloves and get ready to clean.
Training
First, you need to acquire a set of tools for carrying out this procedure:
- different screwdrivers;
- cotton swabs;
- thermal paste (if you know how to apply it);
- pliers;
- machine oil;
- some flat plastic object.
Surface method
How to clean a laptop from dust without disassembling it? We arm ourselves with cotton swabs and start looking for places where dust accumulates. Most often, dust accumulates between the holes in the ventilation system. With the help of sticks, remove all the dust from there and blow it with a vacuum cleaner (at medium power).
Important! This method is very simple and does not require any special experience.

Deep cleaning
Let's plunge "headlong" into cleaning, in the literal sense of the word. This method requires a minimum knowledge base about laptop components and their approximate location inside the case.
Important! If you are disassembling a laptop for the first time, we recommend photographing the location of laptop components at each step of this procedure. This will make it easier for you to assemble your laptop.
Ready? Getting started:
- We remove the keyboard. V different models this is done in different ways. Show patience and accuracy in this matter.
- Remove the battery and remove the back cover. Usually it is held by several screws, which can be unscrewed with a small Phillips screwdriver.
- Before climbing inside, remove static from yourself by touching an iron object. But it is best to carry out work with gloves.
- Hard-to-reach areas are effectively cleaned with cotton swabs... Alcohol, with which you can moisten sticks, will give greater efficiency.
- Most of the dirt accumulates in the cooling system. Detaching the fans is as easy as removing the cover. You can clean the fan blades with a cloth soaked in alcohol beforehand. Experienced Users It is recommended to lubricate the cooler rotor with machine oil.
- The radiator will need to take more time, since it is this part that provides heat dissipation.
- Gently detach the radiator and remove the old thermal grease using dry wipes. We thoroughly clean everything from dust.
- Be sure to reinstall all components securely in place.
Important! Be careful and attentive when cleaning electronic components. Excessive efforts can lead to the formation of defects, which leads to failure.
Well. They also coped with deep cleaning. True, after the last stage, it is advisable to apply a new thermal paste, but it is not recommended for novice users to do this on their own.
Preventive actions
General cleaning can be postponed for a long time if you follow these tips:
- Place the laptop only on a clean surface. Do not use pillows, blankets, because most models have coolers on the bottom, and the inlet will easily become clogged.
- If the pace of life does not allow you to avoid having a meal at the computer, try to be careful in relation to the device: do not spill liquids or sprinkle crumbs on the keyboard.
- Always turn off your device or put it into sleep mode.
- It's a good idea to have a can of compressed air that you can use to blow through the vents of your laptop from time to time.
Important! There are special devices available at many hardware stores. They can help keep things clean: small vacuum cleaners powered by a USB cable, external systems cooling and more.
Now you know how to clean your laptop from dust at home. Operating tips will help you avoid regular tampering with the inside of the device. Keep the area where you use your laptop clean and ventilate often. Be attentive to your device. This attitude will help you avoid future problems. Good luck!
If you have a laptop, then sooner or later you will be faced with this question: how to clean a laptop from dust? Can you do it yourself, at home, without special skills? How do I disassemble a laptop before cleaning, will I break it? The fact is that laptops are excellent dust collectors, since they use active cooling with the help of coolers, or in Russian, propellers.
And of course, since air is sucked into the laptop, then dust is also sucked in with it, which safely settles on the radiators that cool the processor.
And here there is a great danger that the dust will accumulate over time so much that the processor will no longer receive normal cooling. The result is the death of the processor.
Cleaning a laptop from dust at home is quite real and more often than not it is even VERY EASY to do it! How can you clean your laptop from dust at home?
There is a big difference whether you clean a fairly new laptop, or a very old one that no one has ever cleaned, since the degree of pollution affects how we clean the laptop.
1. How to clean the dust from a new laptop?
In a laptop that is not one year old, there is usually not much dust. Therefore, you can remove it ... with your mouth. No, I did not describe myself, it was with my mouth. We take a laptop in our hands and look for a hole from which warm air blows during intensive laptop operation. Usually it looks like this, in the form of a lattice in the right or left side of the laptop. But sometimes there is such a hole in the back.

Now imagine that this is a harmonica. Wrap your lips around this hole and blow hard! Just do it in a place where you can get dusty, as a huge cloud of dust will erupt from elsewhere on the laptop. That's all, now you can work for a couple of months, maybe more.
But what if the laptop has not been cleaned for a very long time, then the pressure from your breathing may not be enough to blow out all the dust. Therefore, there is a more effective way clean your laptop from dust.
2. How do I clean a dusty laptop?
Here the compressor can come to our aid. But it is clear that not everyone even has compresses in the garage, and even more so at home. Therefore, the easiest way is to buy a can of compressed air. It perfectly replaces a bulky compressor. Everything would be perfect here if such cans were sold on every corner and cost a penny.
In reality, finding them is not so easy, and this ordinary, albeit compressed air costs about 400 Russian rubles. But there is a way out: you can make such a reusable can of compressed air yourself. Watch the video:
But there are times when a laptop is so old and dirty that a simple or even very powerful blowing cannot be cleaned. Then there is only one way out.
3. How to clean a laptop from dust if it is old and without warranty?
And the solution is simple, the laptop needs to be DISASSEMBLED. Most of the time it's not difficult if you have a Phillips screwdriver or a friend who knows how to do it. Sometimes it is possible to disassemble the laptop not completely, but only by providing access to the coolers.
It all comes down again to cleaning moving parts or around them. Here you may even need to pick out pieces of rolled dust. If you do not know how to disassemble your laptop, then look for instructions on the Internet, usually on older models there are even videos on how to disassemble and clean laptop from dust... It remains to wish you success!
Published on 4 Feb 2013 16:53 © Just Linux | Everything about Linux, Android and Windows. Customizable software
 Windows 8 will return the start button
 Installing Skype on a computer (step by step instructions)