How to clean the keyboard on a hp pavilion g6 laptop. How to disassemble and dust a HP Pavilion g6 laptop
- We install the cooling system on motherboard... We connect the fan power.
- We install the motherboard into the laptop case and perform the same steps as when disassembling the laptop, but in reverse order.
- We connect cables and connectors to the motherboard.
- We tighten the screws that secure the motherboard.
- Installing the Wi-Fi module. And we connect his contacts.
- Installing the drive optical discs.
- We install the top cover of the laptop case and connect the power cables.
- We connect the power supply to the keyboard and install it in place.
- Install HDD and connect its power supply.
- Tighten the screws that secure the keyboard and optical drive, as well as the rest of the screws on the bottom cover of the laptop.
This completes the disassembly of the HP Pavilion g6 laptop. As a result of cleaning from dust and replacing thermal paste, the operating temperature of the laptop dropped from 79 to 46 degrees.
Unable to disassemble the Pavilion g6 on your own? It took an urgent computer help? Do you want to reinstall windows or need to configure a wifi router? Contact us - Compolife computer service. We are always happy to help you.
The HP pavilion G6 laptop was very hot even with simple Skype communication, and the fan was accelerated to the maximum, and the outgoing air from the fan was not felt. The D-SUB output got so hot that you could even get burned on it (on its metal part)
Photo of the HP pavilion G6 laptop itself:
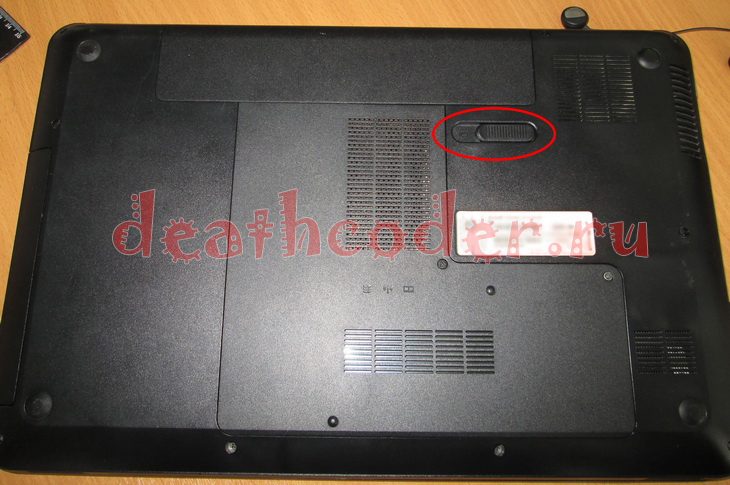
Before disassembling, be sure to disconnect the laptop from the network and remove the battery by sliding the holder to the left side:
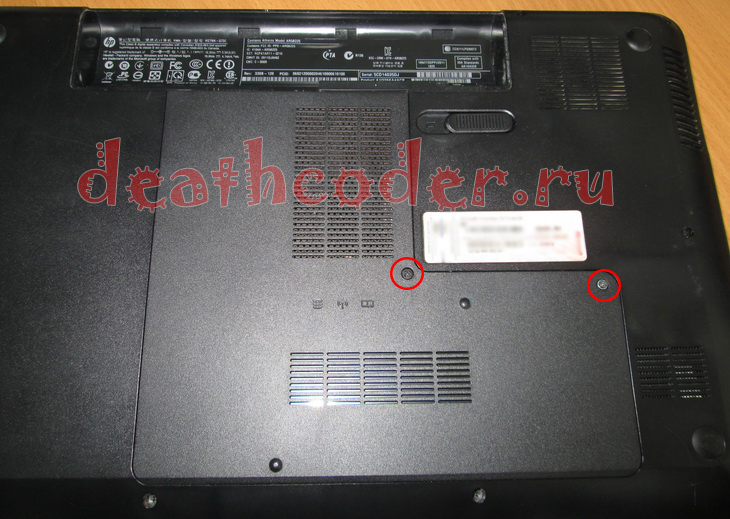
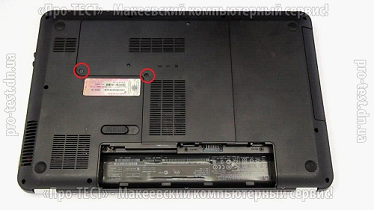
We unscrew two screws from the back cover:
We shoot back cover, applying a little effort, since in addition to the bolts, it is also held by the latches. After removing the cover, immediately unscrew the four screws:
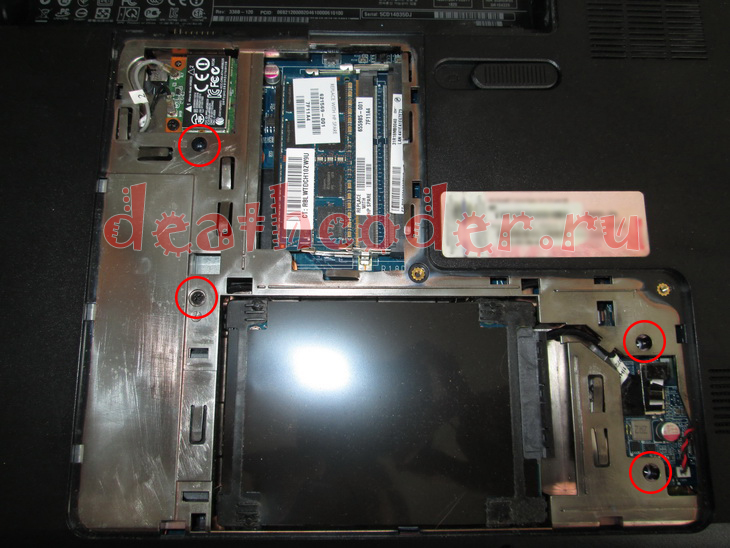
Moreover, one of the screws holds the keyboard, in the photo above it is located at the very top left.
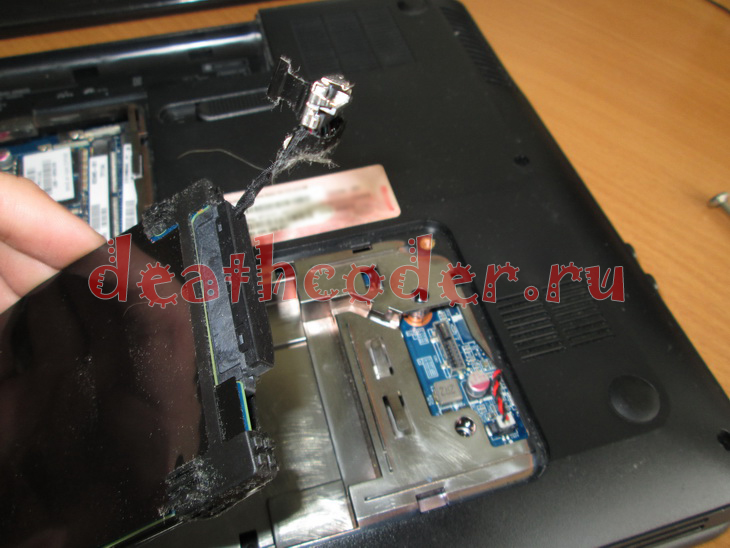
Disconnect the hard drive wire from the motherboard using the tab:
We take out the hard drive (nothing else holds it):
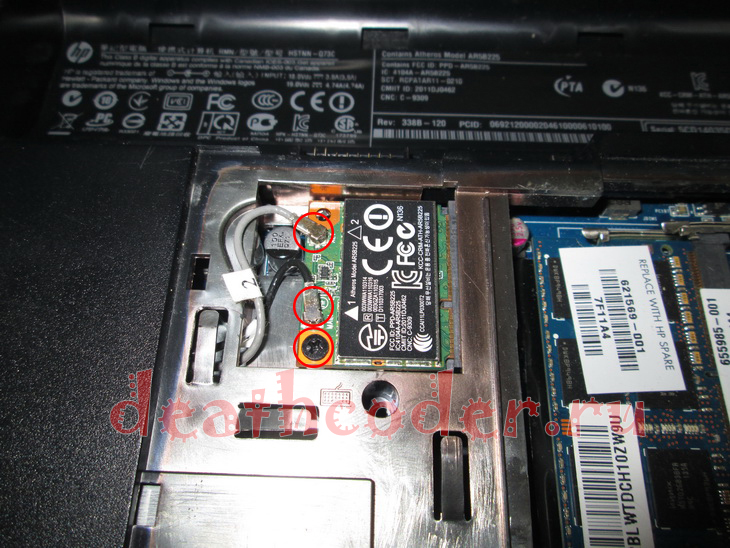
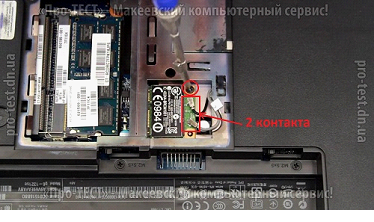
Disconnect the antenna wiring from the Wi-Fi module, unscrew one screw holding this module and remove it from the motherboard slot:
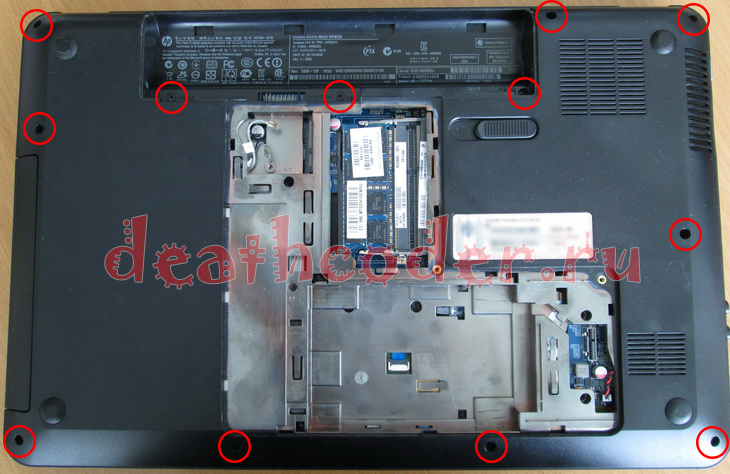
We unscrew all the screws (12 pieces) from the laptop case:
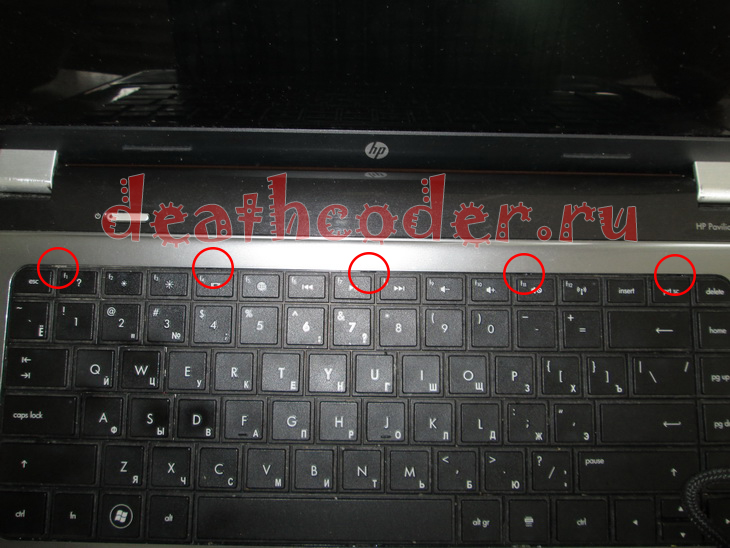
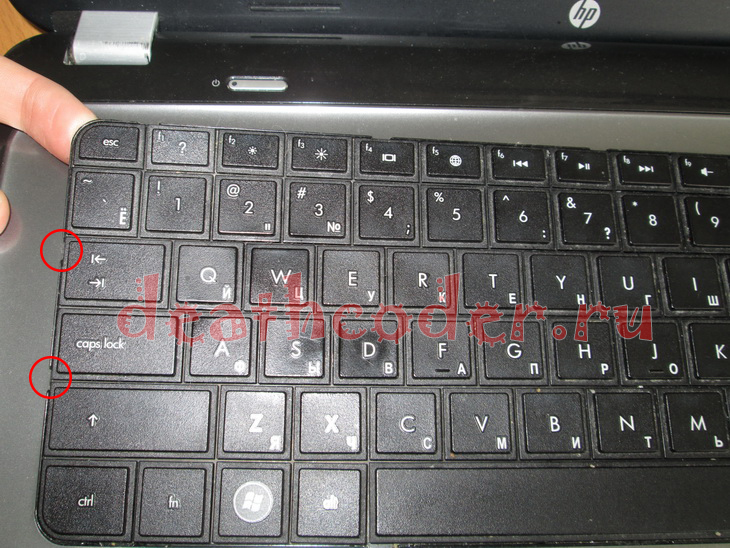
Turn over and open the lid of the HP pavilion G6 laptop in order to remove the keyboard. In addition to the screw (which was unscrewed earlier), the keyboard is held by latches on the case, which are pressed into the case with a flat small screwdriver in these places:
There are also holders on the sides, they are located in these places:
As soon as the keyboard is released, it is necessary to carefully turn it over in order to disconnect the keyboard cable from the motherboard:
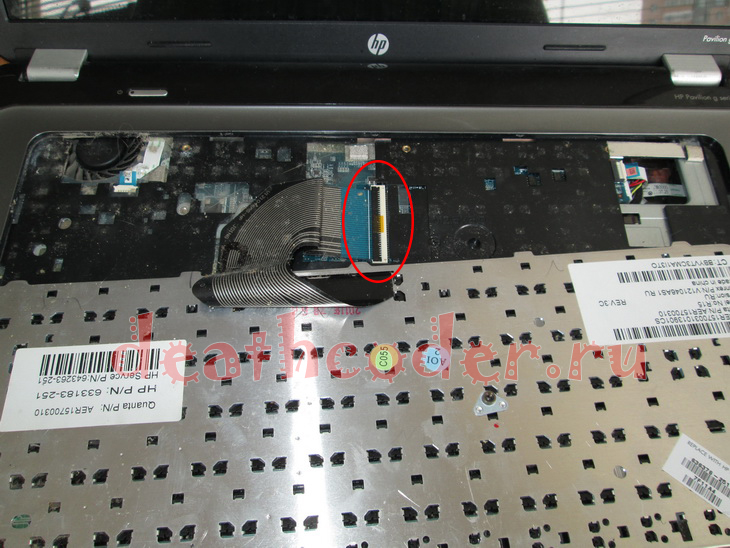
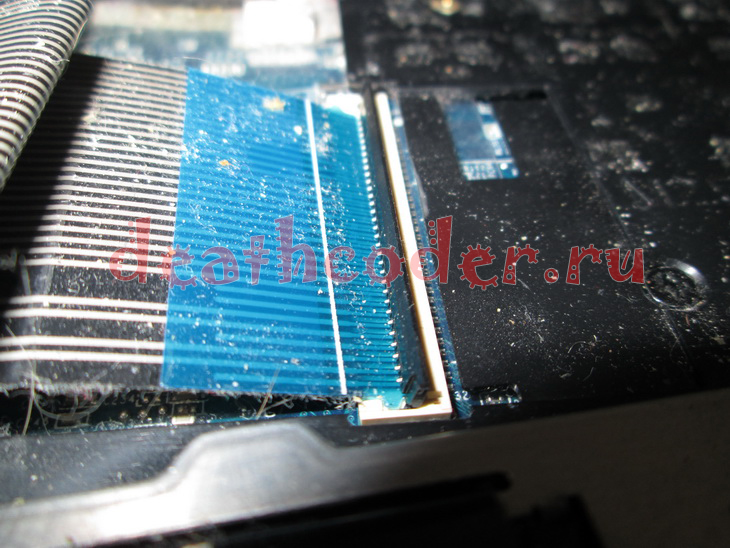
It can be detached very simply, you just need to turn the cable latch, which presses the cable to the connector on the motherboard, by 90 degrees:
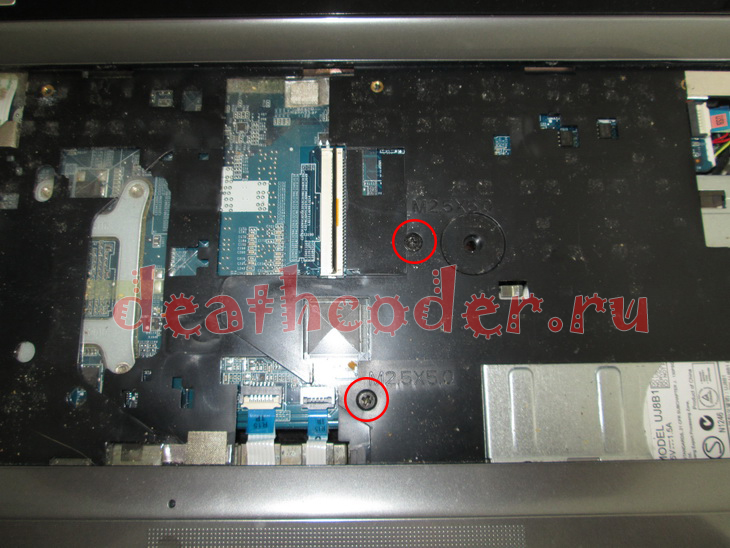
We remove the keyboard to the side and unscrew the two bolts that were under it:
Now we need to disconnect these two cables (go to the touchpad):
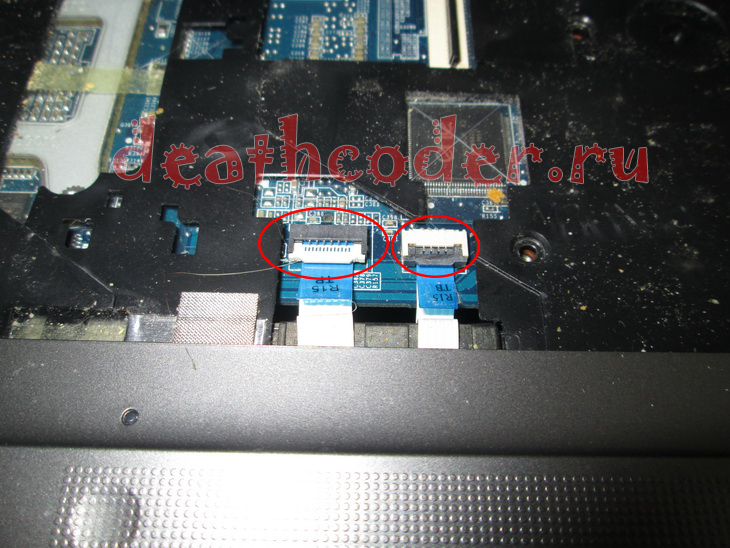
Everything here is also very simple, the latches are also rotated 90 degrees and the cables quietly come out of the motherboard connectors:
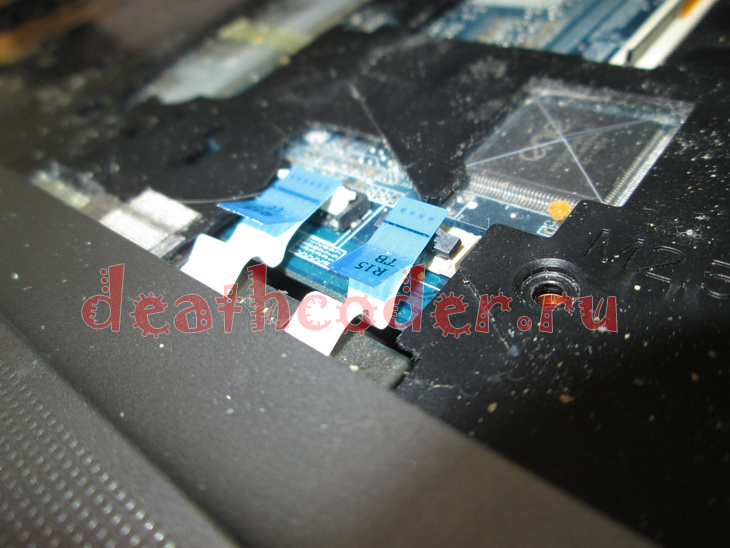
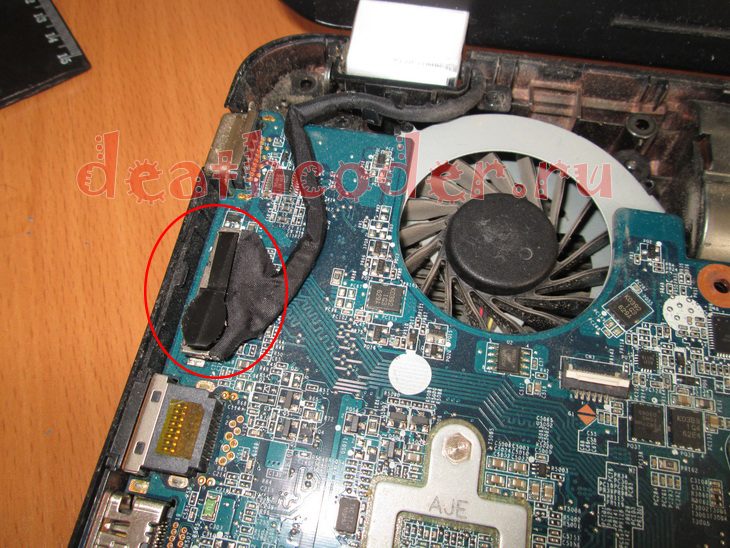
In the upper left area, near the fan, it is also necessary to disconnect another loop:
It detaches in the same way as the previous ones, that is, the latch must be rotated 90 degrees:
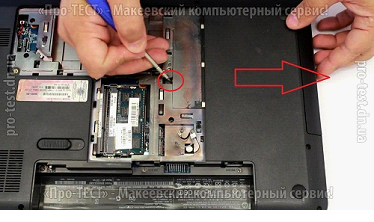
After all that has been done, you can remove the decorative / protective cover of the laptop, which hides all the insides of the laptop. In addition to the bolts, it is also held by the latches, it is better to start removing it from the upper right edge:
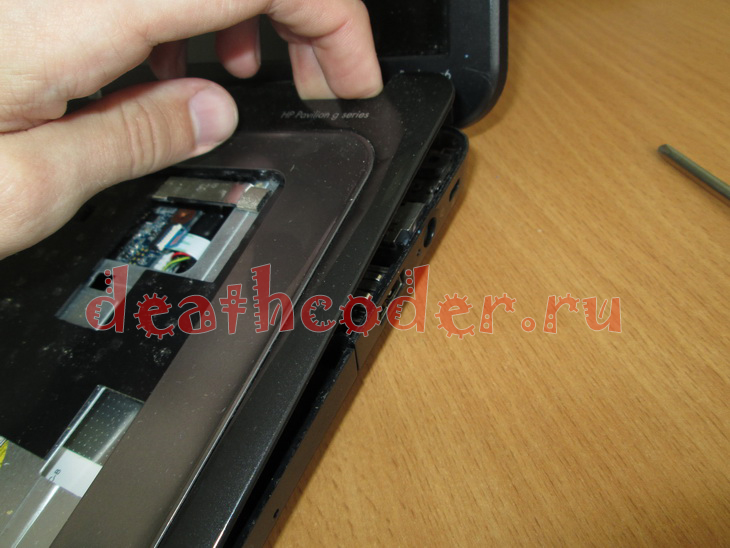
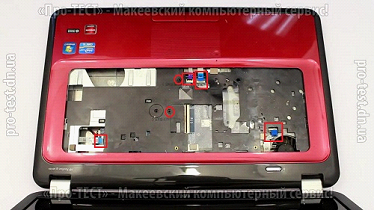
After removing the decorative / protective cover, we observe the following:
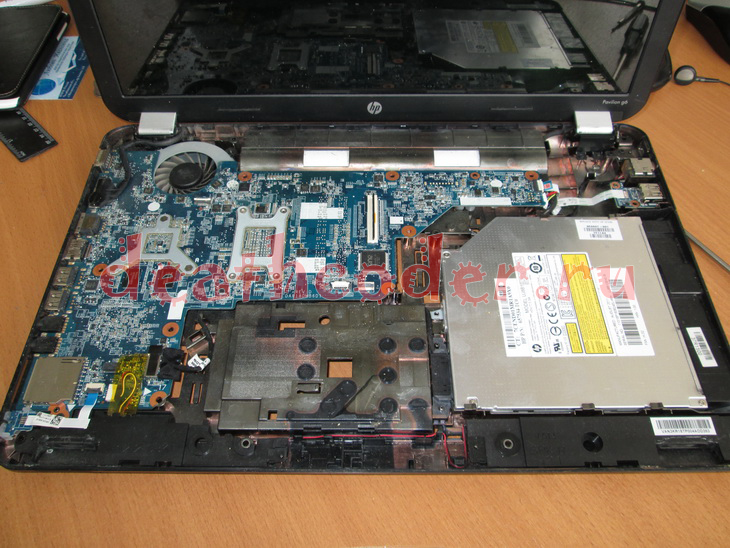
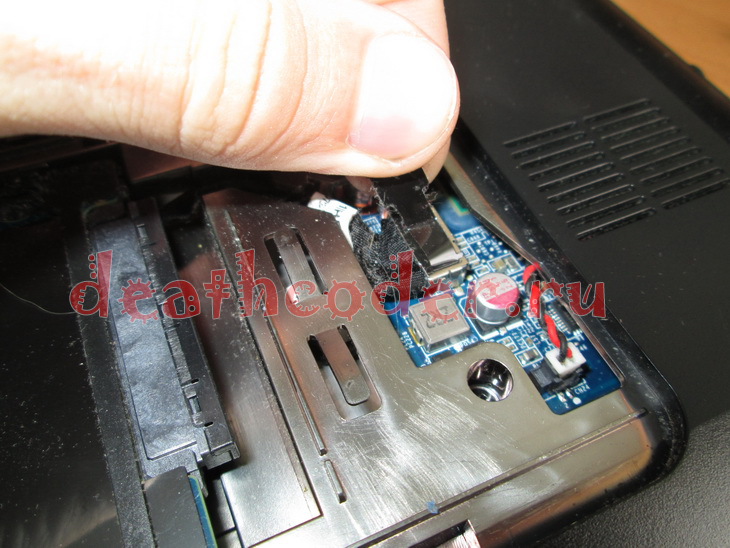
Here we will need to disconnect a few cables and cables, starting from the bottom left corner:
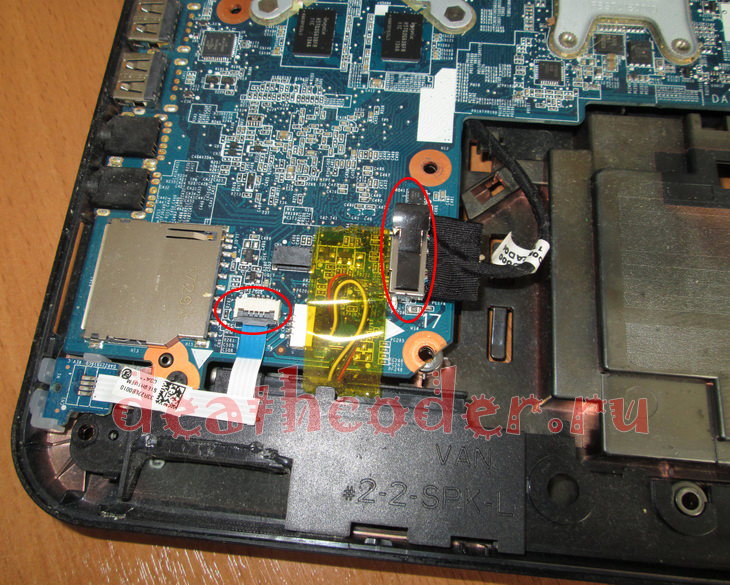
After disconnecting the above highlighted cable and wire - remove the transparent yellow film, under which one more wire with a connector is "hiding":
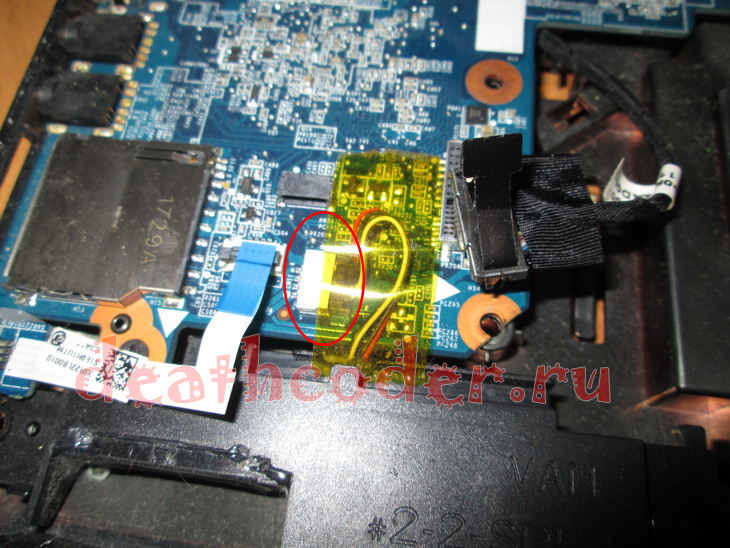
We simply disconnect it from the motherboard connector:

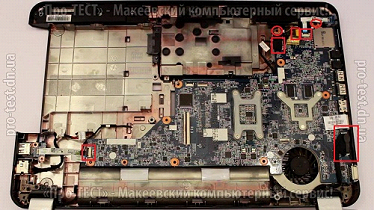
Go to the top left corner:
Pull the tab and disconnect the monitor wire from the connector:
Upper right corner, disconnect the USB cable with a rotary latch.
V this material You will learn about the intricacies of disassembling notebooks version HP-Pavilion-G6. To disassemble your Pavilion-G6 laptop successfully and without complications, use the tips in this manual to help you disassemble it correctly and efficiently.
HP makes good electronics, but like all other gadgets, the HP Pavilion laptop can break.
Laptop components and components are available and easily replaceable. To get inside the HP-Pavilion g-6 laptop system, to remove dust, replace any board or change thermal paste, you will need to open the case. It should be remembered that disassembling a laptop is a tremulous business, does not tolerate haste or oversights, so please be patient, set aside an hour so that no one bothers you, and you can get down to business using the instructions below.
The first thing that needs to be done is to remove the battery from the laptop (especially those who are not patient in disassembly may not take it off). This is the simplest step, but you need to complete it first. 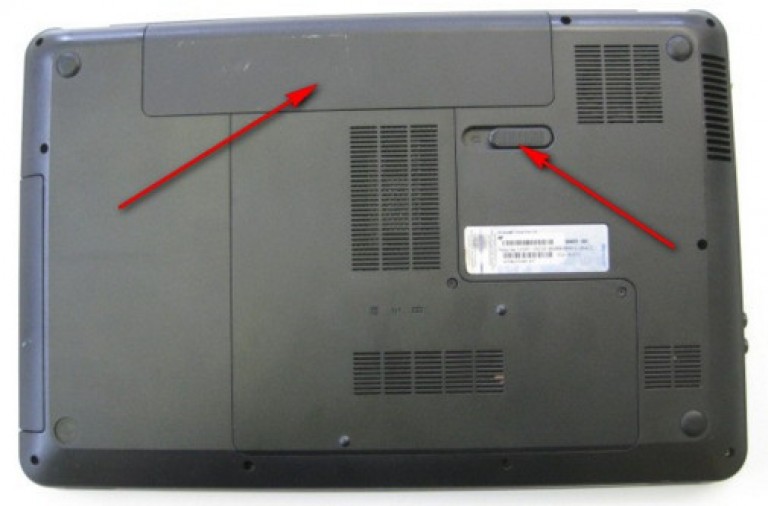 Now you need a screwdriver to unscrew the screws securing the laptop case. Flip the device over to access the rear plastic compartment that covers the main components of the computer.
 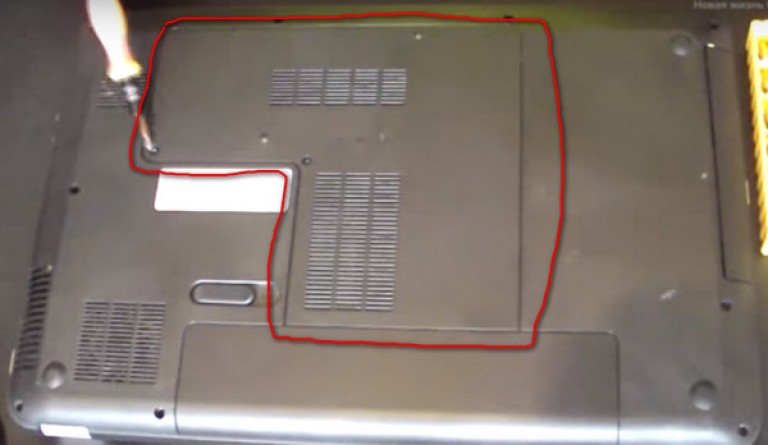 When the screws are unscrewed, you can remove the cover, under which you will immediately find a 2.5-inch hard SATA drive, fee random access memory(4 Gb DDR3), network access card and CMOS element providing power for Bios.
To remove the hard drive, you must remove it from the clips. This is done by gently pressing the hard drive case with a shift to the left. You will feel when the latches release it. Then remove the memory card by loosening the retaining latches, then it will easily slide in for removal. 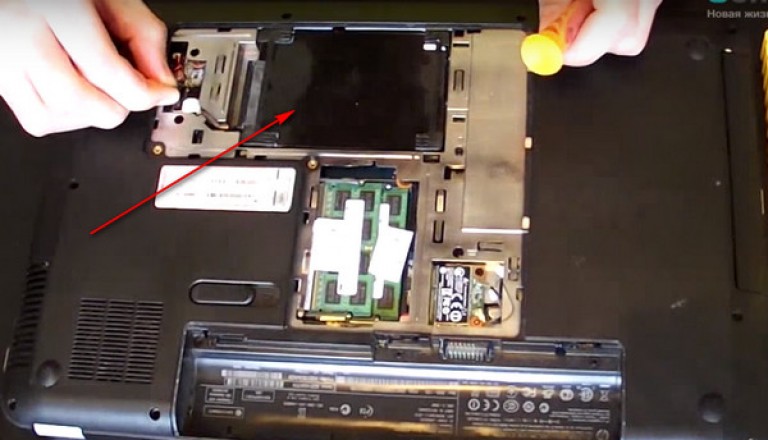
Now we withdraw DVD drive... The bolt that holds it can be easily identified visually. We also carefully unscrew it so as not to damage the adjacent parts, and pull out the DVD-Rom without effort. 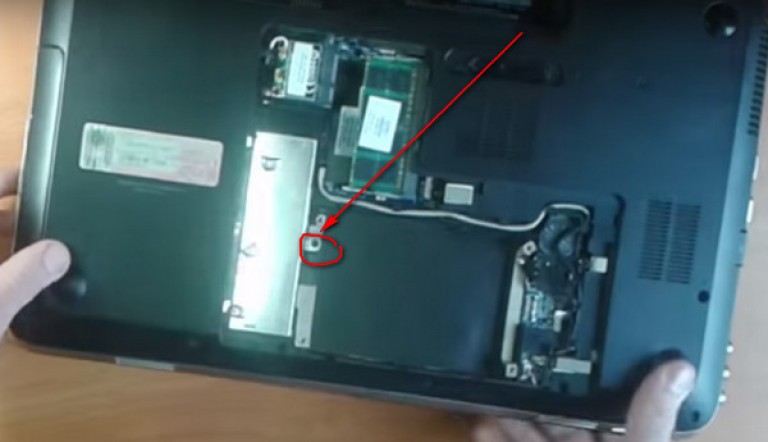 Be careful, if the drive does not want to come out, inspect carefully whether all the bolts are unscrewed, one of which is imperceptibly located near the network access card.
After removing all the most important parts, you can start removing the keyboard. Its mounting system is quite simple, but it takes a little dexterity and patience to pull the keyboard out without damage. HP-Pavilion laptop G6. In total, the keyboard on this laptop is held by five latches that are located on the top of the keyboard.
For work, you need a flat screwdriver, which you need to press down on the latch and slightly raise the dial. In this position, the clip does not block the keyboard. You need to repeat this procedure with all the clips, and when they are disconnected, you can slowly unfold the dial and disconnect the ribbon cable on the main board.
We can assume that half the job has been done, and now all the screws on the laptop case should be unscrewed.
It is also necessary to disconnect other cables that opened in the place where the keyboard stood.
Now we open the case of the laptop HP-Pavilion G6. By plastic card or other narrow object, carefully detach the upper compartment. Now you will have access to batteries, coolers, USB ports and other items on the main board.
As you can see, you can disassemble the HP-Pavilion G6 laptop yourself, but be careful not to damage the fragile microcircuits. Now you can replace parts, clean the insides of dust or replace the thermal paste.
Today we disassemble, clean, replace thermal grease and assemble the HP Pavilion G6 1321se laptop. All HP notebooks are disassembled in almost the same way.
For cleaning, you need to disassemble the laptop almost completely.
The first step is to remove the battery. To do this, you need to move the lock and pull out the battery.
The hard drive is not screwed on and can be removed very easily, you just need to disconnect the ribbon cable.
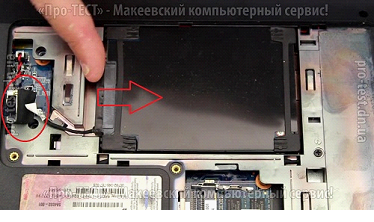
The WiFi module holds one bolt, unscrew it and remove two contacts.
There is no need to get the RAM.
We start to unscrew the back cover. To do this, unscrew all the screws on the back panel.
The screws under the battery and the screw holding the DVD-ROM are shorter than the others, so it is advisable to separate them so as not to be confused.

Open the first one, then pry it off, gradually open the rest without extra effort.
![]()
Disconnect the keyboard loop and it is disabled.
![]()
There are several loops under the keyboard that need to be disconnected and only two screws.
Loops are disconnected very easily, without any extra effort.
The screws are a different size than the others, so set them aside.
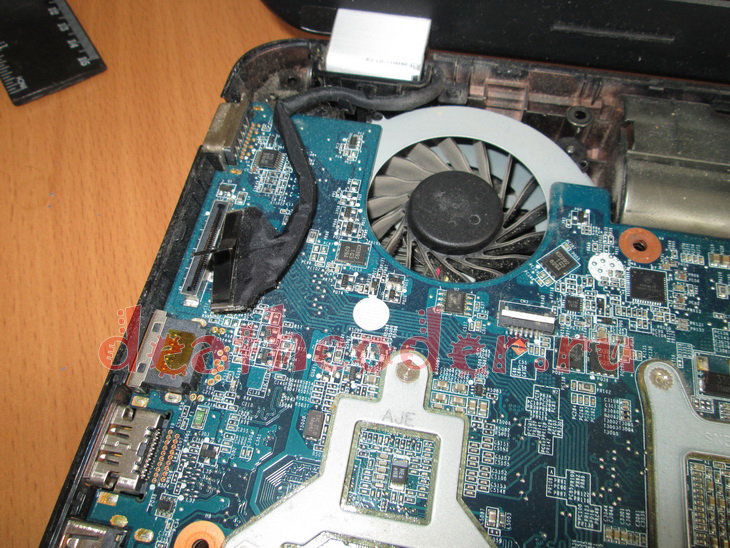
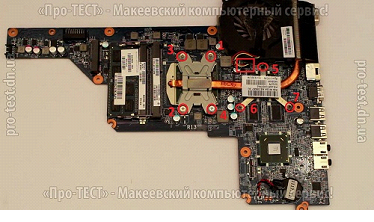
We now have access to the motherboard. To access the cooling system, we need to remove it, having previously disconnected all the loops.
Disconnect the power cable, speakers, LEDs, cooler and unscrew the motherboard from the case.
The screws are numbered and unscrew them in order so that the radiator does not warp. First, loosen all the screws a little, and then unscrew it completely.
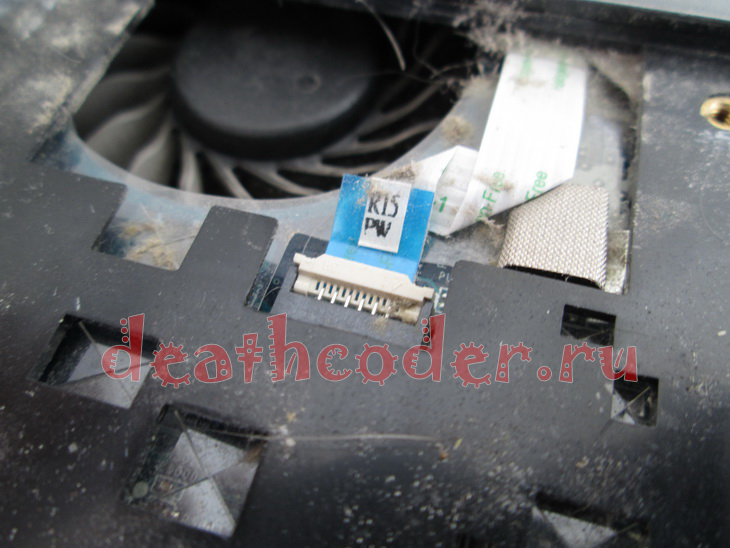
Do not forget to disconnect the fan power connector.
We lift the system and see the old thermal paste. It must be completely removed with a cotton swab or napkin. The main thing is to wash gently without pressing hard.
We also need to unscrew the fan cover to clean it. To do this, unscrew 2 bolts and bend the latch.
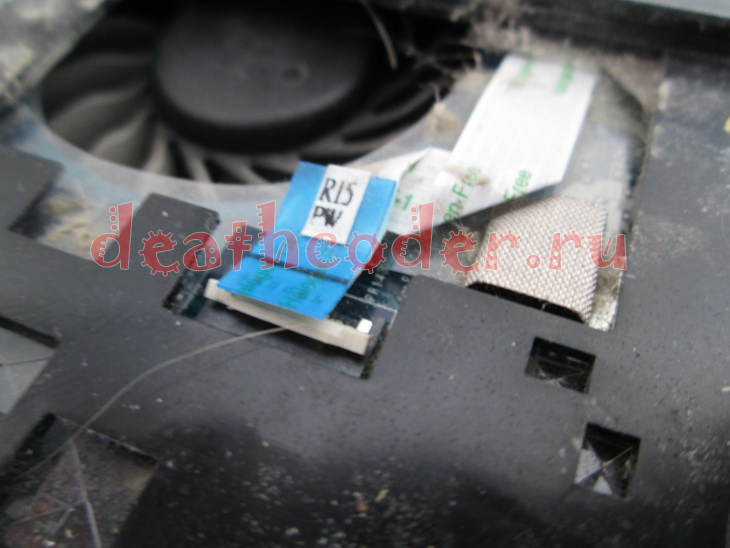
A dusty pad is collected inside, which greatly interferes with cooling.
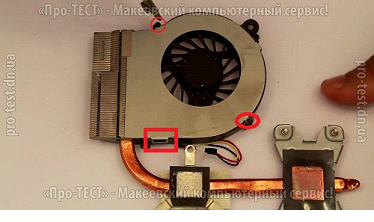
After cleaning, we assemble the fan back. We clean the inside of the plastic case, preferably with a brush.
After that, we start the assembly, doing all the steps in reverse order:
- We install and fasten the cooling system. Tighten also in strict sequence and little by little.
- We install the motherboard in place, fasten it and connect all the cables that were disconnected.
- We cover with a top lid, snap it on the sides.
- We return the rest of the trains to their place. We fasten 2 bolts that hold the lid.
- We connect the keyboard cable and insert it. It is inserted with the lower part and snaps into place with the upper one.
- We insert the hard drive and connect its ribbon cable. We insert the WiFi module, connect it and screw it on.
- Insert the DVD-ROM until it stops and fasten it with a short bolt.
- We screw in all the remaining screws.
- We cover the lid, screw it on.
We insert the battery.
That's it, the assembly is complete. Your laptop is cleaned and your cooling system is fresh with thermal paste.
Video review of how to disassemble HP Pavilion G6 1321se laptop.
 Bugs in Singularity?
 Just Cause 2 crashes
 Terraria won't start, what should I do?